9
Practicing Vector Essentials
If there’s one thing you must learn to conquer in the domain of programming graphics (besides triangles), it is vector mathematics. I may have mentioned this before, but that’s how important it is! As you will start to see in this chapter and then throughout the rest of this book, you can’t do anything in this domain without a solid understanding of them.
This understanding began in Chapter 8, Reviewing Our Knowledge of Triangles, with the introduction of trigonometry. Vectors are used in everything from defining meshes as the positions of vertices, edges that run between vertices, UV values, and more to moving objects to rendering pixels on the screen. They are extremely versatile, as are their mathematical principles.
This chapter will begin by examining the similarities and differences between the concepts of points and vectors to help you distinguish between the two since, mathematically, they are very similar. We will then go on to discuss the key operations that can be used to manipulate vectors, which will allow you to use them for a variety of graphics programming purposes. Two of these operations that you will see being used over and over again include finding the length of a vector and the angles between two vectors.
To cover these issues, in this chapter, we will cover the following topics:
- Understanding the difference between points and vectors
- Defining vector key operations
- Working out a vector’s magnitude
- Exploring the relationship between angles and vectors
The data structure of a vector begins with stored values that have been measured on a Cartesian plane. This plane is a two-dimensional plane formed by the intersection of two axes. Think of it as a large flat surface defined by one of its horizontal edges and one of its vertical edges. While these values are strictly lengths and not precise coordinates, the nature of the data structure, as you will see herein, is most often used in graphics to store points. Though points and vectors cohabit Cartesian space, they are different things. We will discuss this fact in the first section.
By the end of this chapter, you will have a working knowledge of calculating a variety of operations with vectors to position, move, and rotate graphics elements.
Technical requirements
In this chapter, we will be continuing to build on the project that has been developed throughout this book using Python in PyCharm with Pygame and PyOpenGL. The solution files containing the necessary code can be found on GitHub at https://github.com/PacktPublishing/Mathematics-for-Game-Programming-and-Computer-Graphics/tree/main/Chapter09 in the Chapter09 folder.
Understanding the difference between points and vectors
We can make sense of vectors by examining them in Cartesian coordinates. A vector in 2D is expressed as (x, y), in 3D as (x, y, z), and in 4D as (x, y, z, w).
Yes, I said four dimensions! At this stage, you are most likely looking at that “w” at the end of the expression and wondering where it came from. Don’t worry about it too much as its purpose will become clearer when we examine matrix multiplication.
In theory, a vector can be defined in any number of dimensions extending to infinity. They are used for complex mathematical calculations that can be found in applications relating to machine learning, astrophysics, financial analysis, and inverse kinematics, to name a few. However, in graphics, 2D, 3D, and 4D vectors are used.
Figure 9.1 illustrates a point and a vector in both 2D and 3D space. If you were to just look at the expressions for a vector, shown previously, you could be forgiven for thinking that a vector and point are the same thing. While they are both defined by x, y, z, and other dimensional amounts, this is where the similarities end.
A point is a single location in space. Its coordinates specify its distance along each axis (representative of the dimensions) from the origin or (0, 0, 0) location of the space that the point occupies. For example, the point (3, 5, 3) in Figure 9.1 (b) is at a distance of 3 from the origin along the x axis, 5 along the y axis, and 3 along the z axis:
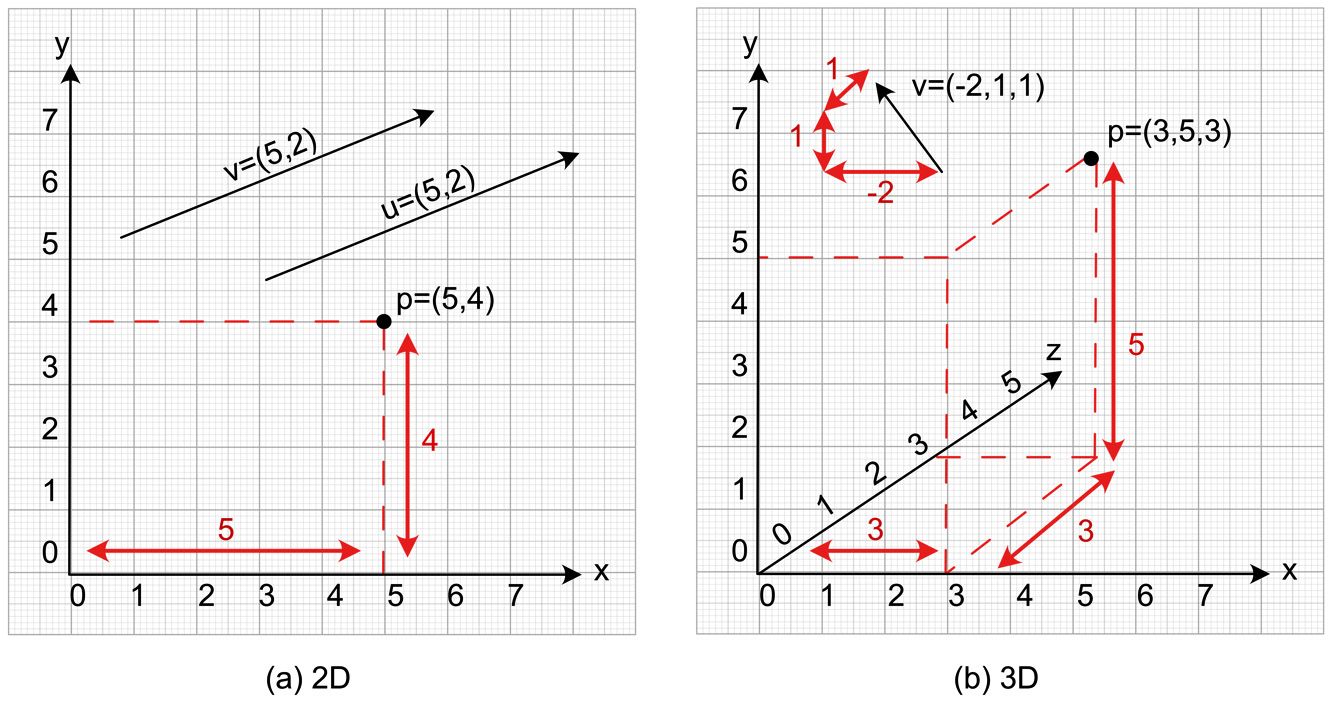
Figure 9.1: A point (p) and a vector (v) shown in (a) 2D and (b) 3D
A vector, however, doesn’t specify a location in space. It can be located anywhere. The values that represent it (and look very similar to those of the coordinates of a point) specify the vector’s length when broken down into a series of vectors that run parallel with the axis of the space. As shown in Figure 9.1 (b), the v vector is made up of the component vectors that are aligned to the x, y, and z axes. In this case, v is -2 in the x direction, 1 in the y direction, and 1 in the z direction. Even if this vector were moved elsewhere in the space, it would still be represented by (-2, 1, 1). This is illustrated in Figure 9.1 (a), which shows vectors v and u. They are the same.
The thing about vectors is that they don’t have a specific starting location. Instead, you must think of them as instructions. The best way to understand this is to start working with them.
Let’s do it…
In this exercise, we will begin working with vectors by moving the previously drawn cube around the screen. Follow these steps:
- Create a new folder in PyCharm called Chapter 9 and make copies of the final versions for it based on the files from Chapter 8; include Button.py, Cube.py, Mesh3D.py, Object.py, Settings.py, Transform.py, and Utils.py.
- Make a new Python script called Vectors.py and copy into it the final code from the original AddingButtons.py file from Chapter 7, but remove the code that creates the button, as highlighted in the following snippet:
def button_click():
print(“Hello Button”)white = pygame.Color(255, 255, 255)
green = pygame.Color(0, 255, 0)
blue = pygame.Color(0, 0, 255)
button1 = Object(“Button”)
button1.add_component(Button(screen, (0, 0), 100, 50,
green, white, blue,button_click))objects_2d.append(button1)
When this code is run, you will see the regular window and cube in the middle. The cube will still move with the arrow keys.
- When we start using vectors, we want to be able to measure the results. To do this, we will add a visible grid to the environment. Create a new Python script called Grid.py and add the following code to it:
from OpenGL.GL import *
class Grid():
def __init__(self, interval, halfsize, colour):self.interval = intervalself.halfsize = halfsizeself.colour = colourdef draw(self):glColor3fv(self.colour)glBegin(GL_LINES)for x in range(-self.halfsize, self.halfsize):for y in range(-self.halfsize,self.halfsize):glVertex3fv((x * self.interval,y * self.interval - 10,0))glVertex3fv((x * self.interval,y * self.interval + 500,0))glVertex3fv((y * self.interval - 10,x * self.interval, 0))glVertex3fv((y * self.interval + 500,x * self.interval, 0))glEnd()
This new class will be used as another object. When the draw() method is called, the nested for loop will draw a series of horizontal and vertical lines across the screen in the given color. These lines will be spaced by the value of interval.
- The Grid class can now be used in Vectors.py to draw a grid on the screen:
from Grid import *
from Object import *
cube.add_component(Cube(GL_POLYGON,
“Chapter_Four/images/wall.tif”))objects_3d.append(cube)
grid = Object(“Grid”)
grid.add_component(Transform((0, 0, -5)))
grid.add_component(Grid(0.5, 8, (0, 0, 255)))
objects_3d.append(grid)
clock = pygame.time.Clock()
Note that the grid will be transformed back into the screen by -5 since we added a Transform component. Ensure that the cube will move by the same amount.
- Before running this, we need to tweak Object.py to ensure it calls the draw() method of the grid. As the call will be the same as for Mesh3D, rearrange the update() function as follows:
def update(self, events = None):
glPushMatrix()for c in self.components:if isinstance(c, Transform):pos = c.get_position()glTranslatef(pos.x, pos.y, pos.z)elif isinstance(c, Mesh3D):c.draw()elif isinstance(c, Grid):c.draw()elif isinstance(c, Button):c.draw(events)glPopMatrix()
At this point, run the application; you will see a blue grid across the screen that runs through the center of the cube. The cube will still move with the arrow keys.
- We will now program the functionality to move the cube using a vector. To the Transform class, add a new method called move:
def move(self, amount: pygame.math.Vector3):
self.position = pygame.math.Vector3(self.position.x + amount.x,self.position.y + amount.y,self.position.z + amount.z)
This method will accept a 3D vector as the parameter and then use each part of the vector to update the corresponding position coordinate.
- Let’s try using it. In Vectors.py, add a key press for the spacebar and move the cube by 0.5 in the x direction, like this:
while not done:
events = pygame.event.get()for event in events:if event.type == pygame.QUIT:done = Trueif event.type == KEYDOWN:if event.key == K_SPACE:trans.move(pygame.Vector3(0.5, 0, 0))keys = pygame.key.get_pressed()if keys[pygame.K_LEFT]: - Run the code, take note of where the cube is, and then press the spacebar. The grid lines are 0.5 apart and we are moving the cube by 0.5 in the x direction. The cube will move 0.5 to the right.
What we have done here is taken the cube’s position of (0, 0, -5) and added a vector of (0.5, 0, 0) to it. This places the cube at a new position of (0.5, 0, -5). Each time you press the spacebar, the vector (0.5, 0, 0) will be added to the cube’s position, resulting in placing the cube at (1, 0, -5).
The position of the cube is a point, a location measured from the origin of the world. The movement instructions for the cube of (0.5, 0, 0) is a vector. This same vector value is added to the position of the cube each time the spacebar is pressed. The vector is not a fixed location in space like the cube’s positions. It merely provides instructions for how the cube should move in the x, y and z directions.
As you can see, working with vectors at this level is quite elementary. The x values of the vector affect the x values of a point, the y values of the vector affect the y values of a point, and the z values of a vector affect the z values of a point.
Now, it’s your turn to test your understanding of points and vectors.
Your turn…
Exercise A: Modify the code to move the cube by a vector of (0.5, 0.5, 0.) each time the spacebar is pressed.
Exercise B: Modify the code to move the cube by a vector of (0, 0, -1) each time the spacebar is pressed.
Having completed this section, you will be starting to understand how easy it is to use vectors to move an object in 3D space. This was achieved using the addition operator. We will now take a look at the other vector operations and how they are used in graphics for manipulating points in an environment.
Defining vector key operations
As you discovered previously, the addition of a point (position or location in space) and a vector leads to another point. This was demonstrated by moving the cube from one position to another by adding a vector to the cube’s position. We can express this mathematically as:
P1 + V = P2
Here, P1 is the initial point, V is a vector, and P2 is the second point. A visualization of this equation is shown in Figure 9.2:
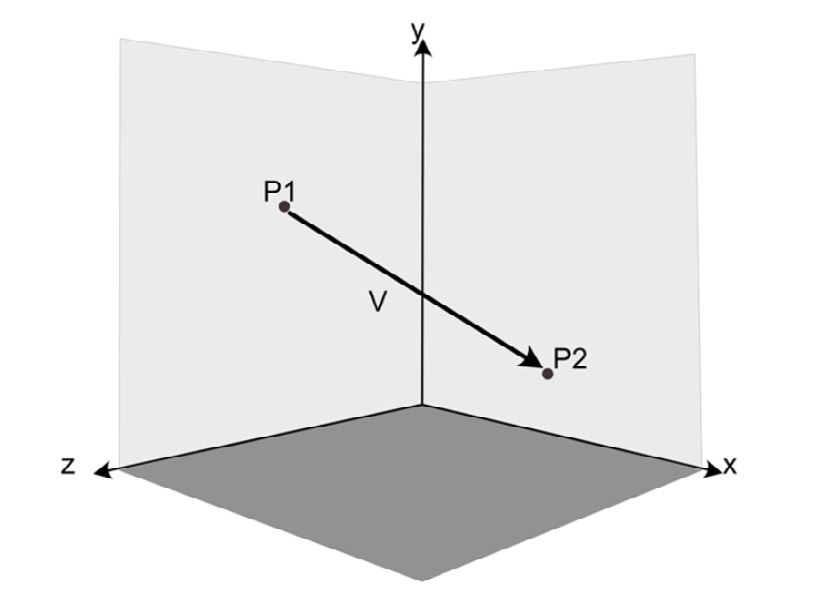
Figure 9.2: The vector, V, when added to point P1 results in point P2
This equation can be rearranged to find the vector between two points:
V = P2 - P1
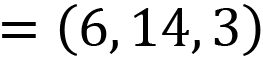
This equation states that you can find the vector that is required to get from P1 to P2 by subtracting P1 from P2. Why would you want to do this? Well, if you are given two points and want to know how to get from the first point to the second point, the vector that lies between these points contains the directions that tell you how to get from P1 to P2. For example, given the points illustrated in Figure 9.3, where P is the location of the pirate and T is the location of the treasure, the vector, V, can be calculated by subtracting P from T, where the x, y, and z values are subtracted from each other, respectively. These calculations look like this:
![]()


The vector, V, gives the specifics of how to travel from P to T – that is, 6 in the x direction, 14 in the y direction, and 2 in the z direction. Note that the pirate can travel directly along the vector (as the crow flies) to the treasure or follow each of the constitute x, y, and z components. Either way, we will end up placing the pirate at the location of T. When a vector is split into its components, we can express each as its own vector (one for each axis):


These vectors can be drawn like so:
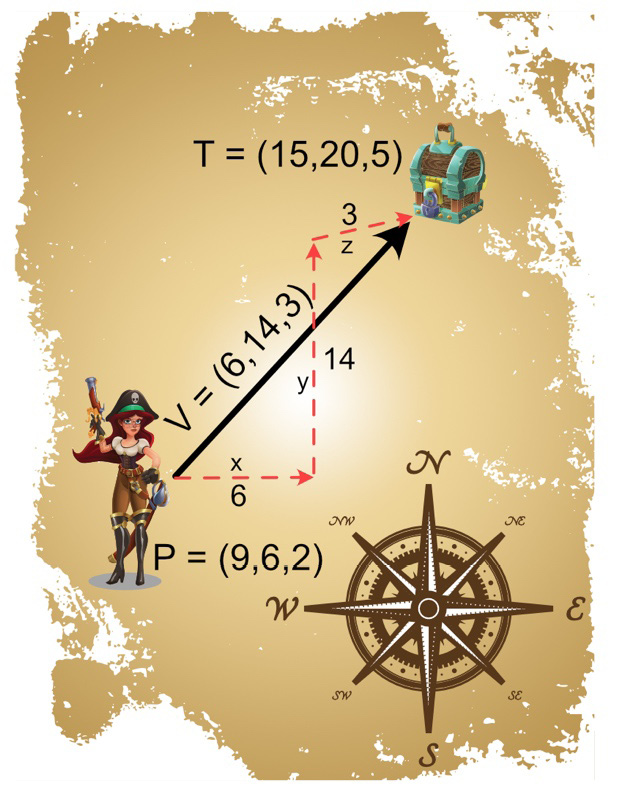
Figure 9.3: The vector between two points
As previously mentioned, a vector has no fixed location in space unless it is applied to a point. The same vector that we’ve just calculated could be applied to another point. It would then result in a different destination for the pirate. Let’s say that if the pirate was located at P = (2, 3, 1), adding the vector V = (6, 14, 3) to that point would place the pirate at (2 + 6, 3 + 14, 1 + 3) = (8, 17, 4) so that they’re nowhere near the treasure. If the pirate had moved to P = (2, 3, 1), the vector to the treasure would have to be recalculated as (15, 20, 5) – (2, 3, 1) = (15 – 2, 20 – 3, 5 – 1) = (13, 17, 4). This is a different vector from the previous one.
Vectors can also be added to other vectors to give another vector. This was previously demonstrated in the last equation, where vectors sitting parallel to the x, y, and z axes were added together to give a value for V. But it’s not just these vectors that can be added together – any vectors can. The mathematics works the same as for adding vectors and points. For example, given the vectors V = (10, 4, -8) and U = (2, -1, 6), the sum of these is:
![]()


Graphically, this is drawn as shown in Figure 9.4. The resulting vector is a vector that extends from the start of the first vector and is drawn as an arrow to the end of the second vector. You can add more than two vectors together. When this is the case, the resulting vector extends from the beginning of the first vector to the end of the last added vector:
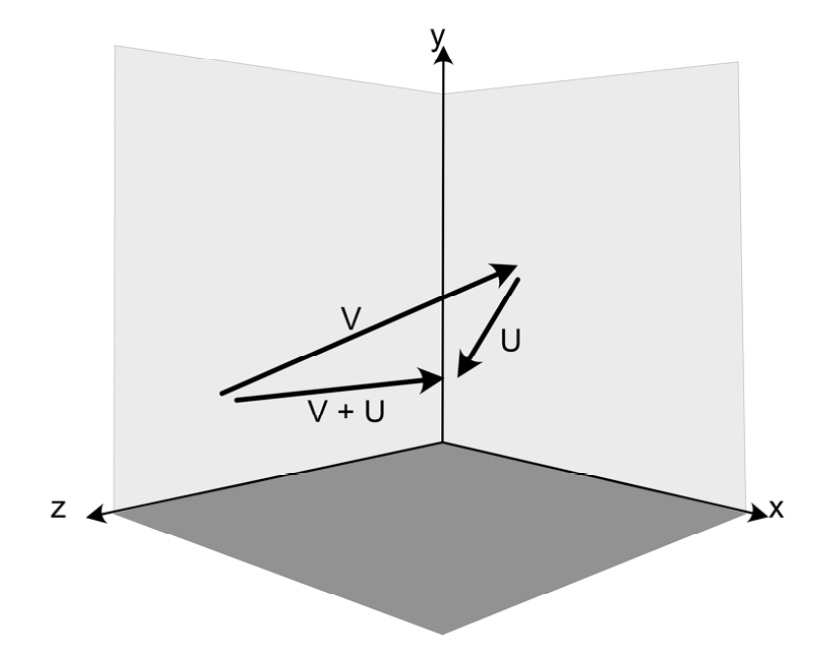
Figure 9.4: Vector addition
Other than addition, there is one other fundamental operation that can be performed on a vector: scaling. When a vector is scaled – that is, multiplied by some value – each of the x, y, and z components is affected. If V = (8, 4, 20), then 2V will be (16, 8, 40) and 0.5V will be (4, 2, 10). We can scale a vector when we need a vector that points in the same direction as the original but isn’t as long. If you plot the three preceding vectors, you will see they all point in the same direction. The only difference is their length, as shown in Figure 9.5:
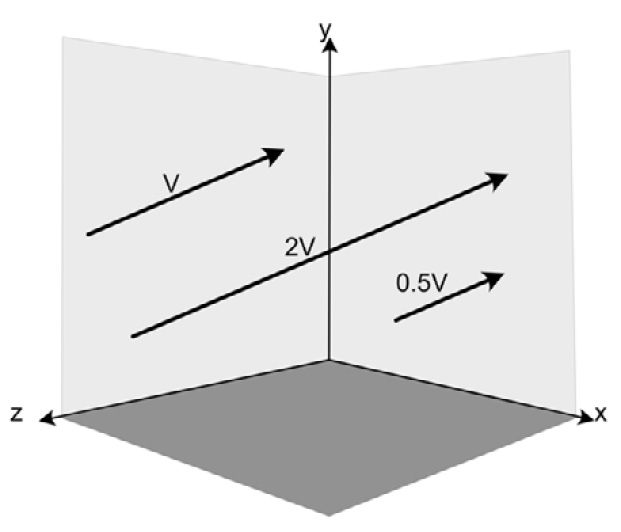
Figure 9.5: Scaled vectors
Working with scaled vectors is no more difficult than what you attempted in the previous exercise, as you are about to discover.
Let’s do it…
In this exercise, we will add another cube to the scene we’ve been working on and use some scaled vectors to investigate how the direction is not affected. Follow these steps:
- Add another cube to Vectors.py, as follows:
cube.add_component(Cube(GL_POLYGON,
“Chapter_Four/images/wall.tif”))cube2 = Object(“Cube”)
cube2.add_component(Transform((0, 1, -5)))
cube2.add_component(Cube(GL_POLYGON,
“Chapter_Four/images/brick.tif”))objects_3d.append(cube)
objects_3d.append(cube2)
Note that the second cube is placed one unit above the first cube. When you run this, you will get two cubes on the screen. The second cube that I have created uses a different texture. Make sure you change the paths of these textures to suit the ones you are using.
- We will now move both cubes with the spacebar, as shown in the highlighted code:
trans: Transform = cube.get_component(Transform)
trans2: Transform = cube2.get_component(Transform)
while not done:
events = pygame.event.get()for event in events:if event.type == pygame.QUIT:done = Trueif event.type == KEYDOWN:if event.key == K_SPACE:trans.move(pygame.Vector3(1, 1, 0))trans2.move(pygame.Vector3(1, 1, 0) *2)
The original cube will move one unit up and one unit to the right. The same vector is being used for the second cube, but it is being multiplied by 2. This will make the second cube move in the same direction but twice as far. Run your application and press the spacebar to witness this.
Notice that the pygame.Vector3() class is easy to scale through multiplication.
- Remember when I said scaled vectors point in the same direction as the original? Well, this wasn’t entirely true. What I meant to say was that scaled vectors remain parallel to the origin. This is because if we multiply a vector by a negative number, it gets turned around 180 degrees. This is easy enough to see by modifying the move for the second cube, like so:
trans2.move(pygame.Vector3(1, 1, 0) * -2)
Try this out to see the second cube move in the opposite direction.
In this exercise, we looked at how easy it is to scale a vector. Exactly why this is useful will be made more apparent when we start moving objects around on the screen through animation later in this book.
As vectors are used to move objects or define the distance between one location and another, it is also possible to measure their length, which is another important mathematical function to learn.
In the next section, you will discover how to use Pythagoras’ theorem to calculate it.
Working out a vector’s magnitude
By drawing and working with vectors, it’s obvious to see they have a length. This is something that also distinguishes them from a point. The magnitude or length of a vector is useful for calculating the distance between where it starts and where it ends. For example, in Figure 9.3, we calculated the vector the pirate had to travel to get from a starting location to the treasure. From this vector, we can see the direction of travel, but we can also calculate how far the pirate is from the treasure. A very common operation to perform in graphics when it comes to moving objects is determining how far objects are apart, as well as working with collisions and a multitude of other functions. Therefore, it’s useful to understand how the magnitude is calculated.
To perform this operation, we must go back to Pythagoras theorem and triangles. Essentially, every vector can be made into a right-angled triangle. From there, the vector itself represents the hypotenuse of the triangle, and as such, the length can be determined. Let’s begin by examining an example in 2D. As shown in Figure 9.6, any vector can be turned into a right-angled triangle. The lengths of the sides of the triangle relate to the vector’s constitute x and y dimensions. For example, the vector (3, 4), when used to construct a right angle, will have sides that are 3 and 4 in length. The magnitude can then be found using Pythagoras theorem:
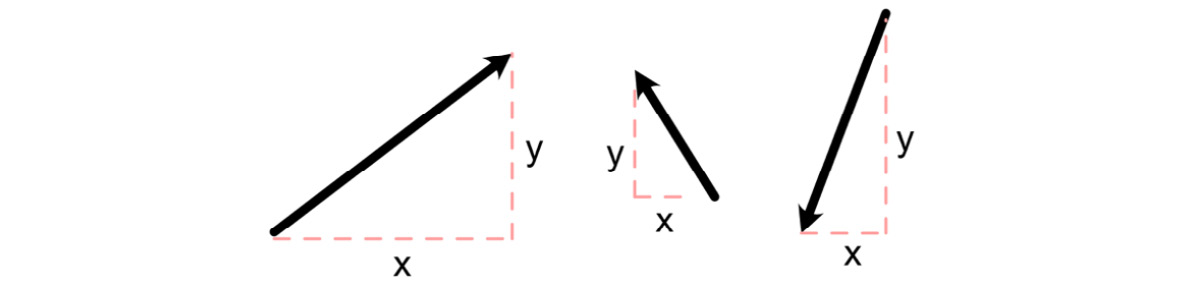
Figure 9.6: Vectors made into right-angled triangles
To calculate the magnitude, use the following formula:
 or
or

Here, |v| is the way to mathematically write the length of v.
This can be extended to vectors in 3D by adding in a z component:

For example, the magnitude of the vector (9, 2, 5) will be:


![]()
Your turn…
Exercise C: What is the length of the vector (2, 3, 4)?
Having found the connection between triangles and vectors, we are now able to make a connection between vectors and angles. It’s the fact that vectors can be expressed as a right-angled triangle that makes this possible. This means we can bring the trigonometric functions of sine, cosine, and tangent, as explained in Chapter 8, Reviewing Our Knowledge of Triangles, into play.
So far, you’ve learned how to work with vectors to move from one location to another, as well as how to find the distance between those locations.
In the next section, we will look at another fundamental operation of vectors that will become very useful for rotating graphics elements, as well as providing simple artificial intelligence with turning functionality.
Exploring the relationship between angles and vectors
The angles that are made from intersecting two vectors can best be explored by considering how a game character facing one vector should turn to be facing another. In this section, we will explore how such a game character might turn toward the desired object.
At the end of Chapter 8, Reviewing Our Knowledge of Triangles, you added a mesh loading class to your project and used it to display a teapot in the graphics window. How much did you want to turn this teapot around to get a better look at it? Besides translation, rotation is another primary transformation used in graphics. Rotations require angles; these angles are measured between vectors using the principles we explored in Chapter 8.
For example, let’s consider the case shown in Figure 9.7, in which the game character, Chomper, would like to turn and face the jar of Vegemite. A vector is used to represent the direction Chomper is facing, as well as the direction he would like to face, that being the vector from Chomper to the Vegemite:
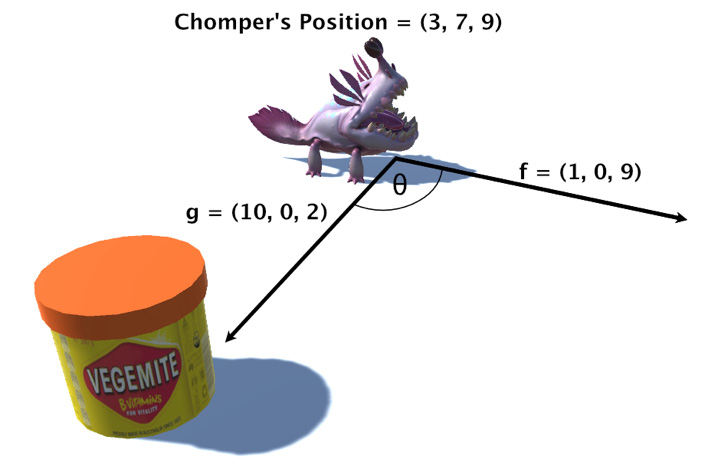
Figure 9.7: Turning a game character to face an object
From the information given, we can conclude that the Vegemite is located at the following position:
Vpos = Chomper_Pos + g
This is because adding a vector to a position gives another position, and we know where Chomper is located and the vector to the Vegemite, given in Figure 9.7. Therefore, the Vegemite is located at the following position:
Vpos = (3, 7, 9) + (10, 0, 2)
Vpos = (13, 7, 11)
This is inconsequential to finding the value of θ, which is the angle Chomper has to turn at to face the Vegemite. However, these calculations do demonstrate where positions or points in space and vectors part ways. It doesn’t matter where Chomper is located in space – if the Vegemite is relatively in the same position, then the vector to the Vegemite will be the same. Essentially, you can move Chomper and the Vegemite anywhere in space and so long as they are moved by the same amount, the vectors of g and f will remain the same.
So, the question remains, what is the angle Chomper needs to turn at to be facing the Vegemite? To calculate this, we have another interesting operation. Enter the dot product operation!
The dot product
The dot product is a mathematical operation that’s performed on two vectors. It takes each element of two vectors, multiplies them together, and then adds them together. For the vectors v and w, the dot product is expressed like this:
![]()
Therefore, the dot product for Figure 9.7, for f and g, is like so:
![]()
![]()
![]()
No, this isn’t the angle between vectors f and g, but it’s a start. To calculate the angle, ![]() , between two vectors, we require the following equation:
, between two vectors, we require the following equation:
If you are interested in the derivation of this formula, you are encouraged to read https://www.mathsisfun.com/algebra/vectors-dot-product.html.
Given we’ve already calculated the dot product, we only need to find the magnitude of f and g to use in the divisor (can you work this out from what we covered in the previous section?). The equations with these values will now look like this:
![]()
![]()
![]()
From this, we know that Chomper must turn 72.54 degrees from the direction it is facing to then be facing the Vegemite. This is useful information when programming an artificially-intelligent game character. The only issue that remains is to determine whether Chomper should turn clockwise or anticlockwise. For you and me, we can see Chomper should turn clockwise. However, for a game character, this needs to be calculated. Hence, we require a cross-product calculation.
The cross product
The cross product of two vectors produces another vector that sits at 90 degrees, otherwise called perpendicular, to the original two vectors. For example, if you consider the X, Y, and Z axes of a 3D Cartesian space, then the cross product of the x axis and the y axis would be the z axis. This may not immediately seem like a solution to determining which way Chomper should turn (a problem from the previous section), but it will soon.
When it comes to working on a cross product between two vectors, v and w, the equation is written like this:
![]()
This is not a simple multiplication as vectors contain multiple parts. The actual equation for vectors in 3D is this:

Again, if you are interested in the derivation, you can find it at https://www.mathsisfun.com/algebra/vectors-cross-product.html. Note that in the preceding equation, I used * to represent a normal multiplication as opposed to the x used in the cross-product equation. I’ve no doubt the cross-product equation looks pretty scary to most beginners at this point. However, it’s an important calculation and if you need to Google it now and again, then so be it.
What is more important is that you understand why you are using it and can evaluate the results it gives you to work with. The result will be another vector. If you plot or visualize the three vectors involved, the result will sit perpendicular to the other two.
Taking the example we’ve been working through with Chomper and the Vegemite, the cross product of f and g from Figure 9.7 will be:


![]()
Something that I left out in the previous equation and description is that you must end up with three values added together. These represent an x, y, and z component. The complete equation for cases in 3D is:


This assigns each bracketed equation to x, y, and z, respectively.
The result of all these calculations gives us:
![]()
This is another vector. When drawn into the illustration of Figure 9.7, it will give the vector shown in Figure 9.8:
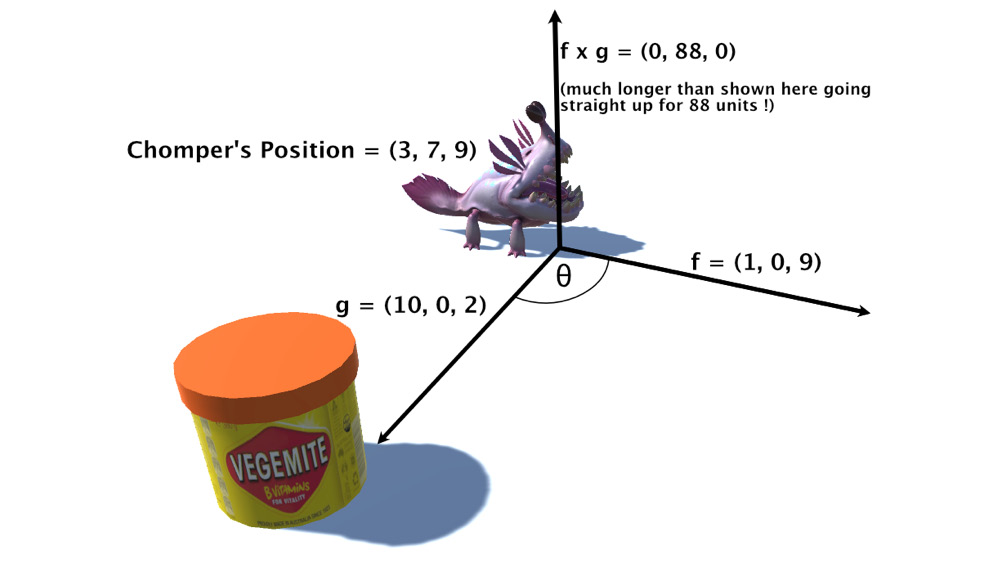
Figure 9.8: The cross product
What does this tell us about the direction that Chomper needs to turn? Well, there are two cross products you can calculate – f x g and g x f – and they give differing results. Try the calculations for yourself. f x g will equate to (0, 88, 0) and g x f will equate to (0, -88, 0). As you can see, a different ordering of the vectors in the cross product will produce vectors that are parallel but going in different directions. And this is what we can take advantage of when deciding the direction in which Chomper should turn. In Figure 9.8, Chomper should turn clockwise. From that, we can conclude that if the y value of the cross product is positive, then Chomper turns clockwise; otherwise, Chomper turns anticlockwise.
In this particular case, Chomper is turning around its Y, or vertical, axis. Knowing the axis of rotation for these calculations is important. For example, if the character needed to turn around its Z-axis, then it would be the negative and positive results from the cross products that would indicate the direction of turn.
All of these properties regarding vectors will be explored in Chapter 15, Navigating the View Space, when we start to produce game objects that can self-navigate in the 3D space we’ve been creating.
Summary
There’s a lot to learn when it comes to vector mathematics, and this chapter has only scratched at the surface and plucked out the essential parts relevant to graphics and games. If you get a chance, I would strongly suggest that you review the extra links given throughout. Vector mathematics is a university-level topic. I’ve attempted to reveal the simplicity of the topic and reduce it to simple addition and multiplication operations, but if you feel you haven’t grasped the topic, I’d encourage you to investigate what’s available on Khan Academy (khanacademy.org). In this book, I’m addressing the most relevant aspects of all mathematical topics concerning computer graphics and games, but unfortunately, due to page count, I can’t cover everything.
We started this chapter by looking at the differences between points and vectors, followed by several key vector operations required to manipulate them to move objects in space. This movement was further defined with a distance of movement, which we discovered could be calculated using Pythagoras’ theorem. Finally, by introducing the dot and cross-product operations, you learned how to turn a character from facing in one direction to facing toward a goal object. With this new set of skills, you are now well equipped to create animated graphics environments and simple artificially-intelligent characters.
To help forge a place for vectors in your game development arsenal, in the next chapter, we will focus on the aspects of the domain that rely on these fundamental concepts and further assist you in developing your skills and focusing on them in this area. To begin, you will discover the variety of uses of lines, line segments, rays, and normals, and discover how each of these can be defined by the use of vectors before we continue to develop an understanding of how each of these concepts is critical knowledge in graphics programming. You will apply them by animating the movement of cubes and defining the exterior sides of polygons to optimize rendering.
Answers
Exercise A:
trans.move(pygame.Vector3(0.5, 0.5, 0))
The cube will move diagonally to the top right.
Exercise B:
trans.move(pygame.Vector3(0, -1, 0))
The cube will move into the screen, away from the viewer.
Exercise C:

![]()
![]()
![]()