
Chapter 19: Motion Capture Editing and Cleanup Using Control Rig and Sequencer
In the previous chapter, we retargeted MoCap from Mixamo to our MetaHuman skeleton. In this chapter, we will learn how to bake it onto the MetaHuman Control Rig and, from there, edit it and combine it into one sequence.
Baking an animation between rigs is the process of transferring animations frame by frame from one to the other. This bakes a keyframe on every frame, so the target rig animation is an exact copy of the source animation in its relative world or local spaces. This will make more sense once you see practical examples as we progress through this chapter.
With the MoCap from the skeletons baked to the MetaHuman Control Rig, we can edit and clean up the animations. Editing MoCap well is a little bit of an art. In essence, what you're trying to do is keep as much of the subtle realistic core MoCap animation data as you can, while repurposing it for your own needs.
With MoCap cleanup, you try to work as non-destructively as you can. To work non-destructively means to keep the core of what you have, and make layered changes on top of it. In animation, you do this by layering additive layers of motion on top of your MoCap data to redirect it. For example, let's imagine you have a nice motion on your character's arm, but it clips through something at some point. Here, you can just add an additive layer of motion to redirect the motion so that the arm doesn't clip anymore.
Sometimes, you can just delete some MoCap frames and add your own, but you try to keep that for ONLY where needed. Sometimes, you can move or scale whole sets of keys or curves. There are many little methods and tricks to make MoCap do what you want it to do, without losing the realism that makes it great in the first place.
In this chapter and its online only bonus material, we will cover some of those methods and little tricks to effectively clean, combine, and repurpose MoCap.
In this chapter, we will cover the following topics:
- Planning your MoCap edit
- Baking the Stand_Up MoCap to the Control Rig
- Overview of the MetaHuman Control Rig
- Editing and cleaning the Stand_Up MoCap
Technical requirements
In this chapter, we will need to work with UE5 and the Mixamo website. You will need the following to complete this chapter:
- A computer that can run basic 3D animation software.
- Unreal Engine 5. You can download it from https://www.unrealengine.com/en-US/download.
- A basic understanding of how to navigate the UE 3D user interface. If you have skipped ahead, then please go back to Chapter 6, Exploring Unreal Engine 5.
- You must have completed Chapter 15, Creating a Control Rig with Basic IK Controls for the Robot in UE5, Chapter 17, Creating Three Simple Animations for the Robot in EU5 Sequencer, and Chapter 18, Importing Motion Capture onto the MetaHuman Control Rig.
The file related to this chapter are placed at https://github.com/PacktPublishing/Unreal-Engine-5-Character-Creation-Animation-and-Cinematics/tree/main/Chapter19
Planning Your MoCap edit
We have five pieces of MoCap: Sitting_Rubbing_Arm, Stand_Up, Standing_Idle, Female_Stop_And_Start_Walking, and Button_Pushing.
In this chapter, we want to clean them up and in Chapter 20, Use Sequencer to Construct Your Final Scene, combine them into one seamless animation. To make it easier to make them flow from one to the other when we combine them, we will edit them in such a way that they have a few specific poses where the animations can blend easily.
Animations can be blended in Sequencer so that they transition and blend smoothly between each other over time on the whole body, but issues usually arise with the feet. Imagine that you have two MoCap animations blending where the character is standing still, but in one of the MoCap pieces, the feet are wide apart, while in the other, they are close together. If we blend these two animations, the feet will slide over the ground when they're not supposed to during the blend. This kind of foot slide is very unnatural, so we must try to avoid that.
Another issue in blending can be the root bone. UE and most game engines normally like to have a root bone for the whole skeleton. It is normally on the ground between the feet of the character, at the origin of the scene. The child of the root bone in the skeleton is normally the hip/pelvis bone in a humanoid or animal rig. The most reliable point of reference for two animations to blend is the root bone.
The problem comes in if, say, in one animation, the hip bone is directly above the root bone and in the other animation, the hip bone is far away from the root bone, as shown in the following screenshot:
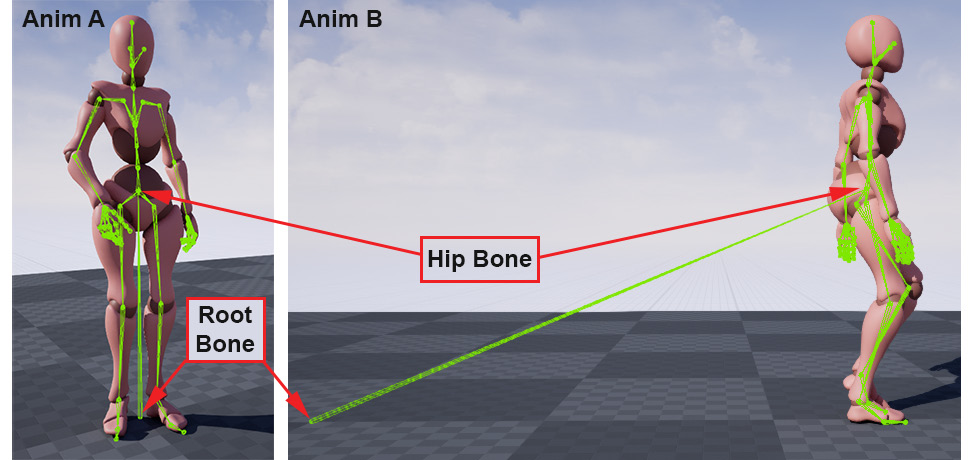
Figure 19.1 – Root bone and hip bone offset
When you try to blend from Anim A to Anim B, the character's hip position, relative to the root, is so different that the character will seem like it's flying off in a direction during the blend to compensate for the difference.
UE has ways of using a different bone as a reference point between blends, but this can get complicated and often has problems. Using the root bone as the blend reference between animations is the most reliable and easy way to set it up.
So, to combine our different MoCap animations and blend them easily, we need some consistent poses and root positions at the points we want to blend. After many years of doing this, I still prefer to do a little extra work in the beginning to sort this out before even attempting to combine and blend the animations. A little work and planning in the beginning can save you a lot of time and headaches later.
I think it might be helpful to set out exactly what we aim to achieve in this chapter in a visual way:
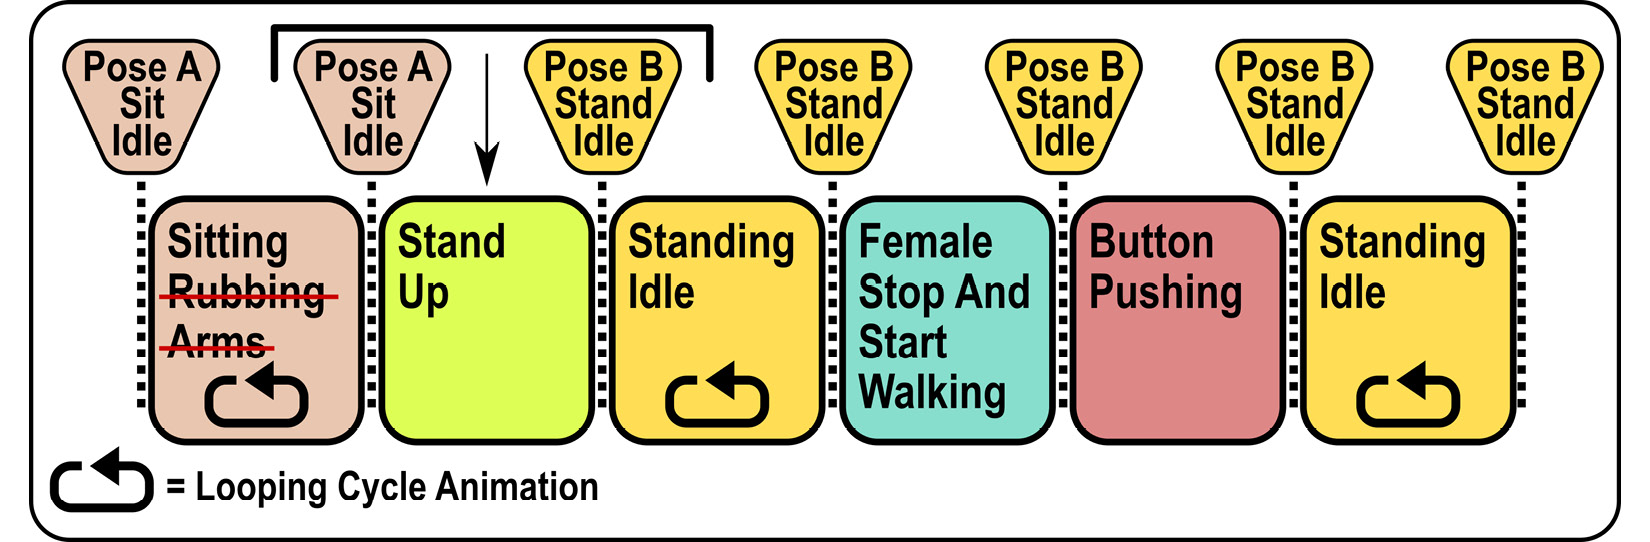
Figure 19.2 – MoCap edit plan
Our character will start sitting down, then get up, stand for a few moments, then walk forward a few steps, stop, press a button on her arm to activate the Robot Drone, and then keep standing, looking at the drone.
We will change the Sitting_Rubbing_Arm animation and remove the part where she is rubbing her arm. We could have kept this and cleaned it up, but it's a bit more complicated and time-consuming, so for this book, we'll just remove the rubbing arm part but keep it idle. We'll also make it an animation cycle, with the first and last frame being the same, so that we can loop it if we want to extend the time she is sitting down in the sequence.
However, the Stand_Up animation is probably where we want to start since it will have Pose A Sit Idle at the start before she stands up, and Pose B Stand Idle once she has stood up. Since it has both these poses, we may as well start with that animation first, then save the poses we create in that edit and take them to Sitting Idle, and then Standing Idle later.
With the Standing_Idle animation, we will take the Pose B Stand Idle pose we created and apply it to the Standing Idle animation at the beginning and end. This will turn it into an animation cycle so that we can also loop her standing still for as long as the sequence may require.
For the Female_Stop_And_Start_Walking animation, we will also edit and apply Pose B Stand Idle to the beginning and end. This is so that it can blend easily to the Button_Pushing animation, which, in return, blends back to Standing Idle. The Standing Idle animation can then play its cycle for as long as we want the character to stand there at the end of the sequence.
We will change the Button_Pushing animation so that instead of her pushing a button in the air in front of her, she lifts her left arm and pushes it on her arm.
So, now that we know what we want to achieve and have planned it out, we will start with baking the Stand_Up animation to the Control Rig for editing.
Baking the Stand_Up MoCap to the Control Rig
Before we can edit the Stand_Up MoCap animation, we need to bake it to our Control Rig. To do that, follow these steps:
- In the Content Drawer interface, under MoCap_From_Maximo | MoCap, add a new folder by clicking + ADD in the top-left corner of the Content Drawer interface. Name it CleanupSequences, as shown in the following screenshot:
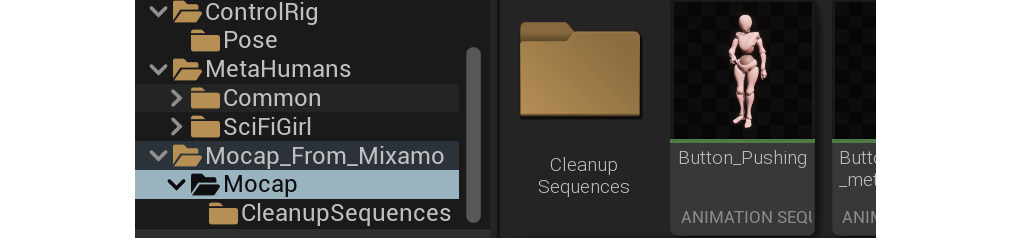
Figure 19.3 – Creating a folder for cleanup purposes
- On the top bar of the main UE interface, create a new Level Sequence by selecting Cinematics | Add New Level Sequence and save it as StandUpCleanup in the CleanupSequences folder, as shown in the following screenshot:
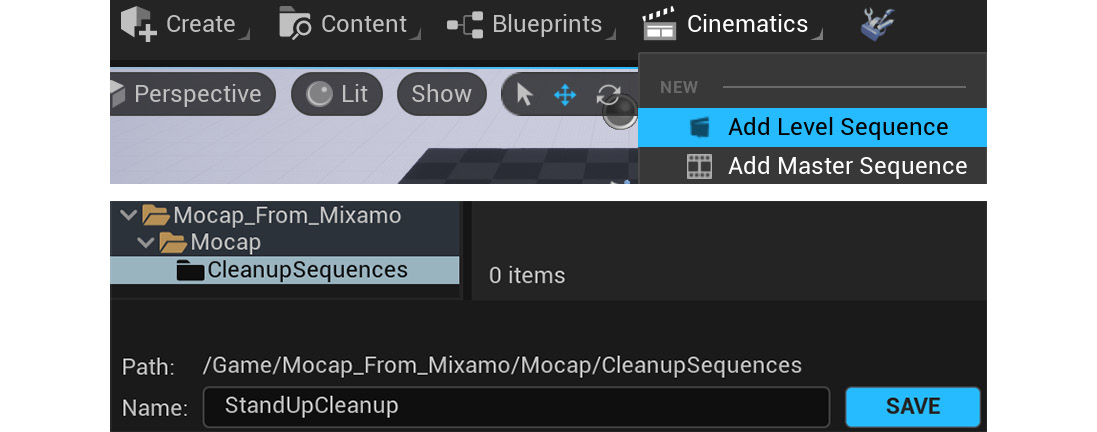
Figure 19.4 – Add Cleanup Sequence for Stand_Up MoCap
The new empty StandUpCleanup sequence will open in Sequencer. We will use this Level Sequence just to clean up and edit the Stand_Up MoCap animation.
- In the Content Drawer interface, open the Content | MetaHuman | SciFiGirl folder. Drag the BP_SciFiGirl blueprint into the empty StandUpCleanup Sequencer timeline, as shown in the following screenshot:
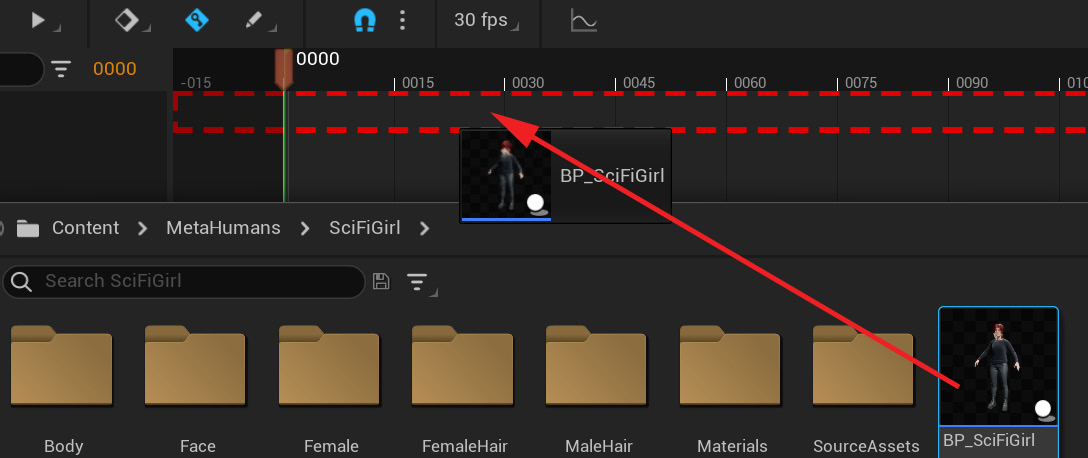
Figure 19.5 – Adding the MetaHuman blueprint to Sequencer
- In Sequencer's TRACK window, under BP Sci Fi Girl | Body, find MetaHuman_ControlRig and delete it by selecting it and pressing Delete on your keyboard or by using the right-click context menu (the one that pops up if you right-click on the item), as shown in the following screenshot:
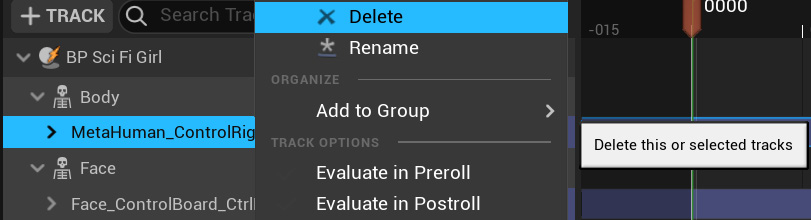
Figure 19.6 – Deleting the Control Rig
We are deleting this because it will override the raw skeleton animation that we will add next and stop it from playing.
At the time of writing this book, UE5 was still in early access and only the old retargeting tools were available from UE4. This redundant retargeting tool was used to retarget the original animations from Mixamo. This book has since been updated, but I based this lesson on those older retargeted animations since they teach better lessons about the MoCap cleanup process than the ones created with the new retargeting method.
You can download the Stand_Up_meta source animation that the following lesson is based on, as well as the bonus material animations, here: https://github.com/PacktPublishing/Unreal-Engine-5-Character-Creation-Animation-and-Cinematics/tree/main/Chapter19
You just need to add these to your UE project folders.
You can also find the old retargeted animations in the example final project file, which can be downloaded from here: https://github.com/PacktPublishing/Unreal-Engine-5-Character-Creation-Animation-and-Cinematics/tree/main/FullFinalUE5Project. Installation instructions have also been provided.
The animations can be found under Content/Mocap_From_Mixamo/Mocap.
- In Sequencer's TRACK window, under BP Sci Fi Girl, to the right of the Body item, select + TRACK| Animation. When you click on Animation, a list of compatible animations will appear that can be played on the MetaHuman skeleton. In the Search Assets field at the top of this list, type in meta to find our retargeted MoCap animations and select Stand_Up_meta, as shown in the following screenshot:
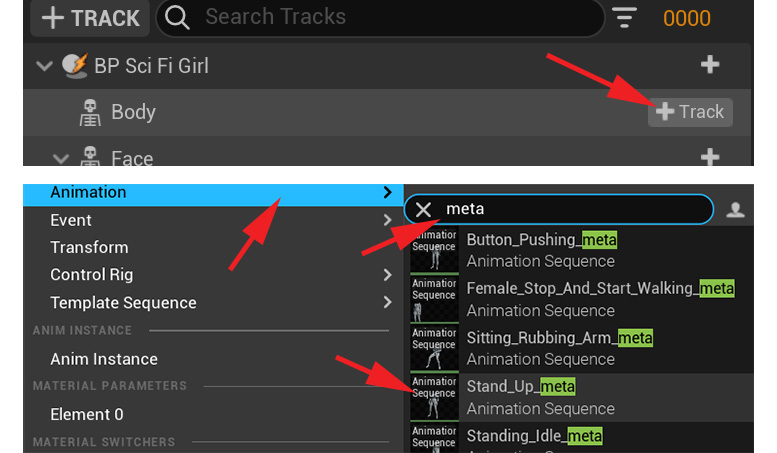
Figure 19.7 – Adding an Animation track
This will add the Standing Up MoCap to the MetaHuman skeleton, as shown in Figure 19.8.
- To make sure we know where the real floor level is, select the floor in the Viewport and make sure its Location is set to 0.0, 0.0, 0.0 in the Details panel to the right of the main UE interface, as shown in Figure 19.8. In newer versions of UE5, the default floor may already be on the ground plane, so you won't need to do this step.
- In the Sequencer timeline, set the active time range from 0000 to 0082, which is the exact length of the Stand_Up_meta MoCap animation:
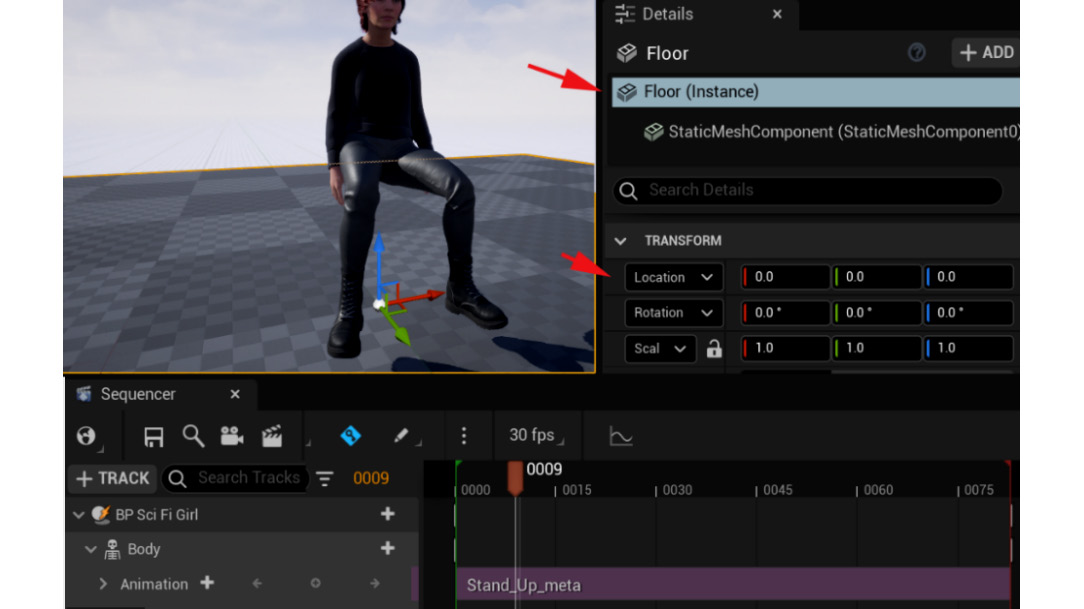
Figure 19.8 – Floor and timeline Active Range
Note
We now have the Stand_Up_meta MoCap animation playing on the MetaHuman skeleton. The skeleton animations play directly on the MetaHuman skeleton. This is different from the Control Rig animations. Control Rig animations play on the controllers, which, in turn, control the skeleton. In Sequencer, we can bake skeletal animations from the skeleton to the Control Rig or bake Control Rig animations from the Control Rig to the skeleton. We may do this several times back and forth during the cleanup process, depending on what we want to do.
As you can see, when we press play, there are some issues, such as the hands going through the legs and she is floating off the floor. However, if we want to edit and fix these issues, we need to bake this skeletal animation to the Control Rig. Let's do that now.
- In Sequencer's TRACK window, under BP Sci Fi Girl, right-click on the Body item. Select Bake To Control Rig; a list of available Control Rigs will appear. Select MetaHuman_ControlRig, as shown in the following screenshot:
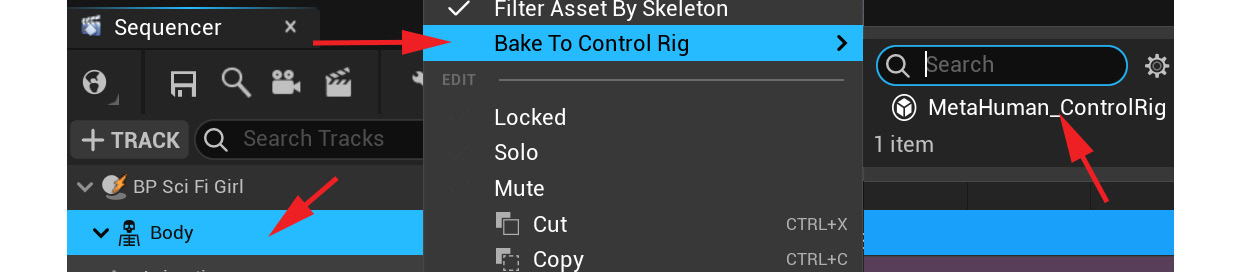
Figure 19.9 – Bake to Control Rig
- The Bake To Control Rig setting window will pop up next. It's very important to uncheck Reduce Keys. We don't want to lose any of our MoCap data at this point. Then, click Bake To Control Rig, as shown in the following screenshot:
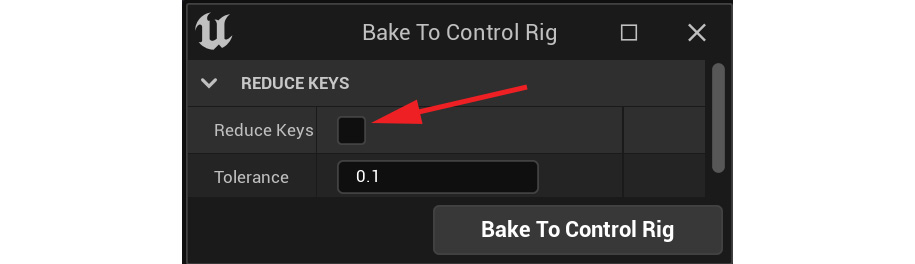
Figure 19.10 – Uncheck Reduce Keys
The skeletal animation will now be baked to the Control Rig. Once that's happened, the Control Rig controllers will appear in the viewport. Also, in the TRACK window under the Body item, there's now a MetaHuman_ControlRig track, just under the MoCap Animation track. We don't need this Animation track item anymore.
- To keep our Sequencer timeline clean, we can delete the Animation track now by selecting it in the TRACK window and pressing Delete on our keyboard. It may get confusing otherwise since we may need to repeat this process a few times. Hence, it's a good habit to get rid of redundant tracks as we go:

Figure 19.11 – Deleting the redundant Animation track
- At this point, remember to save this sequence by clicking the Save icon on the Sequencer window top bar. Save frequently while you work on your sequence.
The animation is now on the MetaHuman Control Rig. Before we edit it, and since this is probably the first time you're using the MetaHuman Control Rig, let me give you a quick overview.
Overview of the MetaHuman Control Rig
The MetaHuman Control Rig is essentially very similar to our Robot Drone Control Rig, but with more controllers and more advanced features. Please make sure you have completed Chapter 15, Creating a Control Rig with Basic IK Controls for the Robot in UE5, and Chapter 17, Creating Three Simple Animations for the Robot in EU5 Sequencer, to understand how these controllers work in practice.
It has standard FK controls on the hips, spine, and head and IK controls on the arms and legs. However, one of the things that makes this MetaHuman Control Rig more advanced is that it can have both IK and FK on the arms and legs. You can switch between IK and FK on the arms and legs depending on your needs.
If you want to experiment with the MetaHuman Control Rig, you can view it in the main Viewport by dragging the MetaHuman's blueprint into a sequence, as we did in Figure 19.5, and then selecting one of the controllers in the TRACK window under Body | MetaHuman_ContorlRig or the Anim Outliner window (if the Animation window is not open, open it with the dropdown at the top of the main UE interface).
Anim Outliner is also where you can generally select your controllers, as well as just left-click on them in the Viewport, as shown in the following screenshot:
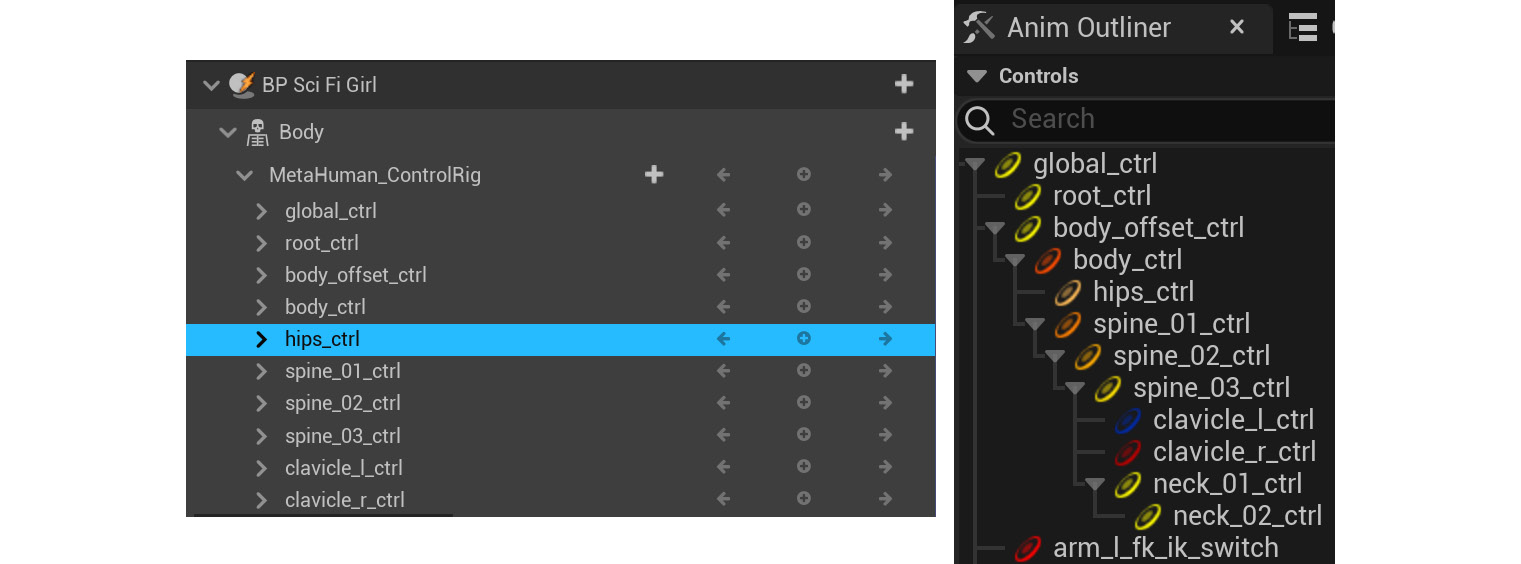
Figure 19.12 – Selecting the MetaHuman Control Rig controllers
When you first drag the MetaHuman blueprint into Sequencer, the rig controllers may not appear in the Viewport until you select one of them.
In the following screenshot, I have highlighted the different types of controllers that are available when the standard MetaHuman Control Rig is normally loaded first into a sequence:
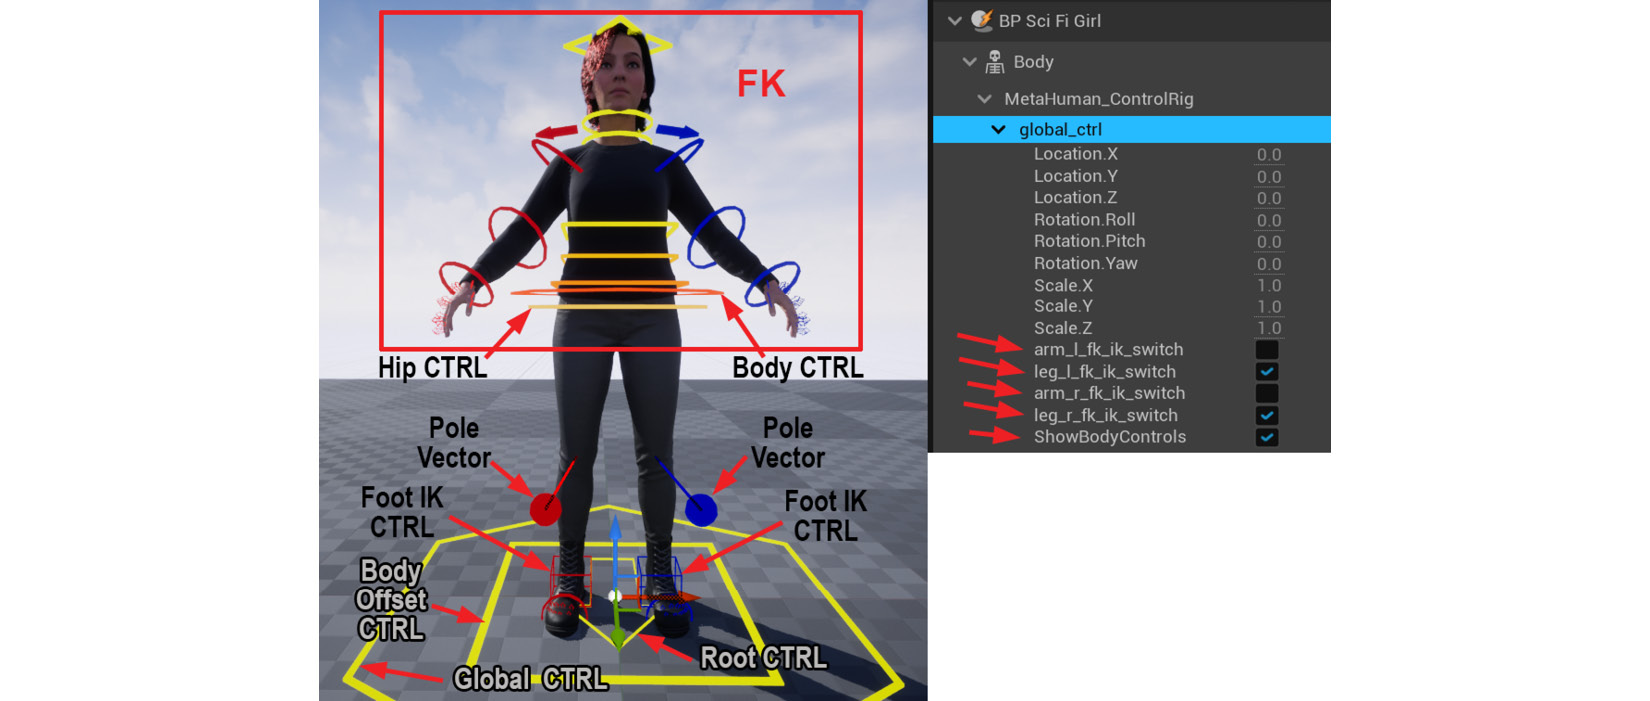
Figure 19.13 – The default MetaHuman Control Rig
The big six-sided yellow controller on the ground is global_ctrl. This controller is the overall parent and can move the entire character and all the controllers anywhere in your scene. This is also where you use the checkboxes to switch between IK and FK on the arms and legs.
If the box is unchecked, it's FK, while if it's checked, then it's IK. Under the FK/IK switches, there is the ShowBodyControls checkbox switch. Here, you can toggle how the controllers are displayed in the Viewport (either on or off). To get to these settings, simply expand global_ctrl in the TRACK window.
Note on IK and FK Switching
At the time of writing this book, the MetaHuman Control Rig has no IK/FK matching functionality. This means that if you're in FK mode on the arm and you animate or change it, none of those changes will be made to the IK controllers and vice versa. So, normally, the IK controllers and the FK controllers will get out of sync as you animate either of them. Some advanced animation rigs in some other 3D animation software programs have a matching feature where you can sync them back up if you want to switch from one to the other mid-animation.
Generally, try to decide at the beginning of the specific animation what you need to achieve and then decide whether IK or FK is the best way to go for the legs or arms. However, there is a workaround that we will cover later in this chapter, in the Fixing the hands with the Snapper tool section, if you want to use both in the same animation.
Next, we have a very useful controller called body_offset_ctrl. With this, you can also position the whole character and all the controllers, but crucially, it doesn't influence global_ctrl or root_ctrl and leaves them where they are when you move it. This is great for when you want to reposition the character relative to the root bone. You will see why this is important later in this chapter.
The next important controller to look at is root_ctrl. It is in the shape of an arrow in the MetaHuman control rig. This could be confusing since this normally controls the root skeleton bone of our skeleton, which is the parent of all the bones in the skeleton. You would think that this would do what global_ctrl does (move the entire rig), but this is not the case.
In a game engine and even with the kind of animation blending we want to do to combine the MoCap into one animation, we want exact control of where the root bone/controller is relative to the pelvis/hips bone. The root skeleton bone is rigged to the root_ctrl controller in such a way that it can be moved without influencing the other controllers (and the skeletal bones in turn) in any way, and vice versa. The root bone's motion is under complete control of the animator, who can do whatever they like with it without it affecting the position, rotation, or scale of the other controllers.
Because the IK box is checked, on the legs, we can see the foot IK controllers and their pole vectors. This works the same way as we used them in Chapter 17, Creating Three Simple Animations for the Robot in EU5 Sequencer, to animate the robot arms, only these are on the legs. The foot itself has some extra FK controllers to control the toes.
Because the FK box is checked, on the arms, we can see the arm FK controllers, as well as those for the fingers. On the MetaHuman Control Rig, the fingers are always FK controlled, even if the arm is switched to IK control. The body (the orange six-sided control around the hips), spine, neck, head, and clavicle controllers are all standard FK controllers too.
The hips_ctr controller has a special behavior (the round light orange control around the hips). This controller should just be rotated on the MetaHuman Control Rig. This can rotate the hips only, without influencing the body or spine position. This is useful if you have already made the perfect pose in the upper body and you just want to adjust the hip rotation to make it into a better shape for the pose.
With the hips_ctr controller set up the way it is, you can use this to make those tweaks to the hip rotation without the entire FK Control Rig above it following and ruining your pose. You can also use this in a walk cycle, where you just want the hips to swing a bit more without this offsetting your spine animation.
In the following screenshot, I switched the legs to FK and the arms to IK.
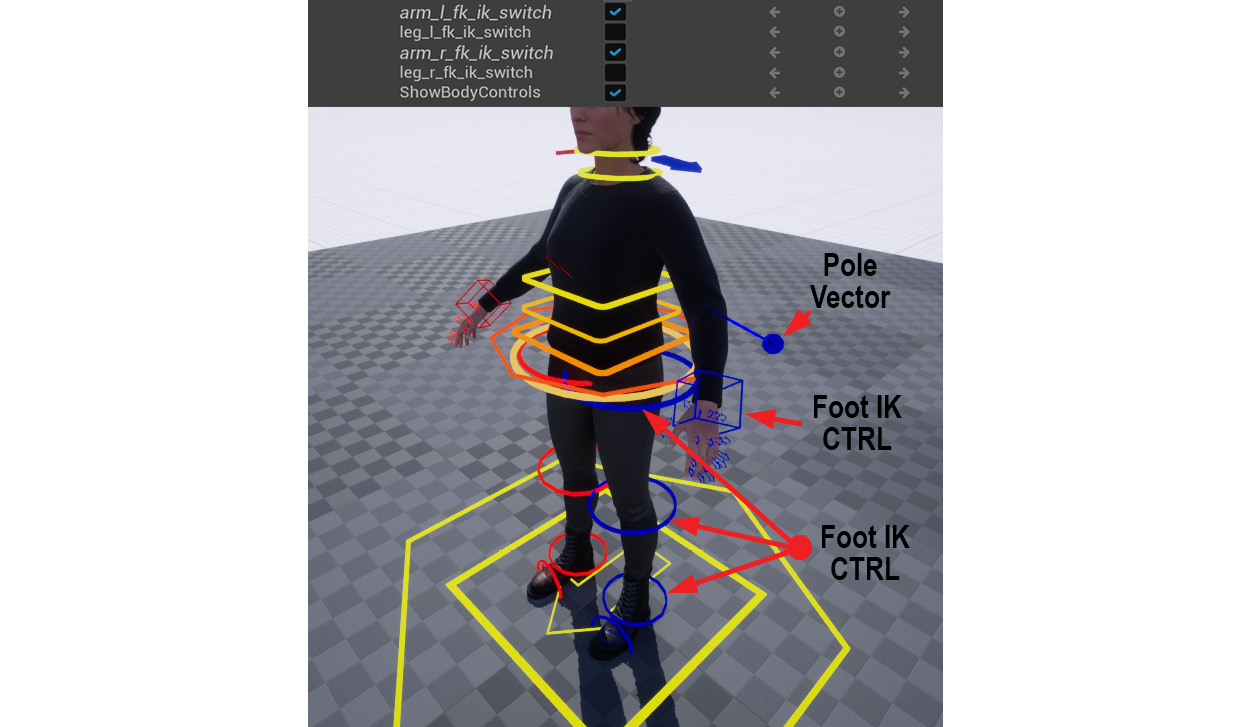
Figure 19.14 – Switching to FK legs and IK arms
Most professionally set-up humanoid animation rigs in most 3D animation software, such as Blender or Maya, are set up in this very similar industry standard way. So, if you get used to using this rig as an animator, it will feel very familiar to switch to other professional set-up rigs in a studio that uses Maya, for example.
With this basic understanding of how the MetaHuman Control Rig is set up and how to use it, let's continue and use this new knowledge to edit the Stand_Up MoCap animation in Sequencer.
Editing and cleaning up the Stand_Up MoCap
Now, let's edit the MoCap to suit our needs. Don't worry if you find this a little difficult and time-consuming. It does take a bit of practice to work your way around a rig with so many controllers as the MetaHuman rig has.
However, we need to set up a better near-clipping plane in UE to make posing the character easier in the Viewport display.
Changing the clipping plane in UE
In UE, the standard user camera in the Viewport has a clipping plane of 10 cm. This means that if you move the camera within 10 cm of an object in the Viewport, the parts of that object that are within the 10 cm won't appear in the Viewport. However, this is annoying if you want to get close to finger controllers to select and rotate them.
Let's adjust that while we animate. It's a good idea to switch it back to 10 cm after you've finished your animation since it could influence the way things render in the Viewport.
At the top of the main UE interface, select Edit | Project Settings. The Project Settings window will appear. Then, in the Search field at the top right, type near. In the search results, scroll down and find Near Clip Plane. Change that to 1.0 instead of 10.0, as shown in the following screenshot:

Figure 19.15 – Changing Near Clip Plane
Next, we'll offset the position of our MoCap so that it lines up with the ground and root.
Lining up the MoCap with the ground plane and the root
If the StandUpCleanup sequence is still not open in Sequencer, open it now by double-clicking on it in the folder you saved it in.
If you saved the sequence after completing the Baking the Stand_Up MoCap to the Control Rig section, then the MoCap should already be baked to the MetaHuman Control Rig.
If you look at our baked MoCap animation in the Viewport, you'll see that she is floating off the ground and away from her root_ctrl, as shown in the following screenshot. Let's fix that:
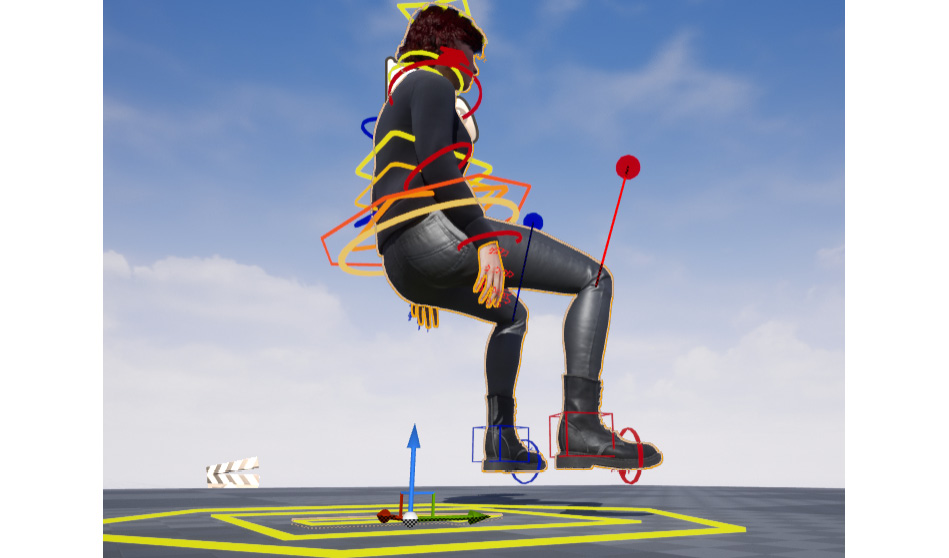
Figure 19.16 – Floating character animation away from the root
It would be better if, when she is fully stood up, her feet are on the ground and that the root is between her heels so that we can determine what we want this offset to be. This is frame 0044, just at the point she is fully stood up:
- Scrub to frame 0044 in the Sequencer timeline. Select body_offset_ctrl in the TRACK window and then left-click, hold, and box select all the keyframes on that controller only, before frame 0044. Then, hold Shift on your keyboard and select all the keyframes after frame 0044 at the same time.
- Press Delete on your keyboard to delete those keys, leaving the single frame on frame 0044, as shown in the following screenshot:
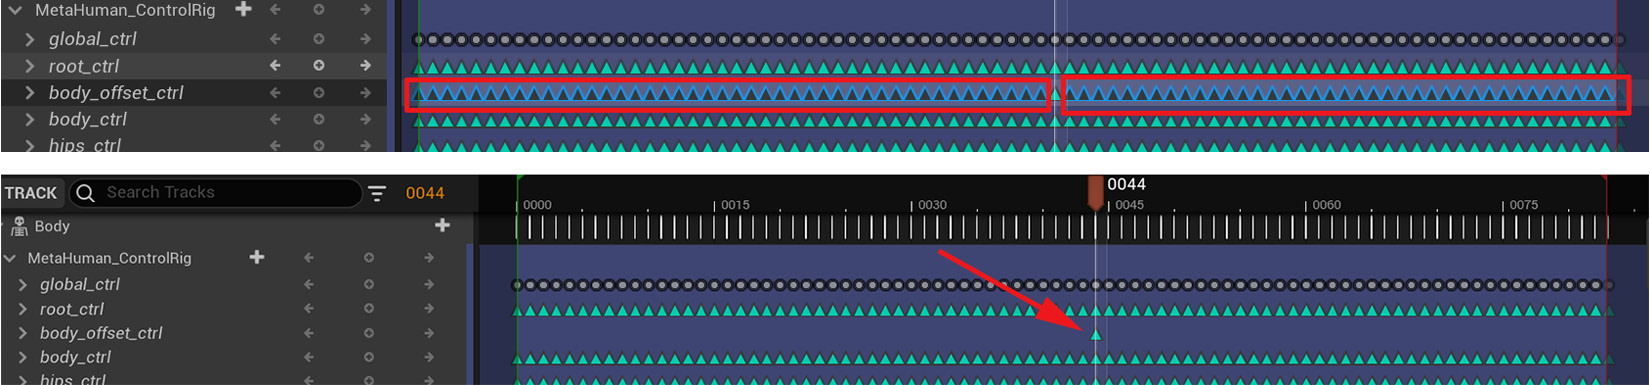
Figure 19.17 – Deleting extra keyframes from body_offset_ctrl
- With Automatic Keyframe set to on, move body_offset_ctrl into the Viewport until the character's feet are on the ground and her heels are on either side of the root_ctrl controller, as shown in the following screenshot:
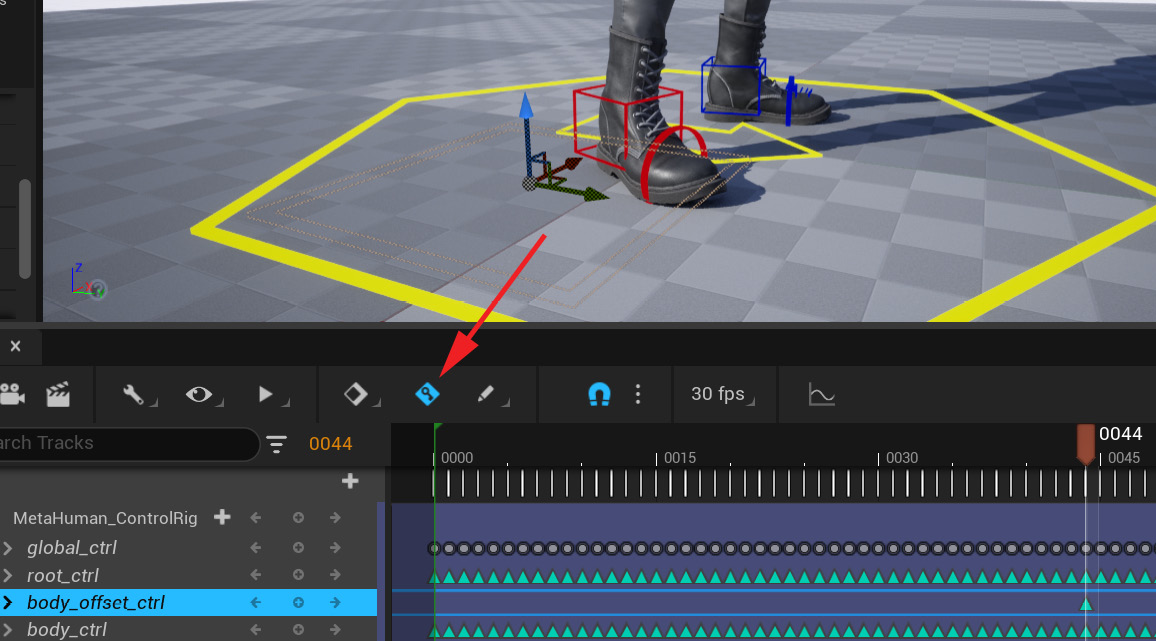
Figure 19.18 – Moving body_ffset_ctrl so that the character's feet are on the ground
Because Automatic Keyframe was on, the new position of body_offset_ctrl would be keyframed in this position, and since there are no keyframes before or after this keyframe, it will stay there.
The whole animation has now been offset so that the character's feet are on the ground… well – at frame 0044 anyway. For the rest of the animation, the feet are floaty. Let's fix that next.
Fixing floaty feet
With the offset keyed on body_offset_ctrl at 0044, you can now scrub the Sequencer timeline to see what your animation looks like, all the way back to the beginning at frame 0000, and after frame 0044 to the end of the animation.
Look at the feet of the character in the Viewport while you scrub the timeline or play the animation. It is very floaty (it doesn't stay in the same spot on the ground) and even clips the floor in places. This is because the whole animation is offset now, and sometimes, retargeted animations to differently proportioned characters can lose some accuracy in terms of where the feet should be. This is often the case with MoCap retargeting and a lot of time is spent by animators cleaning up the feet of MoCap animations.
In this case, we are lucky and it's an easy fix. The character in this original MoCap animation never really moves her feet during this animation. Where her feet position was while she was sitting is where they stay when she stands up. We know that on frame 0044, her feet are perfectly aligned to the floor, so let's keep them in exactly that spot during the whole animation.
Just like we did in Step 2 of the previous section, scrub to frame 0044, select the keyframes before and after keyframe 0044 on both foot_l_ik_ctrl and foot_r_ik_ctrl, and delete them, leaving just the keyframe on 0044.
With all the keyframes on the feet IK controllers deleted and leaving the one keyframe on 0044, the feet will now stay in that position and not move and float when we play the animation.
If this animation was for an AAA game, I would have reanimated some micro-movements back into the feet to keep them alive during this animation, but for this tutorial, that is not needed. Next, let's look at the full body pose and improve it.
Improving the standing pose
Back on frame 0044, have a look at your pose, as shown in the following screenshot:
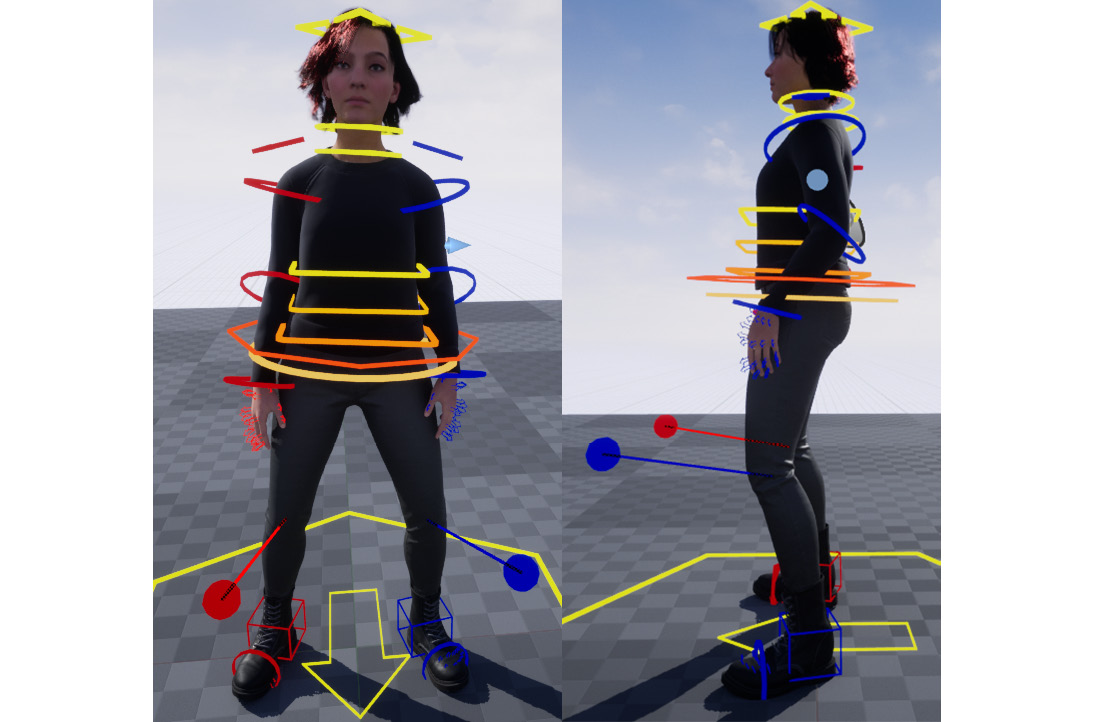
Figure 19.19 – Not a good pose
This is not a very appealing pose. The feet are too far apart, and the shoulders are drooping. Also, the hands are too close to the legs. This is also often the case when we retarget MoCap animations since the MoCap actor probably had different proportions from the final 3D model. Let's fix this now.
Here, we will make the change as an Additive layer since the MoCap keyframes are baked onto the rest of the body controllers and we don't want to lose that subtle core base MoCap data. Follow these steps:
- On frame 0000, in the TRACK window, to the right of the MetaHuman_ControlRig track, select + Section | Additive to add an Additive track:

Figure 19.20 – Adding an Additive track
A complete duplicate Additive set of controllers will appear in the TRACK window.
- On the original set of controllers, expand global_ctrl and check the boxes for IK on both the arms and legs, as well as ShowBodyControls. Delete all the keyframes on the IK/FK switch channels and ShowBodyControl, apart from the ones on frame 0000. Make sure that the blue dashed Additive track is the whole active frame range in the timeline window. Left-click on the end of it and drag it to make it longer if needed, as shown in the following screenshot:
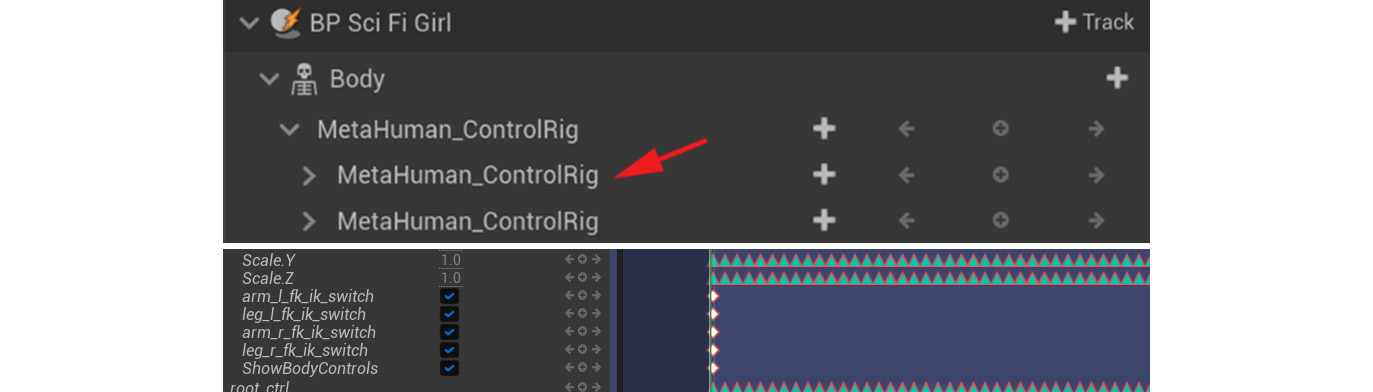
Figure 19.21 – Checking IK and extending the track
With Additive animations, I like to set the anchor keyframes. These keyframes can be used in several ways. Generally, the best way to judge where to put these Additive anchor frames is where we would have put a keyframe if we were to animate this from scratch. This animation would have three main poses in that case:
- Sitting Pose is the keyframe pose at the beginning of the sequence at frame 0000. We will do this after Stood Up Pose because we want to determine where the feet will end up when she stood up first. Then, we can feed that back to Sitting Pose. We will do that later in this tutorial.
- Stood Up Pose is what we started with at frame 0044.
- A Stood Up Pose would be placed at the end of the animation at frame 0082 to hold that stood-up position. We will do that later in this tutorial.
In this case, I want to anchor in the change on frame 0044 as the main offset across the whole animation. This is why I'm starting at frame 0044 and not 0000.
Since we're now dealing with Additive animation layers, turn Automatic Keyframe off (so we don't accidentally key the base layer of the MoCap and not the Additive layer). In the timeline, scrub to frame 0044, and then add a keyframe to the Additive MetaHuman_CotrolRig parent track. This will put a keyframe on all the controllers in this Additive set of controllers, as shown in the following screenshot:
Figure 19.22 – Setting an Additive anchor keyframe on frame 0044
Reminder
With Automatic Keyframe off, if you don't set the keyframe directly after you move the controller, and then scrub the timeline or select another controller, you'll lose the change you just made. It will revert to previous keyframe values before you made the change since you did not keyframe the change.
On frame 0044, adjust the pose. Bring the feet closer together by moving the feet with the foot IK controllers in the Viewport. Set + keyframe on the Additive versions of the controllers as you change them. You'll probably need to move the pole vectors on the legs too. Lift the shoulders a bit with the clavicle controllers.
Then, adjust the arms so that they're more natural with the hand IK controllers and their pole vectors. Look from the side and see if she leans backward or forwards too much and adjust if needed. The following screenshot shows before and after shots of what I did:
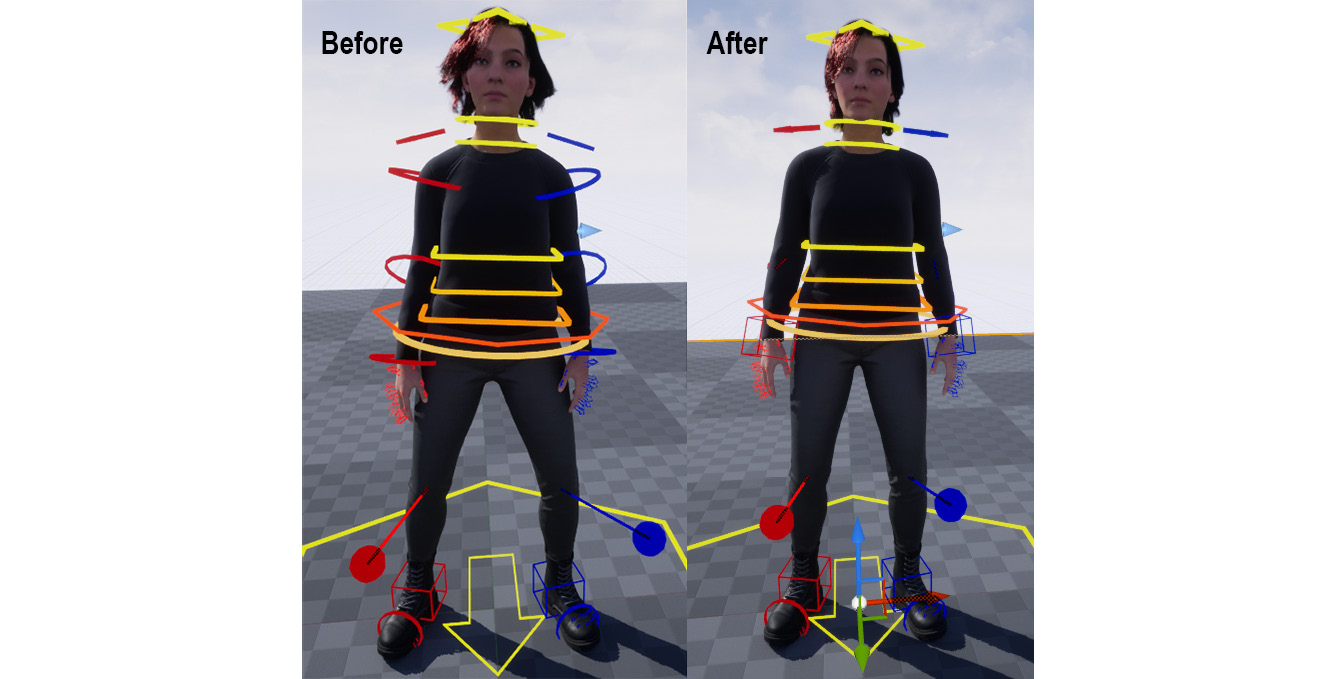
Figure 19.23 – Standing Additive pose at frame 44 – before and after
Some Help Needed?
If you are having some trouble, we also provide this pose in the final UE project file under Content | ControlRig | Poses. It's called PoseB_Stand_Idle_tutor. You can load this premade pose if you want to save some time.
If you decide to load this premade pose from the UE project files, then follow the steps numbered 1 to 5 in the following screenshot. Remember to be on the frame you want to paste the pose on and add a keyframe to the Additive layer controllers after to keyframe the pose:
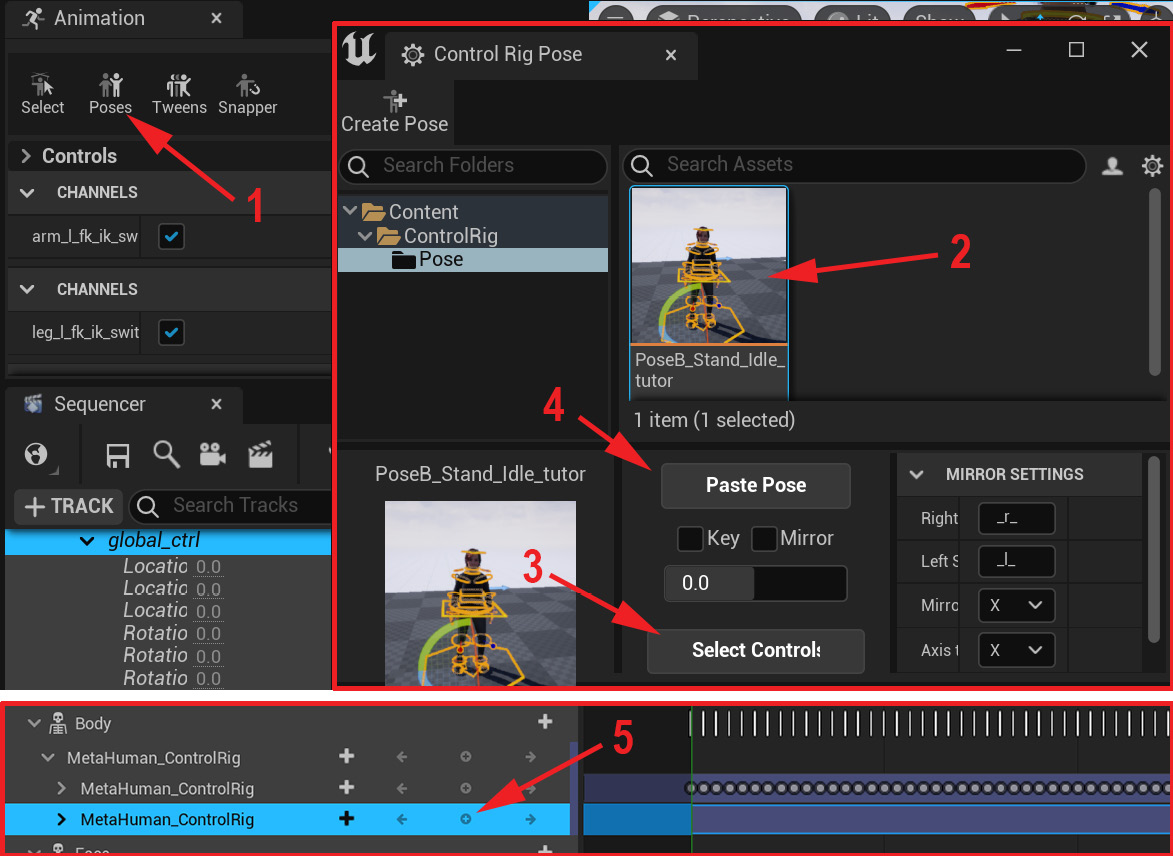
Figure 19.24 – Pasting the pose
If you decide to keep the pose you created, save it to the Pose library under Content | ControlRig | Poses. Select All the MetaHuman controllers while on frame 0044. Then, open Poses in the Animation window. Click Create Pose and name it PoseB_Stand_Idle and click Create Asset, as shown in the following screenshot:
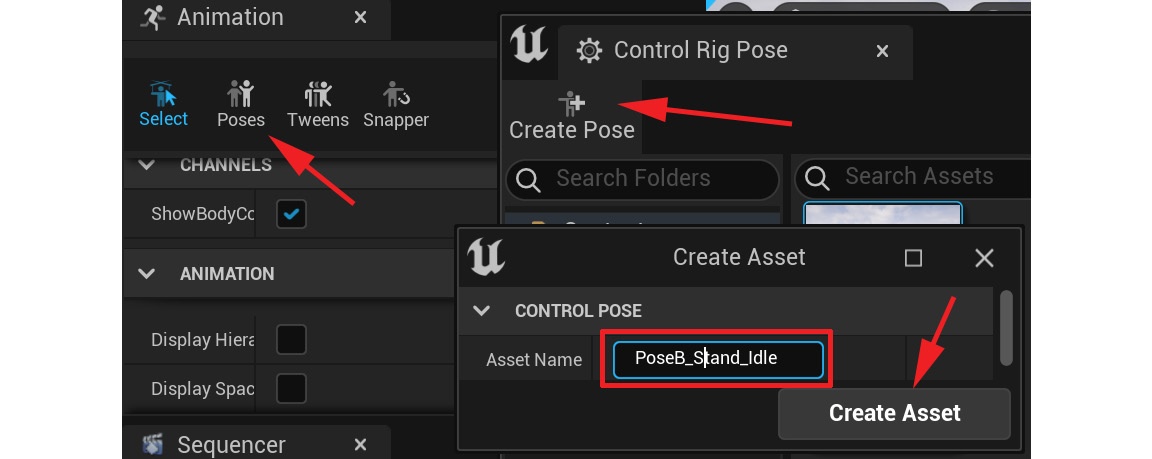
Figure 19.25 – Saving PoseB_Stand_Idle
Since we have this PoseB_Stand_Idle pose saved so that we can link the animations together, as shown in Figure 19.2 of our plan, let's paste it at the end of the animation.
With Automatic Keyframe still off, scrub to frame 0082 at the end of the animation. Then, as shown in Figure 19.23, paste the PoseB_Stand_Idle pose from the Poses tool. Remember to only add a keyframe to the Additive MetaHuman_ControlRig parent track to set the keyframe on all the Additive controllers.
If this animation was for an AAA game standard, I would have created a new cleaned-up pose at the end so that the Standing Idle pose doesn't repeat at frame 0044 and frame 0082 so soon after each other. However, that is more high-level cleanup and for this exercise, it is fine to just reuse the same standing pose.
The standing pose is now keyframed on frame 0044 and at the end at frame 0082. Next, let's clean up Sitting Pose at frame 0000.
Cleaning up Sitting Pose
Currently, the sitting pose doesn't look natural, and she is in an awkward pose. In this section, we will clean up the sitting pose so that it feels natural and looks appealing.
If you scrub to frame 0000, you'll see that our Sitting Pose needs a lot of work, as shown in the following screenshot:
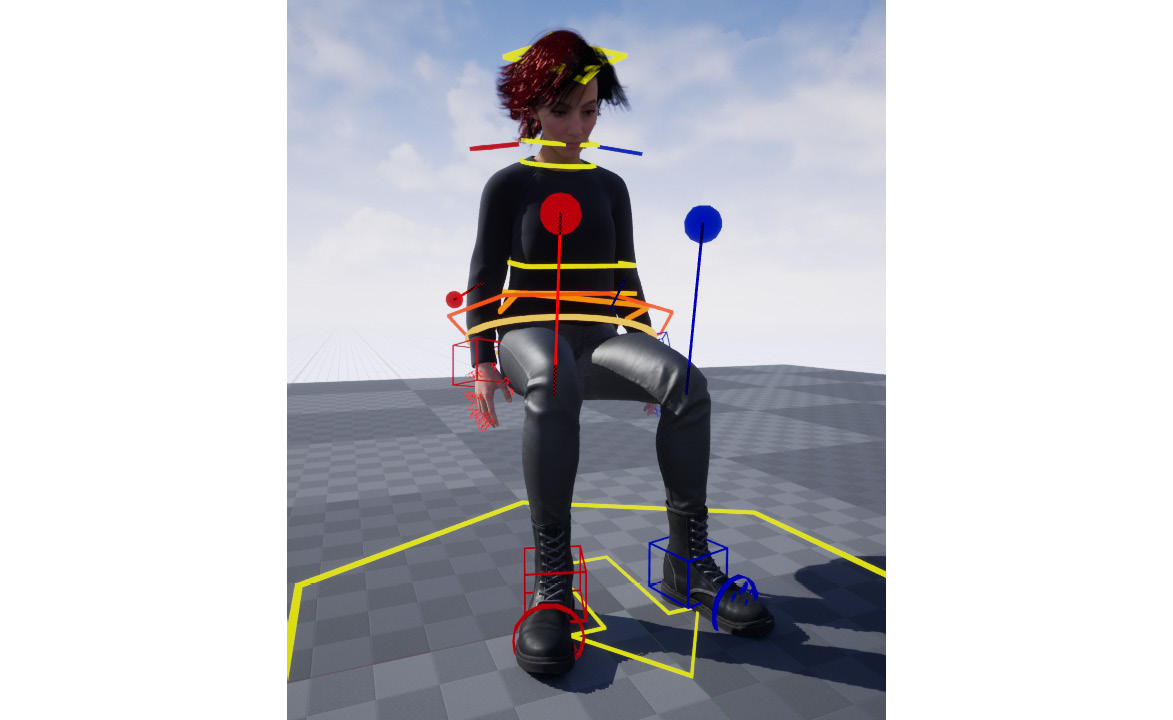
Figure 19.26 – Current bad sitting pose
Follow these steps to clean it up:
- As shown in Figure 19.22, set a keyframe on all the Additive controllers at frame 0000 to anchor in a keyframe.
- Now that all the Additive controllers have a keyframe at frame 0000, we can adjust the pose to something better.
Here, using the controllers in the Viewport, I moved her hands onto her legs and positioned her fingers naturally. I moved her head up more and widened her knees so that they line up with her feet better in the sitting position with their pole vector.
Remember to add a keyframe to the Additive set of controllers as you do this so that you don't lose your changes since Automatic Keyframe is off. The result should look similar to the following:

Figure 19.27 – Cleaned sitting pose
Some Help Needed?
If you are having some trouble, or want to save time, we also provide this pose in this chapter's UE project file under Content | ControlRig | Poses. It's called PoseA_Sit_Idle_tutor. You can load this premade pose if you want to save some time.
- If you decide to keep the pose you created, save it to the Pose library under Content | ControlRig | Poses. Open Poses in the Animation window. Click Create Pose, name it PoseA_Sit_Idle, and click Create Asset, as shown in Figure 19.25.
With that, we've cleaned up the Sitting Idle pose on the first frame. However, if you play back the animation now or scrub the timeline, you'll see that there's still a problem – her hands go through her legs as she gets up.
Let's fix that with the Snapper tool, which can be found in the Animation window.
Fixing the hands with the Snapper tool
The Snapper tool can be found in the Animation window to the right of the Poses tool. With the Snapper tool, you can make one object follow another while it bakes them into a separate keyframe animation. This is typically used if you just want one object to follow another temporarily and you don't want to create parent/child rigging just for that.
For example, let's say that we want a character to pick up a ball and then put it down. We can make the ball follow the hand, from the exact frame it picks it up to the exact frame it puts it down.
You can also use the Snapper tool to keep something in the same place by making it follow the world instead of another object. It will keep that object in the same spot in the world space during the snapped frames.
This is helpful if, say, an object is the child of another. The parent is moving, but we want to keep the child in the same spot for a certain number of frames. It's also really useful to get rid of foot sliding issues or to keep a hand on a fence while the character jumps over it.
In our case, I want to use the Snapper tool to keep the character's hands on her legs for a few frames in the beginning, as she stands up. We want her hands to follow her upper legs in this case. Unfortunately, the leg IK controllers don't track the upper legs. They track the feet; the pole vectors don't keep track of rotation – they only keep track of the position.
So, we need our upper leg FK controllers for the hands to track the upper legs accurately. We have been working with IK on the arms and legs. Furthermore, the IK and FK controllers are completely out of sync now since we made lots of changes to the animation of the IK controllers. Simply switching them to FK won't work.
Luckily, there's a workaround to get the IK and FK controllers' animations back in sync. Then, we can switch to FK or IK without losing our animation. Follow these steps:
- Bake the MetaHuman Control Rig animation back on the skeleton as a separate animation with all the edits and cleanup we've done so far.
- Bring that back into a fresh sequence.
- Bake this new skeletal animation back on the MetaHuman Control Rig controllers. At this point, it will bake both the IK and FK controllers' animations according to the bone positions of the skeletal animation and the FK and IK will both be in sync again.
- Now, we can switch to either FK or IK on the arms and legs and the animation will be the same on both again.
Now, let's do what we've just outlined. You have already performed all these actions separately previously, but the following is a brief reminder of the steps.
- Right-click on Body in the TRACK window and select Bake Animation Sequence. Name it Stand_up_meta_cl_stage01 and save to the Content | MoCap_From_Mixamo | MoCap folder. Click on Export To Animation with the default settings, as shown in the following screenshot:
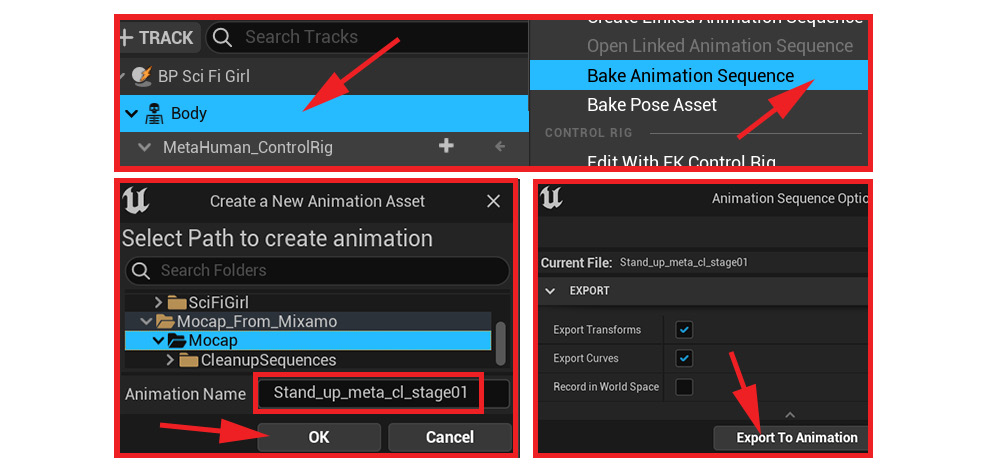
Figure 19.28 – Bake Animation Sequence
- Now, create another new Level Sequence by selecting Cinematics | Add Level Sequence. Save it as StandUpCleanup_Stage2 in the CleanupSequences folder. Open this sequence and drag the BP_SciFiGirl blueprint into it from the Content Drawer interface, as shown in the following screenshot:
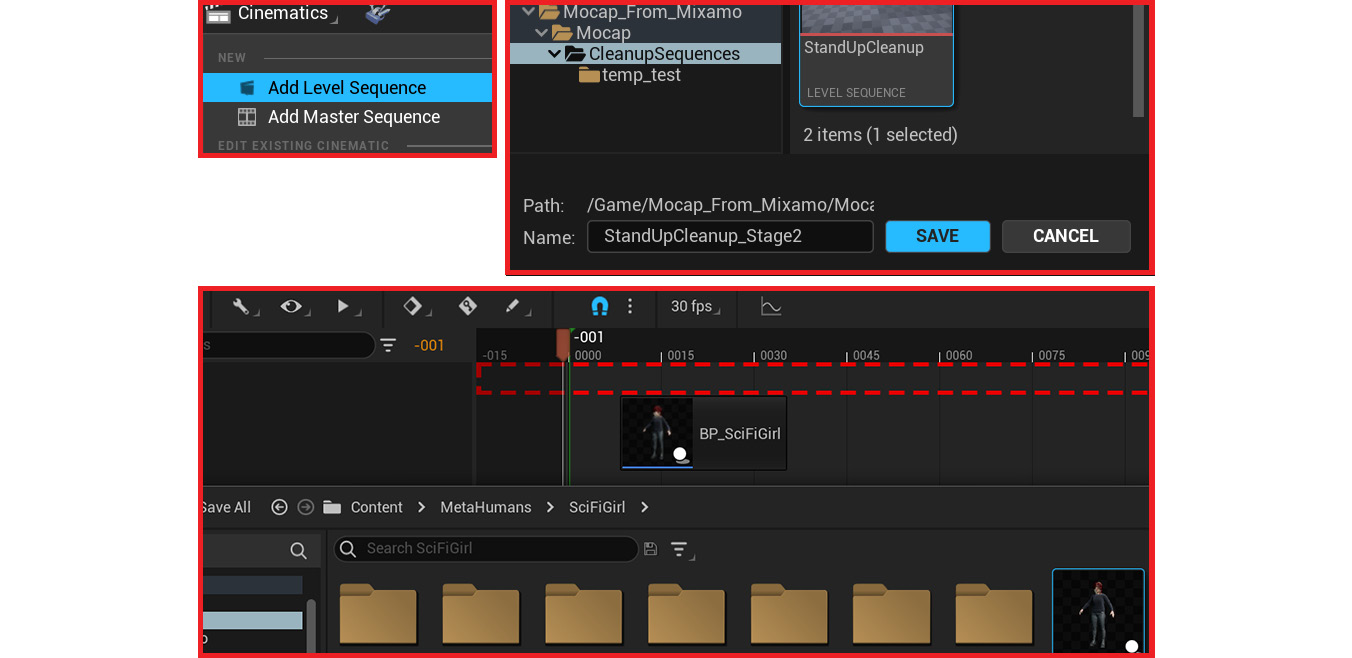
Figure 19.29 – New Level Sequence
- Delete the MetaHuman_ControlRig track under the Body track in the TRACK window by selecting the track and pressing Delete on your keyboard so it that doesn't override the skeletal animation. Click on + Track on the Body track, select Animation, and pick Stand_up_meta_cl_stage01, as shown in the following screenshot:

Figure 19.30 – Adding the skeletal animation track
- Right-click on the Body track and select Bake To Control Rig | MetaHuman_CotrolRig. Make sure that the REDUCE KEYS box is unchecked and press Bake To Control Rig, as shown in the following screenshot:
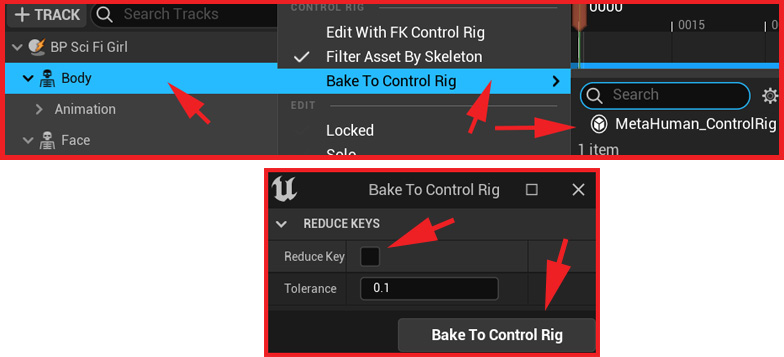
Figure 19.31 – Bake to Control Rig
Now, the FK and IK controllers both have the same animations and are back in sync. We can switch them to what we need them to be for the next part of the MoCap cleanup.
- Since we're not on an Additive layer anymore, turn Automatic keyframe on. Expand the global_ctrl controller in the TRACK window. Delete all the keyframes on the IK/FK switch channels and ShowBodyControl, apart from the ones on frame 0000. Check the box for arms to IK and uncheck the box for legs to FK, as shown in the following screenshot:
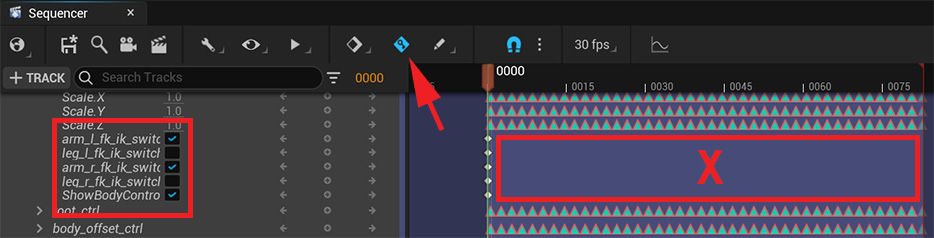
Figure 19.32 – Switching arms to IK and legs to FK
Next, let's use the Snapper tool.
- Open the Snapper tool by going to the Animation window to the right of the Poses tool, as shown in the following screenshot:

Figure 19.33 – The Snapper tool
- Select the left-hand IK controller (hand_l_ik_ctrl) then left-click on the gray box under Children in the Control Rig Snapper window, as shown in the preceding screenshot.
The left-hand IK controller (hand_l_ik_ctrl) is now set up as the child and it will follow what we set in the Parent field, in the Control Rig Snapper window. If you leave it set to World, it will bake the left-hand IK controller to stay in the same spot in the world.
- Select the left thigh FK controller (thigh_l_fk_ctrl) then left-click on the gray box under Parent in the Control Rig Snapper window, as shown in the preceding screenshot.
The left thigh FK controller is now set up as the parent of the left-hand IK controller and the hand will follow the thigh during the frame range that we will set up next.
We want the left hand to follow the left thigh from frame 0000 to frame 0031. Let's do this now.
- Scrub to frame 0000 in the Sequencer timeline and click on the gray box around the first numbers field on the left. This will set the start of Snapper frame range to frame 0000. Now, scrub to frame 0031 and click on the gray box around the second numbers field on the right. This will set the end of Snapper frame range to frame 0031, as shown in Figure 19.33.
- Check the Keep Offset box; otherwise, the Snapper tool will snap the left-hand IK controller's pivot to the thigh FK controller's pivot so that her hand will end up in her leg during the snap. We want to keep the same offset that we have now on frame 0000 when the range starts, as shown in Figure 19.33.
- Check the Snap Position and Snap Rotation boxes, but keep Snap Scale off. It's not needed in this case. Then, click Snap Animation, as shown in Figure 19.33.
The left hand will now follow the leg exactly, from frame 0000 to frame 0031.
Now, if you scrub the timeline, you will see that the hand follows the thigh well. However, when we get to frame 0032, there's a sudden snap in the hand controller. The IK hand controller is now in a very different position at frame 0031 than it was before we used the Snapper tool. The next frame at 0032 is still the original animation.
To smooth this transition out from the new IK hand controller position at frame 0031 to the original animation afterward, we will simply delete some keyframes to aid the transition and let the animation curves take care of it. We generally try to delete as few keyframes as we can in cases like this, to keep as much of the MoCap data as possible.
- In Sequencer, box select and delete all the keyframes between 0032 and 0042 on the hand_l_ik_ctrl controller, as shown in Figure 19.34.
The snap in the animation is now gone but when you scrub to frame 0037, the elbow might be overextending and locking out. This doesn't look very good. Let's fix that.
- With Automatic keyframe still on, in the Viewport, move the hand up and position it. Then, set an in-between keyframe to help the transition, as shown in the following screenshot. An in-between keyframe is a regular keyframe, but we call it an in-between keyframe since it's put in-between to help transition between two main keyframes or poses:
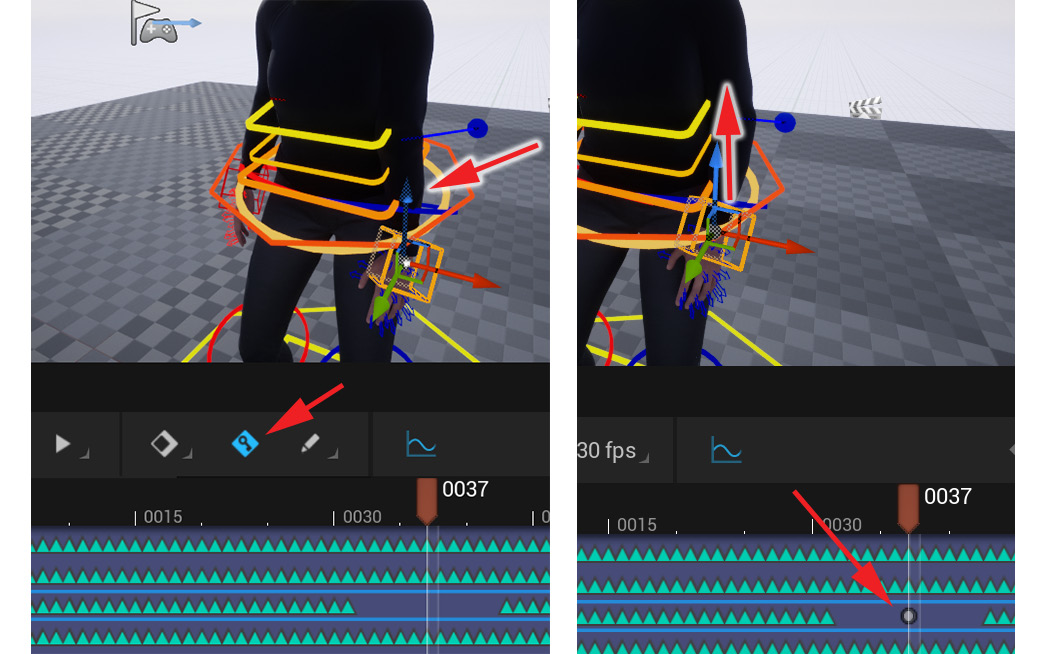
Figure 19.34 – Setting an in-between keyframe to aid the transition
To further help the transition, let's edit the animation curves. Since the animation is baked, it probably has linear curves that don't normally flow very well in transitions like this.
- Select the hand_l_ik_ctrl controller and open the Sequence Curve Editor window. Left-click, drag, and box select all the keys around the transition and set the Curve Handles type to Auto, as shown in the following screenshot. Afterward, if you want to, you can clean up the other curves more by adjusting the handles on a channel-by-channel basis for position and rotation (XYZ):
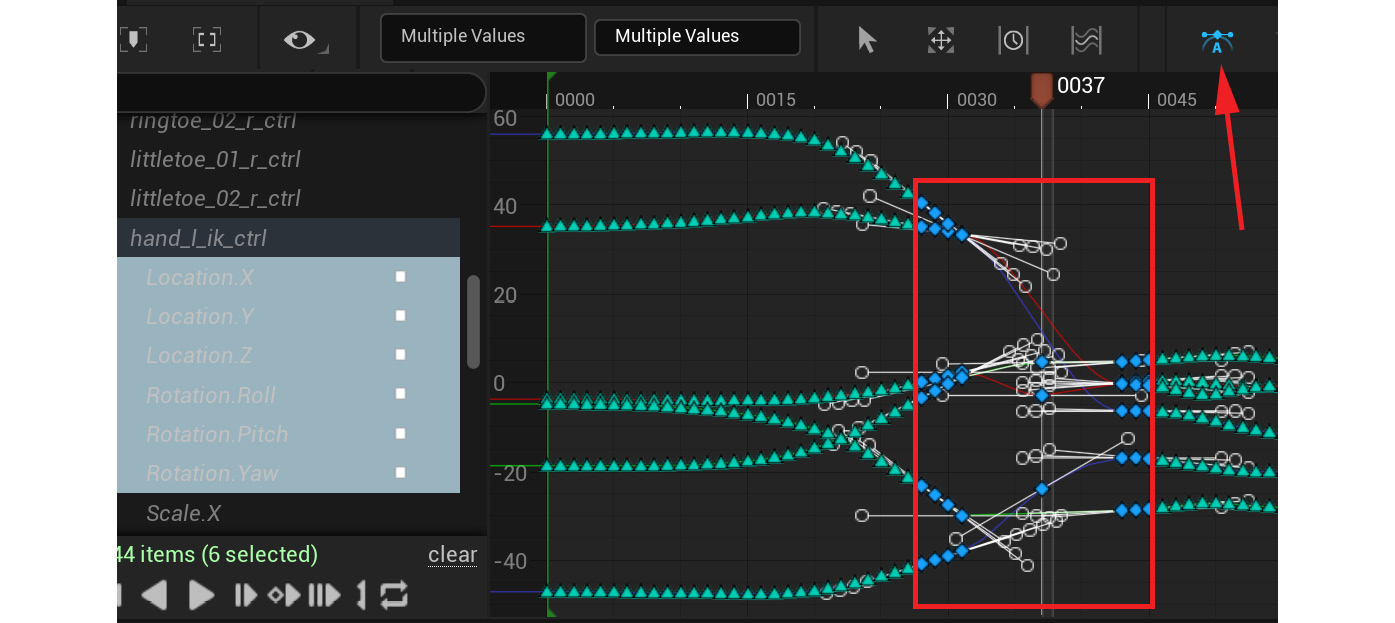
Figure 19.35 – Setting the animation curves to Auto
Another issue you may notice is that the character's fingers are clipping her legs as she gets up. This is because there's an animation on the fingers as they go from the pose of the fingers on the leg to the pose of the fingers while standing, as shown in the following screenshot:
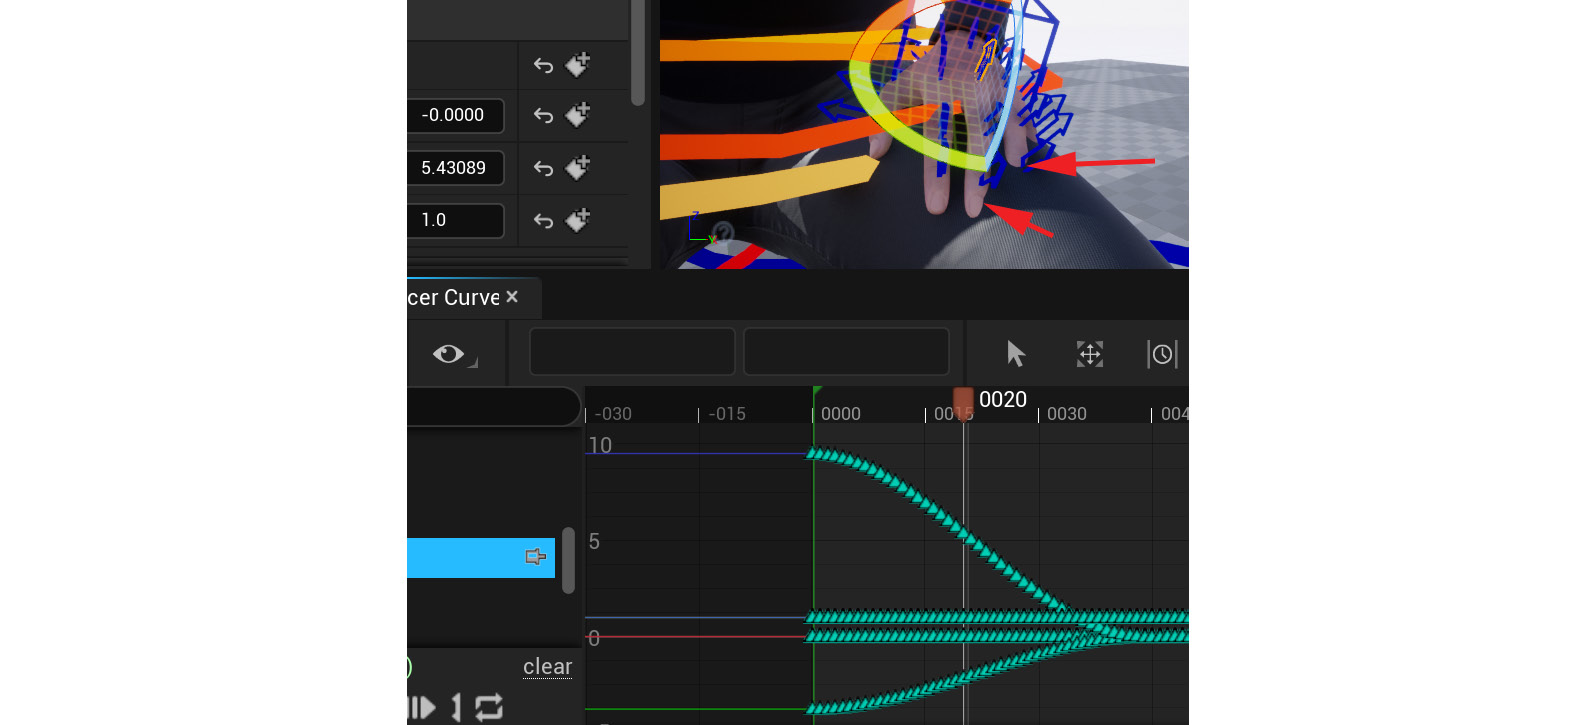
Figure 19.36 – Fingers clipping
We want the character's fingers to stay in the same position until she moves them off her legs at around frame 0032. This will stop them from clipping the legs while her hands are on them.
- In Sequencer, box select all the keys on the left-hand finger controllers, apart from the first and last frame, and delete them by pressing Delete on your keyboard, as shown in the following screenshot:
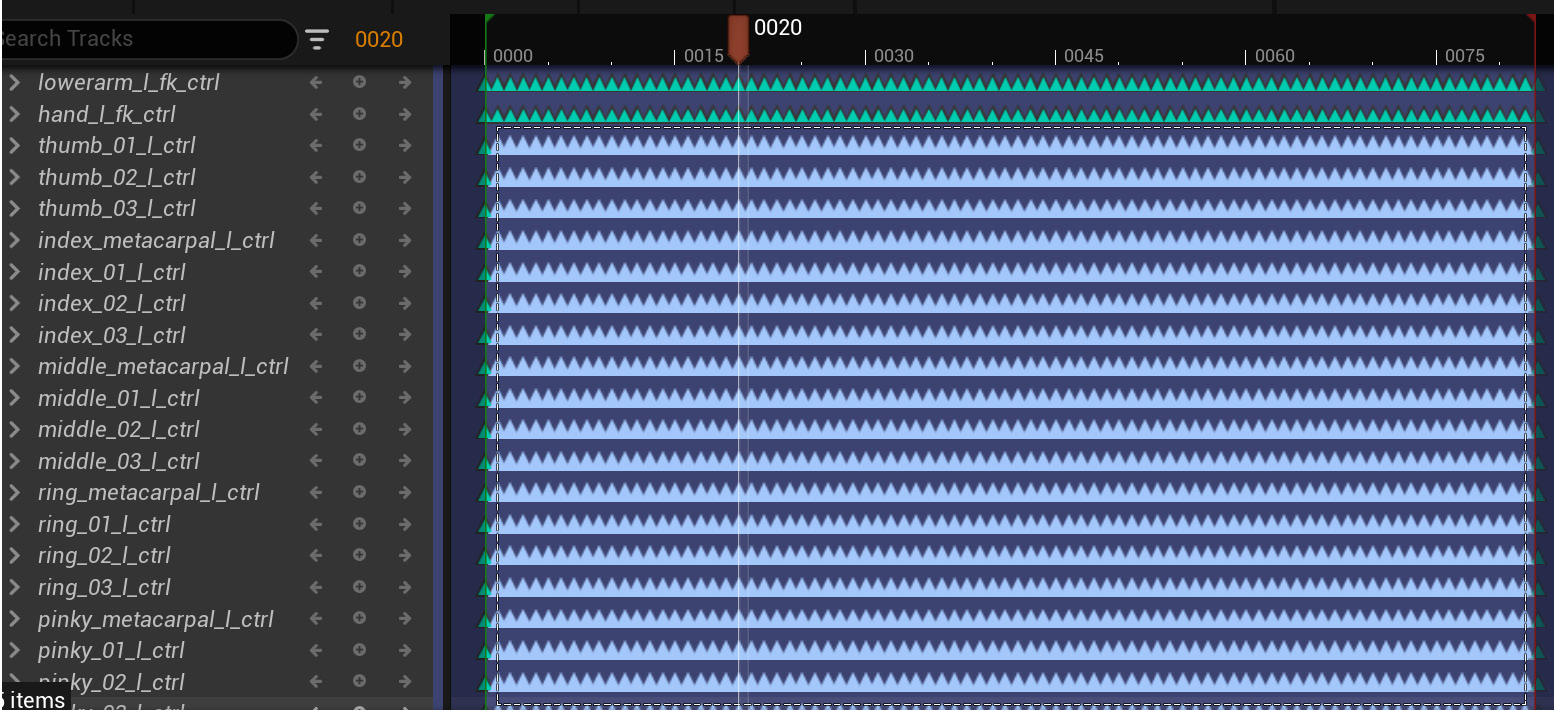
Figure 19.37 – Deleting the finger controller keyframes
- Scrub to frame 0000. In Sequencer, box select all the keys on the left-hand finger controllers, on frame 0000 (that you did not delete in Step 19). Press Ctrl + C on your keyboard to copy them, then scrub to frame 0032 and press Ctrl + V on your keyboard to paste them on that frame, as shown in the following screenshot:
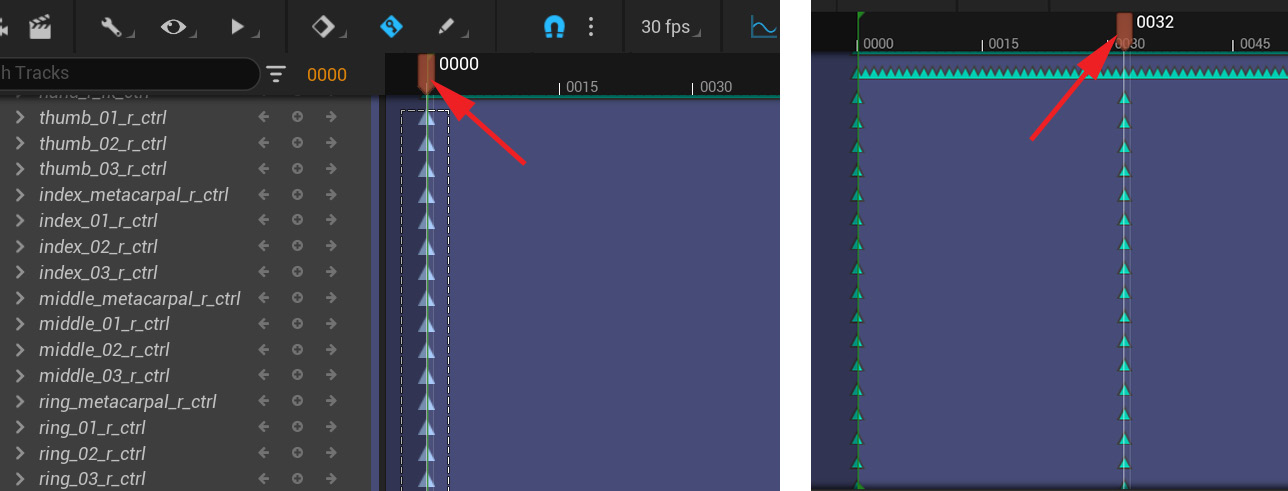
Figure 19.38 – Copying and pasting the finger controller keyframes from frame 0 to frame 32
The fingers should now stay in the same position from frame 0000 to frame 0032.
Follow the same process with the Snapper tool to make the right hand follow the right thigh. However, there are some small differences and at the time of writing this book, there seems to be a bug in the early access version of UE5 concerning the Snapper tool, the right hand IK controller, and the left foot IK controller. If the same issue still exists when you're going through this chapter on your version of UE5, here is the fix.
When you use the Snapper tool on the right hand and right foot IK controllers, they may come out flipped in the opposite direction, as shown at the top of the following screenshot:
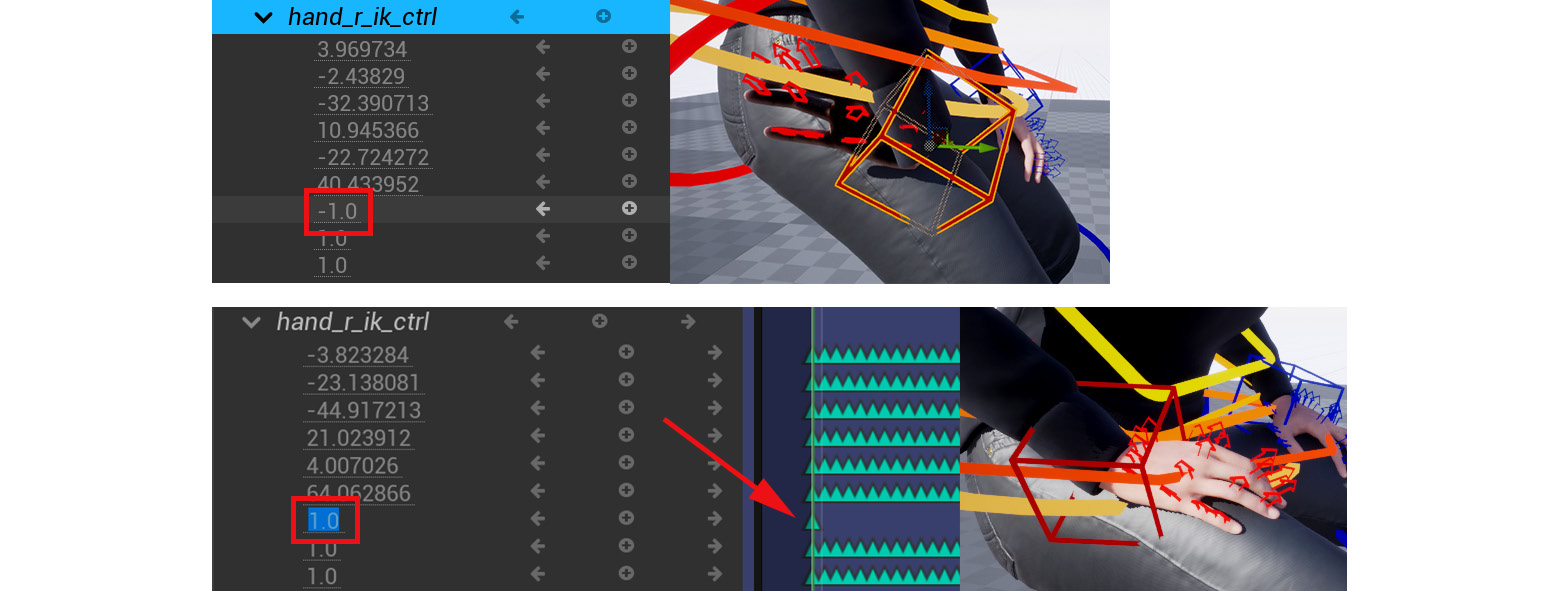
Figure 19.39 – Snapper bug on the L and R IK controllers
This is because the Snapper tool seems to bake a -1.0 X scale value onto the controller's X scale channel. Delete these -1.0 keys on the X scale channel and replace them with a +1.0 value and add a keyframe. This will fix the hand or foot, as shown at the bottom of the preceding screenshot.
Also, for the right hand to follow the right thigh, I found that I needed two keyframes to correct the transition from the snapped frames to the original, as shown in the following screenshot:
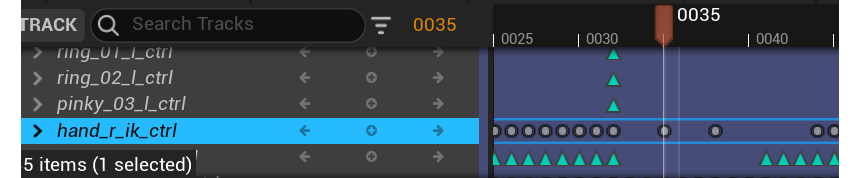
Figure 19.40 – The right hand IK controller snapped as it needed two in-between keyframes
Once you've finished making the right hand follow the right thigh at the beginning of the Stand Up animation and you're happy with your final animation, it's time to bake it to its animation asset.
- Right-click on Body in the TRACK window and select Bake Animation Sequence. Save it as Stand_up_meta_cleaned_final in the Content | MoCap_From_Mixamo | MoCap folder, as shown in the following screenshot:
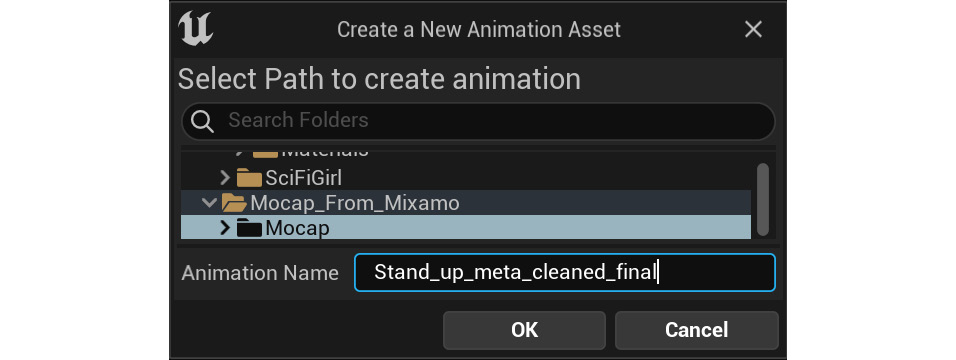
Figure 19.41 – Baking the final animation sequence
For those that want to explore MoCap cleanup in UE5 further, we have provided bonus online material on how to clean up the other four MoCap animations in this set. This will broaden your knowledge on the subject and teach you a few extra tricks of the trade on how to effectively clean up MoCap animation without losing too much of the core underlying MoCap data. This bonus online content can be found at https://github.com/PacktPublishing/Unreal-Engine-5-Character-Creation-Animation-and-Cinematics/tree/main/BonusMaterial.
In the UE project files that are provided with this chapter, I have included the cleaned-up MoCap files so that they can be used in the next chapter, including Stand Up, which we cleaned up in this chapter. You can find it in the accompanying UE project by going to Content | MoCap_From_Mixamo | MoCap | CleanedMoCap_Final. The final UE project can be downloaded from https://github.com/PacktPublishing/Unreal-Engine-5-Character-Creation-Animation-and-Cinematics/tree/main/FullFinalUE5Project.
Summary
In this chapter, we covered how to work with MoCap animation on the MetaHuman Control Rig in UE5 Sequencer. We planned what we wanted to achieve, then learned how to bake MoCap animation from the skeleton to the MetaHuman Control Rig. We had a good overview of the MetaHuman Control Rig itself and how to use its controllers. Then, we set up UE so that it's easier to animate within tight spaces by changing the Near Clipping Plane values.
We finished this chapter by cleaning up the Stand Up animation while using the Poses and Snapper tools in the Animation window. This chapter should have provided a good overview of how to edit MoCap in UE5. You should now be able to get the most out of all the free or paid-for MoCap libraries out there, as well as customize these MoCap animations for your own needs.
In the next chapter, we will combine all the assets we created in this book into our final movie scene in Sequencer.