
Chapter 20: Using Sequencer to Construct Your Final Scene
We now come to the end of this book, and I hope you have enjoyed the journey through all the topics with us. In the previous chapters, we created all the custom content for this final scene. All we need to do now is put it all together in our final scene using Sequencer. All our hard work is about to pay off. We will combine the character animations we created together to tell the story and we will work with camera animation and camera cuts in the same scene.
We will also learn to migrate our content from other project files we might have created or used in this book. The final project file is provided with this chapter if you want to study my setup afterwards at https://github.com/PacktPublishing/Unreal-Engine-5-Character-Creation-Animation-and-Cinematics/tree/main/FullFinalUE5Project
In this chapter, we will cover the following topics:
- Importing all the scene assets and positioning them in the scene
- Importing animations onto our characters
- Creating cameras and animating them
- Rendering our final scene
Technical requirements
In this chapter, we will need to work in Unreal Engine (UE) 5. You will need the following to complete this chapter:
- A computer that can run basic 3D animation software.
- You need to have installed UE5. You can download it from https://www.unrealengine.com/en-US/download.
- A basic understanding of how to navigate the UE 3D user interface. If you skipped ahead, this was covered in Chapters 6, Exploring Unreal Engine 5.
- You need to have completed Chapter 17, Creating Three Simple Animations for the Robot in UE Sequencer, Chapter 18, Importing Motion Capture onto the MetaHuman Control Rig, and Chapter 19, Motion Capture Editing and Cleanup Using Control Rig and Sequencer.
Importing all the scene assets and positioning them in the scene
If you used different UE projects files and folders to create the content in this book, we now need to combine them into one project for our final scene. It all needs to be available to us in a single project in UE. Luckily, UE makes that process easy with the Migrate tool. Even if you created all the content in this book in one UE project, it is still good to know how to migrate content between UE projects.
Migrating UE content between projects
We are going to start by creating a new project in UE5 for this last scene. If you already have everything in the same project, you can use this as a reference in the future, whenever you need to combine content from different projects into one.
For the purposes of this exercise, we'll migrate the content that we created in Chapter 19, Motion Capture Editing and Cleanup Using Control Rig and Sequencer, first:
- Create a new UE5 project by opening UE5, then choose Games and Blank. Call it FinalSceneChapter20, as shown in Figure 20.1. Click CREATE and the new project will open in UE5:
We use the Games profile instead of the Film/Video profile since the Games profile gives a better default blank scene to integrate our varied custom content.
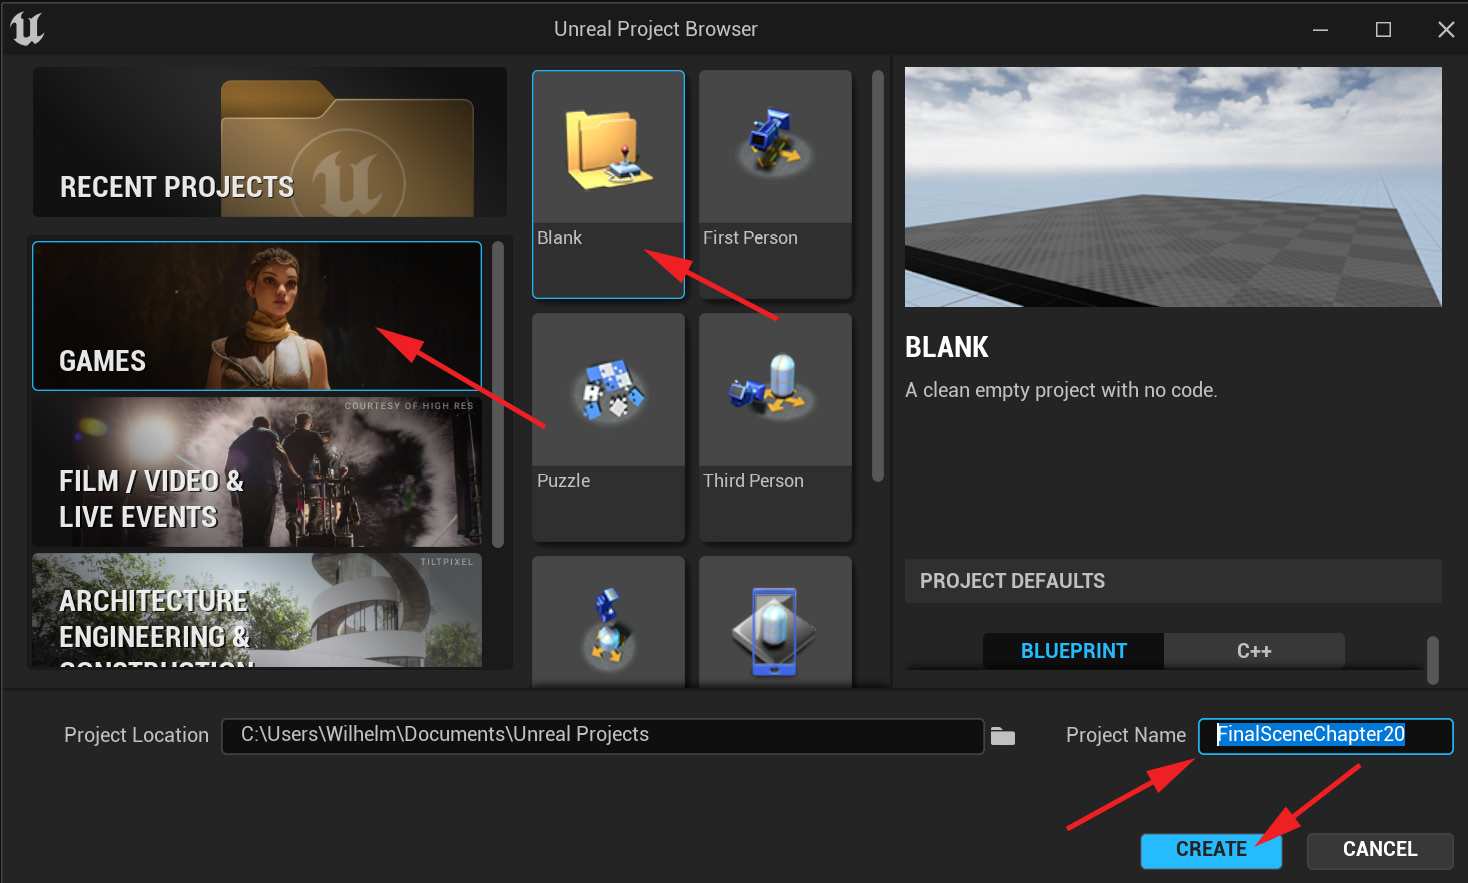
Figure 20.1 – Creating a new project for the final scene
- With the new project for our final scene created, we can now close it again and then open the project we used for Chapter 19, Motion Capture Editing and Cleanup Using Control Rig and Sequencer.
- Once that project is open, open Content Drawer and right-click on the Content parent folder. Then, select Migrate…, as shown in Figure 20.2:
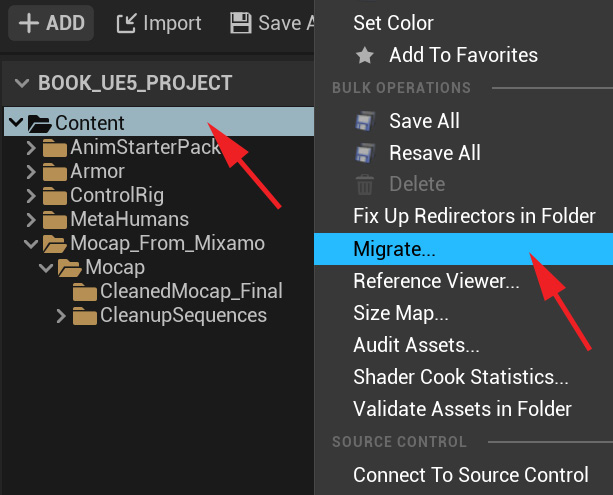
Figure 20.2 – Migrating UE assets
- Once you select Migrate… in Step 3, a window will open where you can check the boxes for the folders and files you want to migrate, as shown in Figure 20.3:
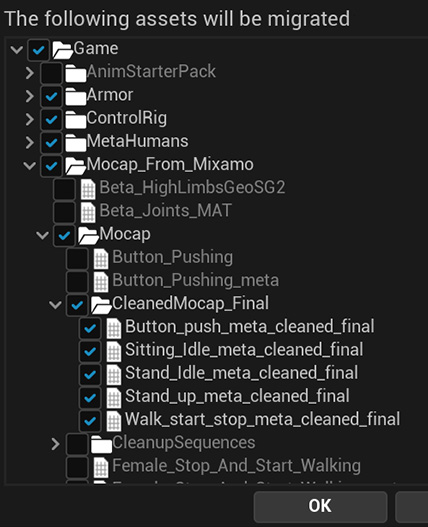
Figure 20.3 – Choosing the asset folders to migrate
We don't need AnimStarterPack since that was just for demonstration purposes. We need the Armor, ControlRig, and MetaHuman content folders since they are needed for our female MetaHuman character in our final scene. However, in the Mocap_From_Maximo folder, we only needed the Mocap and CleanedMocap_Final folders and the final-stage cleaned Mocap animations for our scene, so I unchecked the rest.
Note
Generally, it's better to bring entire folders over so not to miss something that the content is reliant on. We call these dependencies. Say, for example, when we migrate the body Armor folder over, we don't want to leave out the texture and shader files. If we don't bring all the dependencies over, it might not load correctly in the new project and cause errors. Generally speaking, if you're in doubt, it's better to migrate more than you need, than less than you need for the assets to function correctly, with all its dependencies intact..
- Once you have selected what you want to migrate, click OK, and you will then be asked to navigate to the Content folder of the project you want to migrate these assets to. Navigate to the FinalSceneChapter20 project Content folder and click Select Folder at the bottom of the window, as shown in Figure 20.4:
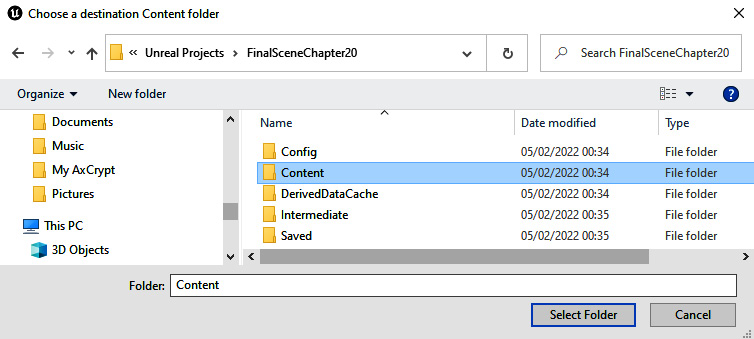
Figure 20.4 – Target Content folder selected
These selected assets will now be moved to the new project.
- You can now close the project you're migrating from and open the FinalSceneChapter20 project and then the project's Content Drawer. You'll now see those assets in the new project for the final scene, as shown in Figure 20.5:
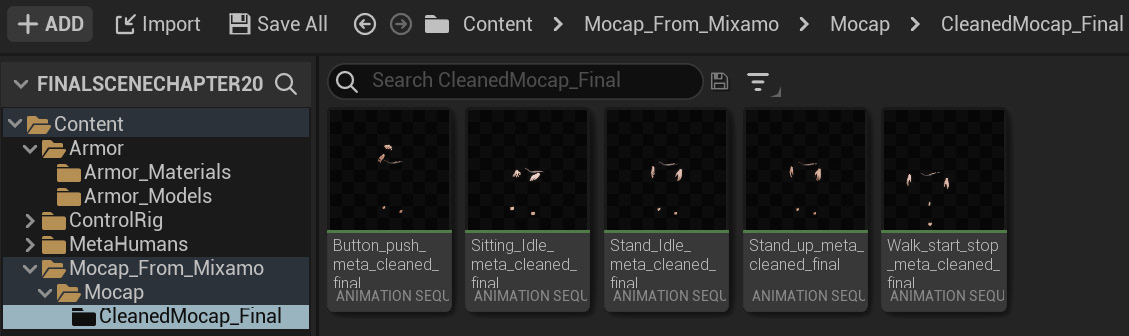
Figure 20.5 – Content migrated to a new project for the final scene
- You can now use the same process to migrate all the other content needed for the final scene. This will include the Robot Drone and its animations, the Alien Plant and its animations, and the environment set and its effects. If you forget something, you can add it later as we go.
You have now learned how to migrate and move content between projects. Next, we can set up the body armor of the female character to follow her body during the scene.
Attaching the body armor to the MetaHuman Rig
Our custom body armor is a nice extra detail on our MetaHuman character. They have been created so that when they're perfectly aligned to her body and limbs, their pivots are at the origin of the scene at 0, 0, 0 position and rotation. Unfortunately, in my early access version of UE5 there's no way that I could find to maintain the default offset once you attach them.
When you attach items to the MetaHuman body parts they snap the pivot of the attached item to the pivot of the bone you're attaching it to. This may lead to them appearing in the wrong looking position once you attach them. Maybe there will be an easier way in the future, but I found a workaround that we can use in the meanwhile.
It is also better to do this right in the beginning before we load animation onto her. We want her to be in the default position when we attach these items.
Let's attach the armor to her body:
- At the top of the main UE menu, select Cinematics | Add Level Sequence. Name it as FinalScene, as shown in Figure 20.6:
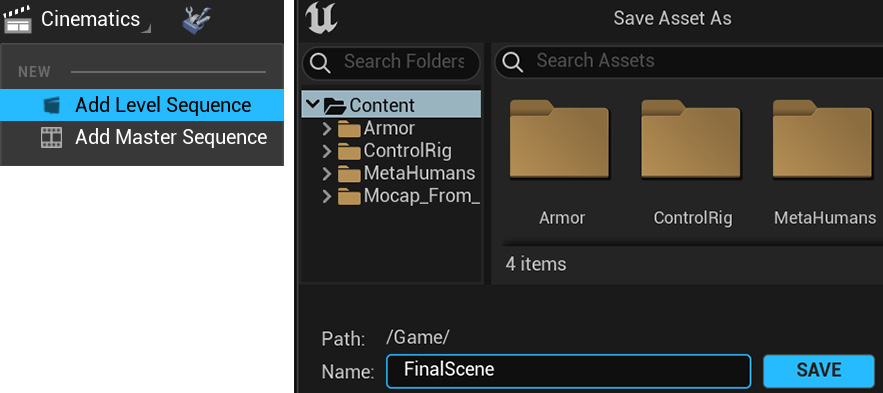
Figure 20.6 – New level sequence for the final scene
- From the Content Drawer, drag BP_SciFiGirl into the Sequencer timeline as shown in Figure 20.7. You might get a plugin error since this is a new project and all the required plugins might not be loaded yet for the MetaHuman setup. If the errors come up, choose Load Plugins, after which UE might ask you to restart UE:
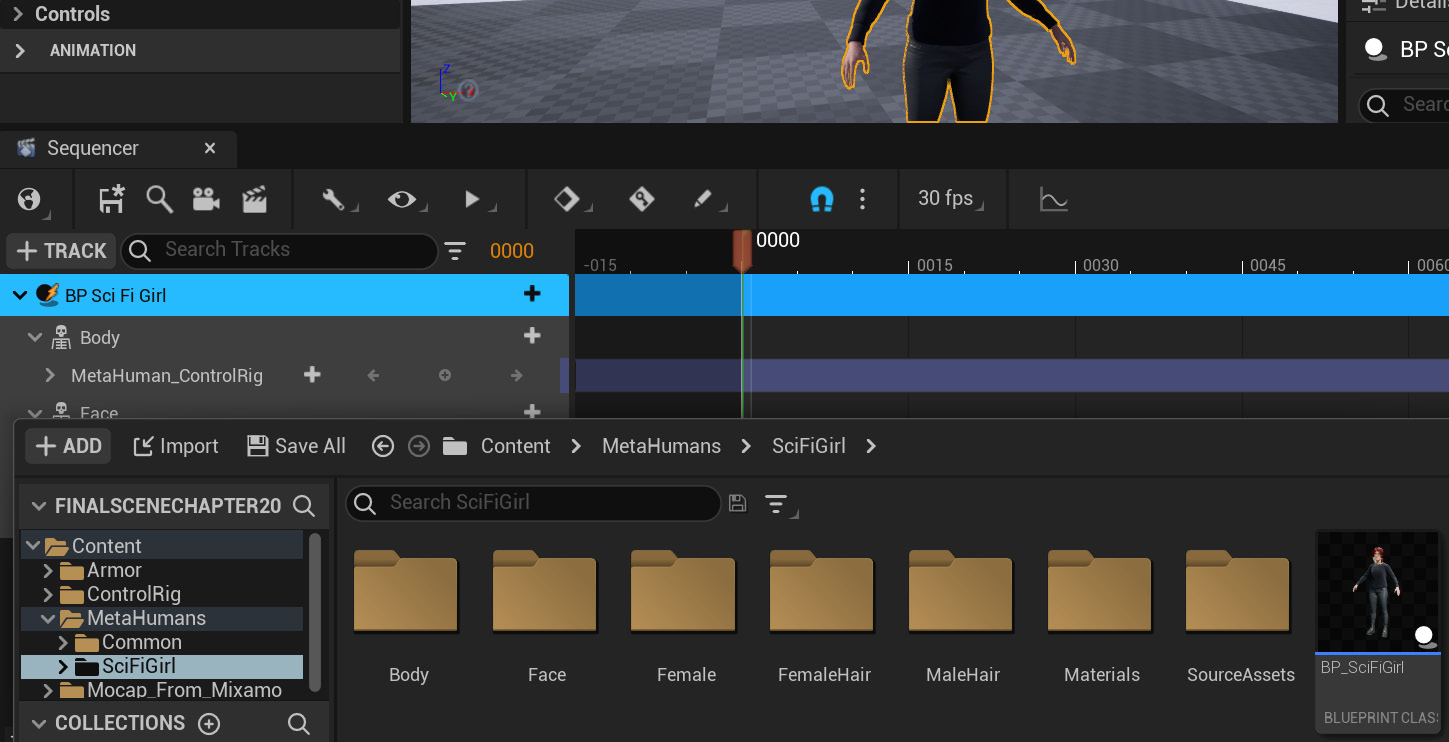
Figure 20.7 – Loading MetaHuman into Sequencer
- If you have the old checker floor as default, select the floor and make sure the location translation is 0,0,0 in the World Outliner since, by default it seems to be 20 cm above the grid.
- If the Animation Mode window for Control Rig on the top left is open, you can switch to Select Mode since it seems to interfere with the regular right click menus, we'll need to align the armor later. You can open it again after by clicking on the dropdown menu at the top of the main UE interface.
- From the Content Drawer also select and drag all 16 the armor static meshes from the Armor_Models folder (Content/MetaHumans/SciFiGirl/Armor) into the Sequencer timeline as shown in Figure 20.8.
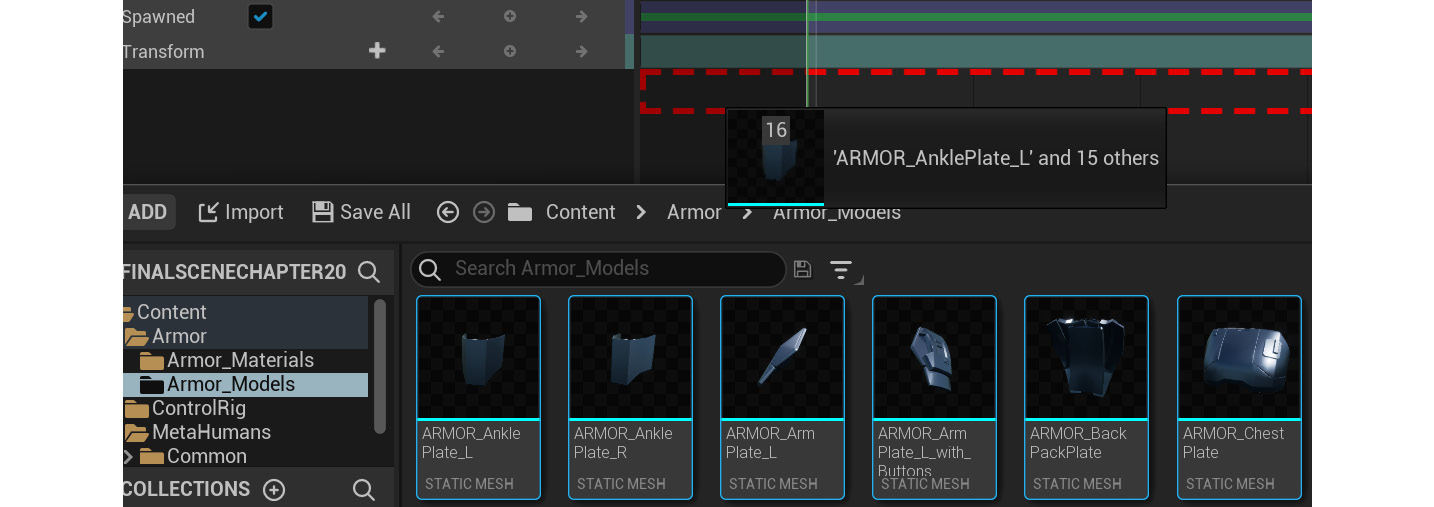
Figure 20.8 – Dragging armor into Sequencer
- In the Sequencer TRACK window, select ARMOR Chest Plate and then click + Track | Attach | BP Sci Fi Girl. Choose Torso in the next pop-up window, and then spine_04 in the next one, as shown in Figure 20.9:
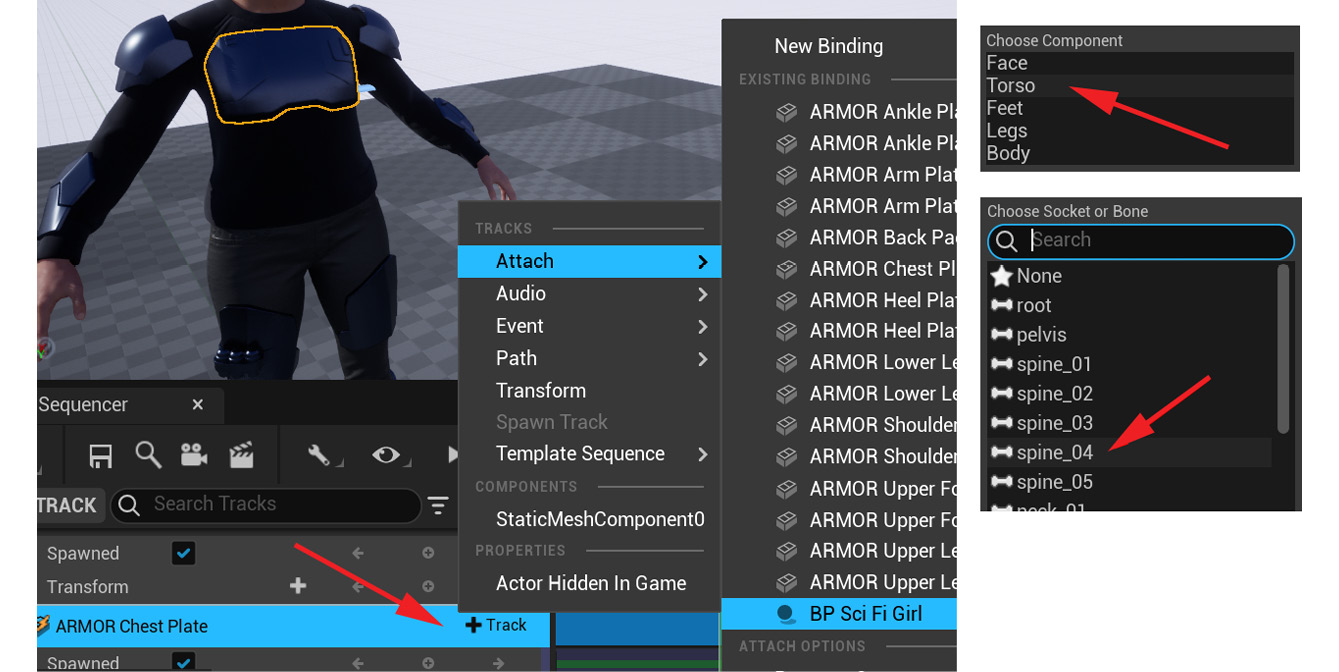
Figure 20.9 – Attaching the Chest Plate armor to the rig
As the Attach track attached the armor to the spine, it now also snapped the pivot of the armor to the pivot of the spine bone, so the chest plate armor is now in the wrong position on the character, as shown in Figure 20.10:
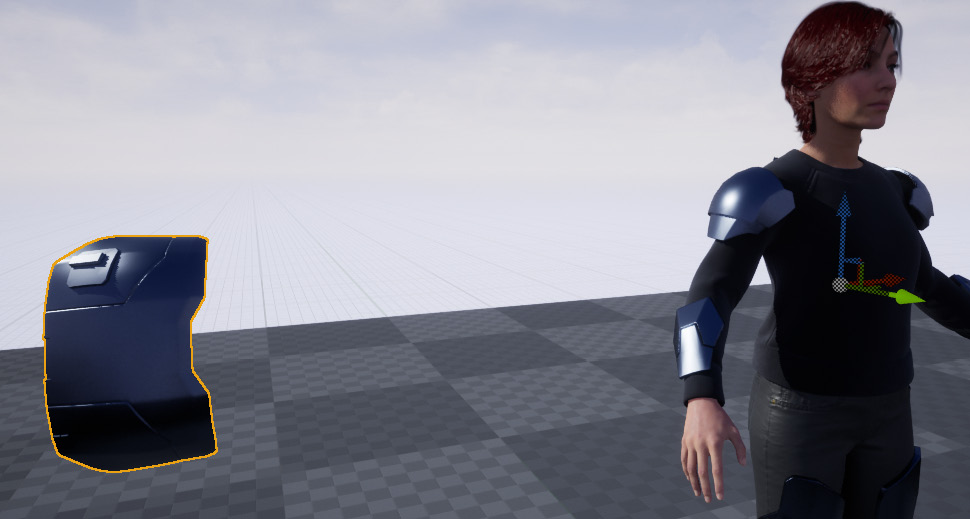
Figure 20.10 – Chest plate armor in the wrong position
Now, let's fix the chest plate armor.
- Right click on the ARMOR Chest Plate in the viewport and a context menu will appear. This is the menu that doesn't always work when the Animation Mode is active, and this is the reason why we switched to Select Mode in Step 4. From this menu, select Transform | Snapping | Align to Floor as shown in Figure 20.11:
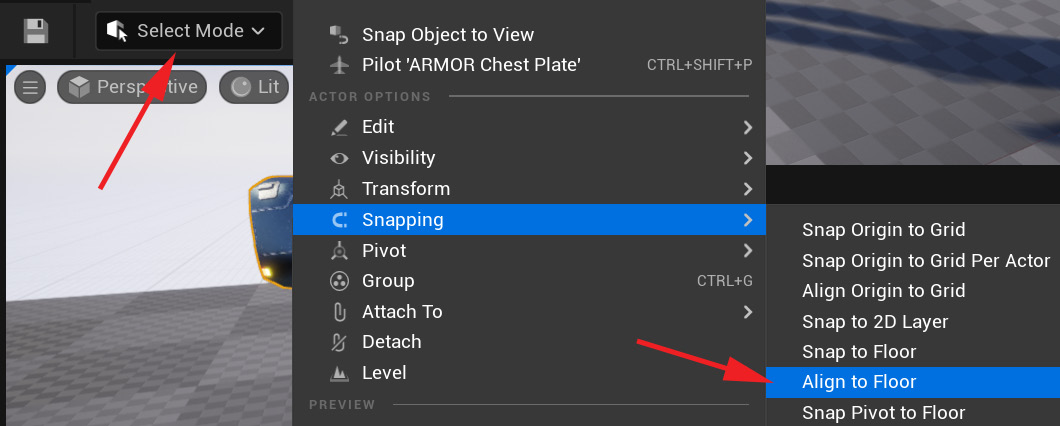
Figure 20.11 – Aligning the armor pivot to the floor again
This aligns the armor pivot to the floor again like the original rotation before it snapped to the bone pivot. However, the position is still off. To get the armor pivot back to the original position at 0, 0, 0 in the world, we'll have to temporarily change it back to World space (its real position in the world) as opposed to Relative space (its position relative to the parent it's a child of, in this case, the spine bone).
We can only do this temporarily since only relative space works well with attached objects in Sequencer.
- With the ARMOR Chest Plate selected, follow the steps below as also shown in Figure 20.12:
- In the World Outliner, click on the Location dropdown and set it to World.
- Then change all the Location values to 0,0,0. After changing them all to 0, the armor's pivot will be back at the World origin at 0,0,0.
- Switch it back to Relative in the location dropdown.
- You will see that the location values change, and are not 0,0,0 anymore.
You now have the accurate relative location values that we can keyframe later in the armor's local Relative space:

Figure 20.12 – Getting the Relative offset position
- On some of these items, including this chest plate, you might have to repeat Step 7, as shown in Figure 20.11, to align this armor's rotation to the floor again to get the Relative offset rotation value.
- Once the chest plate is back in exactly the right place on the body again, you'll know that you've done it right. With ARMOR Chest Plate selected in the TRACK window, create a keyframe on frame 0 on its track with these new relative position and rotation values after you have gone through this process. This will lock in and save these Relative transform values of the armor versus the skeleton bone it's attached to, as shown in Figure 20.13:

Figure 20.13 – Setting the keyframe with the Relative offset
- Repeat this process for all the pieces of armor, with the only difference being the bone you attach it to; for example, the armor plates on the forearms should be attached to the forearm bones, and so on.
- If you make a mistake and attach an armor piece to the wrong bone, you can simply delete the Attach track you created in the TRACK window under that item. Also note that it will only stay attached to the specified bone for the range set on the Attach track in the Sequencer timeline. In our case, make sure to make that range for the whole final scene length so they stay attached for all of it. You do that by left-clicking at the beginning or end line of the range, holding, and dragging it, making it longer or shorter, as shown in Figure 20.14:

Figure 20.14 – Attach range
Along with attaching the armor, we have also now learned how to attach items and props to any part of our MetaHuman or Control Rig character in Sequencer.
Next, let's prepare our other characters and the level for the final scene.
Preparing character and Level Assets
When we skinned and rigged our Alien Plant and Robot Drone, we might not have had the final textures on them inside UE. If not, assign the correct textures by double-clicking on their SKELETAL MESH files in Content Drawer.
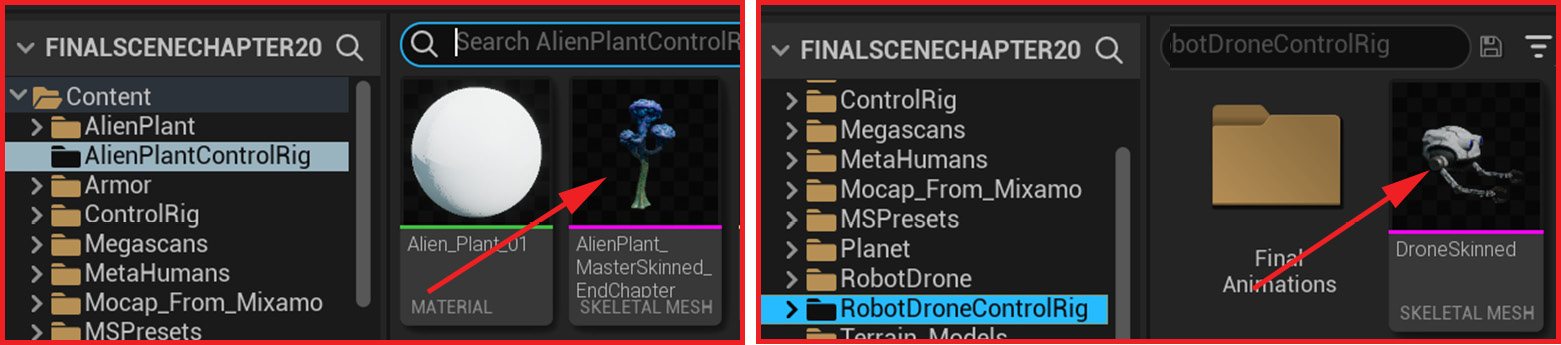
Figure 20.15 – Opening Skeletal Mesh by double-clicking
Once the asset opens, the Asset Details panel should open by default on the left of the interface, instead of the right-hand side where it normally opens.
If you can't see it, in the main UE interface menu, at the top, click on Window | Asset Details to turn the window display back on, as shown in Figure 20.16:
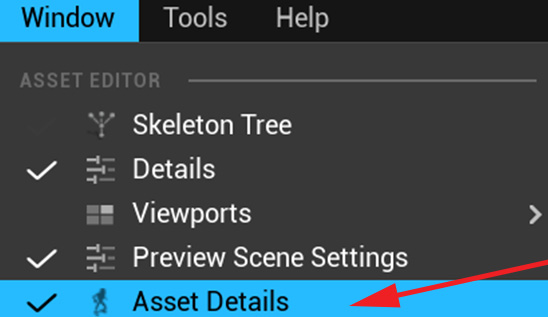
Figure 20.16 – Opening the Asset Details window
In the Asset Details window, under MATERIAL SLOTS, use the dropdown to select the correct final textures for the Alien Plant and Robot Drone, as shown in Figure 20.17:
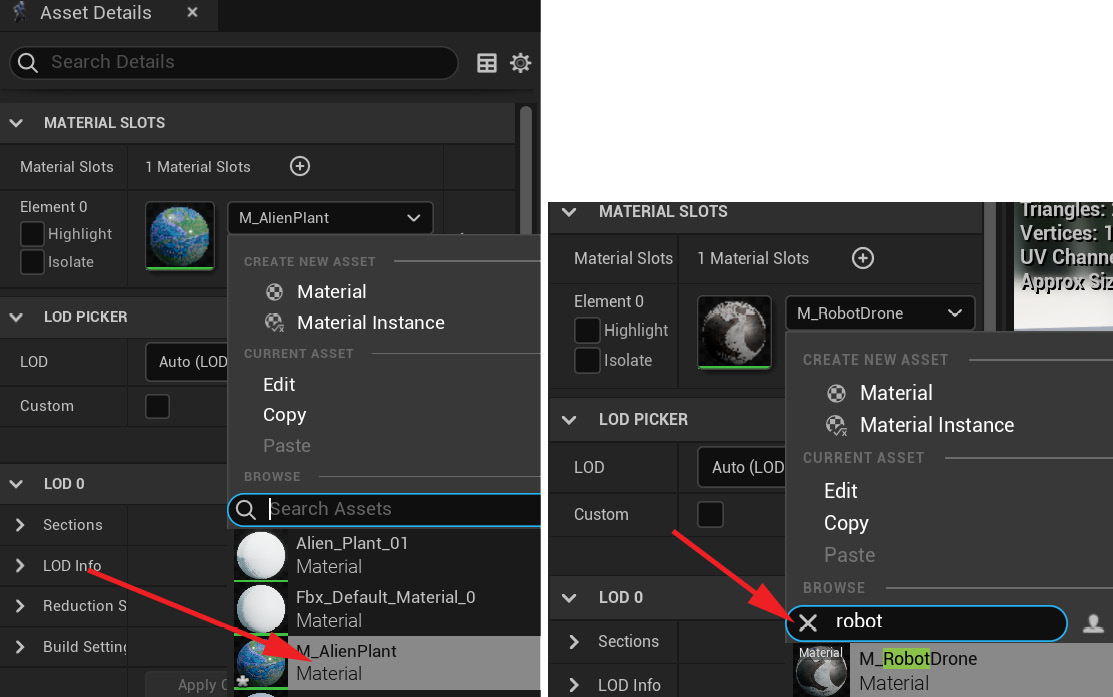
Figure 20.17 – Loading final textures on the Alien Plant and robot characters
Afterward, it might have to calculate the Shaders again, so give it a bit of time to complete the process.
Currently, we have a Level Sequence in Sequencer for our final scene, and then we also have the Level (Virtual 3D movie set) you created at the end of Chapter 9, Let's Build a Virtual 3D Movie Set, and Chapter 10, Adding Lighting and Atmospheric Visual Effects in UE5.
We'll use both these assets in combination. Let's play it safe and make a Duplicate of the Main level with the set, background, and lighting. If we delete the wrong thing, we can then always go back to the original.
To do that, right-click on the Level containing Virtual 3D Movie Set in Content Drawer, select Duplicate, and call it MovieSetFinal, as shown in Figure 20.18:
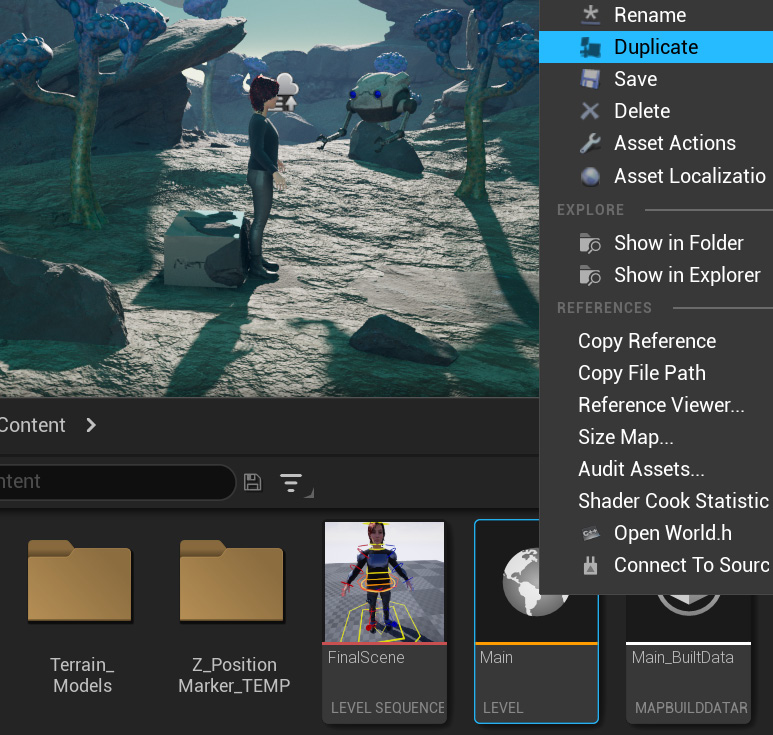
Figure 20.18 – Duplicating the movie set level
Now, open the new duplicate MovieSetFinal level and delete the placeholder MetaHuman and Robot Drone if you have them in there. You do that by selecting them and them in the Level viewport and pressing Delete on the keyboard. (Do not delete them in the Content Drawer, delete them only in the Level itself). Deleting it in the Level viewport will only delete them out of the Level, and your assets will still be in your Content Drawer for when you want to use them again.
We are simply cleaning up the movie set to only have what we want in it. We need to add the skinned Robot Drone and Alien Plant in our final scene later, so they can animate. So, these unskinned placeholder objects are not needed anymore.
You can also delete anything that you don't want on your movie set but be careful to leave all the wonderful backgrounds, environments and lighting you did. I left the Alien Plant static meshes for now as placeholders, so I know where to place my animated ones later, as shown in Figure 20.19:

Figure 20.19 – Just the movie set with the placeholders removed
Save the MovieSetFinal level and everything else at this point by selecting File | Save All in the UE main menu at the top.
Once you have a movie set with only the background environment and lighting, we can combine it with our Level Sequence called FinalScene. This is the one where you attached all the armor to her body in the Attach Body Armor to MetaHuman Rig section of this chapter.
With the MovieSetFinal level you just prepared still open, double-click on the FinalScene Level Sequence in Content Drawer.
She will appear in the level with all her armor as you set it up earlier, as shown in Figure 20.20:
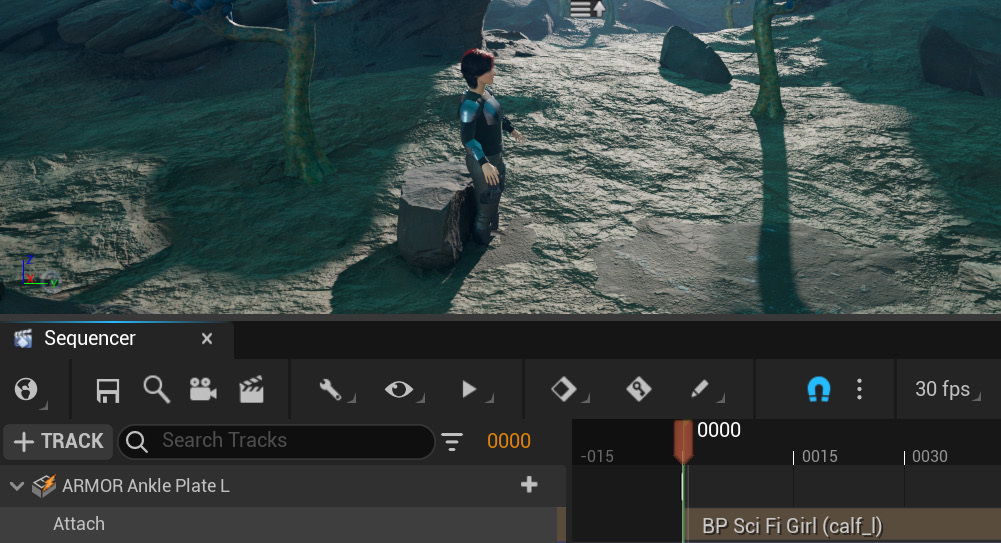
Figure 20.20 – Final scene Sequencer in Level
We have now, in a sense, combined our FinalScene Level Sequence and our MovieSetFinal Level. In fact, it's more like our FinalScene Level Sequence is playing inside the MovieSetFinal Level with it acting as its backdrop or movie set.
Now, from Content Drawer, drag SKELETAL MESH for Robot Drone and Alien Plant into the Sequencer timeline, one after the other. They will then appear in the scene at the origin, just like the MetaHuman with her armor, as shown in Figure 20.21:
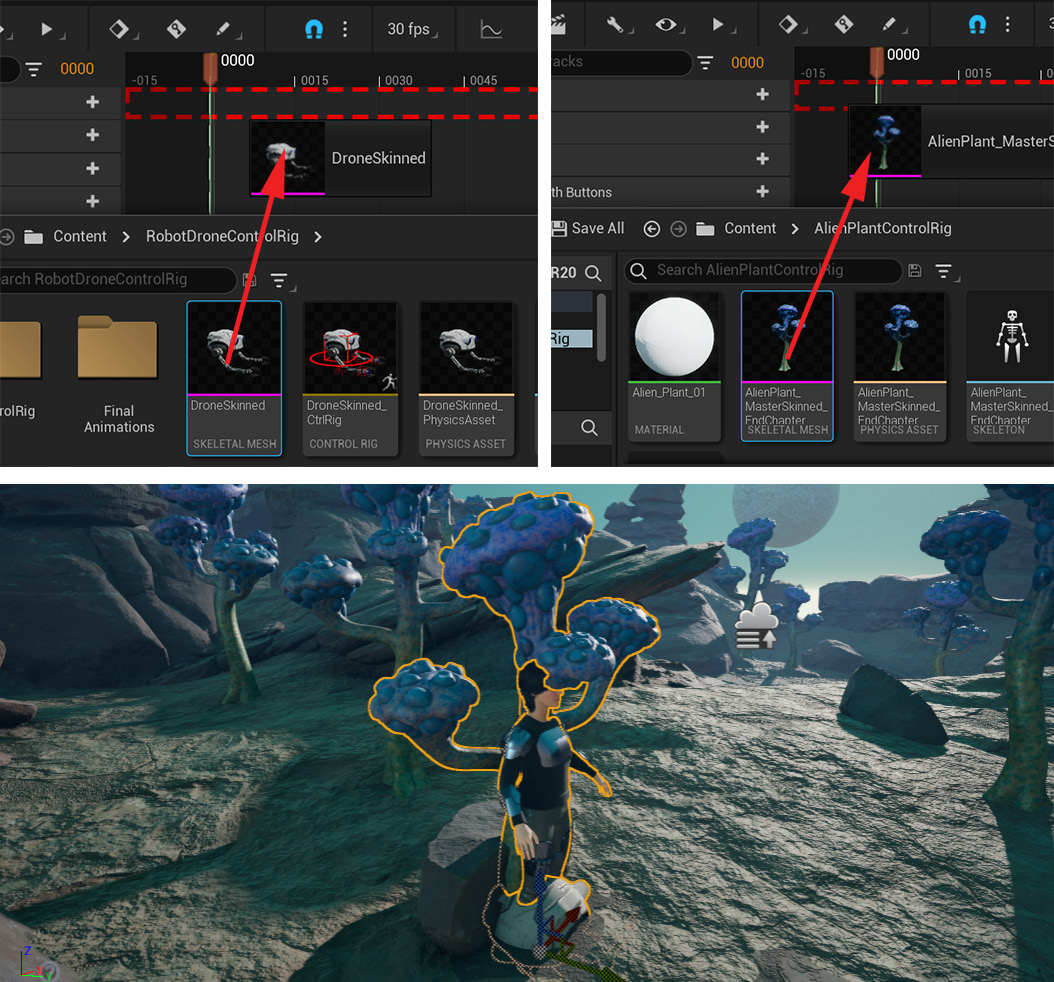
Figure 20.21 – Adding actors to the movie set
Note
Since the Robot Drone and Alien Plant have a simple setup and we prebaked all their animations, we do not need to bring the Control Rig versions of them into this scene. If you do want to create new animations for them in this sequence itself, then you can bring the Control Rig versions in if you choose to. With the MetaHuman's complex setup, it's far easier to just bring the whole blueprint into the sequence to make sure everything loads correctly.
Finally, we just need to change a setting on the character's hair. At the moment, it has Levels of Detail (LODs). LODs are more for games that will display less detail of an object, for example, the number of polygons, depending on how far the game camera is away from it. For our scene, we don't need it, and we don't want to see lower-detail hair if the camera is further away. There's also a bug in the current release of UE5 surrounding hair thickness. This might be fixed in later releases of UE5, but for now, we need to change the default thickness to display it better.
Select the BP Sci Fi Girl MetaHuman Blueprint in the viewport or World Outliner. In the Details window, select the Hair (Inherited) item, then under GROOM, double-click on the box next to Groom Asset, as shown in Figure 20.22:
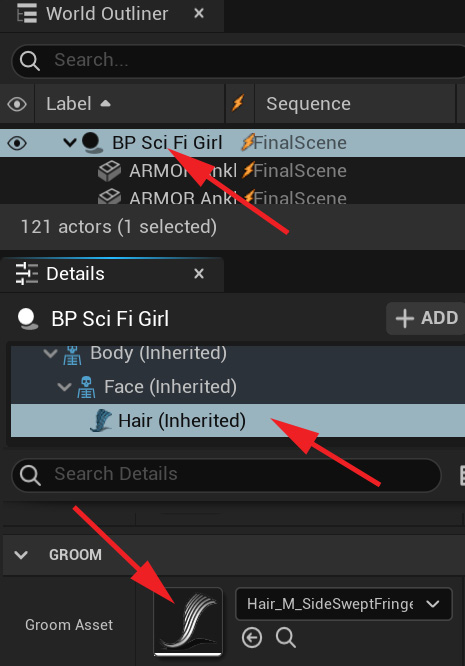
Figure 20.22 – Selecting the Hair item for editing
This will open the hair asset. In the LODS window on the right. Change Thickness Scale to 3.0. Then, delete the other LODs by clicking the X on the right, until only LOD 0 is left. You might have to do that a few times since the next LOD in the sequence renames itself to LOD 1; so if you have four LODs, repeat this three times so only LOD 0 is left, as shown in Figure 20.23:
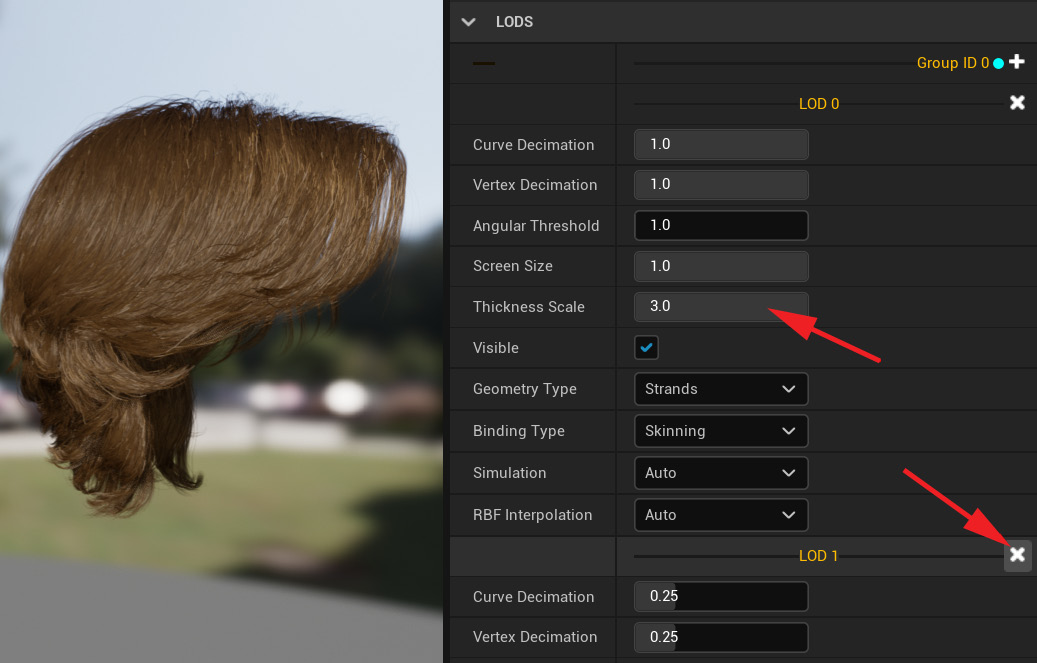
Figure 20.23 – Deleting extra LODs and setting Thickness Scale
We have now loaded and prepared our movie set and added the main actors to it. We are now ready to make our movie. Next, we will load the animations we created onto our characters/actors and bring them to life.
Note
On my current version of UE5, the hair physics tends to do strange things at times in my Sequencer scenes. You can disable the physics simulation by unchecking Enable Simulation under Solver Settings present in the Physics tab, which is to the right of the LOD tab at the top. This problem might be fixed in future updates of UE5.
Importing animations onto our characters
Importing animations onto the skeletal meshes of our characters is the next step in Sequencer. This will add the cleaned Mocap for the human character and the animations we created for the Robot Drone and Alien Plant to the characters in Sequencer.
Importing Mocap animations onto the MetaHuman
First of all, we probably need to discover how long our sequence will roughly end up being. That is why we'll import our animations onto our human character first:
- For now, move the Alien Plant and Robot Drone out of the way, by selecting them in the viewport and moving them. This is just so that we can have a clear view of our human character. You'll notice that her feet are going through the floor, as shown in Figure 20.24:
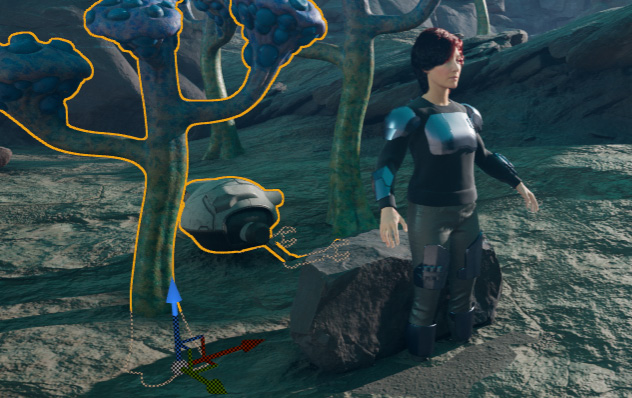
Figure 20.24 – Moving the robot and plant out of the way
- Delete the MetaHuman_ControlRig track under the BP Sci Fi Girl item in Sequencer by selecting it and pressing Delete on the keyboard, so as to prevent an override of the animation we're about to load, as shown in Figure 20.25:
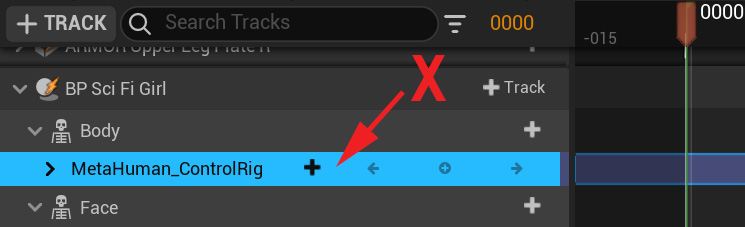
Figure 20.25 – Deleting the Control Rig track
- Add an animation track by clicking + Track | Animation, then search for sit and choose Sitting_Idle_meta_cleaned_final, as shown in Figure 20.26:
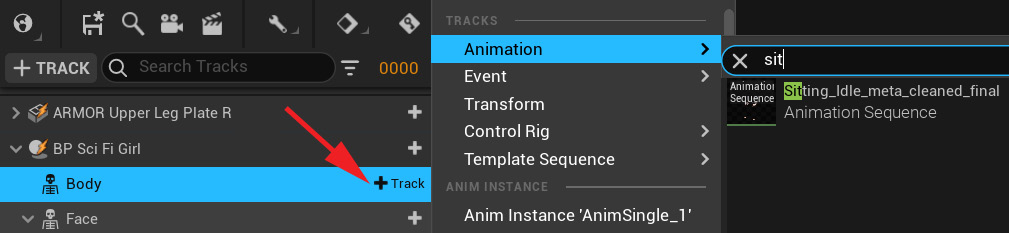
Figure 20.26 – Adding a sitting idle animation
The sitting idle animation will now play on the character.
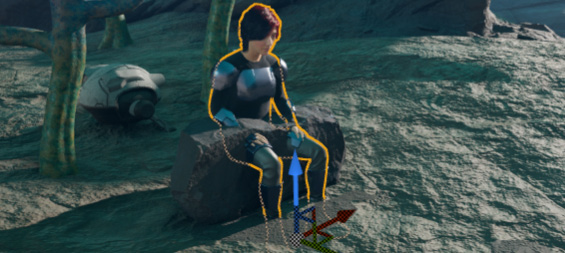
Figure 20.27 – Sitting animation cycle playing on the human character
- Next, on frame 0000, select her in the viewport and lift her up about 20 cm so her feet are on the ground. Set a keyframe on the BP Sci Fi Girl item Transform channel in the TRACK window to lock that position in, as shown in Figure 20.28:
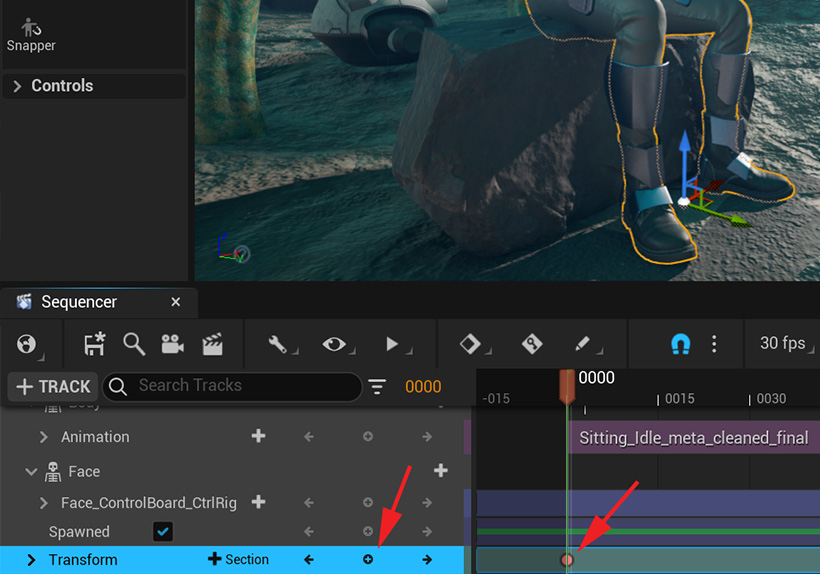
Figure 20.28 – Moving the character on the Transform track and keyframe
On close inspection, we now realize something. The hands are clipping the armor we attached earlier, as shown in Figure 20.29:
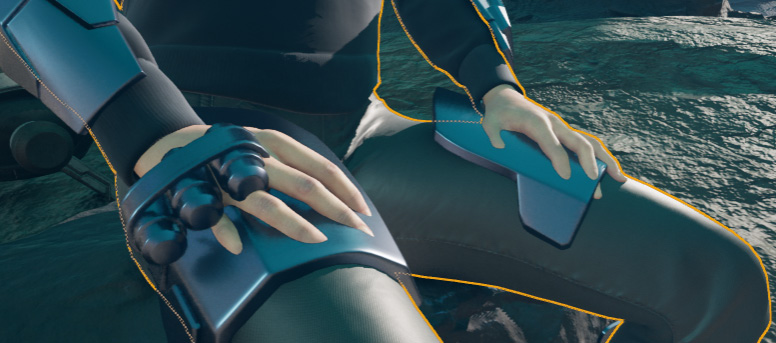
Figure 20.29 – Clipping hands
This kind of thing happens very often in a production environment where items are added later or models are updated. We can now fix this with all the methods we learned about in Chapter 19, Motion Capture Editing and Cleanup Using Control Rig and Sequencer. For the purposes of this chapter, I included the fixed animation. If you want to use that instead, load the Sitting_Idle_meta_cleaned_final_armorFix and Stand_up_meta_cleaned_final_armorFix animations from the project file provided with this book.
Fix hands clipping armor
If you want to do this yourself for practice, here's a very brief description of the steps, covered in detail in the previous chapter. There's nothing really new in here, just a repeat of the steps we've already covered in Chapter 19, Motion Capture Editing and Cleanup Using Control Rig and Sequencer:
- Set the range in the timeline from 0000 to 0238 (the length of the sitting animation).
- Right-click Body | Bake To Control Rig | MetaHuman_ControlRig. Don't reduce keys.
- Add an Additive animation layer, check the arms and legs controllers IK box to switch them to IK, and on head_ctrl, check the Local box, if it looks like it is at an odd angle.
- Set a keyframe on all the Additive Controllers on frame 0000. Make sure Automatic Keyframe is off since we're working with an Additive layer.
- Create a new pose on the hands and fingers, not clipping the leg armor, and keyframe it on frame 0000 on the additive layer.
- Select all the Control Rig controllers and save this new pose at frame 0000 to the Poses Library and call it PoseA_Sit_Idle_ArmorFix.
- Right-click on Body in the TRACK window, select Bake Animation Sequence, and name it Sitting_Idle_meta_cleaned_final_armorFix.
- Delete the MetaHuman_CotrolRig track from BP Sci Fi Girl, so we can adjust the Stand Up animation with the same changes.
- On Body in the TRACK window, select + Track | Animation and choose the Stand_up_meta_cleaned_final animation.
- Set the range in the timeline from 0000 to 0082 (the length of the sitting animation).
- Right-click on Body | Bake To Control Rig | MetaHuman_ControlRig. Don't reduce keys.
- Add an Additive animation layer, check the arms and legs controllers' IK box to switch them to IK, and on head_ctrl, check the Local box, if it looks like it is at an odd angle.
- Load the PoseA_Sit_Idle_ArmorFix pose from the Poses tool and key it on frame 0000 on all the Additive controllers.
- If you scrub the animation, everything looks fine from frames 0 to 20 on the hand, so set an anchor keyframe on all the Additive controllers.
- At frame 0044 and frame 0082 at the end of the animation, load and keyframe the PoseB_Stand_Idle_tutor pose from the Poses tool to get it back to the correct standing position and end pose at the end.
- At frame 0031, the fingers and hand clip badly, so make a correction with in-between keyframes on the hand IK controllers to stop the clipping.
- Right-click on Body and in the TRACK window, select Bake Animation Sequence, and name it Stand_up_meta_cleaned_final_armorFix.
- Delete the Animation and MetaHuman_ControlRig tracks in the TRACK window for BP Sci Fi Girl.
We have now fixed the hands clipping the armor on the Stand up animation. Next, we can load them into Sequencer.
Loading animations into Sequencer continued
We can now start again, loading animations where the hands don't clip with the upper leg armor:
- Load the Sitting_Idle_meta_cleaned_final_armorFix animation by repeating Step 2 (Figure 20.26) and Step 3 (Figure 20.27), only now loading this fixed animation at frame 0000.
- Go to the end of the Sitting Idle animation at frame 0239 in the timeline and click + Animation on the existing Animation track. Search for stand and select the fixed Stand_up_meta_cleaned_final_armorFix animation, as shown in Figure 20.30:
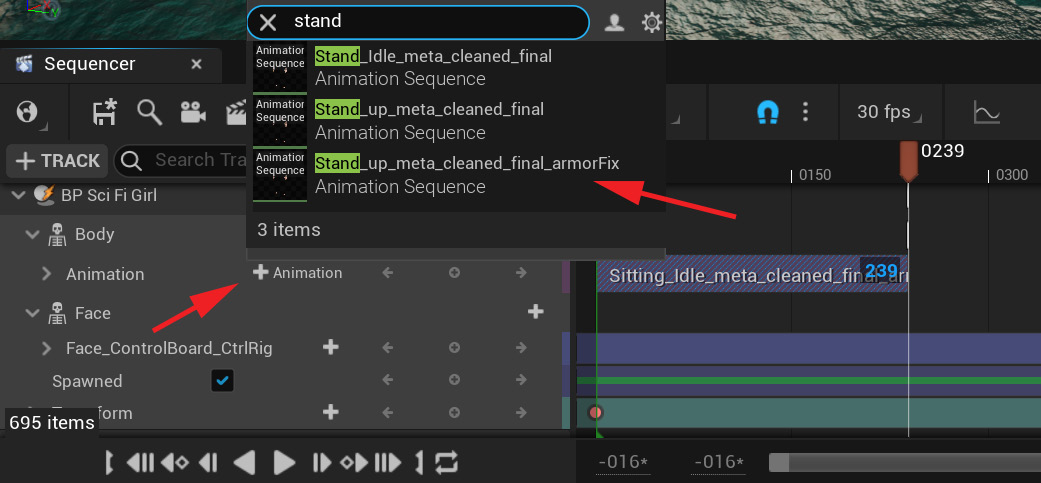
Figure 20.30 – Adding a fixed standing up animation
- It will appear on a second Animation layer. However, blending animations is easier if they're on the same Animation layer, so left-click and hold in the middle of this track and drag it to the same layer as our sitting idle animation, as shown in Figure 20.31:
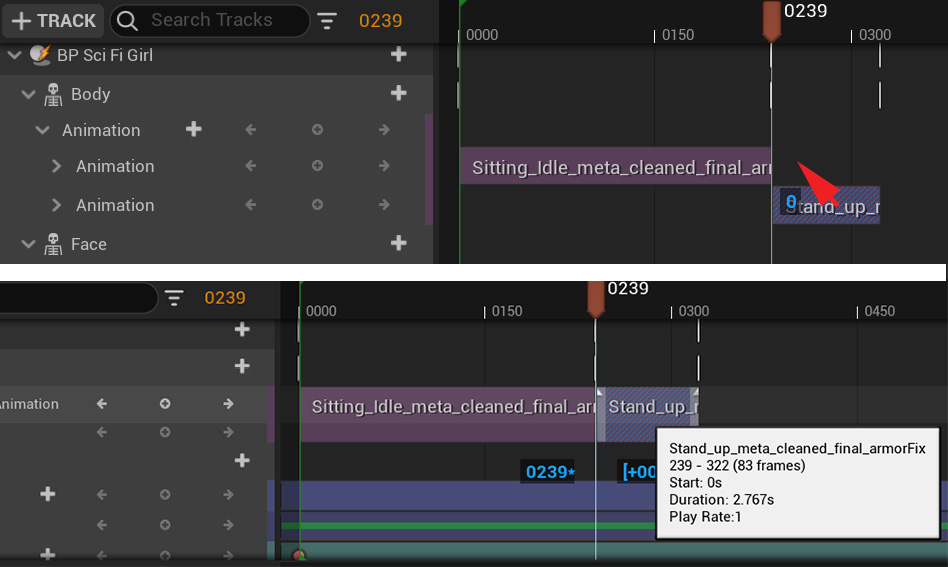
Figure 20.31 – Dragging the animation to the same track
If your animations don't flow seamlessly one to the other, you can blend animations together to smooth the transition by left clicking and holding, in the middle of these tracks, and dragging them over each other. The section where they overlap will blend one animation to the other as shown in Figure 20.32:
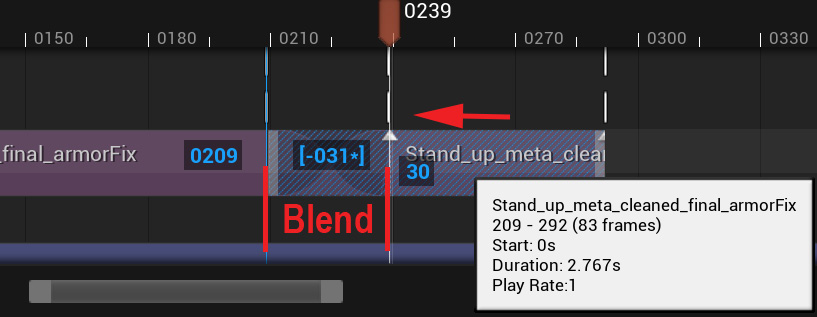
Figure 20.32 – Blending animations
Because we matched our start and end poses exactly in our Mocap cleanup, we don't need to do that between the Sitting Idle and the Stand Up animations in this case. Just line the end up with the beginning of the next one with no gap in-between.
- Next, in the same way as the ones before, add the Stand_Idle_meta_cleaned_final animation. However, it turns out that there's a small glitch in the head going from the end of stand up animation to the beginning of the stand idle animation. So, drag them over each other to blend between the two for a few frames to get rid of the glitch, as shown in Figure 20.33:

Figure 20.33 – Adding the Add Stand Idle and Small Blend
Playing back our sequence at this point, it feels like she stands still for too long in the stand idle animation after she gets up. Let's make it shorter.
- Hover the mouse at the end of the Stand_Idle_meta_cleaned_final animation track on the timeline and click, hold, and drag it shorter to about frame 0400, as shown in Figure 20.34. You can also call this trimming the animation:
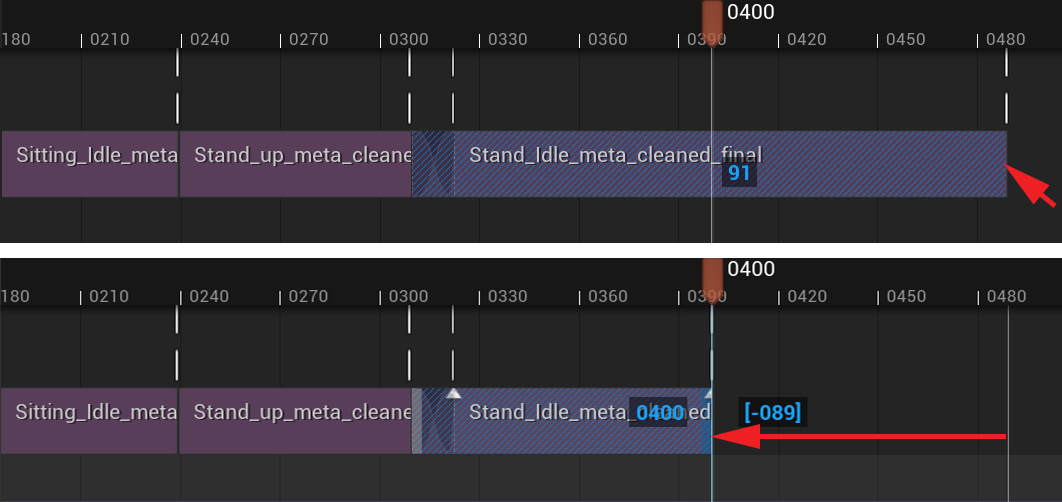
Figure 20.34 – Trimming the animation
- Now, at frame 0400, add the Walk_start_stop_meta_cleaned_final animation. Since we're not completing a full cycle of the stand idle, the pose at the beginning of the Walk animation won't match exactly. So, drag the Walk animation track a few frames to the left for a little bit of blending, as shown in Figure 20.35:
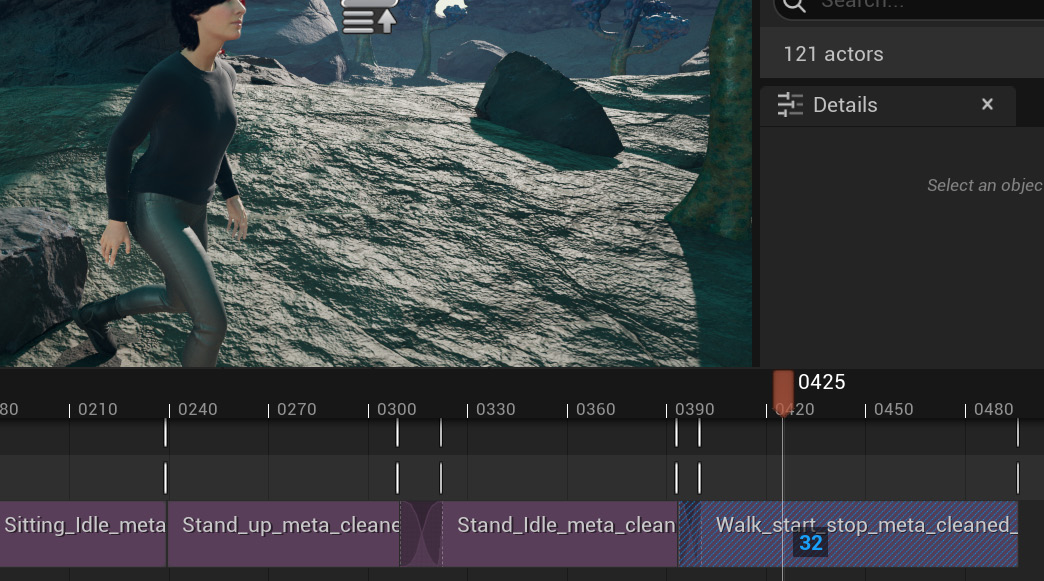
Figure 20.35 – Adding a walking start-stop animation
After she stops walking, we want her to push the button on her arm to activate the Robot Drone.
- At the end of the walk animation, around frame 0496, add the Button_push_meta_cleaned_final animation and also drag it to the same animation track as the others.
However, we have a problem. When you scrub or play the timeline, when it transitions from the Walk animation to the Push button animation, at frame 0497, she snaps back to the origin of the scene.
This happens because during the Walk animation the character and its root moved several meters forward, whereas during the other animations she was still in the same spot. The Push button animation was animated at the origin, so when it starts playing it plays it back at the origin.
Luckily, we animated the root of the character in the Walk animation to follow the character so that as she stops again the root is exactly between her heels, like the main stand pose. This root position is our relative reference point of where our character is in the world. We can use this root position to tell the Push button animation where the character is in the world and then play the animation there, instead of at the origin where it was animated
- Right-click on the Button_push_meta_cleaned_final animation clip in the Sequencer timeline, then select Match With This Bone In Previous Clip | root, as shown in Figure 20.36:

Figure 20.36 – Matching with root previous clip
- Between the end of the Walk animation and the beginning of the Push button animation, it felt a bit abrupt, so I added a 16-frame blend in-between the two animations.
- At the end of the Button_push_meta_cleaned_final animation, add the Stand_Idle_meta_cleaned_final animation again, so she can stand there in her stand idle cycle for as long as needed for the movie scene. Have a little bit of blending between the two animations.
- Drag and extend the end of the Stand_Idle_meta_cleaned_final animation track to frame 1000.
Because it's a seamless cycle, it will just keep repeating without any glitches. You can see where the beginning and end of each cycle is in these extended animation tracks by the thin white vertical line, as shown in Figure 20.37:
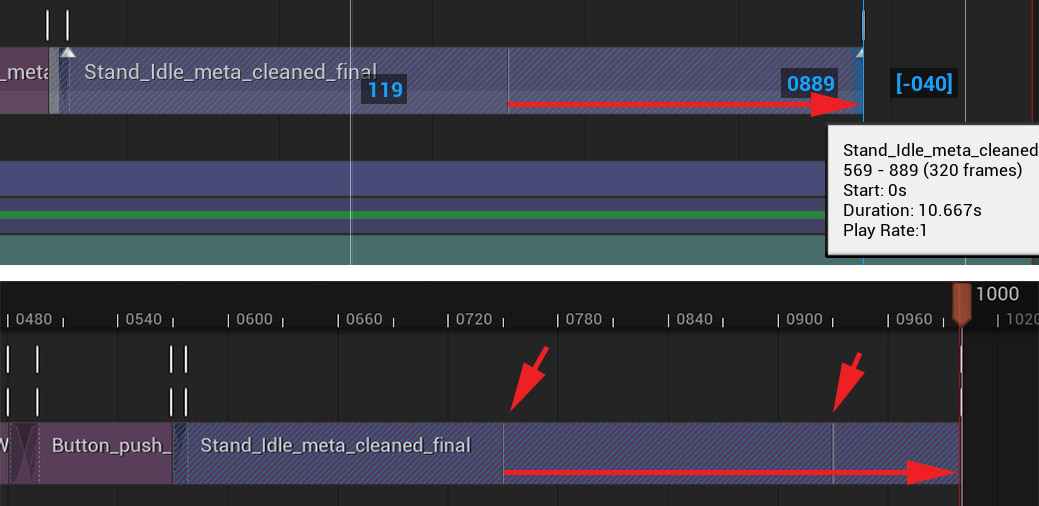
Figure 20.37 – Extending standing idle to frame 1000
- Set the active range (thin vertical green and red line) from frame 0000 to 1000.
- One by one, extend all the Attach tracks for all the armor pieces so they're longer than the active range by clicking, holding, and dragging them at the end of the track in the timeline till they're longer than frame 1000, as shown in Figure 20.38. They should now stay attached during the whole sequence:

Figure 20.38 – Attaching the track range
Congratulations, you have now added the full Mocap animation sequence to our MetaHuman character! We now know roughly how many frames our scene is and can time the Robot Drone animations. Next, let's import our animation onto our Robot Drone in our movie scene.
Importing Mocap animations onto the Robot Drone
The timing of the animations on the Robot Drone depends on when the female character pushes the button on her arm to activate it. But first, let's position it in our scene.
When you add assets to Sequencer, in the case of the Alien Plant and the Robot Drone, they will automatically get a Transform track, as shown in Figure 20.39. Normally, it's the last track on the item. This Transform track can be used to position the asset in the scene, and we can even animate that position. This Transform track is like the overall parent of the world position of the asset in Sequencer and the scene:

Figure 20.39 – Transform track
This is separate from the Animation tracks or Control Rig tracks of the items where you play the skeletal or Control Rig animations. This is very useful since you can play a skeletal animation on the item that has been animated at the origin of the scene and then use the Transform track position to play that animation in a different location in the scene, and even animate that position over the course of the scene.
We will use this Transform track to control the world position of our Robot Drone and also use it to animate it flying around the scene. We know we want the drone to be un-activated until she pushes the button on her arm. In my Sequencer, it is at frame 0530 (yours might be different).
This is a good starting point for our Robot Drone animation before it starts moving when she pushes the button:
- On frame 0530 (in my case), select the drone in the viewport and move it to its starting position when it activates. I put it in front of the human character within her perspective on the ground. After you move and rotate the drone to sit perfectly on the ground with its main body, set a keyframe on the Robot's Transform track at this frame, as shown in Figure 20.40:
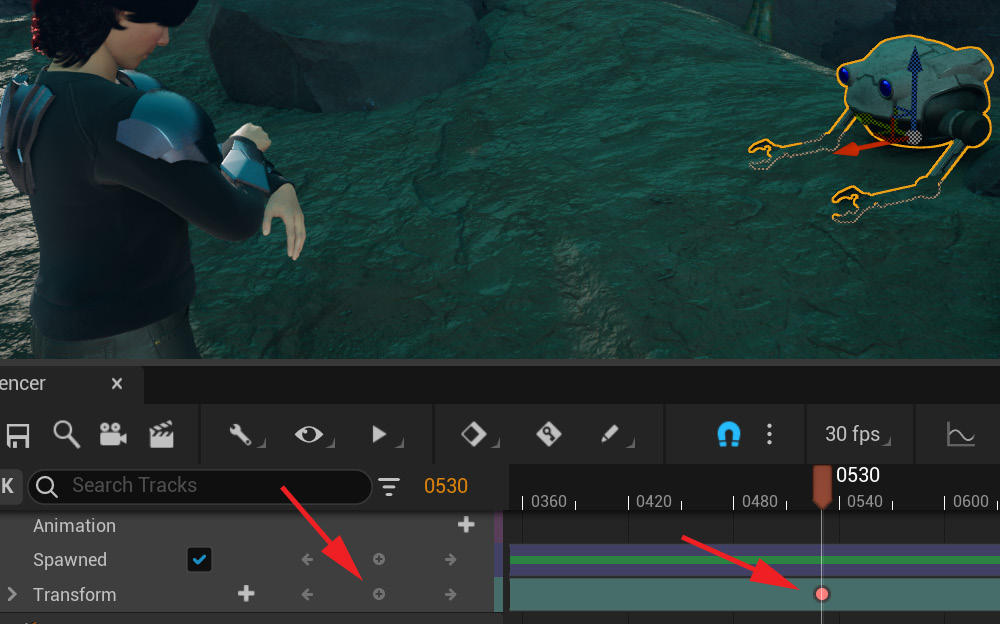
Figure 20.40 – Moving the robot to the starting position and setting the keyframe
- On frame 0000, add an animation on the Animation track and choose Robot_Action_Unactivated. Extend this animation cycle till just before the point that the human character pushes the activation button in the usual way, by clicking, holding, and dragging the end of the track, as shown in Figure 20.41:
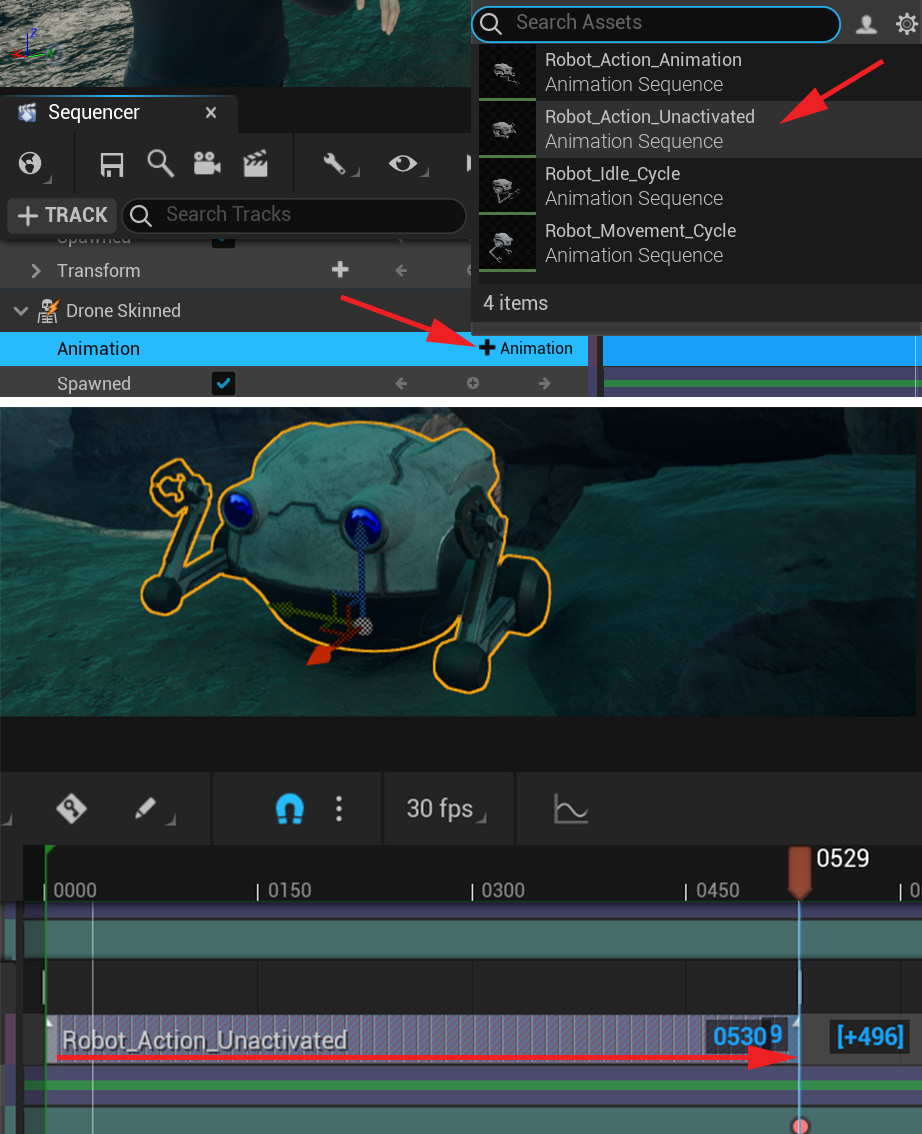
Figure 20.41 – Adding the unactivated animation and extending
- At the point that the human character pushes the activation button, in my case frame 0530, add Robot_Action_Animation (in my case, it's the salute) with + Animation on the Animation track. Make sure there is no gap between this and the previous track. Add a keyframe to the Transform track at the beginning of Robot_Action_Animation. Then, when it's fully activated, in my case, 50 frames later at 0580, lift the robot off the ground in the hovering position and set another keyframe on the Transform track at this position, as shown in Figure 20.42:
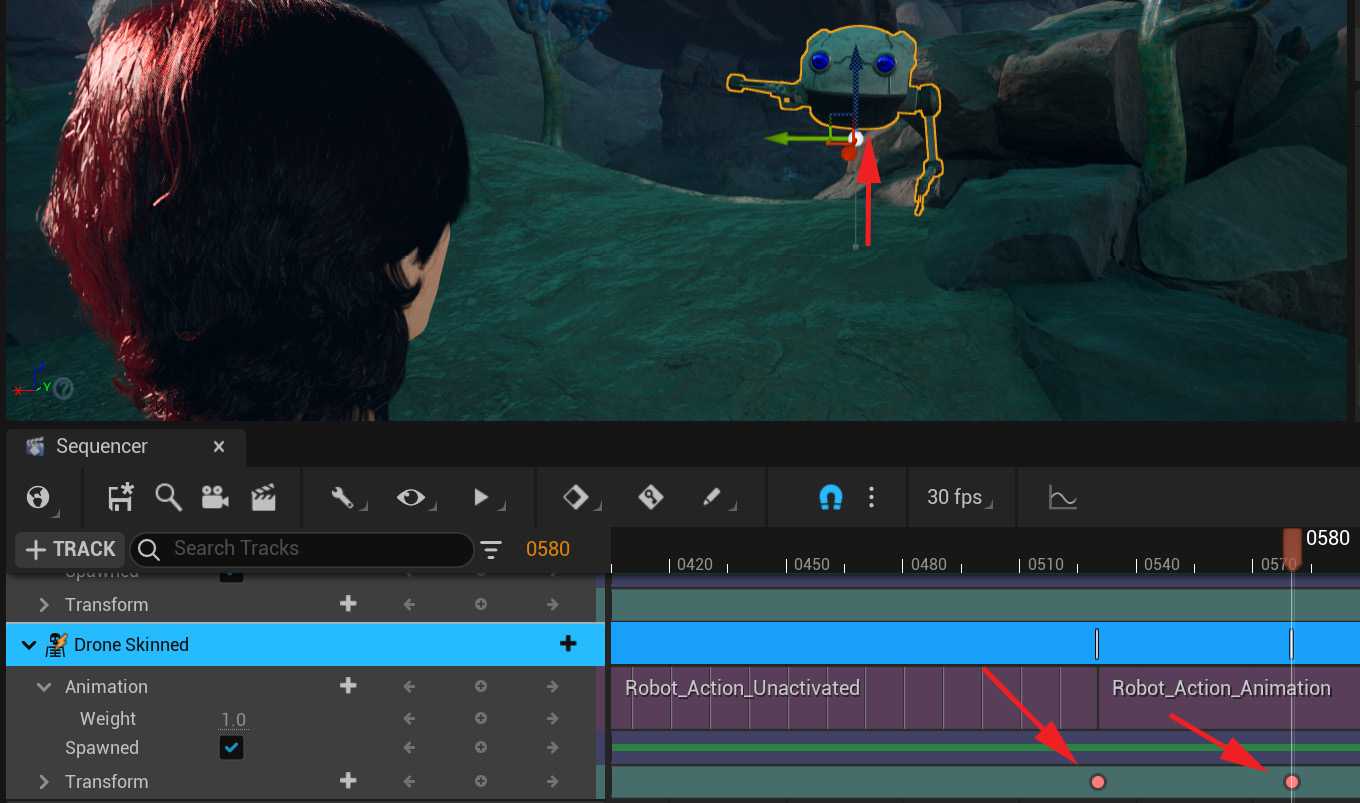
Figure 20.42 – Adding an activate action and keyframe position
After this, it's up to you what you want the Robot Drone to do next. If you want an example, you can study what I did in the FinalScene_tutor level sequence (included with this chapter's resource UE project). Have fun with this and be creative. Experiment with the tools and timing. Remember that you can also use the Graph Editor to edit the animation on the Transform track.
In summary, this is what I did with my FinalScene_tutor level sequence:
- I added the Robot_Idle_Cycle and Robot_Movement_Cycle animations to my Robot Drone Animation track.
- After the salute action (in my case), I put the Robot_Idle_Cycle animation, which I then trimmed to be shorter, and then I blended that into the Robot_Movement_Cycle that I extended for several cycles.
- Then, I used the Transform track to animate the Robot flying off into the environment to explore it, as shown in Figure 20.43:
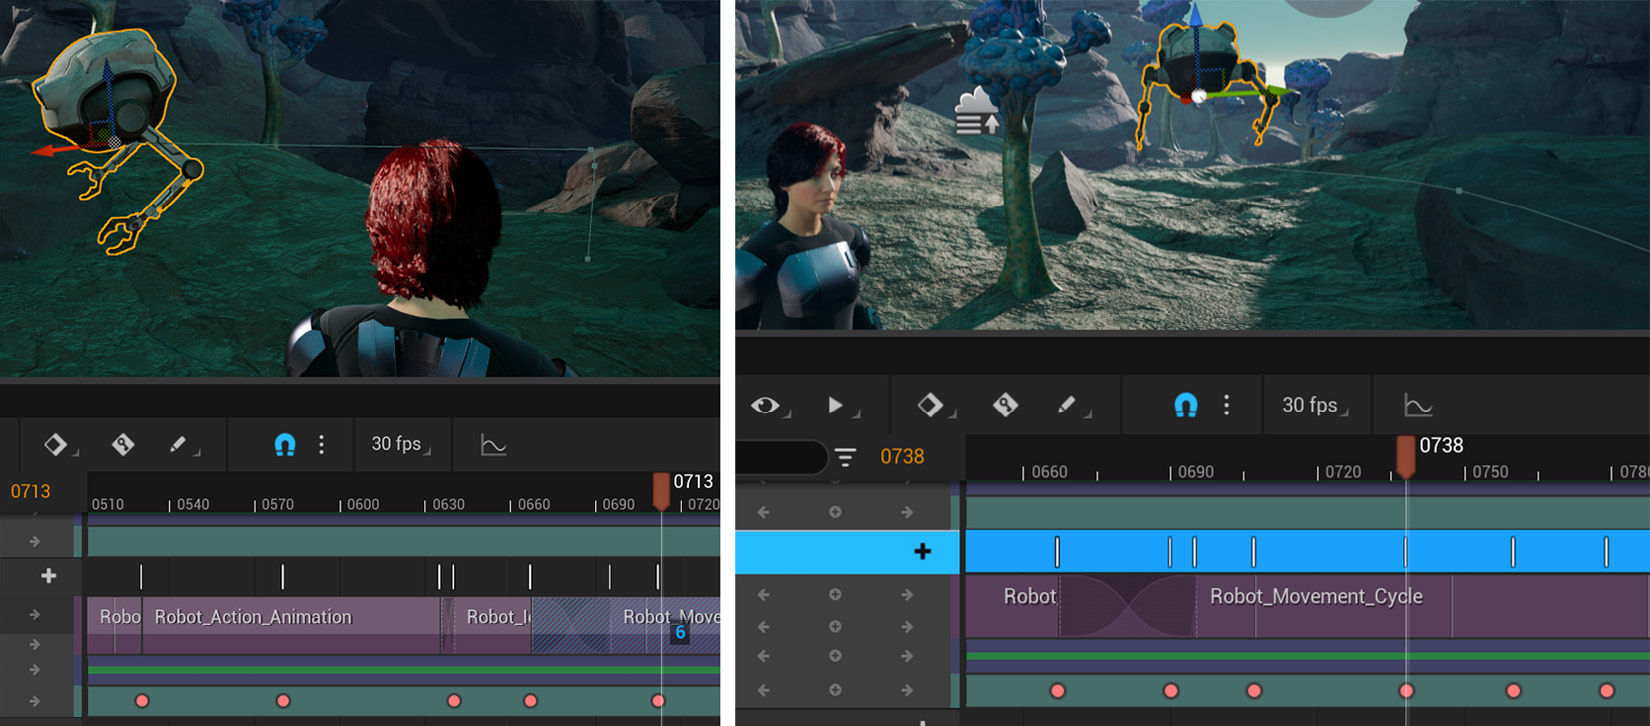
Figure 20.43 – Example robot sequence
- Finally, I decided my sequence at the beginning is too long while she is sitting down, so I set the active range of the sequence to start at frame 0200 and end at frame 0800, as shown in Figure 20.44:
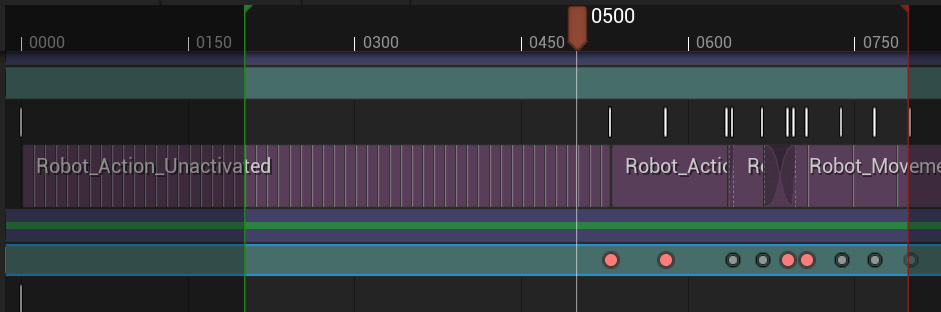
Figure 20.44 – Active range adjustment
Our animation is now on our Robot Drone, and it has come to life in our movie scene. Next, let's get some movement into the movie set background by making the Alien Plants play the swaying animation we created in Chapter 16, Creating a Simple Swaying Animation Cycle in UE5 Sequencer.
Importing animations onto the Alien Plant
After everything we've done in this chapter, you might be happy to hear that this is probably easier part. Let's make our Alien Plants come to life:
- Add AlienPlant_Sway_Animation to the Alien Plant Master Skinned item's Animation track by clicking + Animation at the beginning of your active range in the timeline, as shown in Figure 20.45:

Figure 20.45 – Adding a sway animation to Alien Plant
- Extend the AlienPlant_Sway_Animation track to be several cycles longer than the active range of the timeline, by clicking, holding, and dragging it at the end of the track, as shown in Figure 20.46:
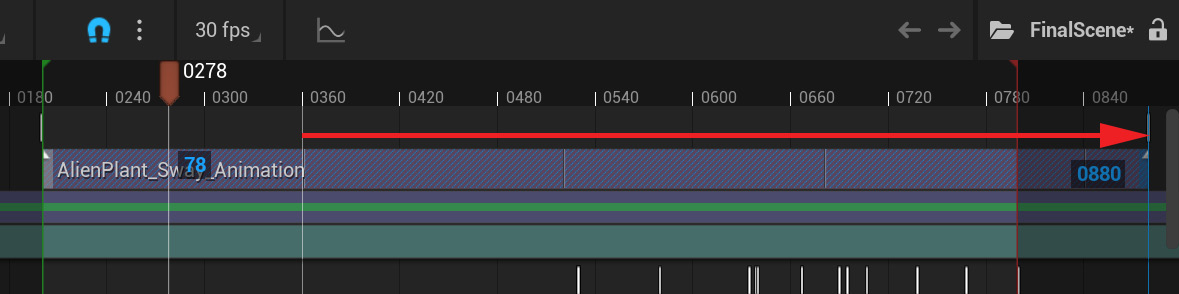
Figure 20.46 – Extending the Alien Plant sway animation
- Move, rotate, and scale it into the position of one of the Alien Plant static mesh placeholders in the viewport, and then delete the placeholder and keep the new animated one. We've now replaced the placeholder with an animated Alien Plant, as shown in Figure 20.47:

Figure 20.47 – Replacing the static plant with an animated Alien Plant
- Right-click on the Alien Plant Master Skinned item and select Duplicate in the TRACK window. This will duplicate both the item and the Animation track, as shown in Figure 20.48:
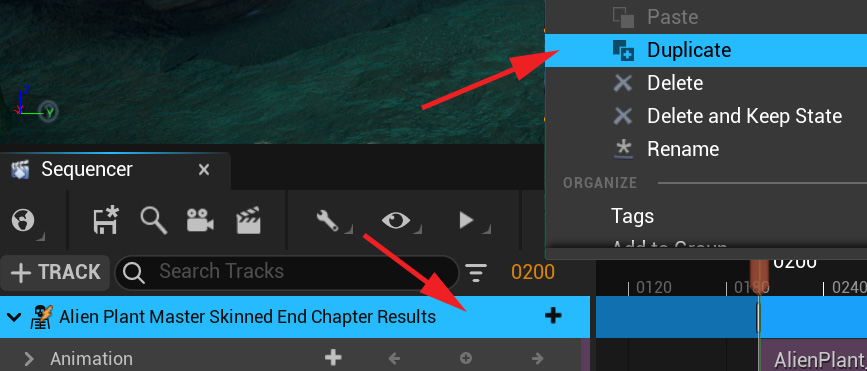
Figure 20.48 – Duplicating the Alien Plant track item
We now have two animated Alien Plants in Sequencer, but their animation plays at the same time and is perfectly in sync since the animation track was also duplicated as it was. This will look odd in a natural scene. We'll offset each Alien Plant's animation a little bit, so they don't play perfectly in sync.
- Move the duplicated Alien Plant to the position of the next static Alien Plant you want to replace. Now move the AlienPlant_Sway_Animation track a few frames earlier to offset the timing of the animation, so it's not in sync with the original animated Alien Plant anymore, as shown in Figure 20.49:

Figure 20.49 – Offsetting the duplicate Alien Plant animation track
However, still make sure that the AlienPlant_Sway_Animation track covers the whole active range, so the swaying animation plays for the whole sequence. You can drag and extend them to make them longer if needed.
- Repeat Step 4 and Step 5 until you have replaced all the static Alien Plants with animated ones and offset their animations, so they don't play in sync.
All our animations have now been implemented for the actors on our movie set. Next, let's work with the cameras to film them.
Creating cameras and animating them
As far as the cameras are concerned, I will leave it up to you. Do whatever you want with them. However, if you want an example, you can study what I did in the FinalScene_tutor level sequence (included with this chapter's resource UE project).
But you probably want to know how to work with cameras in Sequencer in the first place. Here's how to set up multiple cameras and then create camera cuts between them in Sequencer. These are just the basics, but you can do most things you would ever want to do with cinematic cameras with these simple tools. There's much more that you can do with a camera and shots in Sequencer, but that is beyond the scope of this book.
To create a camera and animate it, please execute the following steps:
- First, we need to add a Camera Cut Track to our sequence to store and manage our cameras and camera cuts. You do this by clicking + TRACK at the top of the TRACK window and then selecting Camera Cut Track, as shown in Figure 20.50:
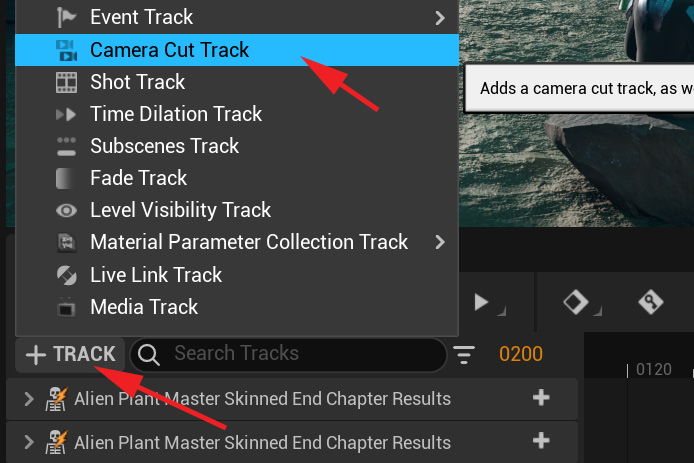
Figure 20.50 – Adding Camera Cut Track
- Then, to create a new cinematic camera, click on the camera icon on the top menu of the Sequencer window, as shown in Figure 20.51:
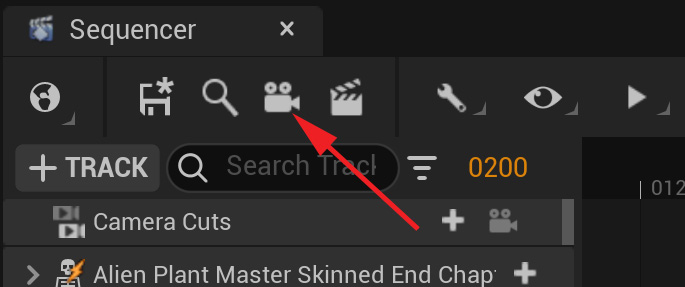
Figure 20.51 – Creating a new cinematic camera
The new Cine Camera Actor will appear in your Sequencer TRACK window and timeline. You can create as many of these cameras as you want. Later, you can create one for every camera cut.
- If you select this Cine Camera Actor in the TRACK window, a small viewport will appear overlayed over your regular viewport. This is looking through the viewpoint of this cinematic camera, as shown in Figure 20.52:
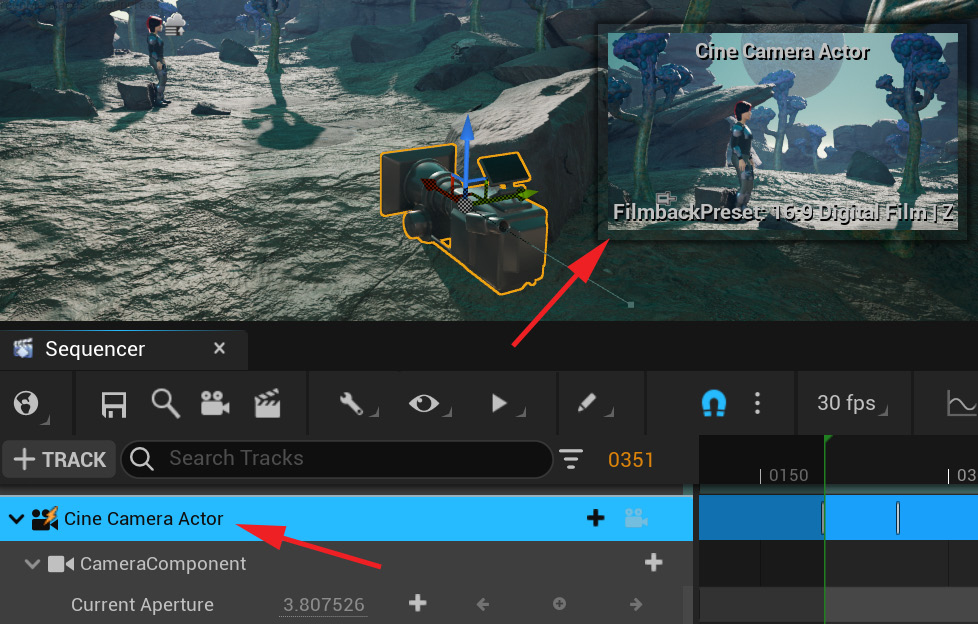
Figure 20.52 – Cinematic camera selection
This is useful for when you move, animate, or change settings on the camera in the main working viewport, but you want real-time feedback on its effect on the cinematic camera. You can animate and set keyframes on this camera's position on its own Transform track.
Note
Make sure to animate the Cine Camera Actor and not the CameraComponent. This might cause issues. Like in this case it's also sometimes best to keep your animation keys on one of the objects in the hierarchy if they serve the same child. If you do some keyframes on one object in the hierarchy and then some on the other, they become more difficult to clean up. Try to keep it simple.
There's another very useful way to control these cameras and that is in Pilot Mode. If you click on the camera icon on the right of the new Cine Camera Actor track to switch it on, your main viewport becomes what this cinematic camera sees, as shown in Figure 20.53:
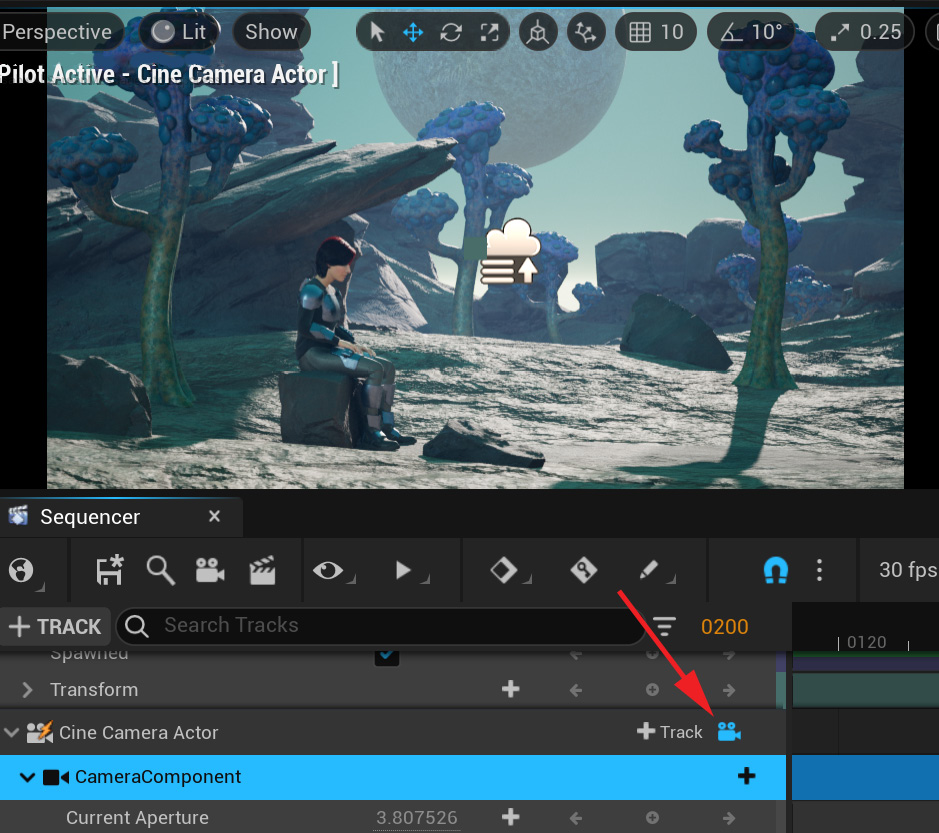
Figure 20.53 – Pilot cinematic camera
Here, you can use your regular viewport navigation to pilot the camera position to get the exact view you want from this camera. If you want to go back to the regular perspective camera and viewport, just click on this camera icon to turn it off.
The other three most frequently used important settings on the camera that are on CameraComponent in the TRACK window are Aperture, Focal Length, and Manual Focus Distance, as shown in Figure 20.54:
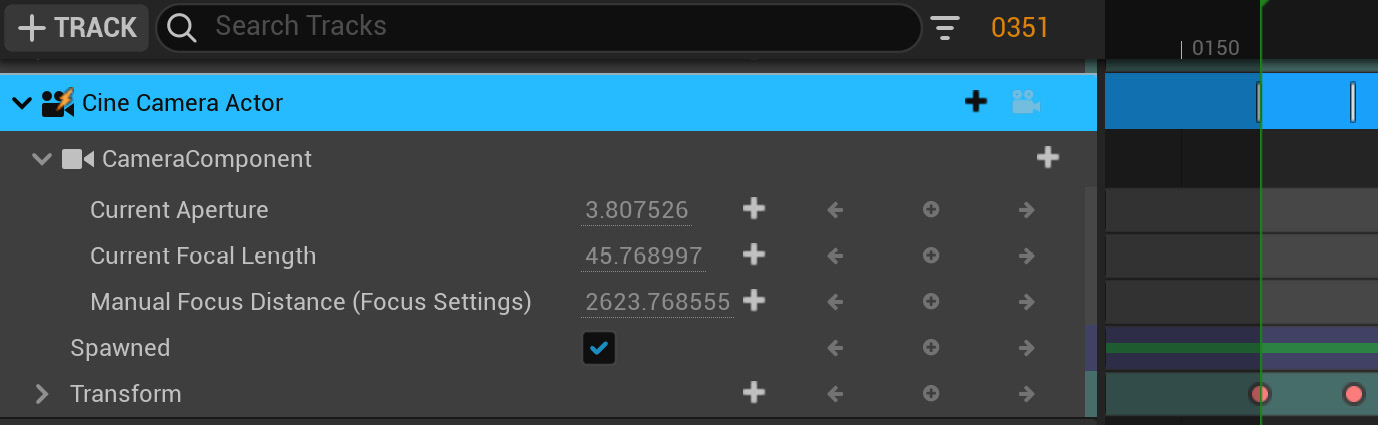
Figure 20.54 – Camera settings
These have the same function as a film camera in the real world. Aperture is how wide the aperture is and it effects the depth of field (things in background more or less out of focus). Focal Length is the type of lens and can also be used to zoom in and out. Manual Focus Distance is the distance at which the subject will be perfectly in focus.
Don't worry about this too much if you don't know what these settings should be. Next to Current Aperture, Current Focal Length and Manual Focus Distance, of the camera item in the TRACK window, there's a grey number, if you left click, hold, and drag left or right on this number, and it will go up or down.
Simply drag these values left or right until you get the desired result. With the camera selected, in the Details window of the main UE interface there are more advanced camera settings that you can experiment with if you want to, but most of the time, these three settings will be all you'll need.
Next, we'll look at how to use multiple cameras and cut between them.
Using multiple cameras and cutting between them
In UE5, we can create multiple cameras with different positions, angles, and settings and cut between them, just like a real movie set. These camera cuts are controlled through the Camera Cuts track. Here is how to use it:
- Set up and animate your first cinematic camera, for the first cut, the way you want it.
- On frame 0000, in the Sequencer Track window to the right of the Camera Cuts track, click + Camera and select the first camera you want to cut to in the sequence.
This cinematic camera appears in the Camera Cuts track. You can adjust the length and timing of this track in the same way as you adjust any track in Sequencer, by dragging the end or clicking and holding, then dragging in the middle to move it.
- Trim it to where you want your second camera cut, as shown in Figure 20.55:
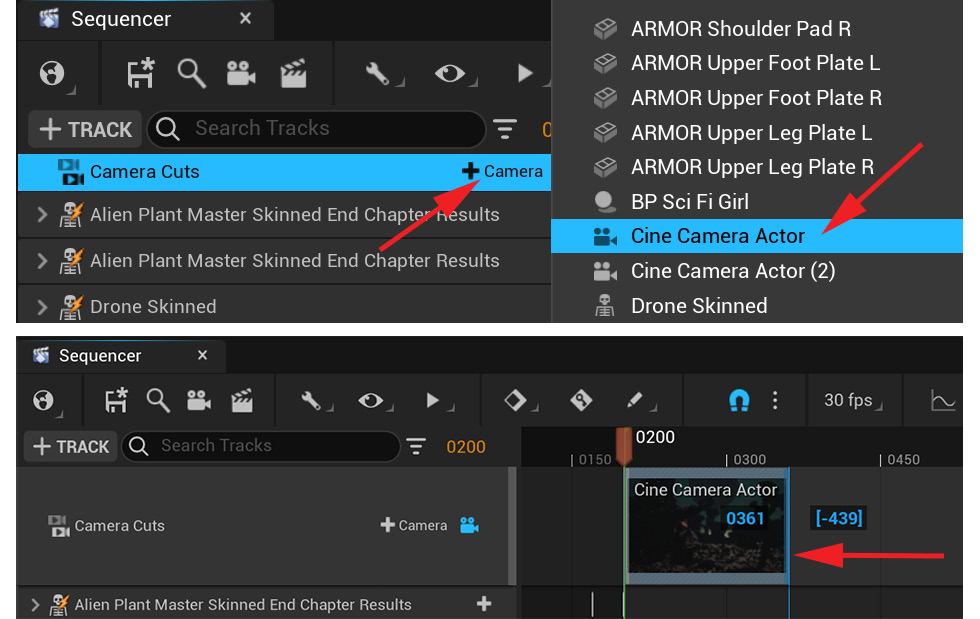
Figure 20.55 – Adding the first camera cut
At this point, you can create another cinematic camera by clicking on the camera icon at the top of the Sequencer menu for your second camera cut.
- Animate and set it up the way you want your second camera cut to look, at the timing you want. Then, add it to the Camera Cuts track at the time you want it to cut to this camera by clicking the + Camera on the Camera Cuts track, as shown in Figure 20.56:
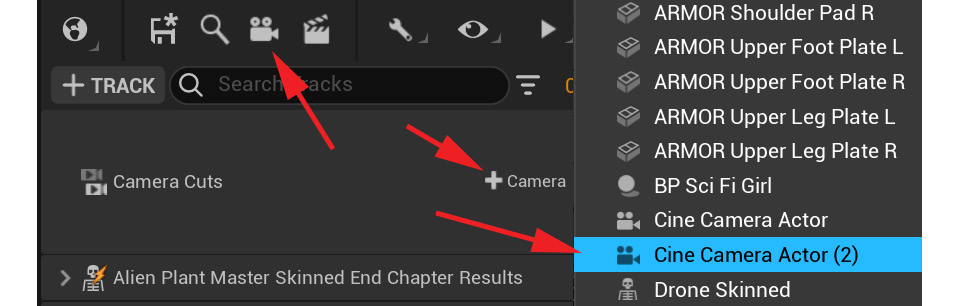
Figure 20.56 – Adding a second camera cut
- If you want to see your sequence camera cuts in the viewport, to see what will be rendered to your movie at the end, click on the camera icon on the Camera Cuts track.
This is not like the Pilot Mode on the individual cinematic cameras since you can't edit the camera with the viewport navigation in this mode. It is simply for viewing the camera cuts and the final result, as shown in Figure 20.57:
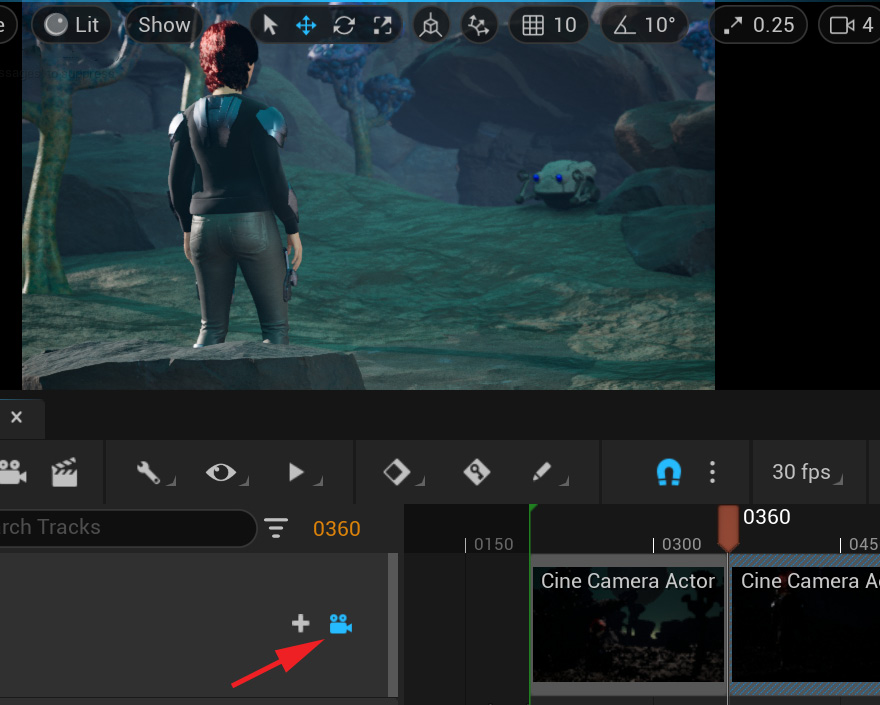
Figure 20.57 – Viewing the camera results in the Viewport
- You can exit this viewing mode again by clicking the camera icon to turn it off.
You can create as many of these camera cuts as you want to film this scene. Have fun and try different things. Present the hard work you put into this book in the best possible way. Once you're happy with your camera cuts and are ready to render your final movie, we can move on to the very last step of this book.
Rendering our final scene
You'll also be happy to learn that this last step is the easiest one. In this last step, we will render an AVI movie file of our scene that can be uploaded and shown to your friends on social media if you want to:
- Next to the camera icon on the main Sequencer menu is a film clapperboard icon. Click on that to open Render Movie Settings, as shown in Figure 20.58:
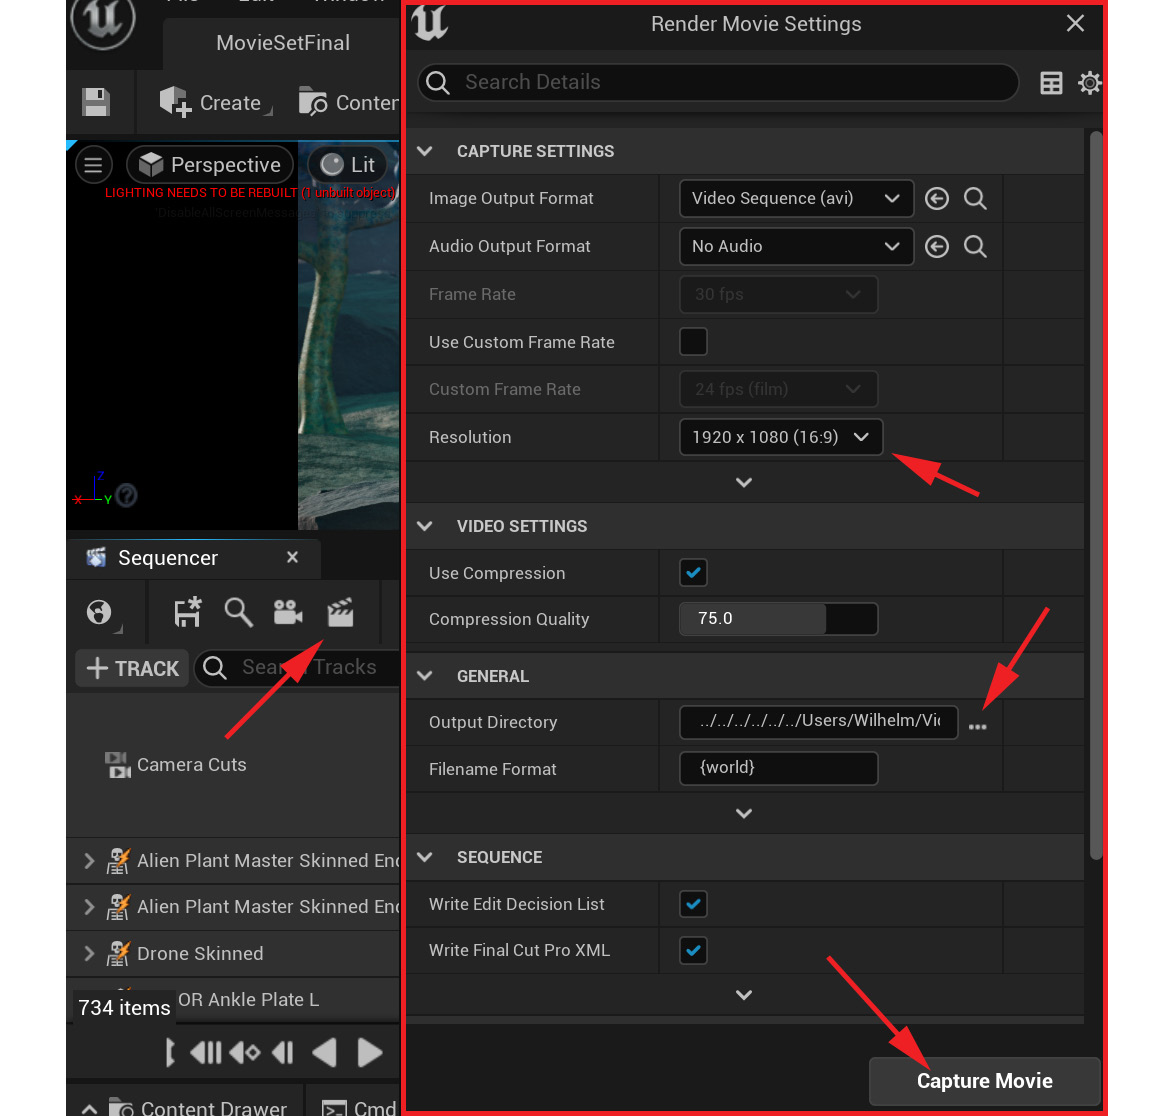
Figure 20.58 – Render Movie Settings
- The Resolution is 1920 x 1080, which is full HD, but you can render it bigger or smaller if you want to. Select an output directory for the movie to be saved to, and then click Capture Movie.
This will render the active time range of your sequence from the Camera Cuts track point of view. It might take several minutes for this process to complete, depending on the speed of your computer.
- Once completed, navigate to the folder you specified as the output directory to find your rendered final movie. Watch it and enjoy the result of all your hard work.
Huge congratulations to you for reaching this point in your journey and finishing this book!
We provide the final UE5 project file that can be downloaded here with installation instructions: https://github.com/PacktPublishing/Unreal-Engine-5-Character-Creation-Animation-and-Cinematics/tree/main/FullFinalUE5Project.
You can explore this project with examples of everything we've done in this book.
We also include the example final render of the final scene here: https://github.com/PacktPublishing/Unreal-Engine-5-Character-Creation-Animation-and-Cinematics/blob/main/FullFinalUE5Project/FinalScene.mp4.
Summary
In this chapter, you learned how to migrate content from different projects into each other. You learned how to attach different objects and props, such as armor, to character animations. We prepared character and level assets for our final scene. We also imported a cleaned-up Mocap onto our MetaHuman character and stitched them together into one sequence.
We did the same for custom animations on our Robot Drone character and made the background come to life with the swaying animation on our Alien Plant. We then covered how to work with multiple camera cuts in Sequencer and how to edit and animate them. Finally, we rendered the result into a final AVI movie file.
With the skills you learned in this book, you can now create your own custom 3D content and animations and create your own stories inside UE5. You can let your imagination run wild and your only constraint is the time and work it requires.
We feel so honored that you took this journey with us. If this is the start of your computer animation journey, we wish you all the best and we hope that what we covered in this book will lay a solid foundation for you to build upon.
If you're already established as a computer artist, I hope we provided some good alternatives in using the UE5 pipeline instead of the classic ones, especially when it comes to rigging and animation.