
Chapter 5: Firewall
If you got this far, congratulations! We'll explore one of the main features of OPNsense – the firewall! In this chapter, we will learn which packet filter system OPNsense uses for firewalling, what type is it, how it works, what aliases or Packet Filter (pf) tables are, create our first rule, and explore diagnostics and troubleshooting. Through this chapter, you'll learn the firewalling basics that will be required to move on in this book, so pay attention reading it, practice the suggested exercises, and if you are unsure about some of the concepts presented here, please try to read it twice – it will be very important for you in the next chapters.
There will also be practical elements, so start your OPNsense virtual machine to follow all the topics explored here:
- Understanding firewalling concepts
- Firewall aliases
- Firewall rules
- Firewall settings
- Diagnostics and troubleshooting
Technical requirements
This chapter requires basic knowledge of networks, such as networking (for example, IP and IPv6) and transport protocols (for example, Transmission Control Protocol (TCP), User Datagram Protocol (UDP), Internet Control Message Protocol (ICMP), and ICMPv6), how they work, how to execute commands in the CLI, and a running OPNsense machine.
Understanding firewalling concepts
The word firewall is one of the most used ones to define OPNsense; even with a lot of other features, it is very common to hear from someone curious about your network topology asking, which firewall are you using in the network? The firewall feature is so important that it defines a whole network security platform. Let's find out why, beginning with the basics.
A stateful firewall
Every connection that a stateful firewall permits to pass will create a connection state, which means that the firewall will monitor all the connection information, such as the source, the destination, the protocol, the port number, and the protocol state. The protocols that a stateful firewall can handle are the ones that run on layers 3 and 4, using the OSI model as a reference. OPNsense running only with core features is considered a stateful firewall.
For example, monitoring the connection states will prevent common attacks that use the packet spoofing technique. If a packet is sent to a stateful firewall with an established state but doesn't exist in the firewall state table, then it will be blocked by the firewall.
Note
By default, OPNsense reserves 10% of the system RAM to the firewall state table; this setting can be changed, as we will see in the Firewall settings section.
As OPNsense contains a stateful firewall, you're able to check connections states in WebGUI at Firewall | Diagnostics | States Dump.
You will be able to check every state that OPNsense is monitoring. It will show the following columns:
- Int: The network interface.
- Proto: The protocol.
- Source | Router | Destination: Source address:port | (Network router:port) | Destination:port (respectively).
- State: The connection state.
- The X icon: Clicking on this button will drop the state.
OPNsense has another page on WebGUI that summarizes the state table connections: Firewall | Diagnostics | States Summary.
On this page, you will be able to find connections summarized by By Source IP, By Destination IP, and By IP Pair (source and destination).
Note
Depending on the number of connections handled by your state table size, this page can take a long time to load.
Sometimes, it is necessary to reset all connections on the state table. You can do it without rebooting OPNsense; to do so, go to Firewall | Diagnostics | States Reset.
On this page, you have two checkboxes:
- Firewall state table: Checking this option (checked by default) will remove all connection entries from the state table, forcing connections to be recreated.
Note
It will reset your WebGUI connection too, so it will be necessary to refresh the page after resetting the connections.
- Firewall source tracking: This will remove all the connection associations (source/destination), which means that all hosts will need to reconnect to establish connections again.
To reset the connections state table, just click on the Reset button.
Note
Be cautious using this – it will interrupt connections between the hosts that are using OPNsense as a network gateway. This can cause a lot of complaints from your boss, so think twice before pressing this button!
Now that we have learned what a stateful firewall is and how to check connection states, let's move on and talk about the packet filtering system used by OPNsense – the powerful pf!
The Packet Filter
pf's history starts from the OpenBSD project in 2001; it was designed to replace the IPFilter, which was removed from OpenBSD due to licensing concerns. The first FreeBSD version to have a ported version of pf was 5.3 in 2004, so, as you can see, this is a packet filtering platform with a long history, which brings reassurance of great reliability and trustworthiness. Despite FreeBSD's pf version originating from OpenBSD, the actual versions differ a lot on both platforms.
pf is what OPNsense uses to filter packets and to do network address translation, and you can find options related to it in WebGUI in the Firewall menu. It's not the purpose of this book to dive into pf's CLI utilities; one of the best features in OPNsense is its WebGUI, which makes managing firewalls very easy. But if you are interested in how to use pf command utilities, don't worry – during this chapter, we will learn a little bit about it.
Incoming and outgoing packets
This is an important thing to understand before we start creating firewall rules – what is an incoming packet? And what about the outgoing packets? Which ones are filtered by default? Let's understand from the firewall perspective first:
- Incoming packets: All traffic that enters the firewall through a network interface is considered an incoming packet. In regards to the firewall ruleset, we will use the direction of the traffic as a reference, so in this case, the incoming traffic will be considered as follows: source | (in) firewall (out) | destination.
Note
By default, all incoming traffic, if not matched with some pass action rule, will be blocked by the default deny rule.
- Outgoing packets: From a firewall perspective, traffic leaving will be considered as going in the outward direction by the pf system.
Note
By default, all outgoing traffic is allowed, if not matched with some block rule.
After finishing with these basic firewall concepts, let's learn about firewall aliases and pf tables.
Firewall aliases
To introduce you to aliases, let's start with a little story.
Let's imagine that you oversee an OPNsense firewall in a network with thousands of hosts, dozens of network segments, and a lot of VPN tunnels. This scenario will probably (considering good security practices) demand a lot of different rules to control host traffic, right? So, this will easily produce more than a thousand rules (yes – this part is based on a real example!), and managing each host individually using the one rule per host approach can increase this number to tens of thousands of rules incredibly quickly, becoming a nightmare to anyone in charge of managing the firewall!
Now, imagine it being possible to group hosts by access profile, selecting both source and destination hosts and adding them to lists, and then creating firewall rules based only on these lists.
This will drastically reduce the number of rules, turning the nightmare into the firewall ruleset of dreams! Now, you are probably feeling relieved thinking about the possibility of doing that. Well, we can do it!
Let me tell you about OPNsense aliases.
Aliases (also known as tables in the pf world) can group not only hosts but also networks, ports, fetch IPs from URLs, regions (using GeoIP), and much more! Let's see how to use them.
From the web browser, head to Firewall | Aliases:
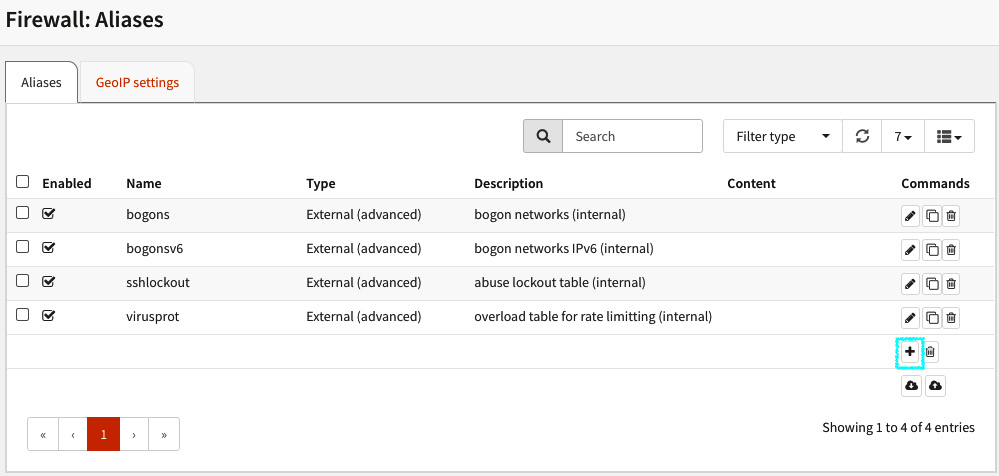
Figure 5.1 – The Firewall: Aliases page
Click on the + icon to open the new aliases dialog; in it, you will be able to create a new firewall alias using the following options:
- Enabled (checked by default): Check this option to enable this alias.
- Name: A descriptive name to the new alias (without spaces).
- Type: These are explained as follows:
- Hosts: A single IP address or a hostname using the Fully Qualified Domain Name (FQDN). To exclude a host in the alias, you need to put a ! sign before the name or IP address. The ! sign represents a NOT (negate) expression.
- Networks: A network address using the CIDR notation (such as 192.168.0.0/24).
- Ports: Port numbers or a port range using the first_port:last_port format (such as 10000:20000).
- URL (IPs): An IP addresses list that is fetched just once.
- URL Tables (IPs): An IP addresses list that is fetched periodically.
- Refresh Frequency: When you select URL tables, this option will be shown with two textboxes – Days, which will define the interval in days to refresh the IP list, and Hours, which will define the interval of refreshing the list in hours.
- GeoIP: In this option, you can select what geographical regions will be matched to the rules using this alias. Each region will list the respective countries. You can also select IPv4, IPv6, or both to match this type of alias. Note that to use this type of alias, you will need to follow these instructions first: https://docs.opnsense.org/manual/how-tos/maxmind_geo_ip.html.
- MAC address: Fill with complete MAC addresses or with the Organizationally Unique Identifier (OUI) part of the MAC address (such as F4:90:EA, which will match all Deciso-registered MAC addresses).
Note
You can consult the MAC OUI on the internet using websites such as https://www.wireshark.org/tools/oui-lookup.html.
Users can easily spoof MAC addresses to bypass firewall rules based only on these criteria.
- Network group: This type of alias can nest other ones. For example, you can combine several types of aliases (host, GeoIP, and network) into just one.
- External (advanced): This type of alias can't be managed using WebGUI and it is used by plugins, API calls, and so on. Practically speaking, this tells OPNsense to not touch this alias, which means that it will be managed by an external program using the pfctl command directly to manage the created table (or, as we are calling it here, the alias). An example is the NGINX plugin, which manages an alias to block bots and so on.
Note
Custom pf tables are not managed by the WebGUI and will not be saved in the configuration file (config.xml).
You can check the alias content in Firewall | Diagnostics: Aliases – we will see how to do this later in the chapter.
- Statistics: This option enables a set of counters of each table entry. You can check the alias content in Firewall | Diagnostics. Don't worry – as already mentioned, we'll explore it later in the chapter.
- Description: Type a description of your new alias here.
Now that we have learned how to create an alias, let's learn how to import and export it.
Importing and exporting aliases
Let's think about the following scenario: you need to migrate from another firewall platform – let's say a brand name x, for example – and the configuration of it is sent to you with a lot of existing objects and with tons of IP addresses inside each one. If you decide to add each object IP list using just the WebGUI, then you'll spend a lot of time converting these objects into aliases. So, if you have programming skills (or hire professional support from a company that does), you can convert it quickly to JSON file format, which is the one OPNsense uses, and import all these objects, saving a lot of time.
Let's take an example to practice this concept:
- Create a new alias choosing the Port(s) type, naming it SMTP_ports.
- Add in its content the following ports – 25 and 587.
- Save it by clicking on the Save button.
Tip
While adding alias content, type a comma (,) or just hit the Enter key to add new values in the Content textbox.

Figure 5.2 – The firewall alias download and upload icon buttons
Done! But wait – oh no! We forgot to add a port – the 465 SMTP port! Let's say we want to add the forgotten port in ascending order. So, we must add it between ports 25 and 587 – how can we do it? Let's see:
- In Firewall | Aliases, click on the download icon.
- A JSON file named aliases.json will be saved on your computer.
- Open it with your favorite text editor and search for the alias:
"aliases": {
"alias": {
"c0f60f78-c62b-4768-b9cf-b5c34df1f3bb": {
"enabled": "1",
"name": "SMTP_ports",
"type": "port",
"proto": "",
"counters": "1",
"updatefreq": "",
"content": "25 587",
"description": ""
},
- Find the following line:
"content": "25 587",
- With your favourite text editor, change the line to the following:
"content": "25 465 587",
Note
The special character represents a new line.
- Save your changes and go back to WebGUI.
- Click on the upload icon; a dialog will be shown. Click on the Choose File button, select your changed file, and click on the upload button:
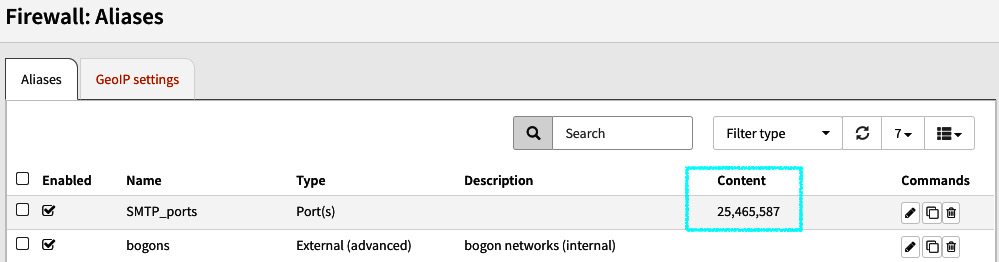
Figure 5.3 – A successfully imported alias JSON file
- OPNsense will check the file syntax, and if everything passes, after refreshing the page, you will be able to see the updated aliases in WebGUI.
- Congratulations! You did your first alias export and import successfully!
- To remove or copy an existing alias is very simple:

Figure 5.4 – Cloning an existing alias
- If you need to copy an existing alias, just click on the clone icon.

Figure 5.5 – Removing an existing alias
- If you need to remove an existing alias, then just click on the trash icon.
And what about the external (advanced) type of alias I mentioned before? Let's look at it.
Aliases and pf tables
To manage an external (advanced) alias type, it is necessary to look at the pf tables directly. There are two different ways of doing that:
- WebGUI: Go to Firewall | Diagnostics | Aliases, where you will be able to see the alias (pftable) or edit its content:
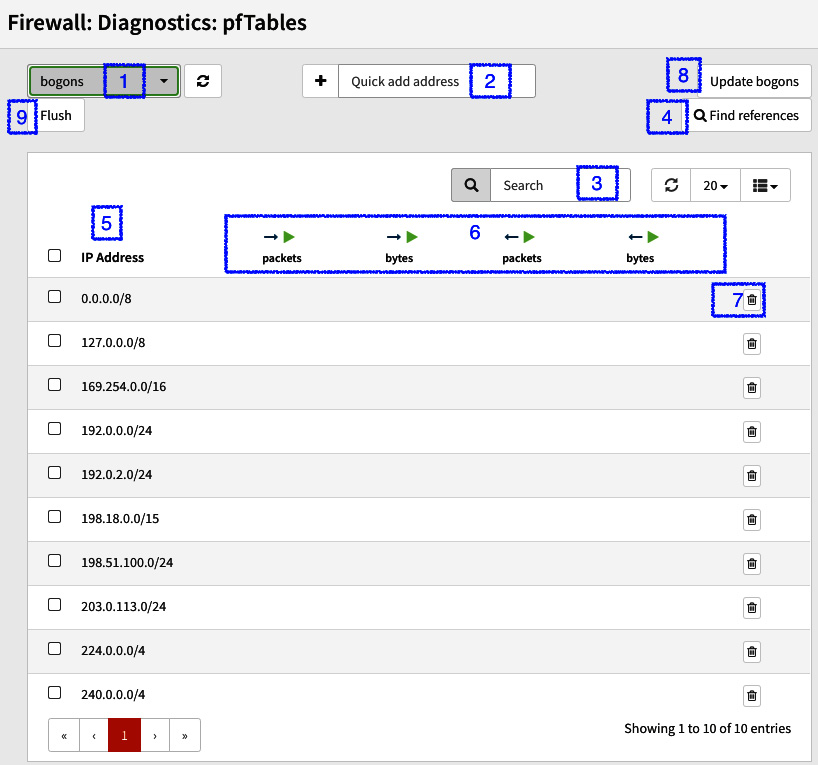
Figure 5.6 – The pfTables page
The numbers marked in Figure 5.6 are explained here:
- Selected table/alias to manage.
- Add an IP address in the existing table.
- Search for an IP address alias's content.
- Search for an IP address in all existing tables.
- The IP addresses table's content.
- When the Statistics option is checked in the alias, the counters will be shown in these columns.
- Remove a table entry.
- This button will update the special bogons table from the OPNsense servers.
- This button will remove all the tables content.
Notes
On this page, only aliases with an IP address in their content will be listed. You can also edit their content here, but remember that changes made here are not saved in the configuration file.
- To learn more about bogon networks, refer to https://en.wikipedia.org/wiki/Bogon_filtering.
- CLI: To manage pf tables in the CLI, we will use the pfctl command:
root@OPNsense:~ # pfctl -t bogons -T show
0.0.0.0/8
127.0.0.0/8
169.254.0.0/16
192.0.0.0/24
192.0.2.0/24
198.18.0.0/15
198.51.100.0/24
203.0.113.0/24
224.0.0.0/4
240.0.0.0/4
The command syntax to manage tables is as follows:
pfctl -t <table> -T <action>
In this book, we will be covering just three pfctl actions:
- add: To add a new IP address entry to an existing table or create a new one.
- del: To remove an existing table's IP address entry.
- show: To list the table's content. The complete actions list can be found at https://www.freebsd.org/cgi/man.cgi?query=pfctl&sektion=8.
Now that you have learned all about aliases and tables, it's time to learn how to use them in the firewall rules.
The firewall rules
One of the most important and useful features in OPNsense is the firewall rules. With them, OPNsense can control network traffic, and block, allow, or forward packets based on the firewall ruleset.
Before we start creating firewall rules, let's learn about some rule concepts used in OPNsense.
The rule processing order
OPNsense uses the pf with the quick parameter set by default, which means that the matched rule will be processed immediately, on a first-match basis. Otherwise, if we leave the Quick option unchecked in the rule, the last-match basis will be used, which means that all the rules will be processed.
OPNsense divides rules by network interfaces, except for the floating rules, which permit creating rules on any interface and are processed before the rules defined in the interfaces ruleset.
The rule processing order is as follows:

Figure 5.7 – The rule processing order
To see the complete list of rules created in your OPNsense using the CLI, you can run the pfctl sa command:
root@OPNsense:~ # pfctl -sa | less
TRANSLATION RULES:
no nat proto carp all
nat on em0 inet from (em1:network) to any port = isakmp -> (em0:0) static-port
nat on em0 inet from (lo1:network) to any port = isakmp -> (em0:0) static-port
…
FILTER RULES:
scrub on em1 all fragment reassemble
scrub on lo1 all fragment reassemble
scrub on em2 all fragment reassemble
scrub on em0 all fragment reassemble
block drop in log on ! em1 inet from 192.168.56.0/24 to any
…
pass out log quick inet6 proto ipv6-icmp from (self) to fe80::/10 icmp6-type echorep keep state label "acdbb900b50d8fb4ae21ddfdc609ecf8"
It will output the complete ruleset, including the translation rules Network Address Translation (NAT).
If you want to only see the firewall rules, type pfctl -sr.
Let's now look at the rule actions.
Rule actions
There are three types of rule actions available:
- Pass: This will just allow the traffic.
- Block: This will drop the traffic, denying it without any response to the source. This causes TCP timeouts, so you can slow down your network! It is not recommended on Local Area Network (LAN) and Demilitarized Zone (DMZ) networks.
- Reject: This will deny the traffic and send a packet to the source to let it know about the block. In the case of TCP traffic, it will return an Reset (RST) flagged packet to the source. For UDP packets, an ICMP unreachable packet is sent to the source.
Let's see how to create a firewall rule in WebGUI:
Creating the first rule
Let's create our first rule to practice the concepts learned in previous sections:
- To create your first firewall rule, go to Firewall | Rules | LAN:
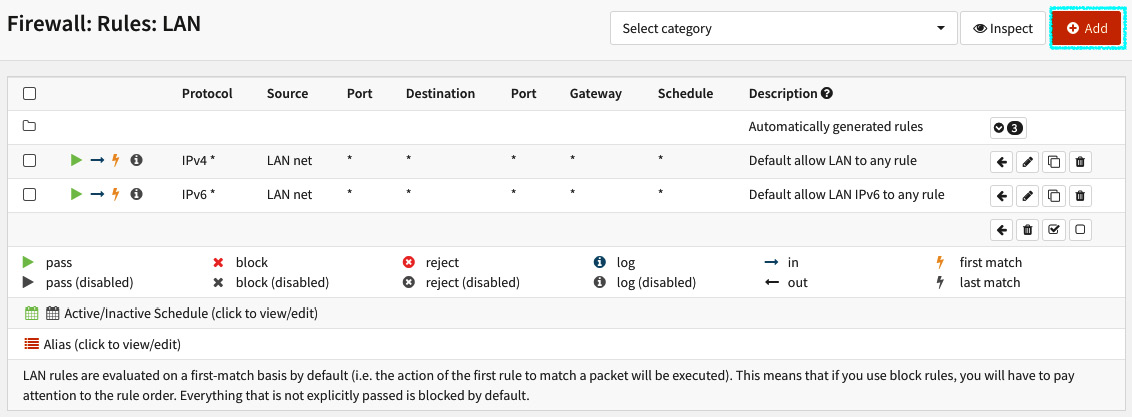
Figure 5.8 – The LAN's firewall rules page
A new page will be opened, with the following options:
- Action: This is the rule action. Choose Pass, Block, or Reject.
- Disabled: Check this option to disable the current rule.
- Quick: Enabled by default, this will apply the first match criteria to the ruleset. If this rule matches, it will stop to evaluate the ruleset and will apply the selected action.
- Interface: The network interface that this rule applies to.
- Direction: As we have learned before, this will select which direction the rules will process, in or out; the default is to filter incoming traffic.
- TCP/IP Version: Select which version of TCP and IP protocols this rule will process – IPv4, IPv6, or IPv4+IPv6 (both).
- Protocol: Select which IP protocol this rule will process. OPNsense supports a lot of protocols in this option, but the most common ones to select here are TCP, UDP, or both.
- Source/Invert: If checked, this option will invert (negate) the source in this rule. ! will be added before the source to identify it as an inverted source (after the rule is created). For example, if checked, a rule with the 192.168.1.1 source IP address will apply to all other addresses except this specified one.
- Source: Click on the Advanced button to show the source and source port range options:
- Source: Select the source address of this rule.
- from: The first port number of a range.
- to: The last port number of a range.
Note
The source port range option will be only available if you selected a compatible protocol in the Protocol option – for example, TCP or UDP.
- Destination / Invert: If checked, this option will invert (negate) the sense of destination in this rule. ! will be added before the source to identify it as an inverted source (after the rule is created). For example, if checked, a rule with the destination of an alias with the RFC1918 networks (private networks) in it will apply this rule only to public IP addresses, because it will not match all private networks (compliant with RFC1918).
Note
If you never heard about RFC1918, refer to https://datatracker.ietf.org/doc/html/rfc1918.
- Destination: Select the destination address that this rule will apply to:
- Destination port range: Select the source address to this rule.
- from: The first port number of a range.
- to: The last port number of a range.
Note
The destination port range option will be only available if you selected a compatible protocol in the Protocol option – for example, TCP or UDP.
- Log: Log packets that are handled by this rule: Check this option to enable the log for this rule. By default, OPNsense only logs the default system rules.
- Category: Categories are a useful resource added recently to OPNsense to help manage firewall rules (especially the larger ones). If you type text here, it will create a new category if it doesn't already exist, and the rule will be grouped in this category. After creating a category, you can select it on the Rules page, as shown in the following screenshot:

Figure 5.9 – The Rules category selection option
- Description: You can type a description of the rule in this option. Add some description that will make sense to others; it will help to keep your firewall ruleset clean and easy to understand!
Now that we have described each option, let's create a LAN rule:
- As the LAN default rule is to allow all traffic, let's create a new rule with the Block action:
- Create a new rule and select the following options (maintain the default values for the options not mentioned here):
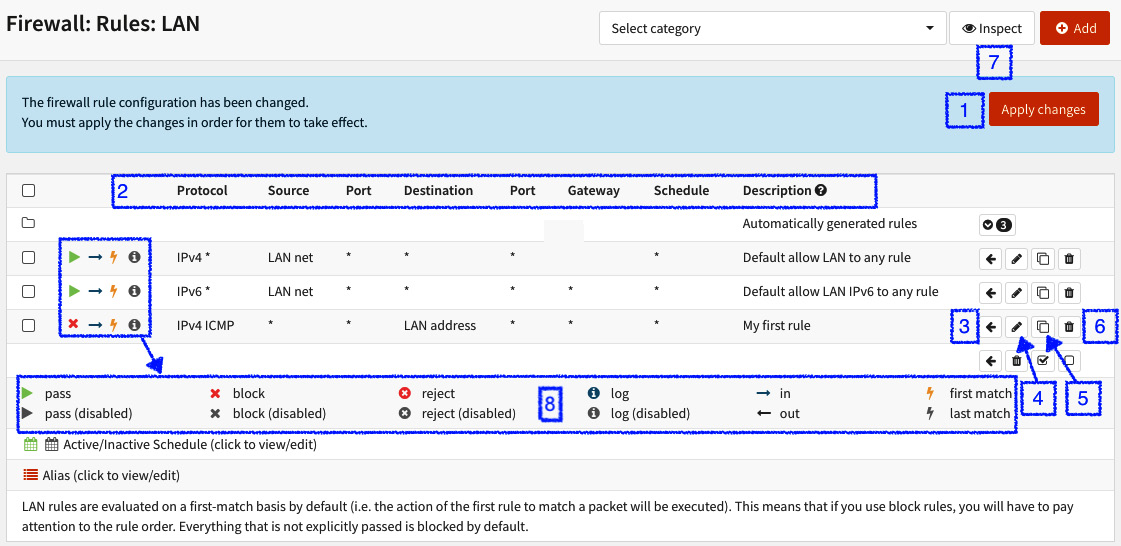
Figure 5.10 – Firewall rules options
The numbers in the preceding screenshot refer to various options:
- After creating or editing rules, this dialog will show to make changes effective, and to do so, just click on Apply changes.
- The Rule columns: They will show the options as the rules are configured.
- The Move rule button: To move a rule, you need to first select the rule you want to move; after that, click on this button in a rule that holds the position that you want to move the selected rule to. By doing this, the selected rule will be moved before the rule you have clicked on the Move rule button.
- The Edit rule button: Click on this button to edit the selected rule.
- The Clone rule button: To clone a rule, just click on the clone button in a rule you want to clone.
- The Delete rule button: If want to remove a rule, just click on this button.
- The Inspect button: This will show the rule statistics by changing the columns to the options, as shown in the following screenshot:
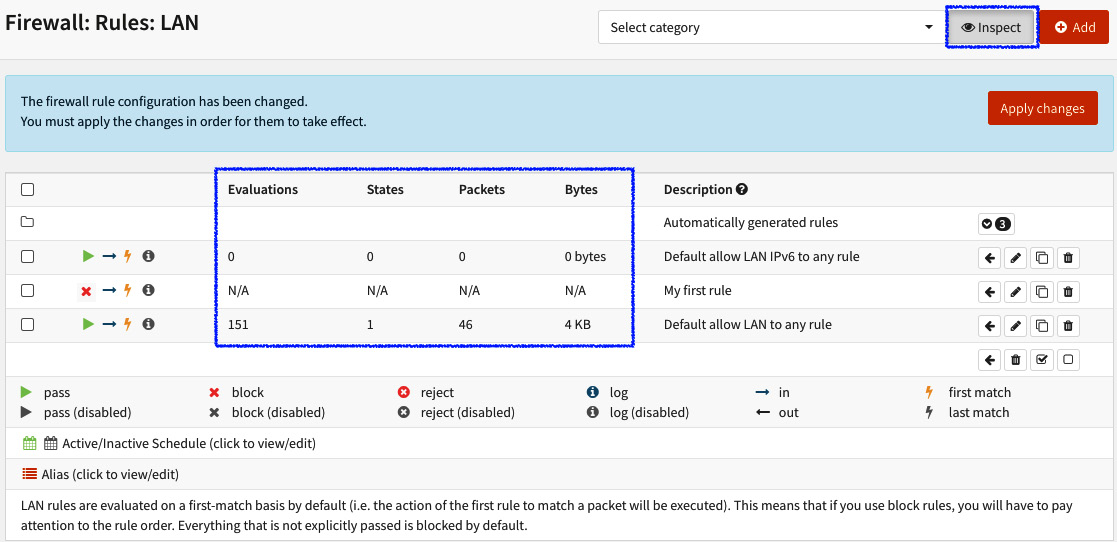
Figure 5.11 – Toggle rule inspection
- Legend: This is the rule's icon legend.
After the rule is created, try to run a ping command to your OPNsense LAN's IP address (in my case, the LAN is 192.168.56.3; change it to your OPNsense LAN's IP address):
$ ping -c 3 192.168.56.3
PING 192.168.56.3 (192.168.56.3): 56 data bytes
64 bytes from 192.168.56.3: icmp_seq=0 ttl=64 time=71.023 ms
64 bytes from 192.168.56.3: icmp_seq=1 ttl=64 time=1.205 ms
64 bytes from 192.168.56.3: icmp_seq=2 ttl=64 time=1.326 ms
--- 192.168.56.3 ping statistics ---
3 packets transmitted, 3 packets received, 0% packet loss
round-trip min/avg/max/stddev = 1.205/24.518/71.023/32.884 ms
The rule you have just created isn't blocking packets yet because the ICMP packets are matching the default allow rule created before the new rule. Let's try to move it to the first position in the LAN's ruleset and see what happens:

Figure 5.12 – Moving the rule
To move the rule position in the ruleset, follow these steps:
- Click on the move rule button (the selected rule will be moved to the first position).
- Click on the Apply changes button.
- Now, try to run the ping command again:
ping -c 3 192.168.56.3
PING 192.168.56.3 (192.168.56.3): 56 data bytes
--- 192.168.56.3 ping statistics ---
3 packets transmitted, 0 packets received, 100% packet loss
- As you can see, the rule now is blocking ICMP packets! Congratulations! Your first rule is working! You just created and moved a rule in OPNsense's WebGUI.
- Now that you know how to create and manage rules in OPNsense, try to create other rules using different protocols and actions to improve your firewall's rule skills! We will use a lot of firewall rules till the end of this book, so this small exercise was to just introduce you to managing firewall rules in WebGUI.
Now, let's look at the firewall settings and tweaks.
Firewall settings
In the firewall settings options, you see how to adjust some firewall configurations such as optimization, firewall's behavior and maximum values to settings such as states and table entries.
In the following section, we will learn how each option can change the firewall settings and behavior globally in the system:
- To start, head to Firewall | Settings | Advanced.
- On this page, the first option is related to IPv6 traffic – IPv6 Options.
- Allow IPv6: The default action is to block all the IPv6 traffic; if you don't want to block it, just check this option.
- NAT: The following options are related to NAT. In the next chapter, we will learn how to create NAT rules in OPNsense; for now, we'll just look at some settings that can adjust the way some NAT rules work in OPNsense.
- Reflection for port forwards: If OPNsense has NAT rules for forwarding ports using external (internet) addresses and you want your local networks to reach these ports, enable this option. This option will create rules to permit local hosts to reach ports forwarded using external addresses to hosts that rely on local networks.
- Reflection for 1:1: The same option mentioned in the preceding section applies here but to the NAT 1:1 rule. In the next chapter, we'll explore the types of NAT rules that OPNsense is capable of.
- Automatic outbound NAT for Reflection: This is another NAT-related option; as explained in the previous option, this will set the reflection to outbound NAT rules.
- Bogon Networks: Bogon networks are IP addresses that are reserved and should not be seen in internet routing traffic. OPNsense frequently updates these IPs, and the following option adjusts the frequency that it is done.
- Update Frequency: The available options are Monthly, Weekly, and Daily.
- Gateway Monitoring: Each OPNsense monitor created a gateway, sending ICMP (ping – ICMP request) packets to check whether the gateway host is alive. The following options are related to this gateway monitoring process:
- Kill states – Disable State Killing on Gateway Failure: When a gateway goes offline, OPNsense will flush states related to this gateway by default. If you want to change this behavior, just click on this option and it will not flush the related states.
- Skip rules – Skip rules when gateway is down: When a gateway specified in a rule is down (which we'll discuss in Chapter 9, Multi-WAN – Failover and Load Balancing), the rule is not created (skipped) when this option is checked.
- Multi-WAN: OPNsense includes multi-Wide Area Network (WAN) and failover capabilities, and the way it works can be configured in the following options:
- Sticky connections – use sticky connections: When using a load balancer with multiple WANs, OPNsense will send packets on a round-robin basis, with connections being sent to all available gateways. This behavior can break some connections and cause problems to users accessing certain services. To avoid that, you can set this option to make connections stick to the same gateway, based on the source address. This way, connections will only have a change of gateway after they expire or when a gateway goes down.
- Shared forwarding Use shared forwarding between packet filter, traffic shaper, and captive portal: Rules with a specific gateway skip the processing of its packets for a traffic shaper and a captive portal. The reason this happens is that the packet filtering system used by these two services (ipfw) is different from the one used by the firewall in OPNsense (pf). To make them work with the same rules from the firewall, check this option.
Note
To learn more about the available pf systems on FreeBSD, refer to https://docs.freebsd.org/en/books/handbook/firewalls/.
- Disable force gateway – Disable automatic rules which force local services to use the assigned interface gateway: By default, OPNsense will use the interface's gateway to outgoing packets. If you want it to use the system routing table instead, check this option.
- Schedules: Firewall rules can be scheduled, specifying a date and time. You can set a schedule on the Firewall | Settings | Schedules page. An example of a schedule is shown in the following screenshot:
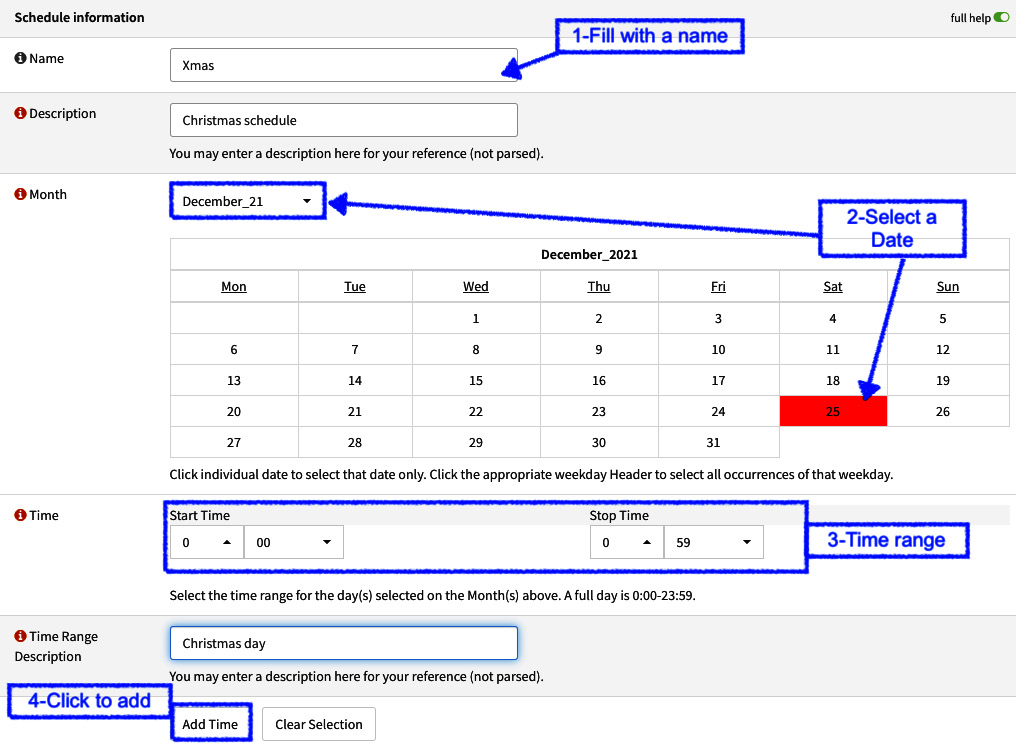
Figure 5.13 – Creating a new rule schedule
- Following these steps, the schedule will be added; you can add more dates or times to a schedule, but in this example, we'll just add one:
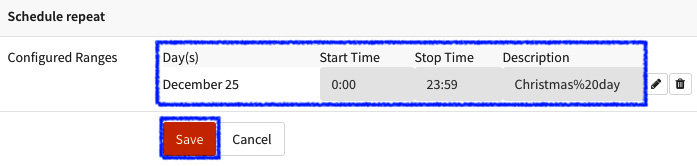
Figure 5.14 – Saving the new schedule
- On the same page, to save the newly created schedule, just click on the Save button:

Figure 5.15 – Selecting the created schedule in a firewall rule
- To assign the created schedule to a rule, just edit an existing firewall rule, select the schedule in the Schedule option, and then click on the Save button:

Figure 5.16 – A schedule assigned to a firewall rule
- After saving the rule, the schedule can be visualized in the Schedule column.
Note
The ruleset is reloaded every 15 minutes, so this will be the period of time a schedule can take to become active. Another detail to consider while using schedules is that an active connection will stay active until it closes, or until the state is killed on the firewall!
Congratulations! We just learned how to create a scheduled rule! Let's get back to the Firewall | Settings | Advanced page to move on with the schedule options:
- Schedule States: After a schedule is expired, the firewall will clean the states for existing connections; if you don't want it to do so, check this option.
- Miscellaneous: The firewall's miscellaneous options are described as follows:
- Firewall Optimization: OPNsense has four firewall optimization profiles:
- normal: This is the default option, which will apply the default optimization algorithm.
- high-latency: This will increase the idle connection timeout. Links with high latency may need to select this option.
- aggressive: This will decrease the idle connection timeout. This way, they expire quicker, saving system resources. The cost of selecting this option is that it may drop some legitimately idle connections.
- conservative: The most system resource-consuming option, this will try to maintain legitimate idle connections longer while increasing CPU and memory utilization.
- Firewall Rules Optimization: Select which rules optimization algorithm OPNsense will apply to the ruleset:
- none: This will disable the firewall rules optimizer.
- basic: This algorithm will perform some actions to try to optimize the ruleset such as removing duplicated rules, reordering rules when it can improve the performance, combining some rules when it is an advantage, and removing rules that are a subset of other ones.
- profile: This uses the currently loaded ruleset as a feedback profile to tailor the ordering of quick rules to actual network traffic.
- Bind states to interface: By default, the connection states in OPNsense are floating, which means that they will not bind to an interface. To bind the connection states to the relevant interface, check this option. In the following screenshot, you can see the difference between when this option is turned on and off (OPNsense defaults) in Firewall | Diagnostics | States:
- Firewall Optimization: OPNsense has four firewall optimization profiles:
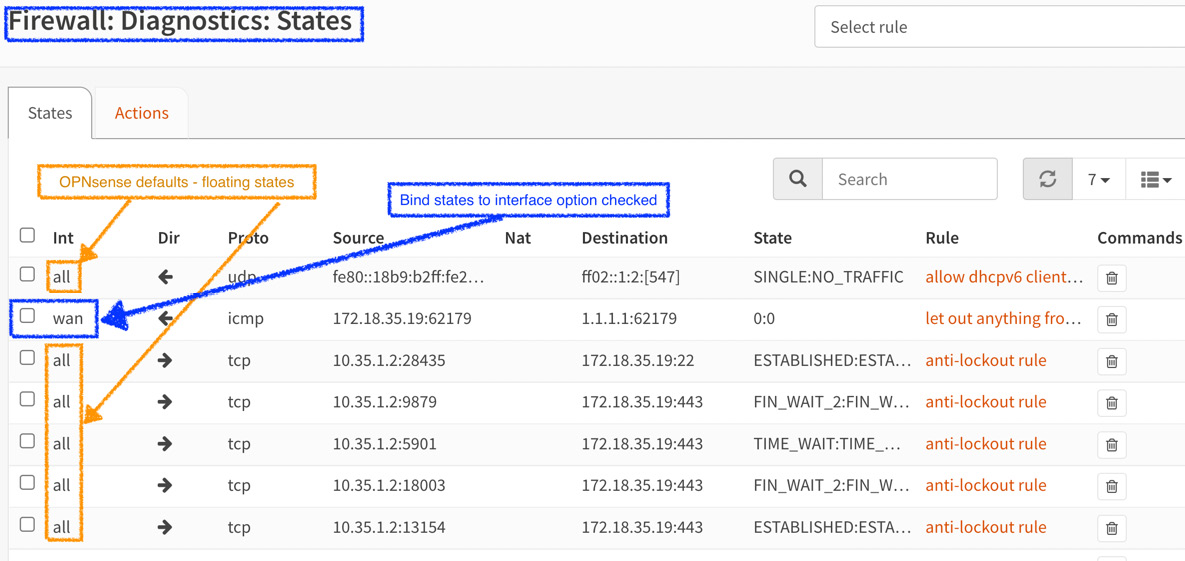
Figure 5.17 – The firewall states dump – a comparison
- Disable Firewall – Disable all packet filtering: This option will disable the pf system, which means no more packet filtering or NAT! With this option checked, OPNsense will act as a network router.
Note
If you need to temporarily disable the firewall and NAT, you can run on the CLI the pfctl -d command, and to re-enable it, just run pfctl -e. When OPNsense is intended to be used as just a network router, this option may increase the throughput. Be careful running those commands in a production environment!
- Firewall Adaptive Timeouts: To prevent the state table from getting full quickly in a state's burst, for example, you can define two values here: the start value, which will trigger a scaled timeout factor for the connections in the state table, and the end value, which will be used as the scale factor. When it has reached the connections, the timeout will become zero, removing all entries immediately, which isn't a good idea, so try to maintain this value high enough to not be reached. The scaling process will work based on this formula: (adaptive end value – current number of states) / (adaptive end value – adaptive start value).
- Here is an example:
end value: 1000
current states number: 750
start value: 500
(1000 – 750) / (1000 – 500) = 0,5
In this case, when the state's number reaches 500, it will start to apply scaling. In the preceding example, the scale factor (with 750 current states) will be 50% (0,5), which means that the default timeout value will be decreased by 50%. The default value is 0.
- Firewall Maximum States: These are the maximum connections entries OPNsense will keep in the state table. The default value will vary based on the system's memory (RAM). Each state entry will consume 1 KB of RAM.
- Firewall Maximum Fragments: This is the maximum number of packet fragments (used for reassembly) that the system will hold.
- Firewall Maximum Table Entries: This is the maximum number of entries that each alias (pf table) will hold. The default value will vary based on the system's memory (RAM).
- Static route filtering: While using static routes in OPNsense, enabling this option will bypass packet filtering for packets that are incoming and outgoing in the same interface. This option can be used when there are multiple subnets connected to the same interface.
- Disable reply-to: By default, while using multi-WAN, OPNsense will keep the same path for traffic arriving by a certain interface, preventing asymmetric routing behavior. For example, in some cases, when using two or more interfaces in bridge mode or with local hosts using another gateway IP, rather than the one configured on the WAN interface, it may be necessary to disable reply-to to make the traffic path flow properly.
- Disable anti-lockout: OPNsense, by default, automatically adds rules to allow system administration through WebGUI- and Secure Shell Protocol (SSH)-configured ports. Check this option to disable these automatic rules. Be warned that checking this option can lock your OPNsense administrative access; be sure of what you are doing before doing it.
- Aliases Resolve Interval: When using hostnames inside aliases, OPNsense must resolve them periodically; here, you can set the intervals in which it does that. The default is 300 seconds (5 minutes).
- Check certificate of aliases URLs – Verify HTTPS certificates when downloading alias URLs: While using URL/URL table aliases with HTTPS addresses, OPNsense will check for a valid certificate before it starts downloading the alias' content. If this option is checked, only fetch content from the server if the certificate is valid.
- Dynamic state reset – Reset all states when a dynamic IP address changes: If some interface configured with a dynamic IP has changed, the whole state table will be flushed to reflect the new IP (which is only used for IPv4 addresses).
That's all the available options on the firewall advanced settings page. Now, let's move on and look at some of the traffic normalization options available in WebGUI.
Go to Firewall | Settings | Normalization. On this page, it will be possible to change some traffic normalization (also known as scrubbing) settings and create new scrub rules for very specific cases when needed. Traffic normalization is useful to normalize packets that may be malformed or created intentionally – for example, for attacks.
The options available in General settings are as follows:
- Disable interface scrub: Checking this option will disable the normalization rules to all interfaces.
- IP Do-Not-Fragment: If a protocol generates fragmented packets with don't fragment bit set, OPNsense by default will drop these packets. To avoid this behavior, check this option; this way, the packets will pass through the filter that will just clean the don't fragment bit instead of dropping these packets. If you want to deep-dive into IP fragmentation, refer to https://en.wikipedia.org/wiki/IP_fragmentation.
- IP Random id: When checked, this will replace the IP identification of the non-fragmented packet's field.
- Detailed settings: You can optionally specify your own packet normalization rules by clicking on the + Add button at the top-right corner of the page. There, you will be able to specify custom rules for several parameters for traffic normalization. As this is an extensible topic, we'll not cover it here. If want to learn more about scrub rules in pf, a good starting point is the pf man page: https://www.freebsd.org/cgi/man.cgi?query=pf.conf&sektion=5&n=1#TRAFFIC%09NORMALIZATION.
Now, we'll explore a little bit about firewall diagnostics and troubleshooting in the next section.
Diagnostics and troubleshooting
Truth has no answer – against facts, it's difficult to argue, so always count on logs and diagnostics tools to help you solve issues related to firewalls. Based on facts, your troubleshooting will be as sharp as a katana (a samurai's sword). As an airplane pilot, aviation experience taught me that things must be checked using a checklist based on facts, and as a firewall administrator, experience has taught me that a firewall will be blamed for network problems in 99.9% of cases. So, don't guess a problem – check it! OPNsense has a lot of tools that can help you with your troubleshooting. In time, users will start relying on just your word and not blame the firewall for any network (or maybe entire internet) problems. This is my advice for you based on a couple of decades of personal experience.
Starting at Diagnostic tools, go to Firewall | the Diagnostics menu:
- pfInfo: This page shows different information based on the pfctl command output. The available options are as follows:
- Info: This is the output of the pfctl -si command, which shows information about interface statistics, the state table, and counters.
- Memory: This will show the pfctl -sm output and displays the memory hard limits for pf.
- Timeouts: This is the pfctl -st output and shows the global timeout values.
- Interfaces: This outputs the pfctl -sI -vv command. It displays the interface statistics available to pf.
- Rules: This shows the current rules loaded in the memory. This is the output of the pfctl -sr -vv command.
- NAT: This is the same as the preceding but applies to the NAT rules. It outputs the pfctl -sn -vv command.
- pfTop: This page displays the pftop command output. It also displays pf states and can be filtered or sorted by the available options – View type, Sort type, and Number of States.
- pfTables: We already explored this earlier in the chapter; please refer to the Alias and pf tables section.
- States Dump, States Reset, and States Summary: We also explored these before; please refer to the Stateful firewall section if you want to review these pages.
Let's move on to the log options; head to Firewall | Log Files | Live View to start.
On this page, we will be able to see in real time all events generated by rules with the log option enabled or by system default rules, such as the default deny rule. This is a useful page and is the starting point for most firewall troubleshooting:
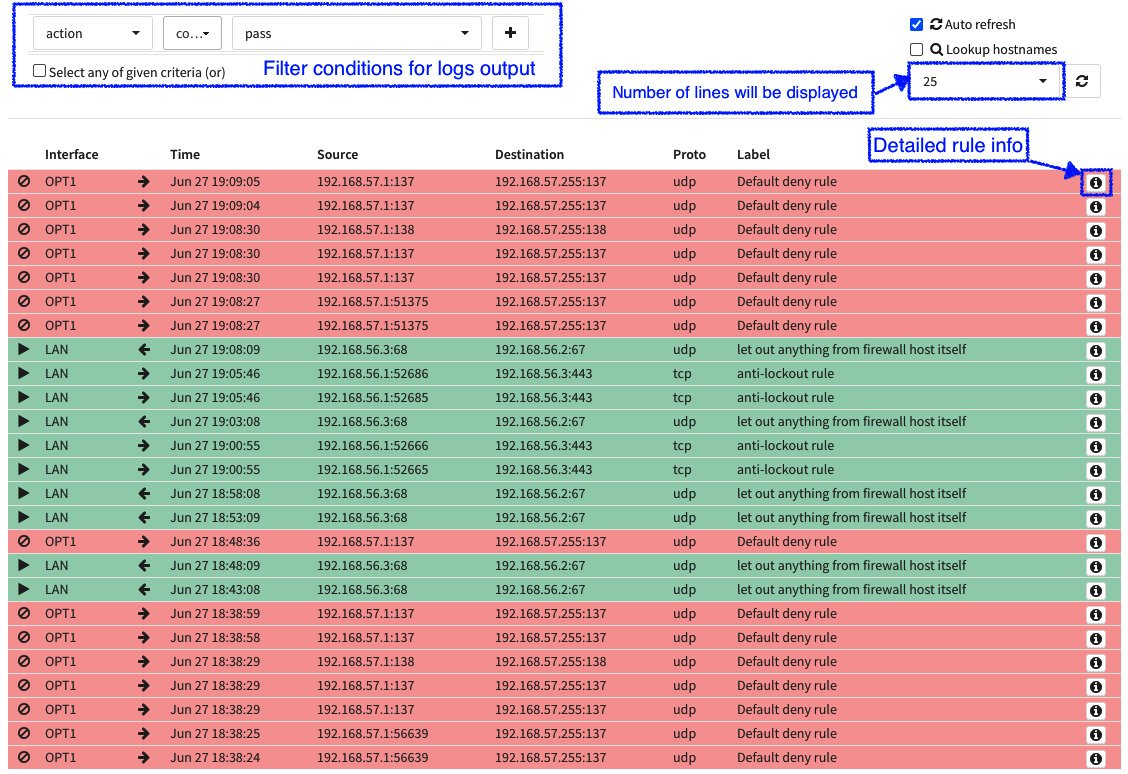
Figure 5.18 – The firewall logs live view page
To see the raw log output, go to Firewall | Log Files | Plain view. As you can see in the preceding screenshot, the output of the live view is formatted and much easier to understand. The red lines are blocked traffic and the green lines are the allowed ones. OPNsense has a page that outputs graphics of the firewall logging; you can explore these graphics by going to Firewall | Log Files | Overview. Let's now explore some troubleshooting cases to see how to use diagnostic tools and log files to find firewall issues.
Troubleshooting
Let's look at some real use cases of issues relating to firewalls and see how we can try to solve each one using OPNsense tools.
The firewall is blocking a connection
In cases like this, a good start is looking at the firewall logs, specifically on the Live View page; this will help to filter the information about the connectivity issue. It is important to know what the source or destination address is (both is better), and the port number will help a lot but isn't essential to know in most cases. If you can't see connections being blocked, it means that the firewall is passing the traffic, or it isn't arriving in the firewall. If the traffic is passing, let's move on to the next item to be checked.
Firewall states dump
If a connection is passing through the firewall, it will generate a connection state. To check it, go to Firewall | Diagnostics | States Dump and filter for connections using a source or destination address, or even the port number. Here's a hint – you can filter for port numbers by typing :port (For example, 443 to filter port 443) in the Filter expression textbox. If traffic isn't arriving in the firewall, you probably will need to check other connectivity issues in the network to find out what is happening. Going to Interfaces | Diagnostics | Packet Capture may help you.
Rule reviewing
If traffic is blocked, then check the ruleset of the related interface. Maybe you'll need to create a new rule, adjust an existing one, or even change the rule order. Common issues related to rules are wrong protocols or port numbers, typos in addresses (source or destination), and so on; when reviewing a rule, be focused. I have seen good analysts take a long time to solve a firewall issue because they were not paying enough attention to the rule reviewing process.
In very rare cases, it's necessary to double-check whether a rule is applied to the pf reviewing the /tmp/rules.debug file in the CLI. Another way to check it is by running the pfctl -sr command. It's very rare in OPNsense to see rules not being loaded, but if you are in doubt, check it.
You can also check whether a rule has been matched with traffic by clicking on the Inspect button on the Rules page.
To end this topic, the last piece of advice is to always use your knowledge and experience. The OSI model is a good guide to follow when troubleshooting connectivity issues. If you don't know the OSI model yet, take a break from this chapter and start studying it; it will save you a lot of time. You can start here: https://en.wikipedia.org/wiki/OSI_model.
Summary
In this chapter, we learned about the OPNsense packet filtering system (the pf). We also learned what a stateful firewall is and how to check states on OPNsense, how to manage aliases and rules, how they are processed in OPNsense, creating rules' schedules, changing firewall settings, and explored firewall diagnostics and troubleshooting. Now you understand how OPNsense's firewalling works, how to create aliases and rules, how to adjust firewall settings, and how to troubleshoot firewall issues. Understanding firewalling is important in preparation for moving on to the next chapters.
In the next chapter, we'll continue the firewalling saga by exploring NAT rules!