
TeamCity can be configured to invoke our test suite and collect results in a scheduled interval.
These steps will prepare us for this recipe by starting up TeamCity and having some code ready for testing:
- Set up TeamCity like we did earlier in this chapter, and have it up and running.
- Create an empty folder for this recipe.
gturnquist$ mkdir /tmp/recipe50 - Initialize the folder for source code maintenance.
gturnquist$ git init /tmp/recipe50
Initialized empty Git repository in /private/tmp/recipe50/.git/
- Copy the shopping cart application into the folder, add it, and commit the changes.
gturnquist$ cp cart.py /tmp/recipe50/
gturnquist$ cp tests.py /tmp/recipe50/
gturnquist$ cd /tmp/recipe50/
gturnquist$ git add cart.py tests.py
gturnquist$ git commit -m "Adding shopping cart and tests for this recipe."
[master (root-commit) 01cd72a] Adding shopping cart and tests for this recipe.
 2 files changed, 55 insertions(+), 0 deletions(-)
 create mode 100644 cart.py
 create mode 100644 tests.py
These steps show the details of configuring TeamCity to run our test suite on a scheduled basis:
- Login to TeamCity console.
- Underneath Projects tab, click Create project.
- Type in recipe50, and then click Create.
- Click Add a build configuration for this project.
- Enter nose testing for the name and then click VCS settings.
- Click on Create and attach new VCS root.
- Enter recipe50 in VCS root name.
- Select Git as the Type of VCS.
- Enter
/tmp/recipe50as the Fetch URL. - Click on Test Connection to confirm settings and then click Save.
- Click on Add Build Step.
- Select Command Line for Runner type.
- Select Custom script for Run type and enter the following script:
. /Users/gturnquist/ptc/bin/activate
nosetests tests.py
Replace this with your own steps to activate your virtualenv and then run the tests using nosetests.
- Click on Save.
- Click on Build Triggering.
- Click on Add New Trigger.
- Select Schedule Trigger from Trigger Type.
- Pick daily for frequency, and pick a time of about five minutes into the future.
- Deselect the option to Trigger build only if there are pending changes.
- Click Save.
- Navigate back to Projects. There should be no jobs scheduled or results displayed.
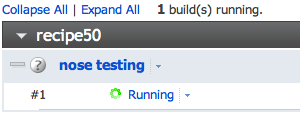
- Wait for the scheduled time to occur. The following screenshot shows the job when it is activated:
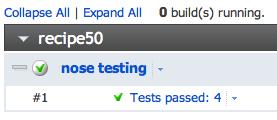
The following screenshot shows the results summarized with our tests having passed:
Doesn't this look suspiciously similar to the previous recipe? Of course! We varied it a bit by creating a time-based trigger instead of a source-based trigger. The time trigger we picked is a daily, scheduled build at a set time. The point is showing a commonly used trigger rule. By seeing what is the same and what's different, we can start seeing how to bend TeamCity to serve our needs.
TeamCity has other triggers that are very useful, like triggering one job when another one completes. This lets us build lots of small, simple jobs, and chain them together.
We also installed the teamcity-nose plugin, which gave us more details on the results.