
Jenkins can be configured to invoke our test suite upon commit. This is very useful, because we can gear it to track our changes. Teams that use CI systems usually adopt an attitude of addressing CI failures immediately in order to keep the baseline functional.
Jenkins offers an almost unlimited number of features, such as retrieving the latest source from version control, packaging a release, running tests, and even analyzing source code. This recipe shows how to configure Jenkins to run our test suite against our shopping cart application.
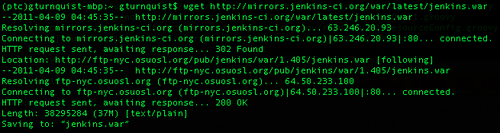
- Download Jenkins from http://mirrors.jenkins-ci.org/war/latest/jenkins.war.
- Start it up by running
java -jar jenkins.war. It's important that no other applications are listening on port 8080.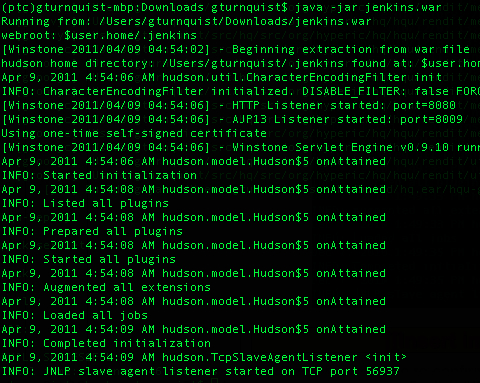
- Open the console to confirm Jenkins is working.

- Click on Manage Jenkins.
- Click on Manage Plugins.
- Click on the Available tab.
- Find the Git Plugin and click the checkbox next to it.
- At the bottom of the page, click on the Install button. Verify that the plugin has successfully installed.
- Navigate back to the dashboard screen.
- Shutdown Jenkins and start it back up again.
- Install git source code control on your machine. You can visit http://git-scm.com/ to find downloadable packages. It is also possible that your system may include package installation options like mac ports or homebrew for Macs, yum for Redhat-based Linux distributions, and apt-get for Debian/Ubuntu systems.
- Create an empty folder for this recipe:
gturnquist$ mkdir /tmp/recipe46 - Initialize the folder for source code maintenance:
gturnquist$ git init /tmp/recipe46
Initialized empty Git repository in /private/tmp/recipe46/.git/
- Copy the shopping cart application into the folder, add it, and commit the changes.
gturnquist$ cp cart.py /tmp/recipe46/
gturnquist$ cd /tmp/recipe46/
gturnquist$ git add cart.py
gturnquist$ git commit -m "Added shopping cart application to setup this recipe."
[master (root-commit) 057d936] Added shopping cart application to setup this recipe.
 1 files changed, 35 insertions(+), 0 deletions(-)
 create mode 100644 cart.py
The following steps will show how to put our code under control and then run the test suite when we make any changes and commit them:
- Open the Jenkins console.
- Click on New Job.
- Enter recipe46 as the Job name and pick build a free-style software project.
- Click on a.
- In the Source Code Management section, pick Git. For URL, enter
/tmp/recipe46/. - In the Build Triggers section, pick Poll SCM and enter * * * * * into the schedule box, to trigger a poll once every minute.
- In the Build section, select Execute shell and enter the following adhoc script that loads the
virtualenvand runs the test suite.. /Users/gturnquist/ptc/bin/activate nosetests tests.py –with-nosexunit
You need to substitute the command to activate your own virtualenv, whether this is on Windows, Linux, or Mac, and then follow it with the command used to run the tests just like we did earlier in this chapter.
- In the Post-build Actions section, pick Publish JUnit test result report and enter
target/NoseXUnit/core/*.xml, so that the test results are collected by Jenkins. - Click on Save to store all the job settings.
- Click on Enable Auto Refresh. We should expect the first run to fail, because we haven't added any tests yet.

- Copy the test suite into the controlled source folder, add it, and commit it.
gturnquist$ cp tests.py /tmp/recipe46/
gturnquist$ cd /tmp/recipe46/
gturnquist$ git add tests.py
gturnquist$ git commit -m "Added tests for the recipe."
[master 0f6ef56] Added tests for the recipe.
 1 files changed, 20 insertions(+), 0 deletions(-)
 create mode 100644 tests.py
- Watch to verify whether Jenkins launches a successful test run.

- Navigate to the test results page, where we can see that four of our tests were run.
Jenkins provides a powerful, flexible way to configure continuous integration jobs. In this recipe, we configured it to poll our software confirmation management system once a minute. When it detects a change, it pulls a fresh copy of the software and runs our test script.
By using the NoseXUnit plugin, we generated an artifact that was easy to harvest with Jenkins. With a handful of steps, we were able to configure a web page that monitors our source code.
Jenkins has lots of options. If you examine the web interface, you can drill into output logs to see what actually happened. It also collects trends showing how long we have had success, when the last build failed, and more.
The answer is No. We used it in this recipe to quickly show how to install a Jenkins plugin from inside the web interface. To apply the plugin, we had to restart Jenkins.
Subversion and CVS are supported out of the box. Jenkins also has plugins supporting every major source code control system out there, so it should be easy to meet your needs.
In fact, there is support for social coding sites like GitHub and BitKeeper. Instead of using the Git plugin, we could configure our Jenkins installation to watch a certain GitHub account for updates.
We configured the polling with * * * * *, which means once a minute. This is based on the format used to configure crontab files. The columns from left to right are:
- MINUTE—Minutes within the hour (0-59)
- HOUR—The hour of the day (0-23)
- DOM—The day of the month (1-31)
- MONTH—The month (1-12)
- DOW—The day of the week (0-7) where 0 and 7 are Sunday