
Robot Framework uses keywords to define tests, test steps, variables, and other testing components. Keywords are short-hand commands that are provided by various libraries and can also be custom defined. This allows many different ways of writing and organizing tests.
In this recipe, we'll explore how to run the same test procedure with varying inputs and outputs. These can be described as data-driven tests.
- We first need to activate our
virtualenvsetup. - For this recipe, we will use the shopping cart application.
- Next, we need to install Robot Framework, as shown in the previous recipe.
The following steps will show us how to write a simple acceptance test using HTML tables.
- Create a new file called
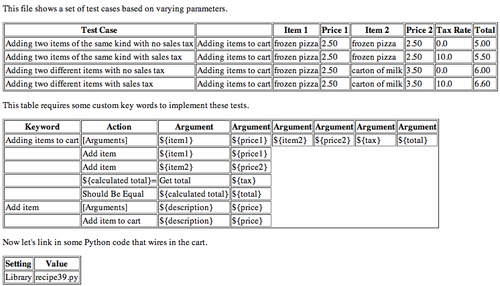
recipe39.htmlto capture the tests and configurations. - Add an HTML paragraph and table that contains a set of data-driven test cases, as shown in the following browser screenshot.

- Add another HTML paragraph and table defining the custom keywords Adding items to cart and Add item.

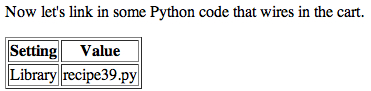
- Create a new file called
recipe39.pyto contain Python code that is wired into our custom keywords. - Create an old style Python class that implements the custom keywords needed for the scenarios.
from cart import * class recipe39: def __init__(self): self.cart = ShoppingCart() def add_item_to_cart(self, description, price): self.cart.add(description, float(price)) def get_total(self, tax): return format(self.cart.total(float(tax)), ".2f") - Add a third HTML paragraph and table that loads our Python code to implement Add item to cart and Get total.
- View the HTML file in your favorite browser.
- Run the HTML file through
pybotto exercise the tests by typingpybotrecipe39.html.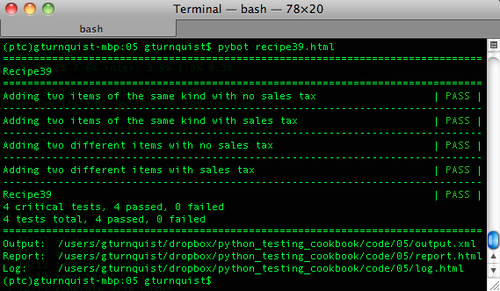
- You can inspect
report.htmlandlog.htmlusing your favorite browser for more details about the results.
Robot Framework uses HTML tables to define test components. The header row of the table identifies what type of component the table defines.
The first table we created was a set of test cases. Robot Framework spots this by seeing Test Case in the first cell of the header row. The rest of the header cells aren't parsed, which leaves us free to put in descriptive text. In this recipe, each of our test cases is defined with one-line. The second column has Adding items to cart on every row, which is a custom keyword defined in the second table. The rest of the columns are arguments for this custom keyword.
The second table we wrote is used to define custom keywords. Robot Framework figures this out by seeing Keyword in the first cell of the header row. Our table defines two keywords.
Addingitemstocart:- The first line defines the arguments by starting with
[Arguments]and six input variables:${item1},${price1},${item2},${price2},${tax}, and${total}. - The next set of lines are actions.
- Lines two and three use another custom keyword:
Additemwith two arguments. - Line four defines a new variable,
${calculatedtotal}, which is assigned the results of another keyword,Gettotalwith one argument,${tax}that is defined in our Python module. - The last line uses a built-in keyword,
ShouldBeEqual, to confirm the output ofGettotalmatches the original${total}.
- The first line defines the arguments by starting with
Additem:- The first line defines arguments by starting with
[Arguments]and two input variables:${description}and${price}. - The second line uses another keyword,
Additemtocart, that is defined in our Python module, with two named arguments,${description}and${price}.
- The first line defines arguments by starting with
The third table we made contains settings. This is identified by seeing Setting in the first cell of the header row. This table is used to import Python code that contains the final keywords by using the built-in keyword Library.
Robot Framework maps our keywords to our Python code by a very simple convention:
Gettotal${tax}maps toget_total(self,tax).Additemtocart${description}${price}maps toadd_item_to_cart(self,description,price).Note
The reason we need
add_item_to_cart, and couldn't have just writtenadd_itemto tie in to keywordAdditemis because Robot Framework uses named arguments when connecting to Python code. Since each usage ofAdditemin our tables had a different variable name, we needed a separate keyword with distinct arguments.
Robot Framework is driven by HTML tables, but it doesn't matter how the tables are generated. Many projects use tools like reStructuredText (http://docutils.sourceforge.net/rst.html) to write tables in a less verbose way, and then have a parser that converts it into HTML. A useful tool for converting .rst to HTML is docutils (http://docutils.sourceforge.net/). It provides a convenient rst2html.py script that will convert all the .rst tables into HTML.
Unfortunately, the format of this book makes it hard to present .rst as either code or with a screenshot. To see a good example, visit http://robotframework.googlecode.com/svn/tags/robotframework-2.5.4/doc/quickstart/quickstart.rst, the source for the online Quick Start HTML guide.
We wrote a chunk of Python code to tie in our custom keywords with the ShoppingCart application. It is important to make this as light as possible. Why? Because when we deploy the actual application, this bridge shouldn't be a part of it. It may be tempting to use this bridge as an opportunity to bundle things up, or to transform things, but this should be avoided.
Instead, it is better to include these functions in the software application itself. Then this extra functionality becomes a part of the tested, deployed software functionality.
If we don't invest too heavily in the bridging code, it helps us to avoid making the software dependent on the test framework. For some reason, if we ever decided to switch to something other than Robot Framework, we wouldn't be tied into that particular tool due to having too much invested in the bridging code.
Another critical factor in making our Python code work is recognizing that the input values are Unicode strings. Since the ShoppingCart is based on floating point values, we had to use Python's float(input) function to convert inputs, and format(output, ".2f") to convert outputs.
Does this contradict the previous section where we discussed keeping this bridge as light as possible? It doesn't. By using pure, built-in Python functions that have no side effects, we aren't getting in deep and instead are only messaging the formats to line things up. If we started manipulating containers, or converting strings to lists, and vice versa, or even defining new classes, then that would definitely be getting too heavy for this bridge.