
There is a Nose plugin that automatically detects when tests are being run from inside the TeamCity. This conveniently captures test results and communicates them with TeamCity. With this recipe, we will explore how to setup a CI job inside TeamCity that runs our tests and then manually invokes that job.
The following steps are needed to get us prepared to run a TeamCity CI job:
- Install nosetests as shown in Chapter 2.
- Install teamcity-nose by typing
pip install teamcity-nose. - Download TeamCity using wget http://download.jetbrains.com/teamcity/TeamCity-6.0.tar.gz.
- Unpack the download.
- Switch to
TeamCity/bindirectory. - Start it up:
./runAll.sh start. - Open a browser to
http://localhost:8111. - If this is the first time you are starting TeamCity, accept the license agreement.
- Create an administrator account by picking a username and password.
- Install git source code control on your machine.
- Create an empty folder for this recipe.
gturnquist$ mkdir /tmp/recipe48 - Initialize the folder for source code maintenance.
gturnquist$ git init /tmp/recipe48
Initialized empty Git repository in /private/tmp/recipe48/.git/
- Copy the shopping cart application and tests into the folder, add it, and commit the changes.
gturnquist$ cp cart.py /tmp/recipe48/
gturnquist$ cp tests.py /tmp/recipe48/
gturnquist$ cd /tmp/recipe48/
gturnquist$ git add cart.py tests.py
gturnquist$ git commit -m "Added shopping cart and tests to setup this recipe."
[master (root-commit) ccc7155] Added shopping cart and tests to setup this recipe.
 2 files changed, 55 insertions(+), 0 deletions(-)
 create mode 100644 cart.py
 create mode 100644 tests.py
The following steps will show us how to configure a CI job in TeamCity:
- Login to TeamCity console.
- Underneath Projects tab, click Create project.
- Type in recipe48, and then click Create.
- Click Add a build configuration for this project.
- Enter nose testing for the name and then click VCS settings.
- Click on Create and attach new VCS root.
- Enter recipe48 in VCS root name.
- Select Git as the Type of VCS.
- Enter
/tmp/recipe48as the Fetch URL. - Click on Test Connection to confirm the settings and then click Save.
- Click on Add Build Step.
- Select Command Line for Runner type.
- Select Custom script for Run type and enter the following script:
. /Users/gturnquist/ptc/bin/activate
nosetests tests.py
You need to customize this with the command needed to activate your virtualenv.
- Click on Save.
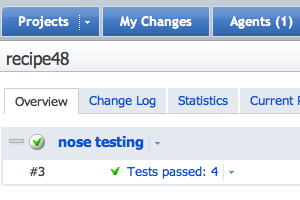
- Go back to the project, and manually run it.
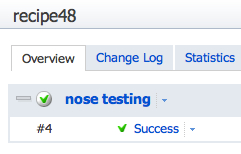
This plugin is designed not to be used in the classic style of being invoked by a command-line argument. Instead, it is automatically run whenever nosetests is executed, and it checks if there is a TeamCity-specific environment variable set. If so, it kicks in by printing out viewable results as well as sending back useful information to TeamCity.
Otherwise, the plugin lets itself be bypassed and does nothing. If the plugin was NOT installed, the following screenshot would be the output:
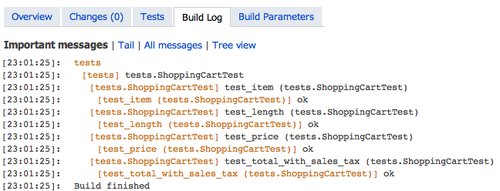
In turn, drilling into the details shows the following output with little detail. There are four periods, one for each test method, but we don't know much more than that.
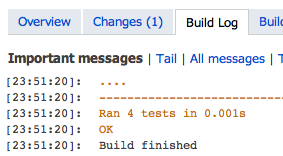
This means no extra arguments are needed to use the TeamCity plugin, but running it from the command line, outside of TeamCity, causes no changes.