
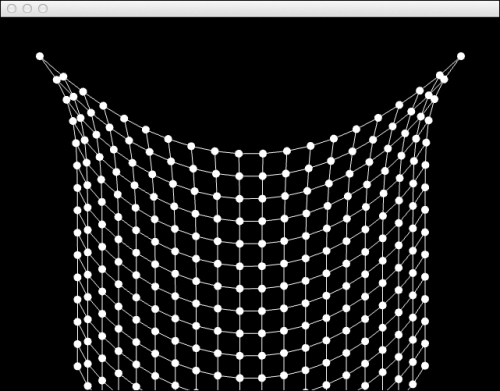
In this recipe we will learn how to simulate cloth by creating a grid of particles connected by springs.
In this recipe, we will be using the particle system described in the recipe Creating a particle system in 2D from Chapter 5, Building Particle Systems.
We will also be using the Springs class created in the recipe Creating springs from Chapter 5, Building Particle Systems.
So, you will need to add the following files to your project:
Particle.hParticleSystem.hSpring.hSpring.cpp
We will create a grid of particles connected with springs to create a cloth simulation.
- Include the particle system file in your project by adding the following code on top of your source file:
#include "ParticleSystem.h"
- Add the
usingstatements before the application class declaration as shown in the following code:using namespace ci; using namespace ci::app; using namespace std;
- Create an instance of a
ParticleSystemobject and member variables to store the top corners of the grid. We will also create variables to store the number of rows and lines that make up our grid. Add the following code in your application class:ParticleSystem mParticleSystem; Vec2f mLeftCorner, mRightCorner; intmNumRows, mNumLines;
- Before we start creating our particle grid, let's update and draw our particle system in our application's
updateanddrawmethods.Void MyApp::update(){ mParticleSystem.update(); } void MyApp::draw(){ gl::clear( Color( 0, 0, 0 ) ); mParticleSystem.draw(); } - In the
setupmethod, let's initialize the grid corner positions and number of rows and lines. Add the following code at the top of thesetupmethod:mLeftCorner = Vec2f( 50.0f, 50.0f ); mRightCorner = Vec2f( getWindowWidth() - 50.0f, 50.0f ); mNumRows = 20; mNumLines = 15;
- Calculate the distance between each particle on the grid.
float gap = ( mRightCorner.x - mLeftCorner.x ) / ( mNumRows-1 );
- Let's create a grid of evenly spaced particles and add them to
ParticleSystem. We'll do this by creating a nested loop where each loop index will be used to calculate the particle's position. Add the following code in thesetupmethod:for( int i=0; i<mNumRows; i++ ){ for( int j=0; j<mNumLines; j++ ){ float x = mLeftCorner.x + ( gap * i ); float y = mLeftCorner.y + ( gap * j ); Particle *particle = new Particle( Vec2f( x, y ), 5.0f, 5.0f, 0.95f ); mParticleSystem.addParticle( particle ); } } - Now that the particles are created, we need to connect them with springs. Let's start by connecting each particle to the one directly below it. In a nested loop, we will calculate the index of the particle in
ParticleSystemand the one below it. We then create aSpringclass connecting both particles using their current distance asrestand astrengthvalue of1.0. Add the following to the bottom of thesetupmethod:for( int i=0; i<mNumRows; i++ ){ for( int j=0; j<mNumLines-1; j++ ){ int indexA = i * mNumLines + j; int indexB = i * mNumLines + j + 1; Particle *partA = mParticleSystem.particles[ indexA ]; Particle *partB = mParticleSystem.particles[ indexB ]; float rest = partA->position.distance( partB->position ); Spring *spring = new Spring( partA, partB, rest, 1.0f ); mParticleSystem.addSpring( spring ); } } - We now have a static grid made out of particles and springs. Let's add some gravity by applying a constant vertical force to each particle. Add the following code at the bottom of the
updatemethod:Vec2f gravity( 0.0f, 1.0f ); for( vector<Particle*>::iterator it = mParticleSystem.particles.begin(); it != mParticleSystem.particles.end(); ++it ){ (*it)->forces += gravity; } - To prevent the grid from falling down, we need to make the particles at the top edges static in their initial positions, defined by
mLeftCornerandmRightCorner. Add the following code to theupdatemethod:int topLeftIndex = 0; int topRightIndex = ( mNumRows-1 ) * mNumLines; mParticleSystem.particles[ topLeftIndex ]->position = mLeftCorner; mParticleSystem.particles[ topRightIndex ]->position = mRightCorner;
- Build and run the application; you'll see a grid of particles falling down with gravity, locked by its top corners.
- Let's add some interactivity by allowing the user to drag particles with the mouse. Declare a
Particlepointer to store the particle being dragged.Particle *mDragParticle;
- In the
setupmethod initialize the particle toNULL.mDragParticle = NULL;
- Declare the
mouseUpandmouseDownmethods in the application's class declaration.void mouseDown( MouseEvent event ); void mouseUp( MouseEvent event );
- In the implementation of the
mouseDownevent, we iterate the overall particles and, if a particle is under the cursor, we setmDragParticleto point to it.void MyApp::mouseDown( MouseEvent event ){ for( vector<Particle*>::iterator it = mParticleSystem.particles.begin(); it != mParticleSystem.particles.end(); ++it ){ Particle *part = *it; float dist = part->position.distance( event.getPos() ); if( dist< part->radius ){ mDragParticle = part; return; } } } - In the
mouseUpevent we simply setmDragParticletoNULL.void MyApp::mouseUp( MouseEvent event ){ mDragParticle = NULL; } - We need to check if
mDragParticleis a valid pointer and set the particle's position to the mouse cursor. Add the following code to theupdatemethod:if( mDragParticle != NULL ){ mDragParticle->position = getMousePos(); } - Build and run the application. Press and drag the mouse over any particle and drag it around to see how the cloth simulation reacts.
..................Content has been hidden....................
You can't read the all page of ebook, please click here login for view all page.