
In this recipe, we will learn how to apply a texture to all our particles using OpenGL point sprites and a GLSL Shader.
This method is optimized and allows for a large number of particles to be drawn at fast frame rates.
We will be using the particle system developed in the recipe Creating a particle system in 2D from Chapter 5, Building Particle Systems. So we will need to add the following files to your project:
Particle.hParticleSystem.h
We will also be loading an image to use as texture. The image's size must be a power of two, such as 256 x 256 or 512 x 512. Place the image inside the assets folder and name it particle.png.
We will create a GLSL shader and then enable OpenGL point sprites to draw textured particles.
- Let's begin by creating the GLSL Shader. Create the following files:
shader.fragshader.vert
Add them to the
assetsfolder. - Open the file
shader.fragin your IDE of choice and declare auniform sampler2D:uniform sampler2D tex;
- In the
mainfunction we use the texture to define the fragment color. Add the following code:void main (void) { gl_FragColor = texture2D(tex, gl_TexCoord[0].st) * gl_Color; } - Open the
shader.vertfile and createfloat attributeto store the particle's radiuses. In themainmethod we define the position, color, and point size attributes. Add the following code:attribute float particleRadius; void main(void) { gl_Position = gl_ModelViewProjectionMatrix * gl_Vertex; gl_PointSize = particleRadius; gl_FrontColor = gl_Color; } - Our shader is done! Let's go to our application source file and include the necessary files. Add the following code to your application source file:
#include "cinder/gl/Texture.h"
#include "cinder/ImageIo.h"
#include "cinder/Rand.h"
#include "cinder/gl/GlslProg.h"
#include "ParticleSystem.h"
- Declare the member variables to create a particle system and arrays to store the particle's positions and radiuses. Also declare a variable to store the number of particles.
ParticleSystem mParticleSystem;
int mNumParticles;
Vec2f *mPositions;
float *mRadiuses;
- In the
setupmethod, let's initializemNumParticlesto1000and allocate the arrays. We will also create the random particles.mNumParticles = 1000; mPositions = new Vec2f[ mNumParticles ]; mRadiuses = new float[ mNumParticles ]; for( int i=0; i<mNumParticles; i++ ){ float x = randFloat( 0.0f, getWindowWidth() ); float y = randFloat( 0.0f, getWindowHeight() ); float radius = randFloat( 5.0f, 50.0f ); Particle *particle = new Particle( Vec2f( x, y ), radius, 1.0f, 0.9f ); mParticleSystem.addParticle( particle ); } mParticleSystem.addParticle( particle ); - In the
updatemethod, we will updatemParticleSystemand themPositionsandmRadiusesarrays. Add the following code to theupdatemethod:mParticleSystem.update(); for( int i=0; i<mNumParticles; i++ ){ mPositions[i] = mParticleSystem.particles[i]->position; mRadiuses[i] = mParticleSystem.particles[i]->radius; } - Declare the shaders and the particle's texture.
gl::Texture mTexture;
gl::GlslProg mShader;
- Load the shaders and texture by adding the following code in the
setupmethod:mTexture = loadImage( loadAsset( "particle.png" ) ); mShader = gl::GlslProg( loadAsset( "shader.vert"), loadAsset( "shader.frag" ) );
- In the
drawmethod, we will start by clearing the background with black, set the window's matrices, enable the additive blend, and bind the shader.gl::clear( Color( 0, 0, 0 ) ); gl::setMatricesWindow( getWindowWidth(), getWindowHeight() ); gl::enableAdditiveBlending(); mShader.bind();
- Get the location for the
particleRadiusattribute in theVertexshader. Enable vertex attribute arrays and set the pointer tomRadiuses.GLint particleRadiusLocation = mShader.getAttribLocation( "particleRadius" ); glEnableVertexAttribArray(particleRadiusLocation); glVertexAttribPointer(particleRadiusLocation, 1, GL_FLOAT, false, 0, mRadiuses);
- Enable point sprites and enable our shader to write to point sizes.
glEnable(GL_POINT_SPRITE);
glTexEnvi(GL_POINT_SPRITE, GL_COORD_REPLACE, GL_TRUE);
glEnable(GL_VERTEX_PROGRAM_POINT_SIZE);
- Enable vertex arrays and set the vertex pointer to
mPositions.glEnableClientState(GL_VERTEX_ARRAY); glVertexPointer(2, GL_FLOAT, 0, mPositions);
- Now enable and bind the texture, draw the vertex array as points, and unbind the texture.
mTexture.enableAndBind();
glDrawArrays( GL_POINTS, 0, mNumParticles );
mTexture.unbind();
- All we need to do now is disable the vertex arrays, disable the vertex attribute arrays, and unbind the shader.
glDisableClientState(GL_VERTEX_ARRAY);
glDisableVertexAttribArrayARB(particleRadiusLocation);
mShader.unbind();
- Build and run the application and you will see
1000random particles with the applied texture.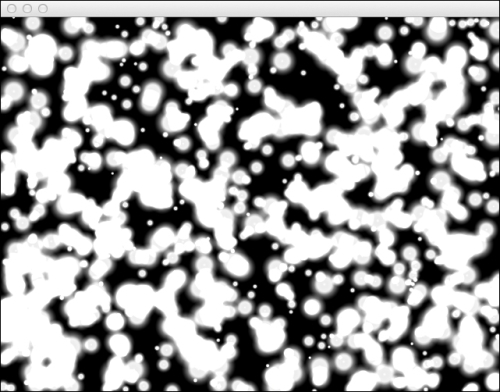
Point sprites is a nice feature of OpenGL that allows for the application of an entire texture to a single point. It is extremely useful when drawing particle systems and is quite optimized, since it reduces the amount of information sent to the graphics card and performs most of the calculations on the GPU.
In the recipe we also created a GLSL shader, a high-level programming language, that allows more control over the programming pipeline, to define individual point sizes for each particle.
In the update method we updated the Positions and Radiuses arrays, so that if the particles are animated the arrays will represent the correct values.
Point sprites allow us to texturize points in 3D space. To draw the particle system in 3D do the following:
- Use the
Particleclass described in the There's more… section of the recipe Creating a Particle system in 2D from Chapter 5, Building Particle Systems. - Declare and initialize
mPositionsas aci::Vec3farray. - In the
drawmethod, indicate that the vertex pointer contains 3D information by applying the following change:glVertexPointer(2, GL_FLOAT, 0, mPositions);
Change the previous code line to:
glVertexPointer(3, GL_FLOAT, 0, mPositions);
- The vertex shader needs to adjust the point size according to the depth of the particle. The
shader.vertfile would need to read the following code:attribute float particleRadius; void main(void) { vec4eyeCoord = gl_ModelViewMatrix * gl_Vertex; gl_Position = gl_ProjectionMatrix * eyeCoord; float distance = sqrt(eyeCoord.x*eyeCoord.x + eyeCoord.y*eyeCoord.y + eyeCoord.z*eyeCoord.z); float attenuation = 3000.0 / distance; gl_PointSize = particleRadius * attenuation; gl_FrontColor = gl_Color; }