
An important part of any software engineering project is versioning. By keeping different versions of the software in a backup, we can revert back to a previous state of the application when problems arise.
Using a versioning tool has always been a bit of a challenge in Oracle software development. Mainly because most of the time PL/SQL code is kept inside the database. Application Express is no exception to this.
So, how can we get a secure and easy-to-use repository of your APEX application? In this recipe, we are going to show you by using Subversion, or SVN, for short. This is a version control system that is developed under the Apache License, which makes it open source. More information can be found at http://subversion.apache.org/.
First of all, make sure you have an SVN server available that you can use for this recipe. If you haven't, you can download some software from http://subversion.apache.org/ For this example, we have installed VisualSVN Server Standard Edition 2.1.3. Using this software, we create a repository called apex_book and create a default SVN directory structure underneath this. The URL to this repository is now https://yourhost/svn/apex_book.
Optionally, we can add some security to this repository by adding users and groups and granting access to the repository to them, but we will skip this for our recipe.
Next to the server, we will need an SVN client that can connect to the repository. For this purpose, we have selected TortoiseSVN because of its nifty right-click menu integration in Windows Explorer, but feel free to use any other software that serves the same purpose.
When you have both installed and configured, check out the 'apex_book' repository. On your local system you should now have three subdirectories under the apex_book main directory: 'branches', 'tags' and 'trunk'.
There are two challenges when trying to apply versioning to an APEX application. The first one is that not all pieces that APEX uses are in one place. In a standard setup, images, JavaScript, and CSS files are on the filesystem, while the code for the pages themselves are in the database. In theory, all files can exist in the database of course, but we will ignore that possibility for this recipe.
The second challenge is that checking out files in the versioning system doesn't always lock them to prevent others from altering them.
But in this recipe, we'll work out a system that provides a smooth way to save the application files and keep them safe.
The first part will be the files that actually exist on the filesystem: JavaScript, CSS, and images (and perhaps some other files as well).
To save these into the repository is the easiest part of the job.
Copy the theme directory of your application and its contents, including any subdirectory into the trunk directory.
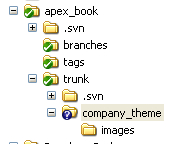
Notice that a question mark icon is placed in front of the directory. This indicates that it hasn't been added to the repository yet. To do this, follow the next steps:
- Right-click on the
company_themedirectory. - Enter the menu for TortoiseSVN and press Add.
- The pop-up menu shows all files that will be added into the repository. Press OK to continue.


- To secure these changes to the repository, right-click on the
apex_bookdirectory and press SVN Commit. - A list of pending changes is shown in a pop-up menu. Press OK to continue.
- After the commit is completed, press OK to finish.
On the filesystem, all icons will have changed to indicate they are up to date. All files and directories are now available to anyone that is allowed into the repository.
When someone else has changed something, we want to get these changes onto our local filesystem.
- Right-click on the
apex_bookdirectory and press 'SVN Update'. - Press OK to finish.
This same process of commit and update applies to the parts that are in APEX and on the database as well. The only extra work that we have to do is get all the code on the filesystem.
Because it's a bit much to show how to export all of the pieces of an APEX application, we will stick to a selection. Later in the book, we will see how this works in more detail.
First, we have to think how small the chunks of the application need to be. We can export the entire workspace in one file or we can do it application by application, page by page, or by a selection of other pieces.
- Go to the Application Builder.
- Press the Export button.
- Choose the Database Application.
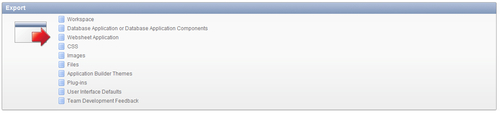
- Select one of the applications.
- When we want to export the entire application, press the button labeled "Export Application" and follow the steps.
- When we want to go deeper and export a single page, press the link Export Page from the Tasks list to the right of the screen and follow the steps.
Both these exports will create one or more SQL files on the file system. To commit these to the repository, we take the same steps that we did for the theme directory.
These steps can be repeated for anything that is available in the APEX environment. But keep in mind that the smaller we make the parts, the more flexible we are in sharing the workload among the development team.
But also the more work it is to keep everything checked in and up to date. Every development team has to find a balance between flexibility and amount of work.
A good practice to help with that is to provide SVN substitutions into the code, pages, and items, so you can actually see which revision is currently running.