
In your APEX application, it is possible to include a Google map. A Google map can be very useful, for example, for contact details or directions. It is quite simple to include a map but you can extend the map with several functions. In former releases of APEX, you needed to create a PL/SQL dynamic region with JavaScript embedded in the PL/SQL code. Since APEX 4.0 you can use plug-ins. We will show you how to include the Google map with plug-ins. In this recipe, we will create a Google map with markers representing the locations from the APP_CUSTOMERS table.
In your APEX application, it is possible to include a Google map. A Google map can be very useful, for example, for contact details or directions. It is quite simple to include a map but you can extend the map with several functions. In former releases of APEX, you needed to create a PL/SQL dynamic region with JavaScript embedded in the PL/SQL code. Since APEX 4.0 you can use plug-ins. We will show you how to include the Google map with plug-ins. In this recipe, we will create a Google map with markers representing the locations from the APP_CUSTOMERS table.
Before, you had to request an API key in order to get the Google map working. However, the API key is not necessary anymore.
First of all, you have to define a plugin.
- In the application builder, go to your application, and click the Shared Components icon.
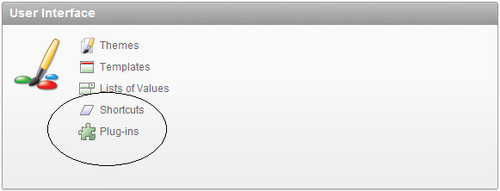
- In the User Interface section, click the Plug-ins link.
- Click the Create button.
- In the name section, enter a name in the name textfield, that is, Google map.
- In the internal name textfield, enter a unique name. If you want to make your plugin publicly available, this name must be unique worldwide. In that case, it is advisable to use your company's fully qualified domain name reversed. For example,
com.packtpub.apex.google_map. - In the type list box, select region.
- Click the create button. The plugin has now been created and now we must define the attributes.
- In the Custom attributes section, click the Add attribute button.
- In the name section, enter Width in the label text field.
- In the settings section, select Integer in the type list box.
- Select Yes in the required list box.
- In the display width text field, enter 4 and in the maximum width text field, enter 4.
- In the default value text area, enter 600.
- Click Create and create another.
- In the name section, enter 2 in the attributes text field.
- Enter Height in the label text field.
- In the settings section, select Integer in the type list box.
- Select Yes in the required list box.
- In the display width text field, enter 4 and in the maximum width text field, enter 4.
- In the default value text area, enter 400.
- Click Create and create another.
- The attributes have now been defined. Now, we will enter the code which is needed to display the Google map.
- In the source section, enter the following code in the PL/SQL Code text area:
function render_google_map ( p_region in apex_plugin.t_region, p_plugin in apex_plugin.t_plugin, p_is_printer_friendly in boolean ) return apex_plugin.t_region_render_result is cursor c_cmr is select cust_street_address1||', '||cust_city geoloc from app_customers where cust_street_address1 is not null order by customer_id; -- l_width apex_application_page_regions.attribute_01%type := p_region.attribute_01; l_height apex_application_page_regions.attribute_02%type := p_region.attribute_02; l_code varchar2(32000); i number(3) := 0; begin apex_javascript.add_library ( p_name => 'maps?file=api&v=2', p_directory => 'http://maps.google.com/', p_version => null, p_skip_extension => true ); -- sys.htp.p('<div id="'||p_region.static_id||'_map" style="width:'||l_width||'px; height:'||l_height||'px"></div>'), -- l_code := 'var map = null; var geocoder = null; if (GBrowserIsCompatible()) { map = new GMap2($x("'||p_region.static_id||'_map")); map.setCenter(new GLatLng(36.902466,-84.202881), 5); map.addControl(new GLargeMapControl()); map.addControl(new GMapTypeControl()); geocoder = new GClientGeocoder();'; -- for r_cmr in c_cmr loop l_code := l_code || 'geocoder.getLatLng(' ||''''|| r_cmr.geoloc ||''''||','|| 'function(point) { var baseIcon = new GIcon(G_DEFAULT_ICON); baseIcon.shadow = "http://www.google.com/mapfiles/shadow50.png"; baseIcon.iconSize = new GSize(20, 34); baseIcon.shadowSize = new GSize(37, 34); baseIcon.iconAnchor = new GPoint(9, 34); baseIcon.infoWindowAnchor = new GPoint(9, 2); var letteredIcon = new GIcon(baseIcon); letteredIcon.image = "http://www.google.com/mapfiles/marker'||chr(65+i)||'.png"; markerOptions = { icon:letteredIcon }; var marker = new GMarker(point,markerOptions); map.addOverlay(marker); });'; i := i + 1; end loop; -- l_code := l_code || '}'; -- apex_javascript.add_onload_code (p_code => l_code); -- return null; end render_google_map; - [1346_03_12.txt]
This code will be explained in the next paragraph.
- In the Callbacks section, enter render_google_map in the Render Function Name text field.
- Click the Apply changes button. The plugin has now been created and can now be used within our webpage.
- In the application builder, go to your application.
- Click the Create page button.
- Select Blank page.
- In the page alias text field, enter a name, for example Google map. Click Next.
- Enter a name for the page and click Next.
- Select No tabs and click Next.
- Click the Finish button to confirm.
The page has now been created. Now you can create a region with the Google map.
- Click Edit page.
- In the regions section, click the Add icon to create a new region.
- Select Plug-ins.
- Select the plugin you just created and click Next.
- Enter a title for the region. Click Next.
- In the next step, enter the width and the height of the map. The default values are shown but you can enter other dimensions. Click Next.
- Click the Create region button.
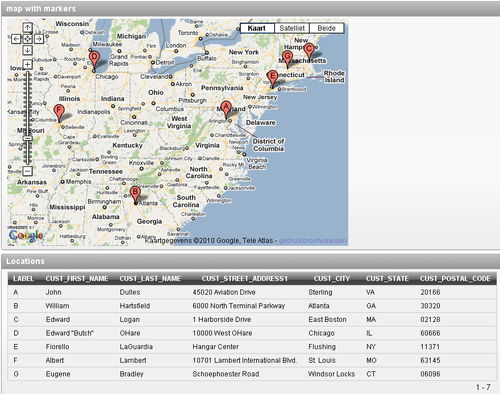
Now the region with a Google map has been created. To show the actual addresses of the markers we will now create a reports region.
In the regions section, click the Add icon.
- Select Report and click Next.
- In the report implementation dialog, select SQL report.
- Enter a title for this region, for example Locations. Alternatively, you can select 2 in the column list box, if you want to display the report next to the map. Click Next.
- In the query text area, enter the following query:
select chr(64+rownum) label
, cust_first_name
, cust_last_name
, cust_street_address1
, cust_city
, cust_state
, cust_postal_code
from app_customers
order by customer_id
- [1346_03_13.txt]
- Click the Create region button.
- The page is ready now. Run the page to see the result.
For this recipe we make use of a region type plug-in. The plug-in contains the code to put a map in the region. This code is PL/SQL with JavaScript embedded. The JavaScript code is the actual code to put the map on the screen.
The function render_google_map starts with a cursor with the query on table app_customers. The street address and the city are concatenated so that this can be used in the JavaScript code. In the declare section, you also see the attributes which were created with the plug-in: width and height. They are referenced using the apex_plugin types.
The code starts with a call to apex_javascript.add_library. In this call, the URL for the Google map is built. The next step is the creation of a div. This div is given an ID and this will be remembered so that the Google map API can put the map in this div. In the div, the width and the height attributes are used to define the size of the map.
In the JavaScript code, a new map is created with the generated ID. This map is centered using the map.setCenter command where the coordinates and the zoomlevel are set. The map.addControl sets the navigational buttons and the zoombuttons on the upper left side of the map. The geocoder is used to search the location which is fetched from the query. This is done with the geocoder.getLatLng function. The base icon functions define the markers on the map. For every character there is an image available on www.google.com. For example, if you want to put a marker with the letter A on the screen, use the following:
http://www.google.com/mapfiles/markerA.png
The map.addOverlay function sets the marker on the map.
This JavaScript code is put in a variable and will be used in the call to apex_javascript.add_onload_code.
The Google maps API offers a lot of possibilities. You can make markers clickable so that a balloon with the location details will be shown. You can also use overlay functions like a path which graphically connects locations with a colored line. For more information take a look at the Google maps api website.
For more information on plug-ins, see Chapter 5, APEX Plug-ins.
If you want to learn more from the Google Maps api, take a look at http://maps.google.com and http://code.google.com/intl/us/apis/maps.