
One of the most difficult tasks of web programming is the control of the layout. In previous versions of APEX, tables were used to place the items on the desired positions. You can use an HTML editor to see a preview of the layout. As from APEX 4.0, new themes are introduced that use divs to position the different components. Divs are almost necessary to be able to use dynamic actions layout. The biggest advantage from div-based layout over table-based layout is that you can precisely position components of the webpage.
In this recipe, we will create a page with a report region showing the application users and a chart region with the number of roles used. The two regions will be displayed next to each other.
- In the application builder, go to your application.
- Click the Create page button.
- Select Report and in the next step, select Classic report.
- Leave the page number or assign a number yourself and enter a name for the page. Click Next.
- Select Do not use tabs and click Next.
- In the text area, enter the following query:
select id
, username
, password
, role
from app_users;
[select_app_users.sql]
- Click Next.
- Enter a name for the region (that is, Users) and click Next.
- In the last step, click the Finish button.
- Your page has now successfully been created and you see a success message.
- Click the Edit page icon.
- In the regions section, click the Add icon in the upper right corner of the section.
- Select Chart.
- In the next step, select HTML chart.
- In the title text item, enter User roles. Click Next.
- In the query text area, enter the following query:
select null link
, role label
, count(id) value
from app_users
group by role
[select_aur_role.sql]
- You can also use the query builder. Click the build query button to start a wizard which helps you to create your query.
- Click the Create region button.
- The region will be created and you now have two regions. When you run the page, you will see that the chart region is positioned below the Users region. Maybe you want to place the region next to the Users region. That can be done in several ways.
- Click the Edit page button at the bottom of the page.
- In the Regions section, click on the User roles link to edit the region.
- In the user interface section, select 2 in the Column list box.
- Click the Apply changes button and run the page to see how it looks.
- You can see that the regions are displayed next to one another. There is also another way to control the position of the regions.
- Click the Edit page button at the bottom of the page.
- In the templates section, click on the Page template link.
- In the definition section you see HTML code for the header, the body, and the footer of the page. To see how this actually looks you could use an HTML editor and copy-paste the code in the editor. However, you can also get a preview of the template. Click on the Preview template link in the tasks section on the right side. You can see a preview that is a little bit more clear when you go to the page, click on the User roles link in the regions section, and click on the flashlight that is located after the Display point list box in the User interface section.
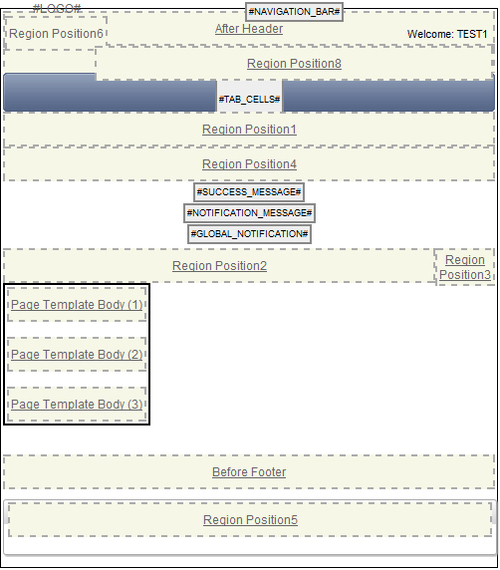
In this preview for theme 1, you can see the region position 2 and region position 3 are positioned next to each other but that region position 3 is smaller. Let's see how this looks when we position the chart region on region position 3:
- Close the preview pop-up window and go back to your page.
- In the regions section, click on the Users region to edit the region.
- In the user interface section, select Page template region position 2 in the Display Point list box.
- Click the Apply changes button.
- In the regions section, click on the User roles link to edit the region.
- In the user interface section, select Page template region position 3 in the Display Point list box. Select 1 in the Column list box (we changed this to 2 in the beginning of this recipe). Click the Apply changes button.
- Run the page and see what the page looks like.