
When working with themes, there are some important things to know. First of all, there is the theme export SQL file in which all templates of the theme are included. Second there are the images that belong to your theme. And third, there are the .css files. CSS is an abbreviation of Cascading Style Sheet and describes the style of the elements in a web page. For example, the font of the text or the color of the background. In the stylesheet there are also references to images. It is important that the references in these files are correct, otherwise you will see no style at all, just plain text.
When you want to create your own theme you can do two things: start from scratch or copy an existing theme and adapt it. Starting from scratch is more work as you have to create all the templates as well. Copying and modifying an existing theme costs less time but if you have to change a lot in order to get the desired layout, you might as well start from scratch.
If you use the embedded PL/SQL gateway to run APEX, you must have FTP access to the host where APEX resides. You can enable FTP by specifying the FTP port. Log in to SQLplus as sys or system and execute the following query:
Select dbms_xdb.getftpport() from dual;
getftpport.sql
The result should be a number, like 2100. In that case, that is the port to which you can connect with your FTP client. You need the database system account with the system password to connect to FTP. If the result is 0, there is no port open and you have to set the port number. You can do that with the following command:
Exec Dbms_xdb.setftpport(2100);
setftpport.sql
In this example, you set the FTP port number to 2100. You can choose the port number by yourself but be aware that if you choose the standard port 21, you might encounter problems if another FTP service is running on the host.
By the way, you can also get and set the HTTP port number. The HTTP port number is used to access APEX. Instead of getftpport() and setftpport(), you use gethttpport() and sethttpport().
To access the FTP, use an FTP client like FileZilla. Use the following parameters:
|
Parameter |
Value |
|---|---|
|
Host |
Name of the database host |
|
Port |
2100 |
|
Server type |
FTP |
|
Login type |
Normal |
|
User |
System |
|
Password |
<your system password> |
When you log in to the FTP, go to the images directory. It is possible that you see other directories starting with images and a number which obviously looks like a date and a sequence number. Those are the image directories from previous releases from APEX and it means that your current APEX version has been upgraded.
In the images directory, you can see the themes directories. There you can make your own new theme by adding a directory in which you can upload your images and .css stylesheets.
In this recipe, we will use an existing theme and adapt it to our own standards. For this recipe make sure Theme 18 is installed. Theme 18 is a simple theme which you can find in the repository. If you haven't installed it, do it now:
- In the application builder, go to the application you are working on. In the application go to the Shared Components.
- In the shared components, go to the Themes. You can find the themes in the user interface section.
- In the themes page, click the Create button.
- Select From the repository and click Next.
- Select theme 18 and proceed to the next step.
- In the last step, confirm by clicking the Create button.
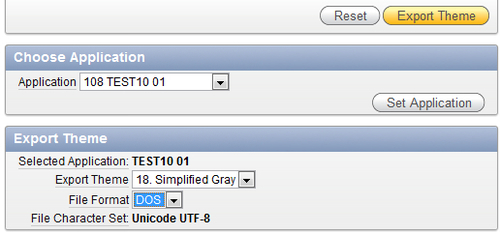
- First we have to make an export of the theme you want to copy. So go to Application | Shared components | Themes and click Export theme. You can find export theme on the right side of the screen, under tasks.
- In the next step, in the Export theme list box, select theme 18. In the file format list box, you can enter UNIX or DOS. If you are using Microsoft Windows as your computer's operating system, select DOS and click on the export theme button. If you use Linux or UNIX as your operating system, select UNIX. Click on the Export theme button.
- Next, create a directory on your local filesystem. We will call the new theme
theme_115so create a directory with that name. - Open your FTP client and log on to the localhost.
- Go to the
directory /images/themes/theme_18and transfer (download) the contents to your local directory called theme_115. - In the CSS files, replace all occurrences of t18 with t115 and save the files. Don't forget to check if the references in the stylesheets are pointing to the newly created theme directory.
- Locate the exported theme (it is an SQL file) and open it. Replace
theme_18withtheme_115, replacet18witht115and save the file under the nametheme_115.sql. - Transfer (upload) the entire directory
theme_115to the FTP server under thedirectory /images/themes. So after the upload you should see a directory theme_115 on the host, like in the following screenshot: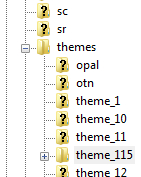
- In the application builder, go to your application and click Export/Import.
- Select Import and proceed to the next step.
- In the import file item, enter the filename of the theme (SQL file) you just modified. In our case it is
theme_115.sql. You can also use the search button to locate and select the file. - At the file type list box, select Theme Export. Click Next. The theme will be imported.
- After the import has been successful, the new theme has to be installed to use it. So, click Next.
- In the last step, you will be asked to enter the application where the new theme has to be installed. Furthermore, you can opt between Replace existing theme and Create new theme. Select Create new theme and click the Install theme button.
- Now, the new theme has been created but it probably does not have the ID 115. In that case you can modify the theme ID. In the theme page, click Change Identification Number on the right side of the screen, under Tasks. You can then select the theme and the new ID you would like to assign. In this case, that would be 115. Click Next.
- To confirm, click the Change theme ID button in the last step.
Your theme is now ready to use and as a last step, you must switch to the new theme:
- Go to the Themes page.
- Click the Switch theme button.
- In the Switch to theme list box, select the new theme and click Next.
- If everything is OK (the status column shows OK checks) you can click Next and switch theme to confirm. If there is something wrong, for example missing templates (this can happen if an existing application has a reference to a template class which doesn't exist in the newly applied theme), the status will show error for the type of template which is missing. In that case, check if everything is complete or select another theme.
Your newly created theme is now active. Run the application to see what it looks like. Actually, you should see no change compared to the theme 18, as you just made a copy of theme 18.
We made an export of a theme and imported it under another name into APEX. We also created a new directory with the images and the CSS files in it. So far nothing special, it is actually a copy of the other theme. But now we can adapt this new theme and add our own style to it, leaving the original theme intact.