
Fragments are yet another component that are offered by the Android platform, which can be used inside the Activity that you learned about in Chapter 3, Mastering the Life and Death of Android Apps. Fragments encapsulate behavior, functionality, or even user interface in an easy-to-reuse format. Also, fragments have their own life cycle so many of them can be combined in the same activity and they can communicate with each other very much like Intents do (which is described in Chapter 8, Mastering Intents – A Walkthrough).
In this recipe, we will see how to use two different fragments in the same activity.
Create a new solution named Fragment_Project and open the project of the same name that Xamarin Studio has created for you.
Let's take a look at the following steps:
- Open the
Main.axmlfile under theResources/Layoutfolder and edit it to make it look as follows:<?xml version="1.0" encoding="utf-8"?> <LinearLayout xmlns:android="http://schemas.android.com/apk/res/android" android:layout_width="match_parent" android:layout_height="match_parent" android:orientation="vertical" > <Button android:id="@+id/button1" android:layout_width="fill_parent" android:layout_height="wrap_content" android:text="Show first fragment"/> <Button android:id="@+id/button2" android:layout_width="fill_parent" android:layout_height="wrap_content" android:text="Show second fragment" /> <fragment android:name="Fragment_Project.FragmentOne" android:id="@+id/fragment_place" android:layout_width="match_parent" android:layout_height="match_parent" /> </LinearLayout> - Create a new layout file named
fragment_one.axmlunder theResources/Layoutfolder and add the following content to it:<?xml version="1.0" encoding="utf-8"?> <LinearLayout xmlns:android="http://schemas.android.com/apk/res/android" android:layout_width="match_parent" android:layout_height="match_parent" android:orientation="vertical" android:background="#00ffff"> <TextView android:id="@+id/textView1" android:layout_width="match_parent" android:layout_height="match_parent" android:layout_weight="1" android:text="This is fragment No.1" android:textStyle="bold" /> </LinearLayout> - Create a new layout file named
fragment_two.axmlunder theResources/Layoutfolder and add the following content to it:<?xml version="1.0" encoding="utf-8"?> <LinearLayout xmlns:android="http://schemas.android.com/apk/res/android" android:layout_width="match_parent" android:layout_height="match_parent" android:orientation="vertical" android:background="#ffff00"> <TextView android:id="@+id/textView2" android:layout_width="match_parent" android:layout_height="match_parent" android:text="This is fragment No.2" android:textStyle="bold" /> </LinearLayout> - Create a new Fragment named the
FragmentOneclass using the New file wizard, as shown in the following screenshot:
- In the
FragmentOneclass, replace theOnCreateView()method by the following:public override View OnCreateView(LayoutInflater inflater, ViewGroup container, Bundle savedInstanceState) { return inflater.Inflate(Resource.Layout.fragment_one , container, false); } - Create a new Fragment named the
FragmentTwoclass using the New file wizard. - Replace the
OnCreateView()method of theFragmentTwoclass:public override View OnCreateView(LayoutInflater inflater, ViewGroup container, Bundle savedInstanceState) { return inflater.Inflate(Resource.Layout.fragment_two , container, false); } - Modify the
MainActivity.csfile to match the following:protected override void OnCreate (Bundle bundle) { base.OnCreate (bundle); // Set our view from the "main" layout resource SetContentView (Resource.Layout.Main); Button button = FindViewById<Button> (Resource.Id.button1); button.Click += delegate { Fragment frag = new FragmentOne (); selectFrag(frag); }; Button button2 = FindViewById<Button> (Resource.Id.button2); button2.Click += delegate { Fragment frag = new FragmentTwo (); selectFrag(frag); }; } public void selectFrag(Fragment frag) { FragmentTransaction fragmentTx = this.FragmentManager.BeginTransaction(); fragmentTx.Replace (Resource.Id.fragment_place, frag); fragmentTx.Commit (); } - Run the application. The following screenshot shows the application at the initialization state:

- Click on Fragment No.2. We will see the following output:

As we stated in the introduction of this recipe, fragments encapsulate behavior, functionality, or even the user interface in an easy-to-reuse format. Fragments are not self-sufficient though. Indeed, fragments absolutely need to be embedded in an activity and fragments completely depend on the activity's life cycle. For example, if the activity is stopped, so are all the fragments embedded in that activity. As long as the activity is running, the fragments contained in it follow their own life cycle. The life cycle of fragments, which is really similar to the life cycle of activity as seen in Chapter 3, Mastering the Life and Death of Android Apps, is described by the following figure:
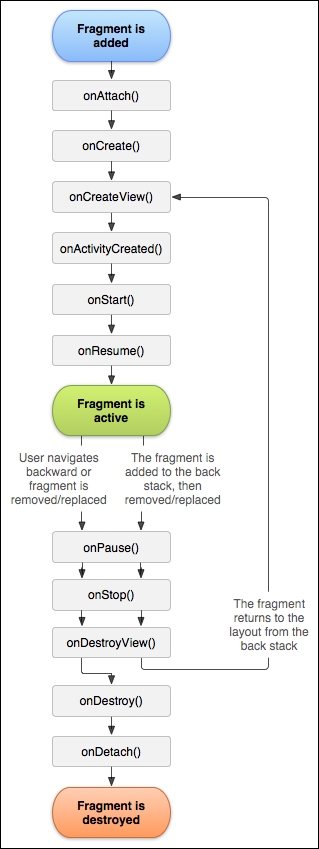
The OnCreate(), OnPause(), and OnCreateViews() methods states of fragments reflect the exact same behavior as activities and might be overwritten by your application during the development process.
In order for fragments to be created and integrated to an activity, we must declare them in the .axml file of the said activity as shown earlier.
<fragment
  android:name="Fragment_Project.FragmentOne"
  android:id="@+id/fragment_place"
  android:layout_width="match_parent"
  android:layout_height="match_parent" />
Fragments can be replaced using a FragmentTransaction object:
FragmentTransaction fragmentTx = this.FragmentManager.BeginTransaction();
fragmentTx.Replace (Resource.Id.fragment_place, frag);
fragmentTx.Commit ();
Fragment transactions can be used for more than a simple replacement of a fragment. In this section, we will see how to add a new fragment programmatically and how to add fragment to the backstack.
In the previous example, we simply use a transaction to replace a fragment with another, when the user presses the button, however, we can do other great things with fragment transactions. Indeed, we can add a completely new fragment to an activity using the add method:
FragmentTransaction fragmentTx = this.FragmentManager.BeginTransaction();
fragmentTx.Add (Resource.Id.fragment_place, new Fragment());
fragmentTx.Commit ();
We can also use the transaction mechanism to register the fragments in the back stack, allowing users to navigate back through fragments in fragments by pressing the back button of the phone. This is done exactly as you would navigate back through web pages when pressing previous in a web page:
FragmentTransaction fragmentTx = this.FragmentManager.BeginTransaction();
fragmentTx.AddToBackStack ("MyFragmentName");
fragmentTx.Commit ();