
For this short recipe, we will review some code samples we saw before without paying attention to them. Indeed, we will simply populate the TextView and TextLabel elements.
Create a new solution named populating GUIs object and then open the project of the same name that Xamarin Studio has created for you.
- Open the
Main.xamlfile under theRessources/layoutoption:<?xml version="1.0" encoding="utf-8"?> <LinearLayout xmlns:android= "http://schemas.android.com/apk/res/android" android:orientation="vertical" android:layout_width="fill_parent" android:layout_height="fill_parent"> <Button android:id="@+id/myButton" android:layout_width="fill_parent" android:layout_height="wrap_content" android:text="@string/hello" /> <EditText android:inputType="date" android:layout_width="fill_parent" android:layout_height="wrap_content" android:id="@+id/editText1" /> </LinearLayout>If you remember from Chapter 3, Building a GUI, where we learned the different available layouts and how to build a GUI, we will see that we simply create a linear layout in which each element comes after the others. We also add a button and an editable text box.
- Add the following code as a replacement of the
onCreate()method in theMain.csfile:protected override void OnCreate (Bundle bundle) { base.OnCreate (bundle); // Set our view from the "main" layout resource SetContentView (Resource.Layout.Main); // Find the button and change the text Button button = FindViewById<Button> (Resource.Id.myButton); button.Text = "My Button"; // A textView with a Date Format TextView textView = FindViewById<TextView> (Resource.Id.editText1); textView.Text = "04/04/13"; } - Run the program.
Heres a screenshot of what you should have on your emulator:
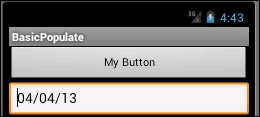
- As simple as that, we populate a button and a
TextViewelement with data.
We learned in Chapter 2, Mastering the Life and Death of Android Apps, that if the OnCreate() method is one of the methods called toward the display of an activity and the increase() method happened before that, the activity is actually rendered to the clients. Therefore, in the onCreate() method, we have the possibility to manipulate the default look and feel of our GUIs before their first display to the user.
In the preceding code, we first assign the Main.xaml file as the layout of our activity just after calling the default constructor of the Activity class. Then, we use the generic method FindViewById<Button> in order to obtain references to our Button and TextView elements. Finally, we use the Text property to update the text they are displaying.
In this There's More... section, we will showcase each component.
You can reuse the exact same code to update the values of classical labels such as EditableTextView, a specialization of TextView that is the class used for the label.