
The ArrayAdapter<Type> instances are really powerful and easy to use. However, they do lack flexibility. Indeed, you cannot populate a ListView instance or spinner with a business object of your own, for example. In this recipe, we will learn how to create a custom adapter.
Create two C# classes in the Populating ListView project named States and StateAdaptor, respectively.
- Add the following code in the
Stateclass:public class State { private string _Name; public string Name { //set the state name set { this._Name = value; } //get the state name get { return this._Name; } } private int _Pop; public int Pop { //set the state pop set { this._Pop = value; } //get the state pop get { return this._Pop; } } // Default constructor public State (String name, int pop) { this.Name = name; this.Pop = pop; } }This class represents states in terms of names and population. Just like the constructor, it owns both the getter and setter for the name and population.
- Add the following code in the
SateAdaptorclass:public class StateAdaptor : BaseAdapter<State> { // Data State[] items; Activity context; //Default constructor public StateAdapter(Activity context, State[] items) : base() { this.context = context; this.items = items; } // Return a row identifier public override long GetItemId(int position) { return position; } //return the data associated with a particular row number. public override State this[int position] { get { return items[position]; } } //tells how many rows are in the data. public override int Count { get { return items.Length; } } //Return a View for each row, populated with data. public override View GetView(int position, View convertView, ViewGroup parent) { var view = convertView; // re-use an existing view, if one is available if (view == null) // otherwise create a new one view = context.LayoutInflater.Inflate(Resource.Layout.TextViewItem, null); view.FindViewById<TextView>(Resource.Id.textItem).Text = items[position].Name + " Pop:" + items[position].Pop; // Concatenate Name & pop of state return view; } }The
StateAdaptorclass extends theBaseAdaptorgeneric class and overrides theGetItemId,Count,thisandGetView()methods. TheGetView()method is the one responsible for creating the view associated with every item in the data set and, as you can see, we concatenate the name of the state and population in this method. Therefore, both sets of information will be printed on the screen. We will further explain other methods in the upcoming How it works... section. - Modify the
Main.csclass of the Populate ListView project in order to use this newly createdAdaptorobject:string[] statesName; // items of the list int[] statesPop; State[] states; protected override void OnCreate (Bundle bundle) { // Class the base onCreate base.OnCreate (bundle); // Populating the statesName array statesName = new string[] { "Ontario","Québec","Nova Scotia","New Brunswick","Manitoba","British Columbia", "Prince Edouard Island", "Saskatchewan", "Alberta", "Newfoundland and Labrador"}; // Populating the statePopArray statesPop = new int[] { 12851821, 7903001, 921727, 751171, 1208268, 4400057, 140204, 1033381, 3645257, 514536}; // Initiate the states array states = new State[statesName.Length]; // Creating the states for(int i = 0; i < states.Length; i++) { states[i] = new State (statesName [i], statesPop [i]); } // Create an adaptor containing the data ListAdapter = new StateAdapter(this, states); }
In the previous code, we create three arrays of String, Ints, and States, respectively. The first two arrays are fed with the state names and their population. Then, we populate the State array using both sets of information. Finally, we affect a StateAdapter instance to the ListAdapter. The following screenshot shows the result:
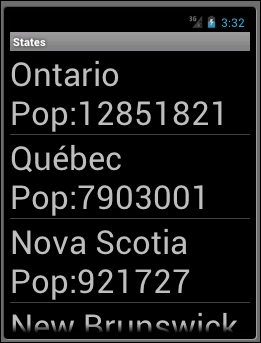
As expected, the list's items are now a combination of the state names and their population.
The only difference between this recipe and the previous ones is the use of CustomAdapter. To implement a custom adapter, you first need to extend the generic BaseAdapter class and then override the following methods:
Count: Tells the control how many rows are in the data.GetView: Returns aViewfor each row, populated with data. This method has a parameter for theListViewinstance to pass in an existing, unused row for re-use.GetItemId: Returns a row identifier (typically the row number, although it can be any long value that you like).this[int] indexer: Returns the data associated with a particular row number.
Three out of these four methods are trivial, and we can easily understand them from the commented code in the second step of the previous section. However, the GetView() method is a little bit trickier. As a reminder, here's the code:
//Return a View for each row, populated with data.
public override View GetView(int position, View convertView, ViewGroup parent) {
  View view = convertView; // re-use an existing view, if one is available
  if (view == null) // otherwise create a new one
  view = context.LayoutInflater.Inflate(Resource.Layout.TextViewItem, null);
  view.FindViewById<TextView>(Resource.Id.textItem).Text = items[position].Name + " Pop:" + items[position].Pop;
  // Concatenate Name & pop of state
     return view;
  }
}
First of all, this method has three arguments: the position, the View, and the ViewGroup. The View is a graphical representation of a single item while the ViewGroup represents the group in which its items are contained, in other words, the ListView as a whole. This method will be called for every item in the data set as long as the row is displayed. Therefore, for every item, we first check if the view is null, if so, we create a new view from the TextViewItem layout we created in the previous recipe. However, views are not created per item; they are created by view type, and if an item goes out of scope on the list, the view it was attached to previously gets reused by another item. Once the view is successfully created, we obtain a reference to the TextView inside the TextViewITem layout and modify its text with the combination of the name and the population of a state using the items array on the current position.
You can use this custom adapter for the spinner, too.