
A popular alternative to a spinner is the ListView instance. The ListView instances are views that will show a list of items in full screen with a vertical scrolling. In other words, it is equivalent to a full screen spinner, which is always active.
In order to follow this recipe, create a new project in the very same solution and name it Populating ListView.
- Edit the
Main.axmlfile underResource/Layoutfile with the following:<?xml version="1.0" encoding="utf-8"?> <TextView xmlns:android="http://schemas.android.com/apk/res/android" android:id="@+id/textItem" android:textSize="44sp" android:layout_width="fill_parent" android:layout_height="wrap_content" />
- Create another
.axmlfile underResource/Layoutand name itTextViewItem.axml. - Add the following code in the
TextViewItem.axmlfile:<?xml version="1.0" encoding="utf-8"?> <TextView xmlns:android="http://schemas.android.com/apk/res/android" android:id="@+id/textItem" android:textSize="44sp" android:layout_width="fill_parent" android:layout_height="wrap_content" />
This new layout will represent every item of the
ListViewinstance. - Replace the code of your
MainActivityclass with the following:[Activity (Label = "States", MainLauncher = true)] public class MainActivity : ListActivity { string[] items; // items of the list protected override void OnCreate (Bundle bundle) { // Class the base onCreate base.OnCreate (bundle); // Populating the items array items = new string[] { "Ontario","Québec","Nova Scotia","New Brunswick","Manitoba","British Columbia", "Prince Edouard Island", "Saskatchewan", "Alberta", "Newfoundland and Labrador"}; // Create an adaptor containing the data ArrayAdapter adapter = new ArrayAdapter<String>(this, Resource.Layout.TextViewItem, items); ListAdapter = adapter; } }In the previous code, we created an array of string containing the Canadian states as well as an
ArrayAdapterinstance with the context, the layout for a single item, and the items as arguments. Also note that we are not extending a classicalActivitybut aListActivity.ListActivityis a special activity that can be bound to a data source. - Run the program.
The following screenshot exposes the expected behavior of the previous codes:

Tip
If you get the following error:
[ArrayAdapter] You must supply a resource ID for a TextView
[AndroidRuntime] Shutting down VM
It means that you made a mistake when creating the
ArrayAdapterinstance and gave theMainLayoutclass as an argument in place of theTextViewItemclass. As a reminder, adapters are responsible for generating a view for each item; therefore, you need to give them a one item enabled view. - As we did for the spinner, we can add an event listener and display a toast when an item is selected.
protected override void OnListItemClick(ListView l, View v, int position, long id) {
  // The name of the clicked state
  var items = items [position];

  // Create a Toast with this line
  Android.Widget.Toast.MakeText(this, items, Android.Widget.ToastLength.Short).Show();
}
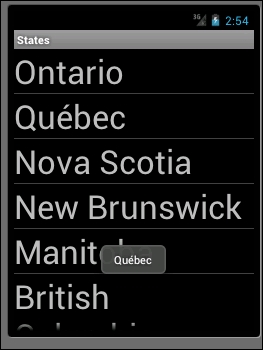
The previous code has to be added in the Main class and override the default OnListItemCLick() method of the ListActivity class. In this override, we receive the ListView, the view, the position of the selected item, and a unique id. We use the position of the clicked item to retrieve the state name in the item array and then create a simple Toast. The following screenshot shows the interface after a click:
The ListView elements are specialization/implementation of the AdapterView instance and the AbsView classes. In the same way as the spinner, they own an adapter, which operates as the bridge between the data and the view. The adapter has to be created with a reference of the layout built for a single item.
The ListView instance can be populated with a high number of items. Therefore, Android developers have implemented an option called fast scroll. The fast scroll will be represented by a little icon on the right side of the phone, as exposed in the following screenshot:

To activate this fast scroll option, you can either do it in the .axml file or in the onCreate() method file, as follows:
<?xml version="1.0" encoding="utf-8"?>
<ListView xmlns:p1="http://schemas.android.com/apk/res/android"
  p1:minWidth="25px"
  p1:minHeight="25px"
  p1:layout_width="fill_parent"
  p1:layout_height="fill_parent"
  p1:id="@+id/listView1"
  p1:fastScrollEnabled="true" />
Or:
ListView.FastScrollEnabled = true;