
In this recipe, we will create and explain all the code that is necessary to open external applications with Intents.
Create a new solution named Intent_Project and open the project of the same name that Xamarin Studio has created for you.
- Add the following code in the
OnCreate()method to theMainActivityclass so that it looks like the following:using System; using Android.App; using Android.Content; using Android.Runtime; using Android.Views; using Android.Widget; using Android.OS; namespace intent_project { [Activity (Label = "intent_project", MainLauncher = true)] public class MainActivity : Activity { protected override void OnCreate (Bundle bundle) { base.OnCreate (bundle); var geoUri = Android.Net.Uri.Parse ("geo:37.8143849,-122.4719223"); var mapIntent = new Intent (Intent.ActionView, geoUri); StartActivity (mapIntent); } } } - Run your application.
- If you're running your code on the emulator, then the following exception should appear:

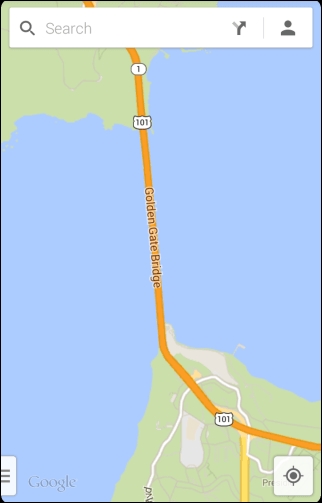
- If you're on a real device, the Maps application should open as follows:
First of all, let's take a look at the little code snippet that we've written in the previous section:
var geoUri = Android.Net.Uri.Parse ("geo:37.8143849,-122.4719223");
  var mapIntent = new Intent (Intent.ActionView, geoUri);
  StartActivity (mapIntent);
With this code, we created an URI out of "geo:37.8143849,-122.4719223" and then an Intent with two arguments: Intent.ActionView and the geoUri. Finally, we started an Activity and sent the intent. Here, we asked the Android OS to perform a view operation of a URI containing the geographic coordinates. The OS is responsible for mapping this request to the appropriate application: Google Maps or any application capable of handling coordinates. However, if no application can handle what we ask, then the application we have created will yield an exception. On one hand, we abstractly describe what we expect from the OS and what action we intend to take, but on the other hand, this abstraction has some limitations as we are not sure that an app can perform this operation.
In the same fashion as the ActionView element, the Intent class proposes (at the time of writing this), 114 other actions that you can use. The most common actions are as follows:
CALL: This performs a call to the contact that is specified in the data.CALL_BUTTON: The user can press the Call button to go to the dialer or other appropriate UI for placing a callEDIT: This provides explicit editable access to the given data.OPEN_DOCUMENT: This allows the user to select and return one or more existing documentsDIAL: This dials a number as specified by the dataGET_CONTENT: This allows the user to select a particular kind of data and return itSEND: This delivers some data to someoneSENDTO: This sends a message to the contact specified in the dataVIEW: This displays the data to the userWEB_SEARCH: This performs a web search
The way in which the OS actually handles the intents requests, fold in the Android system programming and isn't within the scope of this book
Let's look at how to dial a number and open a web page using Intents.
var phoneURI = Android.Net.Uri.Parse ("tel:5147778888");

var phoneIntent = new Intent (Intent.ActionView, phoneURI);

StartActivity (phoneIntent);
In the previous code sample, I renamed the variable name to keep the code coherent, but the only true change is the string passed to Android.Net.Uri.Parse, which we changed from "geo:37.8143849,-122.4719223" to "tel:5147778888". Pretty straightforward, isn't it?
Nonetheless, dialing on behalf of the user requires the CALL_PHONE permission. In order to allow your application to do so, tick the CallPhone checkbox on the Properties/AndroidManifest.xml file as shown in the following screenshot:

Next, run your application. You will see the following:

In order to open a web page using intents, we will have to do the following:
var uri = Android.Net.Uri.Parse ("https://www.packtpub.com/");
var intent = new Intent (Intent.ActionView, uri);
StartActivity (intent);
On successful completion, the following should appear on your emulator:

In conclusion, pass a string that can be parsed into a URI and the OS will do its best to find a matching application.