
The Android's Activity class exposes seven methods for managing the different states. These seven methods are in protected visibility, meaning that anyone specializing the Activity class will be able to override these methods. If we take a look at our MainActivity declaration again, we can see that MainActivity specializes the Activity class using the : symbol:
[Activity (Label = "Hello_World", MainLauncher = true)]
public class MainActivity : Activity
Tip
The inheritance mechanism is also referred to as specialization. It is a strong object-oriented mechanism that establishes an "Is-a" relationship. Classes inherit attributes, methods, and behavior of the classes they specialize. The classes that are an outcome of this inheritance are referred to as derived classes or subclasses. Moreover, subclasses can add new behaviors to the inherited ones and even override or redefine inherited behaviors. While playing around with activities lifecyles, we redefine the base behavior contained in the Activity class.
By means of inheritance mechanisms, we can specialize and customize the behavior of these seven methods to fit our needs while implementing a new activity. If we pay attention to our very first and autogenerated statement of the MainActivity class, we notice that the OnCreate() method is overridden. In this override—and all other states-related method overrides—the new behavior is added after a call to the base() method.
protected override void OnCreate (Bundle bundle) {
  base.OnCreate (bundle);
  […]
}
A call to the base will execute the behavior of the superclass. In our case, the Activity superclass contains mandatory code to handle states, and we are only agreeing this code with specific statements to fit our needs.
In order to follow this recipe, you must have Xamarin Studio or Visual Studio with the Xamarin Studio up and running. Moreover, you should have a thorough understanding of inheritance mechanisms in object-oriented programming. How do we determine whether our understanding is good enough? Basically, the two previous tips about inheritance and base calls should have been only reminders to us. If you are not comfortable with this OOP fundamental, we warmly encourage you to look for literature about inheritance.
In this section, we will see all the methods related to the states of activities. Let's take a look at the following steps:
- Implement the
OnCreate()method in yourMainActivityclass:protected override void OnCreate (Bundle bundle) { base.OnCreate (bundle); SetContentView (Resource.Layout.MainActivity); var helpButton = FindViewById<ImageButton> (Resource.Id.loginQuestion); helpButton.Click += (sender, e) => { var builder = new AlertDialog.Builder (this) .SetTitle ("Need Help?") .SetMessage ("Here What you Should Do") .SetPositiveButton ("Ok", (innerSender, innere) => { }); var dialog = builder.Create (); dialog.Show (); }; } - Implement the
OnStart()method in yourMainActivityclass:protected override void OnStart() { base.OnStart (); TextView aTextView = FindViewById<TextView> (Resource.Id.myTextView); aTextView.Text = "Hello !"; } - Implement the
OnResume()method in yourMainActivityclass:protected override void OnResume() { base.OnResume (); // Some init code aTextView.Text = BluetoothAdapter.DefaultAdapter.Address; } - Implement the
OnPause()method in yourMainActivityclass:protected override void OnPause() { base.OnPause (); // Save data to persistent storage // Desallocate big objects // Free Hardware like Bluetooth } - Implement the
OnStop()method in yourMainActivityclass:protected override void OnStop() { base.OnStop (); StopService (new Intent (this, typeof(Service))); } - Implement the
OnRestart()method in yourMainActivityclass:protected override void OnRestart() { base.OnRestart (); } - Implement the
OnDestroy()method in yourMainActivityclass:protected override void OnDestroy() { base.OnDestroy (); if (!IsStopped) { StopService (new Intent (this, typeof(Service))); } }
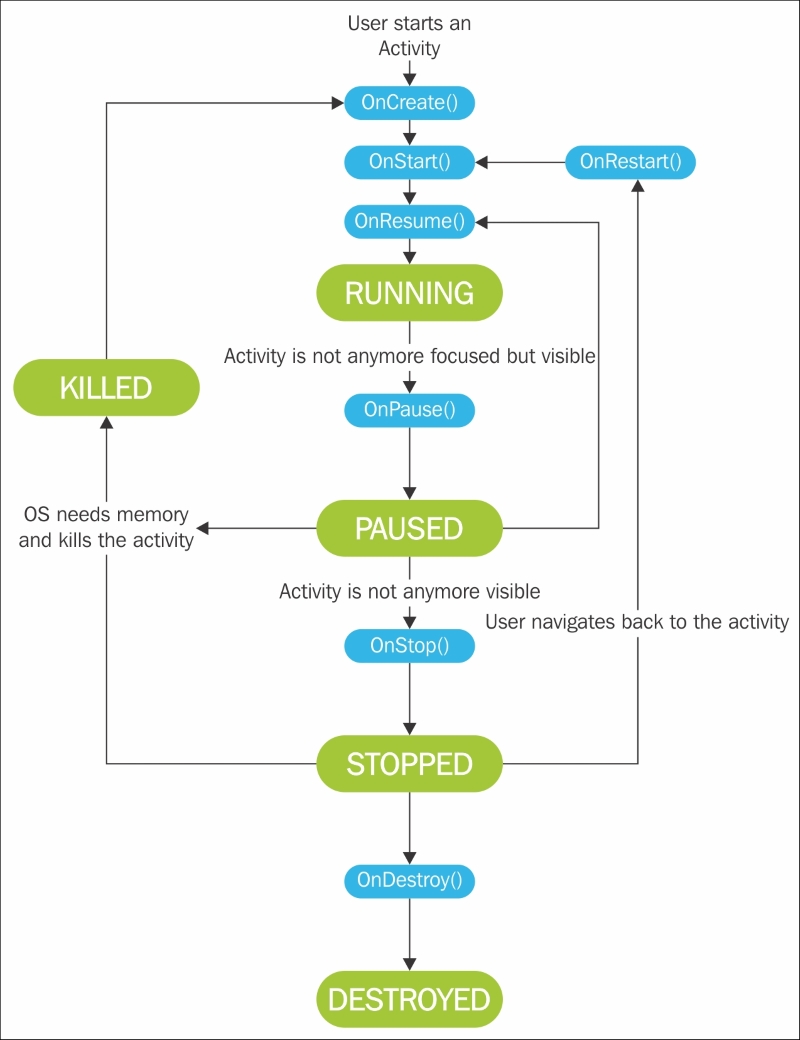
The seven methods of the activity class are: OnCreate(), OnStart(), OnResume(), OnPause(), OnStop(), OnDestroy(), and OnRestart(). These method invocations affect the states as described by the next figure. An activity passes through OnCreate(), OnStart(), and OnResume() in order to acquire the Running status. Methods OnPause(), OnStop(), and OnDestroy(), will lead to the Pause, Stopped, and Destroyed states, respectively. If the user navigates back to an activity that was stopped, the OnRestart() method is called, which in turn calls the OnStart() and OnResume() methods in order to get the activity in the Running state again. Finally, we notice that if the OS is in need of memory and has Killed the activity, the overall instantiation process has to be done again.
Now, we will discuss each method in detail:
The onCreate() method is the first one in getting an activity started. This method will always be overridden for initializing your graphical interfaces (as we did for the Hello World example), inner variable, and other more complex actions, such as starting an embedded database. The signature of the OnCreate method is protected override void OnCreate (Bundle bundle).
In the code sample given in the How to do it... section, we override the OnCreate() method. The first statement in the method invokes the OnCreate() method of the Activity class. As a reminder, we must call the base method in the method we override in order to keep our Android application working. In the second statement, SetContentView (Resource.Layout.MainActivity), we load the graphical interface related to the current activity; we will talk in depth about graphical interfaces in the Chapter 3, Building a GUI. The OnCreate() method being the first one to be called, is the most suitable method to bootstrap the graphical interface. In the following FindView statement, we get a reference to a button on our graphical interface using the FindViewById<ImageButton> (Resource.Id.loginQuestion); method. Again, these methods too will be extensively discussed in the next chapter. Using the acquired reference, we add some behavior to the Click event of the helpButton instance. We create an AlertDialog instance, with Need help as the title and Here What You Should Do? as text. Also, this dialog alert contains an OK button. Finally, we create the AlertDialog instance and display it using the show() method.
As shown by our little example in the How to do it... section, the onCreate() method is the best place to set up the behavior of your graphical interface or other operations that need to be done at the startup of the activity.
The Bundle parameter passed to the onCreate() method is a data structure that contains the last known state of the activity, which is the same as the variable values. In other words, a not null bundle means that the application is restarted (using the onRestart() method) and should therefore restore the previous data. This mechanism is not simple to reproduce on the virtual device because the activity has to be killed by the OS to be triggered. Indeed, if we press the Home button, the activity will be stopped, and in case we navigate back to the application, the onCreate() method will not be called; we will resume the activity using the onRestart() and onStart() methods. However, the following code sample shows how to use the bundle structure to recover data:
if (bundle != null) {
  aTextView = bundle.GetString ("aString");
}
Just like the GetString() method, the Bundle class offers 40 other Get methods. Each Get method will work for a specific data type, therefore, we have the GetBoolean(), GetCharArray(), or GetByte() methods returning a Boolean, char [], and byte, respectively.
Android will automatically call the OnStart() method right after the completion of the OnCreate() method.
OnStart: In the OnCreate() method code sample, we created a reference to a graphical element, which is a TextView, and we set the Text variable to "Hello !". While we stated that the OnCreate() method is the best one to set up our graphical element, the OnStart() method can be a good choice too. However, this method should be used in priority to refresh the value of the graphical interface like we did here with the TextView text. As a concrete example, in the step counter, which is a prebuilt application provided by Xamarin (https://xamarin.com/prebuilt/step-counter) to simply count the steps made by the user, the OnStart() method will be used to refresh the bars and curves that display the steps according to the How to do it... section, when they were made while the application wasn't displayed.
The OnStart() method will most likely not be overridden. Indeed, as seen before, this method is called automatically after the OnStart() method and the OnRestart() method. Moreover, this method will automatically call the OnResume() method. Therefore, if an application's operation is to be carried out, in general use, we will add our specific statements in the OnStart() or OnResume() overrides. The only case in which it can be pertinent to add behavior to the base OnStart() method is for refreshing the values right before the activity becomes visible to the user. The following code sample as seen in the How to do it... section, exposes the OnStart() prototype and changes the text of a TextView element. In methods that handle states, it is important that you always call the base method first. If you don't, the application will throw an exception.
OnResume: The code of the OnResume() method shows the modification of the address of a TextView element with the address of the Bluetooth device embedded in the phone (we will come back to this later in the book when we talk about interaction with hardware). The OnResume() method is called right after the OnStart() method is completed. Just like the OnStart() method, this method should be used to refresh the value of the graphical interface according to the events that might have taken place while the application wasn't displayed.
As soon as the activity is ready to interact with the end user (that is, as soon as the activity is visible), the OnResume() method is called. The OnResume() method is also called right after the OnRestart() method, which intervenes with a Stopped application, and the OnPause() method, which occurs after an activity is paused. With its strategic position in the stack call, the OnResume() method is the best one in which to start playing animations and accessing devices (NFC, Camera, GPS, and so on).
There is an important point to keep in mind about the OnResume() method. The activity is ready to interact with the end user when this method is called, however, this does not mean that the user can interact with the activity. In fact, the activity can be behind some keyguard menus (such as password, resume games, and so on).
OnPause: The code sample of the OnPause() method shows the prototype of the OnPause() method. The OnPause() method can be seen as the opposite of the OnResume() method. While the OnResume() method will be called when the application is called back, the OnPause() method will be called every time the application is set in the background. An example of what can be done in this method includes the use of the following: Save data to persistent storage, Desallocate big objects or free Hardware like Bluetooth.
As we would see in the next figure exposing all activities, the OnPause() method is called when the activity is still visible but partially obstructed by another activity. The OnPause() method gives us an opportunity—that you must take in order to keep the whole system stable—to release hardware, such as the Bluetooth device, or to save data to persistent storage for accessing it later through the bundle mechanisms seen in the OnCreate() method. It's also the perfect moment to destroy objects that consume a lot of resources—thus avoiding getting killed by the OS.
OnStop: The OnStop() method will be called if the activity isn't visible to the user anymore. In other words, this method will be executed if the user presses the home or back button. A classic use of the OnStop activity is to undo our application from services or even stop services. We will see how to create and interact with services in Chapter 6, Populating Your GUI with Data and Chapter 7, Using Android Services. Nevertheless, the OnStop() method should be used to deallocate and free any resources that consume a lot of computational power/battery or resources that may be useful to other applications on the device.
In a very critical memory situation, the OnStop() method can be bypassed by the OS, leading to a direct call of the OnDestroy() method after the OnPause() method. Therefore, it's a terrible idea to add some of your business logic in here. Moreover, the OnPause() method will be called, no matter how low the memory may be; thus, your de-allocation and hardware release must be done in the OnPause() method.
OnRestart: The OnRestart() method is not likely to be overridden as the OnCreate() method will be called right after this one, and we initialize everything on the OnCreate() method. Consequently, there is no typical use of the OnRestart() method nor best practices for it.
The OnRestart() method is called when the user browses back to an activity that was previously Stopped and the OnStop() method was executed. Because the OnStart() method will always be called right after the OnRestart() method, we initialize most of the data needed in the OnStart() method. A call to the OnRestart() method means that the application has not been killed by the OS, there is no typical statement for the OnRestart() method. Actually, this method will only be overridden in some exceptional cases that are beyond the scope of this book.
OnDestroy: Similar to the OnStop()method, the OnDestroy()method must be used for freed resources and the stopped services/threads that your application has launched. If the OnStop() method is overridden, then you should override the OnDestroy() method, and both the methods should have the same behavior. This is due to the fact that the Android operating system, when in need of memory, can kill your application by directly invoking the OnDestroy() method and skipping the OnStop() method. In the majority of cases, you'll find the same code duplicated on both methods. You can see an example of such duplication in the Step Counter prebuilt application from Xamarin, which we spoke about while presenting the OnStart() method. However, using the previous code sample of the How to do it... section, we can ensure that the code is only run once. This code will check whether the application has been through the OnStop() method, which has to set the Boolean isStopped to true—and execute the code once. However, the duplication is still present. Nevertheless, you can extract the logic of closing your application to a private method that the OnStop() and OnDestroy() methods will call.
The OnDestroy() method is the end of the lifecycle. Therefore, no method will be invoked after the OnDestroy() method, and the activity will be completely removed from the memory. If the user browses back to the activity, then the entire process of building an activity has to be done again. The OnDestroy() method is executed after the OnStop() method and, as we saw earlier, there is a possibility—in desperate attempts by the OS to acquire memory—that the OnStop() method will be skipped. This is also true for the OnDestroy() method. However, unlike the OnStop() method, there is some business logic that can be well-suited to an OnDestroy() override. For example, your activities can start any background threads that you wish to continue even when the application is not visible (Paused or Stopped). In such a configuration, the OnDestroy() method is the right place to kill these processes.
Using the API discovery and Intellisense from Xamarin Studio or Xamarin Plugin for Visual Studio, you will be able to discover more than 50 other methods to handle events. These methods range from OnMenuSelected() to OnWindowsDetached(). We will use some of them later in this book, more specifically while building advanced graphical interfaces.
The complete list of Android events at http://developer.android.com/guide/topics/ui/ui-events.html.