
Chapter 15. Entity Framework and ASP.NET
- Binding data with the EntityDataSource control
- Using Dynamic Data controls and Entity Framework
- Understanding the ObjectContext lifecycle
- Common scenarios related to integrating ASP.NET and Entity Framework
ASP.NET is the technology used in the .NET Framework to build web applications. In this chapter, we’ll analyze the ASP.NET and Entity Framework integration, so a basic knowledge of data-binding techniques in ASP.NET is required. You can find more information on this topic on MSDN, in the “ASP.NET Data-Bound Web Server Controls Overview” article at http://mng.bz/c3k4.
You can use Entity Framework’s features in two different ways: you can use ASP.NET RAD support to directly tie them together; or you can manually manage the ObjectContext lifecycle by writing more code. The first approach has the main advantage of not requiring code, whereas the latter gives you maximum control over what is performed under the hood. Which is the best approach for your application is up to you: typically, the former is indicated in small (or quick-and-dirty) applications, because you can be very productive, whereas the latter is for enterprise applications. We’ll start with the simpler approach and then look at how to directly manage the ObjectContext lifecycle in a typical ASP.NET application.
Before we can move on, it’s useful to note that Entity Framework’s ObjectContext can be instantiated only once per page. If you want to build some kind of layer over Entity Framework (as you did in chapter 14), you’ll have to handle this task manually. If you prefer to let ASP.NET do the magic for you, just sit down and relax: there is a special control, called EntityDataSource that will perform most of the tasks for you. Let’s start by looking at what EntityDataSource can do.
15.1. EntityDataSource, a new approach to data binding
Starting with version 2.0, ASP.NET offered a new approach to data binding, using a new set of web controls named data source controls. Data source controls are, in fact, used to enable a development approach based on Rapid Application Development (RAD) in Visual Studio, providing a drag-and-drop-based development environment.
15.1.1. A practical guide to data source controls
You can build an entire application based on data source controls with the wizards and RAD tools integrated in Visual Studio. The result is markup code that includes the configuration for extracting data and for binding to the associated data control, such as the GridView or Repeater.
Several data source controls are available for different scenarios. These are the most used:
- SqlDataSource—Makes a direct connection to a database structure
- ObjectDataSource—Enables the business logic to access business objects in common three-tier applications
- LinqDataSource—Adds support to LINQ to SQL’s DataContext
- EntityDataSource—Implements support for Entity Framework’s data model and ObjectContext
Every data source has a different set of pros and cons, depending on the approach you want to use in your application architecture.
The Sqldatasource Control
SqlDataSource is used when you want to couple your database to your web interface. This situation isn’t ideal in common applications, but it may be useful in quick-and-dirty scenarios, when all you want is a GUI to manipulate your data. When you use SqlDataSource, the connection string and SQL query are saved directly in the markup, so this isn’t the best choice in terms of flexibility.
The Objectdatasource Control
ObjectDataSource provides an alternative method of access in three-tier applications, where you have a separation between the data layer and business logic, and you manipulate data using object representations. This approach is suitable when you want a better architecture and the ability to build the graphical interface using a RAD approach. ObjectDataSource can use an EDM, but you’ll have no benefits: you’re using objects in a simple form.
The Linqdatasource and Entitydatasource Controls
LinqDataSource and EntityDataSource offer the same functionality against different data sources: LINQ to SQL’s DataContext and Entity Framework’s ObjectContext, respectively. They both use the same approach; they don’t use a tier to separate the data access from the interface, but use the O/RM capabilities directly. You can add your own validation and loading logic to both DataContext and ObjectContext by using partial classes.
Using the LinqDataSource and EntityDataSource controls prevents you from separating your data access strategy from your business rules. It may not be a good idea to directly expose the data access in the page. Putting the data access in the business logic tier is a better choice in terms of modularity and maintenance, resulting in a better application architecture. But if keeping the data access separate from the business rules isn’t a problem for you and your application, the EntityDataSource control is a very practical and productive way to go.
Using a data source control has the advantage of avoiding code in your pages, because the DataBind method is performed automatically, during the PreRender event, by the data control itself. If you have a Repeater control on your page, you simply have to set the DataSourceID property to the ID of your data source control. The magic behind the scenes is done by ASP.NET: the resulting page will print data out of your data source.
15.1.2. The EntityDataSource control in depth
From a technical perspective, the EntityDataSource control is very similar to Linq-DataSource, because they’re both based on the System.Web.Extensions.IDynamic-DataSource interface. This interface is primarily used to ensure compatibility in applications based on Dynamic Data controls (which will be discussed in section 15.2).
In order to use EntityDataSource with ASP.NET 3.5, you need to reference the System.Web.Entity assembly, located in the Global Assembly Cache (GAC) and installed by .NET Framework 3.5 Service Pack 1. Entity Framework was added with Service Pack 1 and isn’t directly available with ASP.NET 3.5.
ASP.NET 4.0 directly supports this control.
To explore EntityDataSource’s capabilities, let’s build a simple application to show its features. You’ll build a simple web page that will show the products available from OrderIT. You’ll use this database in all the examples presented in this chapter.
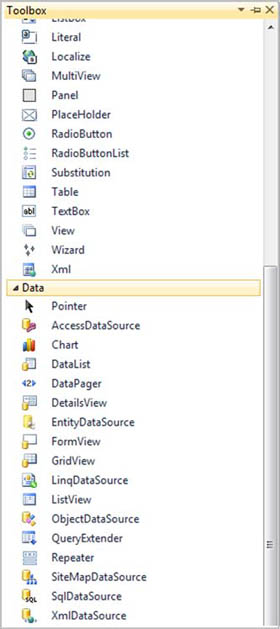
To begin this little project, you need to locate the EntityDataSource control. You can find the EntityDataSource control in your toolbox, as shown in figure 15.1.
Figure 15.1. You can insert an EntityDataSource control via the Visual Studio toolbar. It can be found under the Data category.
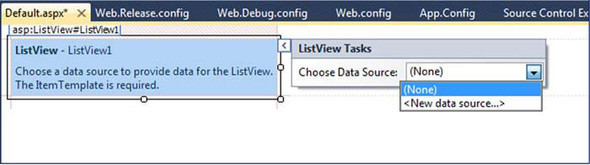
You can start by adding a data control, like a Repeater or ListView. Select the New Data Source option from the Choose Data Source smart task, as shown in figure 15.2. This smart task will appear when the editor is in design view.
Figure 15.2. It’s possible to directly define a new EntityDataSource using the associated Visual Studio smart task. Choose the New Data Source option to open a specific wizard.
The Data Source Configuration Wizard will guide you through a series of options. The most important step is the selection of your EDM and the entity that you want to display.
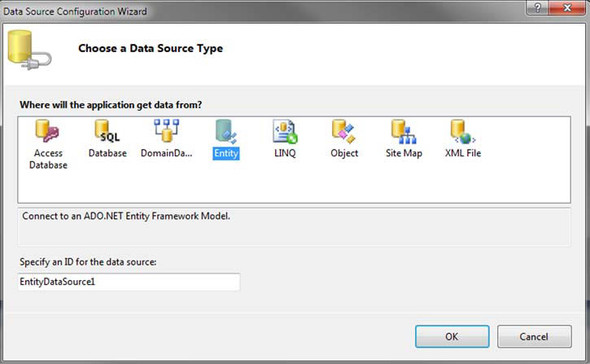
The first wizard step is shown in figure 15.3.
Figure 15.3. By selecting Entity in the Data Source Configuration Wizard, you can later define all the details associated with the to-be-created EntityDataSource.
In this example, you’re using the OrderIT database hosted in the local SQL Server instance: choose Products as the EntitySetName in order to display all the products in the database. This step is shown in figure 15.4.
Figure 15.4. Choose the entity from the EntitySetName drop-down list. If you don’t need to create a partial view of your entity, Select All is the preferred option in the Select box.
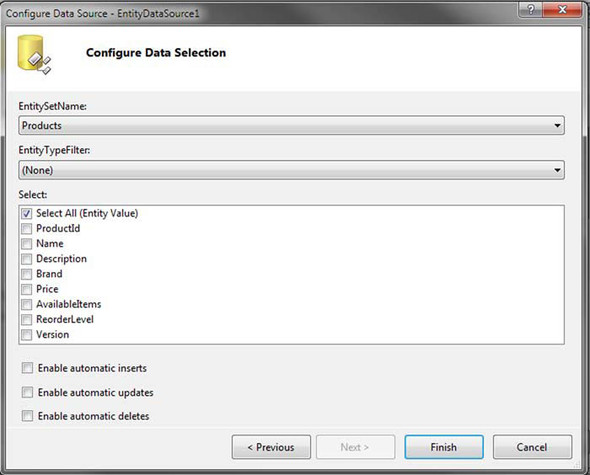
If you want to automatically let EntityDataSource handle inserts, updates, and deletes, all you have to do is select the corresponding check boxes in the wizard screen shown in figure 15.4. Given the common nature of ObjectContext, Entity-DataSource knows how to manipulate entities: the control uses the ObjectContext to persist your actions in the corresponding database, using the previously defined model. When you click the Finish button, the wizard exits, and the corresponding markup is generated in the page.
If you look at the resulting ASP.NET page markup, you’ll see what the EntityData-Source control needs to make things work. The markup is shown in this listing, with the key properties in bold.
Listing 15.1. EntityDataSource markup code that displays a list of products
<asp:ListView ID="ListView1" runat="server" DataKeyNames="ProductId"
  DataSourceID="EntityDataSource1">
 ...
</asp:ListView>
<asp:EntityDataSource ID="EntityDataSource1" runat="server"
      ConnectionString="name=OrderITEntities"
      DefaultContainerName=" OrderITEntities"
      EntitySetName="Products">
</asp:EntityDataSource>
As you can see, ListView’s DataSourceID property is used to configure the corresponding data source control, so it can get the data from the source and display the value.
Speaking of EntityDataSource, the ConnectionString property is used to refer to the EDM previously defined, whereas DefaultContainerName is used to identify the ObjectContext. Finally, EntitySetName contains the entity set from which to get objects (and data).
In listing 15.1, you’re taking all the data from a table named Products, located in the OrderIT database, mapped on an EntitySet named Products, using the ObjectContext named OrderITEntities.
All you need to do to display the value is run the page shown in figure 15.5.
Figure 15.5. The rows are materialized into entities and displayed in the web page using the EntityDataSource control’s capabilities. This is performed without writing code.

You don’t need to write any code to get this result: all the magic is done by the EntityDataSource and the associated data control, which in this example is a ListView.
Your mileage with this approach may vary. As already mentioned, if you want more control over what happens under the hood, don’t worry. We’ll soon look at a more powerful approach to integrating ASP.NET and Entity Framework. First, though, we need to look at Dynamic Data controls, because their features are interesting if you simply need to manipulate data using a nice looking interface.
15.2. Using Dynamic Data controls with Entity Framework
ASP.NET Dynamic Data is a feature initially introduced in ASP.NET 3.5 Service Pack 1 and further enhanced in version 4. The idea behind this technology is to simplify the typical actions related to working with data: displaying, filtering, and altering data.
Dynamic Data controls ship with ASP.NET, and they support both Entity Framework and LINQ to SQL, using the LinqDataSource and EntityDataSource controls discussed previously. Dynamic Data is based on a simple assumption: because the ObjectContext has a fixed set of features that won’t change, even for different mappings, its calls can be generically created. Using generics and reflection, the typical operations performed by the ObjectContext can be standardized. The same principles are valid for LINQ to SQL.
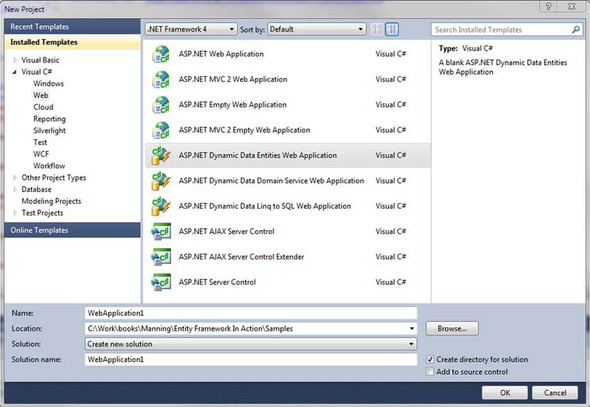
Dynamic Data controls work with a special kind of project—the Dynamic Data Entities Web Application, which can be found with the other ASP.NET projects. You can see it highlighted in figure 15.6.
Figure 15.6. Dynamic Data Entities Web Application is the template project you need to select to start using Dynamic Data controls with Entity Framework. The other templates won’t work for this purpose.
Dynamic Data controls are composed of a set of templates and pages, located in the DynamicData directory. In this directory, you can find the templates used to represent different types, such as strings, integers, Booleans, and so on.
15.2.1. Registering the model
To start with Dynamic Data, you define the model you’re going to work against, and the rest of the work will be performed by using the information already present in it. The model contains the list of entities, and each entity describes itself, so each set of entities can be represented and edited automatically.
The model and routes are registered in listing 15.2. The necessary code is partially generated by the wizard, but you need to add your context in order to use it with Dynamic Data.
Listing 15.2. The model and routes registration
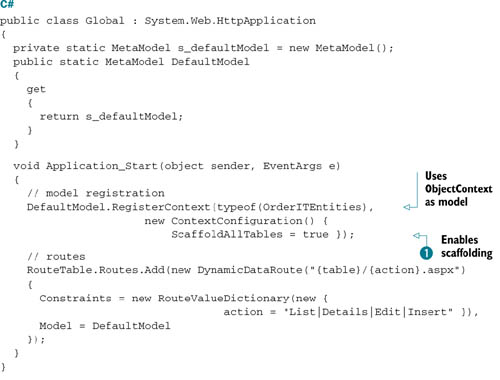
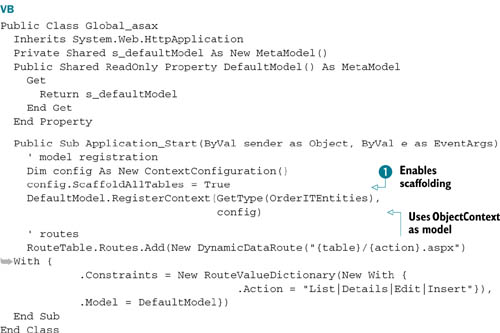
This code explicitly sets the scaffold feature ![]() , so every entity is automatically displayed in the start page. If you prefer to control this list, you must turn it off.
If you use the routing features from ASP.NET 4.0, the resulting URL will be similar to /Custom-ers/List.aspx, where Customers
is the entity set to be managed, and List is the action. As you can see in listing 15.2, the Details, Edit, and Insert actions can be used to manage the respective statuses.
, so every entity is automatically displayed in the start page. If you prefer to control this list, you must turn it off.
If you use the routing features from ASP.NET 4.0, the resulting URL will be similar to /Custom-ers/List.aspx, where Customers
is the entity set to be managed, and List is the action. As you can see in listing 15.2, the Details, Edit, and Insert actions can be used to manage the respective statuses.
15.2.2. Working with data annotations
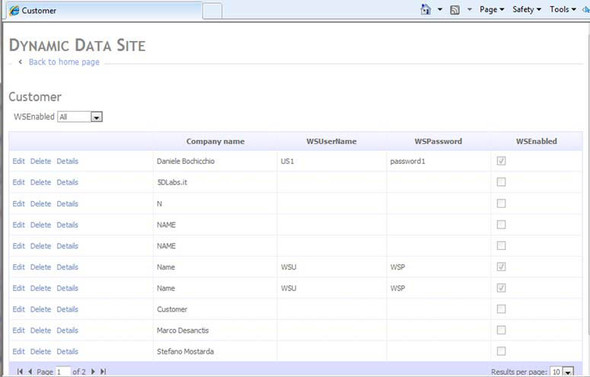
In figure 15.7, you can see the default results you’ll get when you display the Customer list from the model.
Figure 15.7. Dynamic Data controls are capable of displaying any mapped entity. As shown here, the display can be customized.
By default, the display template is inferred from the column’s type, but it can be specified too. Generally, you specify templates by creating a new class, specifically for this scenario, that extends the entity using the MetadataTypeAttribute attribute. Dynamic Data controls work with data annotations, a feature introduced in .NET Framework 3.5 SP1 and further enhanced in version 4. In this example, we’re using POCO entities, so the annotations are directly generated using the T4 engine (which was introduced in chapter 13). If you’re using the default entity-generation engine, you can use a partial class and the aforementioned MetadataTypeAttribute. More information on this topic is available from MSDN in the “MetadataTypeAttribute Class” article: http://mng.bz/q9hA.
In this example, we added some custom logic to the default generation engine by altering the CDSL inside the EDMX file to generate the exact code used to represent the additional properties required by data annotations. Data annotations work with attributes, as you can see in the following listing, which contains an entity generated with these annotations.
Listing 15.3. POCO entities generated by a template with data annotations

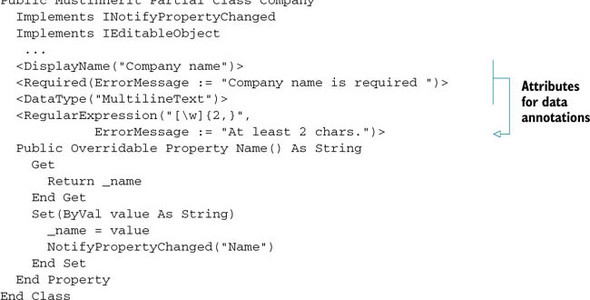
The annotations influence the way the property is displayed and how its value is validated:
- DisplayNameAttribute—Sets a more friendly name to be displayed
- RequiredAttribute—Lets you define the property as required, associating an error message to be displayed
- DataTypeAttribute—Specifies a new template
- RegularExpressionAttribute—Specifies a regular expression for validation
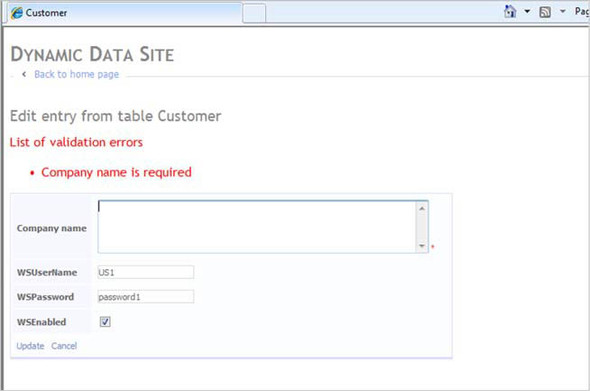
You can see how Dynamic Data controls handles these attributes in figure 15.8. Data annotations are a very important way of using Entity Framework in ASP.NET. Their use isn’t limited to working with Dynamic Data controls but can be expanded to ASP.NET MVC model validation. You can find more information on the available attributes in the “System.ComponentModel.DataAnnotations Namespace” article on MSDN: http://mng.bz/2cWi.
Figure 15.8. The data-annotation attributes modify the way the properties are displayed and how their values are handled. By using them, you can influence what Dynamic Data does.
We’re now finished with Dynamic Data controls. It’s time to learn how to directly manage the ObjectContext’s lifecycle in a typical ASP.NET application, how to handle it properly, and what the main aspects to consider are.
15.3. The ObjectContext lifecycle in ASP.NET
EntityDataSource and Dynamic Data controls are interesting if you want to be very productive, or if you just need a simple interface to display and manipulate your data. In real-world applications, though, where enterprise techniques are needed, this approach won’t work.
As you learned in chapter 14, it’s possible to isolate Entity Framework’s dependency from the application, using a different approach from the one already introduced in this chapter. By using repositories, you can avoid coupling and maintain better control over what is performed under the hood. The examples provided in chapter 14 introduced you to the basics of this subject. The purpose of using a repository is to simplify testability, and, at the same time, to provide flexibility. By using a clean approach, primarily based on interfaces, the use of repositories also avoids coupling, generally thanks to an Inversion of Control (IoC) container that wraps the complexity.
Note
The example provided in this section is based on Unity, an IoC container that’s part of the Enterprise Library, created by the Microsoft Pattern & Practice team. The configuration is performed in the web.config file.
By using an IoC container, you can reuse part of the code already presented in chapter 14, which didn’t incorporate ASP.NET. We can reuse it here because we designed the application with great flexibility in mind.
15.3.1. The Context-per-Request pattern
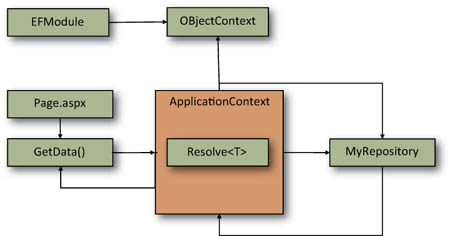
To make sure your strategy-based repositories can be implemented, you need to build a set of classes that will encapsulate the logic, as illustrated in figure 15.9.
Figure 15.9. By using the IoC container, both the ObjectContext and repositories are resolved at runtime. This helps to avoid coupling and lets you manage the ObjectContext’s lifecycle correctly.
There are different ways to handle the ObjectContext’s lifecycle, but the best in web applications, in terms of flexibility and functionality, is to handle it per-request (as in the Context-per-Request pattern). Every request will have its own ObjectContext instance, shared by different repositories, with there generally being one instance of the ObjectContext per entity set.
This simplifies the problem in many ways, because different parts of the page can access the same context, and multiple actions can be completed at the same time. Thanks to the IQueryable interface, the real query to the database will be performed only when the entity set is effectively enumerated, so no tangible overhead is associated with this approach.
15.3.2. Wrapping the context
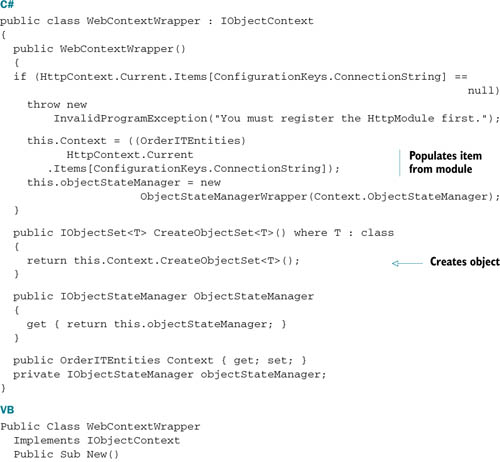
In order to support this scenario, you first need to create a basic implementation that gets the ObjectContext. We previously prepared an interface called IObjectContext that can support more scenarios, like unit testing, or Windows applications. The implementation is shown in the following listing.
Listing 15.4. Context wrapper creating an instance of the ObjectContext
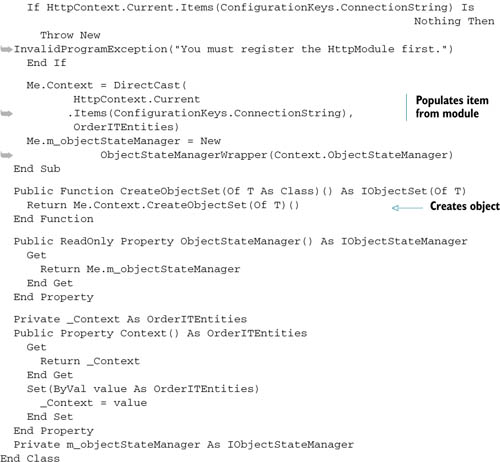
The repositories were created in chapter 14, so we won’t address that topic here. The next step is to create the module to handle the per-request instance. This can easily be accomplished by writing an HttpModule.
15.3.3. A module to handle the lifecycle
You’ve handled the context, so now you need to build the module to manage the ObjectContext instance using the Context-per-Request pattern. The code is very simple, as you can see here.
Listing 15.5. HttpModule that instantiates the ObjectContext per request
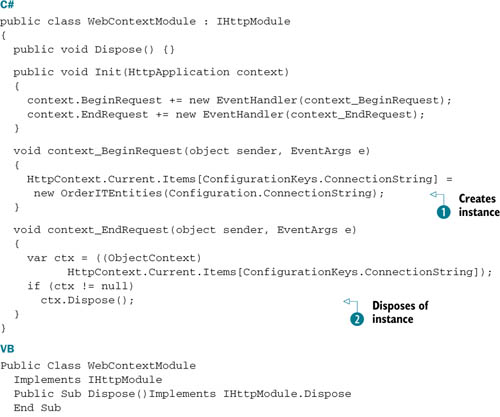

The code speaks for itself: at the beginning of every request, the context is created ![]() , and then it’s destroyed at the end
, and then it’s destroyed at the end ![]() . Note that you must dispose of the ObjectContext, or memory leaks may occur. Remember also to register the module, which is an ASP.NET HttpModule, under the appropriate section in the web.config file; otherwise, you’ll receive an error informing you that the module isn’t
configured.
. Note that you must dispose of the ObjectContext, or memory leaks may occur. Remember also to register the module, which is an ASP.NET HttpModule, under the appropriate section in the web.config file; otherwise, you’ll receive an error informing you that the module isn’t
configured.
15.3.4. Using the repository in a page
In order to use the repository to display customers in the page, you need to use this code in a Web Form page:
C#
Products.DataSource =
  ApplicationContext.Current.Companies.OfType<Customer>();
Products.DataBind();
VB
Products.DataSource =
  ApplicationContext.Current.Companies.OfType(Of Customer);
Products.DataBind()
As you can see, the access to repositories is wrapped in a singleton class, named ApplicationContext, which holds the reference to the repositories. The rest of the code you have already seen.
This approach, with POCO entities, gives you the freedom to change the implementation at any given time, because there’s no deep coupling between ASP.NET and Entity Framework. The approach based on repositories and the Context-per-Request patterns gives you good control over the ObjectContext lifecycle, too. The resulting web page is shown in figure 15.10, where an ASP.NET MVC view is used.
Figure 15.10. The customers in the database are displayed using the new design.

If you need more advanced features in your repositories, you can easily add more complexity to them using this design. Each piece is interchangeable, thanks to the IoC container.
Now we need to look at some common ASP.NET and Entity Framework scenarios and see what needs to be addressed when they’re used together.
15.4. Common scenarios involving ASP.NET and Entity Framework
You have to know a few things when working with Entity Framework in an ASP.NET application:
- Serializing objects in ViewState—By default, POCO entities aren’t serializable when they’re proxied. If you need to save an entity in ASP.NET’s ViewState, for example, this may be an issue. If a proxy isn’t in place, the entities must be decorated with SerializableAttribute. You can manually disable the proxy created or use a DTO (if that’s suitable for your needs). This is discussed in chapter 16, in the context of analyzing Entity Framework in n-tier applications. Non-POCO entities (the ones generated by default) are serializable by default because they’re generated with SerializableAttribute.
- Using transactions and concurrency—ASP.NET applications are disconnected by nature. Between different requests there isn’t a real state bag, so entities are created and destroyed frequently. If you need to handle transactions or concurrency, you have to keep this in mind. You can find more on this topic in chapter 8.
- Attaching entities—Attaching previously detached entities is a common scenario in web applications, because this atomic action is composed of two different steps: first, you get and display the data from the entity; then, you alter its properties, getting the value from the previous form. This problem is very similar to the previous point, and is specifically addressed in chapters 6 and 7.
Now you know how to create web sites using ASP.NET WebForm technology.
15.5. Summary
In this chapter, we discussed the two main options offered by ASP.NET for handling Entity Framework’s ObjectContext. You can easily integrate them either automatically or manually.
Both EntityDataSource and Dynamic Data controls can make you very productive. In particular, Dynamic Data controls can work with the custom T4 template to generate rich data-editing interfaces, using data annotations to further enhance the generated interface. This approach has some limits in terms of controlling the ObjectContext creation, and it can’t be used to wrap the ObjectContext behind a domain model.
If you prefer to isolate Entity Framework, you can manually manage the ObjectContext. Doing so gives you great flexibility; but ObjectContext’s lifecycle needs to be carefully managed in web applications, where multiple instance of the same object may occur per request—this situation must be resolved. You can address this scenario by writing a specific set of classes that automatically instantiate the ObjectContext at the beginning of every request and destroy it when the request is completed. In this scenario, using an IoC container gives you the flexibility to control what happens when common tasks related to your entities are performed.
ASP.NET is the most common way to use Entity Framework; but as a part of the .NET Framework, Entity Framework isn’t limited to web pages: you can use Entity Framework in virtually any kind of application. The following chapters will look at using Entity Framework in n-tier and Windows-based applications.