
Chapter 13. Customizing code and the designer
You know that by default the Visual Studio designer generates Entity Framework 1.0–style classes. You also know that these classes are generated through a template. What’s great is that you can modify this template, or create new templates, to generate classes to fit your needs. You’ve already seen an example in chapter 2, when we introduced the POCO template provided by Microsoft. Another point where templates help in generating code is during database DDL generation from the storage model (when you use the model-first approach). You’ll learn about that later in this chapter.
When you modify templates to change the way CLR code or database DDL is generated, you have to deal with different Entity Framework features and other products in the .NET framework.
Metadata is an important feature that you must use to be able to modify templates. When you create or modify classes in the designer, only the EDMX file is modified; the template generates the code on demand. It reads the conceptual schema metadata and generates the code based on that data. The same way, when the database DDL is generated, the storage and mapping schema are generated. After that, the storage schema data is used to create the DDL. Everything is metadata-driven.
To modify templates, a minimal knowledge of Windows Workflow Foundation (WF) is necessary too, because during database script generation (when using the model-first approach), the MSL, SSDL, and DDL are generated by a custom workflow action.
Finally, having good knowledge of the designer helps simplify code generation, because it can be customized to make things easier for you. For instance, it can be extended to write custom annotations in the EDMX file without you having to do it manually.
This chapter will cover all of these subjects—templates, metadata, Workflow Foundation, and designer extensions—putting them into action to help you customize your development environment.
13.1. How Visual Studio generates classes
When Visual Studio 2008 shipped, it introduced a text-generation engine named Text Template Transformation Toolkit (better known as T4). It’s a template-file-based engine that can generate any data you need.
We said data, but T4’s generation potential is unlimited. You can create text strings and save them to a file, or you can create images, Word documents, and so on. Despite its enormous potential, the goal here is using it for creating classes, which are just text files.
Creating a template file is pretty simple. If you’ve already used code-generation tools (such as CodeSmith), you won’t find it difficult. If you have a Classic ASP background, you’ll see many similarities between a template and an ASP page.
A template is a plain-text file with a .tt extension. It has a dedicated icon in the Solution Explorer window, as figure 13.1 illustrates.
Figure 13.1. A template file shown in the Solution Explorer
A template contains code that generates data. This code is executed automatically when you open the template and save it. A simpler way to trigger generation is right-clicking the template and selecting the Run Custom Tool item from the context menu.
A template file is divided into two main sections:
- Directives (pragmas)—Declares assemblies, namespaces, includes, and other global information
- Code—Contains the code that actually generates the code (classes, in our case)
Each of these parts is identified by tags that are a key aspect of the template. We’ll first discuss the tags and then look at the two sections of the file.
When you open a template, the editor doesn’t offer any help. Autocompletion isn’t enabled, and there’s no syntax highlighting. Fortunately, Tangible Engineering has created an extension for Visual Studio that offers features to make editing and comprehension easier. You can install it directly from Extension Manager inside Visual Studio:
1. Click the Tools menu, and select Extension Manager to open the Extension Manager pop-up window.
2. In that window, click the Online Gallery item at left.
3. Type T4 Editor in the search box at upper right (see the figure).
The free version of this extension offers a limited set of features; if you want the full version, you can buy it from the Tangible website (http://mng.bz/WAxC).
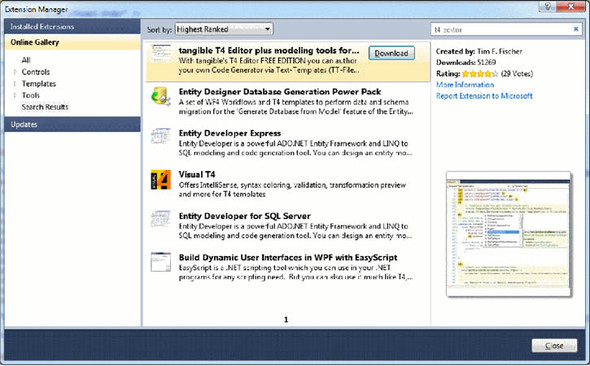
The Extension Manager window shows the T4 editors.
13.1.1. Understanding template tags
We already said that a template is a text file that is interpreted by an engine to generate code. To interpret the template file, the engine relies on specific markup in the template itself.
We also said that a template file is very similar to a Classic ASP page; the template is a mix of directives, code, and dynamic text, with the code and directives being identified by special tags. One difference is that in Classic ASP pages, the server code is surrounded by <% %> tags; but in the template file, both the code and the directives are surrounded by <# #> tags. Everything inside the tags is interpreted by the engine as code that must be executed (also known as a block); the text that’s not included inside the tags is what is written to the output file.
In some cases, you may need to append a special character to the opening tag to perform special tasks. The first special character is @, which specifies that the block is a directive:
<#@ template language="C#" debug="false" hostspecific="true" #>
Another important character is =. The block inside this tag returns a value, and it’s written in the generated code:
public class <#= ClassName #> { }
This block is also known as an evaluation block.
The last special character is +. It specifies that the code inside the block is class-like. If you have to create properties or methods, you have to use this character.
<#+
void WriteClassName() {
  ...
}
#>
This block is also known as a class block.
Understanding tags is only the first step toward understanding templates. We’ll look at the pragma section next.
13.1.2. Understanding directives
The first directive of a template is template. It identifies the file as a template, and it must be the first element. It also specifies the language and enables or disables debugging:
<#@ template language="C#" debug="false" hostspecific="true"#>
Although the template directive is mandatory, all the other directives are optional. The first one is assembly. It imports an assembly, making its classes available to the code. The assembly is specified in the name attribute:
<#@ assembly name="System.Core" #>
Once the assembly is declared, you can use the import directive to import a namespace so you can use classes inside the namespace in the code without fully referencing them. This directive has the same purpose as the Imports and using statements in VB and C#:
<#@ import namespace="System" #>
Another useful directive is output. With it, you can specify the extension of the file generated by the template, through the extension attribute, and the encoding of the file, through encoding:
<#@ output extension=".cs" #>
The last directive is include. It allows you to import a code file whose classes can be used by the template:
<#@ include file="EF.Utility.CS.ttinclude"#>
Note
The file to be included must be placed in the %ProgramFiles% Microsoft Visual Studio 10.0Common7IDEExtensionsMicrosoftEntity Framework ToolsTemplatesIncludes folder, or in the same folder as the template.
You’re two-thirds of the way through learning about templates. The last third, and the most complex, is the code section.
13.1.3. Writing code
Suppose you need to write a template that generates an HTML page that displays all the files in a specific directory. This isn’t an Entity Framework–related example, but don’t worry; you’ll learn about more real-world scenarios later.
To accomplish this task, you need to add a new file of Text Template type to the project and write code to retrieve the files in the directory that you need to display; then, you have to create tags that will write files to the output stream. The following listing shows an example of a template that generates HTML.
Listing 13.1. Template that creates an HTML file that lists a directory’s files

In the first line of this listing, a code block is opened and the files are retrieved ![]() . The block is then closed to write the beginning part of the HTML
. The block is then closed to write the beginning part of the HTML ![]() . This part, not included in code tags, is written in the output stream as is. Next, a new code block starts the iteration
over the files. For each item, an evaluation block adds the filename to the result stream. Finally, another code block closes
the iteration: } for C# and Next for Visual Basic
. This part, not included in code tags, is written in the output stream as is. Next, a new code block starts the iteration
over the files. For each item, an evaluation block adds the filename to the result stream. Finally, another code block closes
the iteration: } for C# and Next for Visual Basic ![]() .
.
The HTML file generated by the preceding template looks like this:
<html>
<head><title>Files</title></head>
<body>
  D:file1.txt<br />
  D:file2.txt<br />
</body>
</html>
This example writes the names of the files in a folder. In many cases, you may need a more complex result whose calculation is better encapsulated in a method (for readability reason). Doing that is easy. First, you add a class block inside which you put a method that accepts the filename and returns the calculated result. Then, you change the evaluation block to invoke the method. The new method and the code that invokes the method are shown here.
Listing 13.2. Creating methods in the template
C#
...
<#=GetFileName(file)#><br />
...
<#+
string GetFileName(string file){
  return file;
}
#>
VB
...
<#=GetFileName(file)#><br />
...
<#+
Private Function GetFileName(ByVal file As String) As String
  Return file
End Function
#>
The GetFileName function is trivial because it just returns the filename. We created it only to explain how to create and consume methods in the template.
The result is automatically saved in a file that’s named after the template file and whose extension matches the template language. If the template name is test.tt, then the filename is test.cs or test.vb. But wouldn’t it be better to force the extension to be .html? The output pragma does the trick:
<#@ output extension=".html"#>
It’s that simple. The next step is to modify Entity Framework templates to adapt them to your needs. You’ll learn how to do that next.
13.2. Customizing class generation
In chapter 2, we introduced a template released by the Entity Framework team that generates POCO classes. Actually, there are two templates: one that generates object model classes and one that generates the context class. In OrderIT, you placed them in a single assembly; to keep things simple, we decided to use a single assembly with data-access code and object model classes.
In the next chapter, you’ll see that in a well-layered architecture, you put object-model classes in one assembly and the context class in another. The Entity Framework team kept this in mind when they decided to deliver two different templates.
In sections 13.2.2 and 13.2.3, we’ll show you how to customize those templates; but first, you need to understand how they’re structured so that modifying them will be easier.
13.2.1. Understanding the available POCO template
Creating a template that reads the EDMX file and generates classes isn’t difficult. You know that the EDMX file combines the three EDM files in one, so you need metadata APIs to read conceptual and storage-schema metadata.
As you learned in chapter 12, accessing metadata using the ObjectContext class or the EntityConnection is easy. Because the template must generate the context class, you can’t use the ObjectContext class, and using the EntityConnection class is too complicated. The only way to access EDMX file metadata is by using the Metadata-Workspace class directly.
You learned in chapter 12 that directly creating an instance of MetadataWorkspace class is complicated. Fortunately, the Entity Framework team has created a helper file containing a set of classes that expose metadata. What’s even better, the metadata is exposed as an ItemCollection, so you can reuse the APIs as you learned in chapter 12.
The helper file is named EF.Utility.CS.ttinclude for C# and EF.Utility.VB.ttinclude for VB, and it’s in the Visual Studio includes folder. The main class in the helper file is MetadataLoader, and it exposes metadata through the CreateEdmItemCollection method, which returns an EdmItemCollection instance. You know that this class holds conceptual data only. If you want to retrieve the storage data, you have to do it on your own. But don’t worry; we’ll show you how to do that in section 13.2.2.
There are other important classes. The first is MetadataTools, which exposes methods that work on EDM types. For instance, its ClrType method accepts the EDM type and returns the CLR equivalent. IsKey accepts a property and returns a Boolean indicating whether it’s part of its entity’s primary key.
The CodeGenerationTools class performs the dirty work on strings. Its Escape function has many overloads that accept metadata objects like EdmFunction, Edm-Property, EntityType, and so on, and returns their escaped names so they don’t conflict with language keywords. The SpaceAfter and SpaceBefore methods ensure that the string they accept as input has a space after or before, respectively, so the string isn’t bound to the next or the preceding text.
The last interesting class is Accessibility. It contains static methods that read the visibility of a type or property defined in the EDM and return a string in the chosen language. For instance, if a property is defined as public in the EDM, the For-Property method returns the string "public" for C# and "Public" for VB.
Both templates instantiate these classes at the very beginning of the code section so you can use them without any effort. That’s another point for Entity Framework’s productivity, isn’t it?
It’s finally time to put all this knowledge to work. The first thing we’ll show you is how to modify the context template to generate user-defined and scalar-valued functions, as we hinted in the previous chapter.
13.2.2. Generating user-defined and scalar-valued functions
User-defined functions are part of the CSDL; scalar-valued functions are defined in the SSDL because they’re defined in the database. We said previously that MetadataLoader only returns data about the conceptual schema, so to retrieve scalar-valued functions defined in the storage schema, you have to write the code on your own.
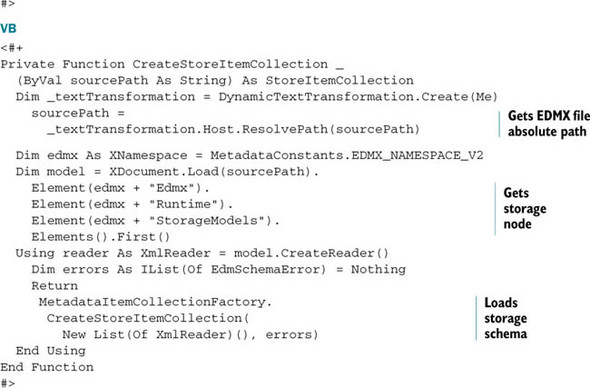
Retrieving the storage schema isn’t that hard. What you need to do is retrieve the raw XML representing the SSDL and pass it to the MetadataItemCollectionFactory.CreateStoreItemCollection method. It returns a StoreItemCollection instance that can be queried, as you saw in the previous chapter.
You can embed the code to retrieve the storage schema in a class-block method inside the template. You could even add the code to the MetadataLoader class, but we don’t recommend that because the file containing the MetadataLoader class isn’t under source control, and you should maintain it manually on each workstation. What’s worse, if the Entity Framework team releases a new version of the file containing the MetadataLoader class, your modifications will be overwritten.
This listing shows the code you need in the template to retrieve the storage schema.
Listing 13.3. Retrieving the storage schema

In addition to the schema, you need the namespace. It’s required in order to build the stub methods. Retrieving the namespace requires a new method whose code is quite similar to listing 13.3. The difference is that when you have the Schema element, you return its namespace attribute instead of the whole element:
C#
string GetStoreNamespace(string sourcePath)
{
  ...
  return model.Attribute("Namespace").Value;
}
VB
Private Function GetStoreNamespace(ByVal sourcePath As String) As String
  ...
  Return model.Attribute("Namespace").Value
End Function
Now that the plumbing is ready, you can write the code that creates the stubs for the functions. First, you retrieve all the functions from both the conceptual and storage schemas using a LINQ query. Then, you iterate over the elements, and for each one you retrieve the return type and the parameters. When you have them, you can write the stub methods’ code. That’s all shown in the following listing.
Listing 13.4. Creating the code for stub methods

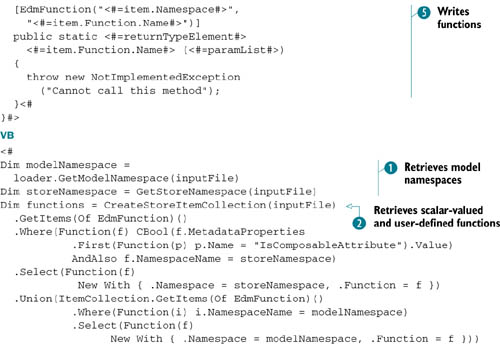

Lots of interesting things happens in this listing. First, the namespace from both models is retrieved so it can be later
used to create the stubs ![]() . The loader variable is an instance of the MetadataLoader class, and it’s used to retrieve the conceptual schema namespace. GetStoreNamespace is the method that returns the storage schema namespace. inputFile is the EDMX file.
. The loader variable is an instance of the MetadataLoader class, and it’s used to retrieve the conceptual schema namespace. GetStoreNamespace is the method that returns the storage schema namespace. inputFile is the EDMX file.
After that, a LINQ query joins the storage and conceptual functions ![]() . Notice how only the objects in the specified namespace are extracted, and in the case of the storage schema how only scalar-valued
functions (functions whose IsComposable-Attribute attribute value is true) are retrieved.
. Notice how only the objects in the specified namespace are extracted, and in the case of the storage schema how only scalar-valued
functions (functions whose IsComposable-Attribute attribute value is true) are retrieved.
Next, a loop over the functions is started, and for each one the string representing the return type is retrieved. The key
point here is that you get the type as a string by invoking the MetadataTools class’s GetElementType method, and you don’t have to deal with the complexity of converting information from EDM to CLR format ![]() . If the method throws an exception, the function returns a DbDataRecord. If the return value is a list, it’s wrapped by the IEnumerable<T> class.
. If the method throws an exception, the function returns a DbDataRecord. If the return value is a list, it’s wrapped by the IEnumerable<T> class.
The next step is creating the string for the parameters ![]() . First, the Function-ImportParameter class’s Create method creates an array of parameters where each one exposes the type and the name as a string. Then, a LINQ query joins
this information, separating the individual parameters with commas.
. First, the Function-ImportParameter class’s Create method creates an array of parameters where each one exposes the type and the name as a string. Then, a LINQ query joins
this information, separating the individual parameters with commas.
Finally, you have the function namespace, name, parameters, and return type. You now can close the block method and create
the function using markup text and evaluation blocks ![]() .
.
This is the result of the template in listing 13.4:
C#
[EdmFunction("OrderITModel", "GetUDFTypedAddresses")]
public static CustomerProjection GetUDFTypedAddresses
  (Customer customer)
{
  throw new NotImplementedException("Cannot call this method");
}
VB
<EdmFunction("OrderITModel", "GetUDFTypedAddresses")> _
Public Shared Function GetUDFTypedAddresses(ByVal customer As Customer) _
  As CustomerProjection
  Throw New NotImplementedException("Cannot call this method")
End Function
Modifying the template that generates object model classes isn’t any different from modifying the context template. Naturally the type of data to be treated changes, but the technique is the same: you use a mix of code blocks and generated text.
13.2.3. Generating data-annotation attributes
In chapters 5 and 12, we showed you how to add custom information to EDM and how to retrieve it in the code. Here we’ll complete the circle and show you how to generate data annotation attributes from those custom EDM annotations.
The example we looked at in those chapters added validation information to the Supplier class’s IBAN property. What you’ll do now is generate an attribute for that property, as shown in the following snippet:
C#
[RegularExpression(@"[a-zA-Z]{2}d{2}[ ][a-zA-Z]d{3}[ ]d{4} [ ]d{4}[ ]d{4}[ ]d{4}[ ]d{3}|[a-zA-Z]{2}d{2}[a-zA-Z]d{22}"]
VB
<RegularExpression("[a-zA-Z]{2}d{2}[ ][a-zA-Z]d{3}[ ]d{4}[ ] d{4}[ ]d{4}[ ]d{4}[ ]d{3}|[a-zA-Z]{2}d{2}[a-zA-Z]d{22}")> _
As you can imagine, the template that generates object-model classes retrieves the entities’ metadata from the EDM’s conceptual schema and iterates over them, generating classes, properties, and so on. We’re interested in the property-creation process because you have to add the preceding code to the IBAN property. You need to plug in the code before the scalar properties are written. You can easily find the point where scalar properties are generated by looking for the LINQ query that retrieves them from the entity’s properties.
Listing 13.5 adopts another technique. Instead of mixing text and code blocks, it uses a method that takes the property and returns a string containing the attribute. Just before the property is written, the method is invoked in an evaluation block.
Listing 13.5. Creating a data annotation containing a regular expression for a property

This code should look familiar to you. The first noticeable thing is that the method scans the input property’s metadata,
looking for an item with the validation namespace (the one specified in the Schema element) ![]() .
.
If the metadata exists, it’s cast to XElement, and its value is used to create the data annotation attribute ![]() . You can then invoke the WriteAttribute method before a property is created, in the following way:
. You can then invoke the WriteAttribute method before a property is created, in the following way:
<#=WriteAttributes(edmProperty)#>
The use of the template increases productivity. If it didn’t generate the scalar-valued and user-defined functions, you would have to write and maintain them, which means writing and maintaining a lot of code. Thanks to the template, these functions are generated and maintained by a single Visual Studio command.
Class generation greatly benefits from templates. The creation of POCO classes is just one of the possible scenarios. The ability to create attributes, to customize setters, and so on speeds things up to a great extent. We consider templates to be a great new feature in Entity Framework 4.0.
Classes don’t consist only of data from the database. They can also contain methods and properties that aren’t persisted in the database. The EDM knows nothing about them, so you have to find a way to create them.
13.2.4. Extending classes through partial classes
Suppose you need to create a FullShippingAddress string property in the Customer class. This property will be read-only and flattens the ShippingAddress complex property into a string.
Templates can’t generate such a property for you, and if you add such a property to the class generated by the template, the property will be lost at the next code regeneration. To add this code to the class manually without losing it when the class is regenerated, you have to create it in a partial class.
Partial classes are a feature introduced in .NET Framework 2.0 that allow you to split a class into multiple files in the same assembly. At compile time, the compiler joins the files and generates only one class. The basic requirement for a class to be partial is that all files that define it contain the partial keyword in the definition, as shown in the following code:
C#
public partial class Customer
{
   ...
}
VB
Public Partial Class Customer
  ...
End Class
The template already generates partial classes, so you don’t have to touch it. What you have to do is add a new class to the project, name it Customer, sign it with the partial keyword for C# or Partial keyword for Visual Basic, and then add the property as the following listing shows.
Listing 13.6. Creating a partial class
C#
public partial class Customer
{
  public string FullShippingAddress
  {
    get
     {
       return String.Concat(ShippingAddress.Address, ",",
         ShippingAddress.ZipCode, ", ",
         ShippingAddress.City);
     }
  }
}
Public Partial Class Customer
  Public ReadOnly Property FullShippingAddress() As String
    Get
       Return String.Concat(ShippingAddress.Address, ",",
         ShippingAddress.ZipCode, ", ",
         ShippingAddress.City)
    End Get
  End Property
End Class
With this technique, you can extend your classes and add any code you need.
Nevertheless, there are things you can’t do with partial classes. For instance, you can’t add an attribute to a property or method defined in another file, nor can you change the implementation of a method or property defined in another file. You can only add code, and nothing more.
Note
Properties added in partial classes can’t be used in LINQ to Entities or Entity SQL queries because they aren’t mapped in the EDM.
We mentioned before that just as you can generate code from the EDM, you can create a script to generate the database from the storage schema. This is what model-first design is all about. You design the conceptual schema, and then the mapping schema, the storage schema, and the database script are generated on that basis. The good part is that the database generation is completely customizable.
13.3. How Visual Studio generates database DDL
As we said in chapter 2, the model-first support in the designer is still naive. Its current limitations make it impractical to use. Fortunately, the designer has been built on a great extension mechanism that you can use to modify the designer’s default behavior. This extension mechanism isn’t simple. It requires the use of Workflow Foundation, templates, metadata, and EDM knowledge. Due to this complexity, we’ll go slowly and explain it all in detail.
The Entity Framework team that built the designer’s extensibility mechanism has also published a toolkit that simplifies the process of building designer extensions to generate databases. The extensions are still a bit difficult to create, but it’s a lot simpler when you use the toolkit. The toolkit, Entity Designer Database Generation Power Pack, can be downloaded here: http://mng.bz/ssf0; or you can download it via Visual Studio’s Extension Manager window.
Before delving into the details, let’s take a quick look at the steps involved when you adopt the model-first approach and generate a database script. In the model-first scenario, you design entities without worrying about how they’re mapped, because you don’t have a database yet. When you’ve finished designing the model, you right-click the designer and select the Generate Model from Database option.
The command opens a pop-up window in which you can add the database connection string (required the first time you generate the database). After some internal processing, a new window opens, displaying the database script.
How does this happen? It’s all based on a Windows Workflow Foundation workflow launched by the designer. We’ll look at that next.
13.3.1. Choosing the workflow
To choose which workflow the designer should use to generate mapping schema, storage schema, and database script, you have to open the designer, right-click it, and select properties. Figure 13.2 shows the interesting part of the Properties toolbox.
Figure 13.2. The designer properties that manage database script generation

The Database Generation Workflow property indicates what workflow is used to generate the database. The only workflow available out of the box is TablePerType-Strategy.xaml. The designer knows about it because it looks for files with an .xaml extension in the %ProgramFiles%Microsoft Visual Studio 10.0Common7IDE ExtensionsMicrosoftEntity Framework ToolsDBGen directory.
As you can see in figure 13.2, the workflow property has a drop-down list, meaning you can choose a different workflow. To do that, you need to create another .xaml workflow file inside the DBGen directory. The Properties Window will automatically list it in the drop-down menu when it’s expanded.
Whatever workflow you choose, it has to do three things:
1. Generate the storage schema from the conceptual schema.
2. Generate the mapping schema.
3. Generate the database script from the storage schema.
The default workflow separates these steps into two actions. The first action takes care of steps 1 and 2, and the second action performs step 3. The entire workflow can be seen in the following listing.
Listing 13.7. Workflow that generates a script to persist inheritance with TPT
<Activity x:Class="GenerateDatabaseScriptWorkflow"
  xmlns="http://schemas.microsoft.com/netfx/2009/xaml/activities"
  xmlns:x="http://schemas.microsoft.com/winfx/2006/xaml"
  xmlns:s="clr-namespace:System;assembly=mscorlib"
  xmlns:sde="clr-namespace:System.Data.Metadata.Edm; assembly=System.Data.Entity"
  xmlns:edm="clr-namespace:Microsoft.Data.Entity.Design.DatabaseGeneration.Activities; assembly=Microsoft.Data.Entity.Design.DatabaseGeneration"
  xmlns:edm1="clr- namespace:Microsoft.Data.Entity.Design.DatabaseGeneration.Activities;  assembly=Microsoft.Data.Entity.Design">
  <x:Members>
    <x:Property Name="Csdl" Type="InArgument(sde:EdmItemCollection)" />
    <x:Property Name="ExistingSsdl" Type="InArgument(s:String)" />
    <x:Property Name="ExistingMsl" Type="InArgument(s:String)" />
    <x:Property Name="Ssdl" Type="OutArgument(s:String)" />
    <x:Property Name="Msl" Type="OutArgument(s:String)" />
    <x:Property Name="Ddl" Type="OutArgument(s:String)" />
  </x:Members>
  <Sequence>
    <edm:CsdlToSsdlAndMslActivity CsdlInput="[Csdl]"
      SsdlOutput="[Ssdl]" MslOutput="[Msl]"
OutputGeneratorType="Microsoft.Data.Entity.Design.DatabaseGeneration. OutputGenerators.CsdlToSsdl,  Microsoft.Data.Entity.Design.DatabaseGeneration"
MslOutputGeneratorType="Microsoft.Data.Entity.Design.DatabaseGeneration .OutputGenerators.CsdlToMsl, Microsoft.Data.Entity.Design.DatabaseGeneration" />
    <edm1:SsdlToDdlActivity ExistingSsdlInput="[ExistingSsdl]"
      SsdlInput="[Ssdl]" DdlOutput="[Ddl]" />
  </Sequence>
</Activity>
Even if you aren’t a workflow expert, you should be able to understand what this workflow does. The CsdlToSsdlAndMslActivity activity reads the CSDL and generates SSDL and MSL, whereas SsdlToDdlActivity creates the database script starting from the SSDL. It’s that simple.
13.3.2. Generating SSDL, MSL, and DDL
The CsdlToSsdlAndMslActivity activity doesn’t require you to do anything. It already has everything it needs to accomplish its task. That’s not true of the SsdlToDdlActivity activity, which needs an input from you.
In figure 13.2, you see two important properties: Database Schema Name and DDL Generation Template. The first is the database schema, and by default it’s set to dbo. You’re free to modify it as you like, but keep in mind that all tables will be generated under that schema. The second property is more important because it specifies the template that will be invoked by the second workflow action (SsdlToDdlActivity).
The default template is SSDLToSQL10.tt, and it’s situated in the same folder as the workflow file. Like the workflow property, the template property has a drop-down list. The designer looks for *.tt files in the DBGen folder to populate the drop-down list with templates.
Let’s quickly recap:
- You can customize the way MSL and SSDL are generated (for instance, to apply a TPH strategy instead of TPT, which is the default).
- You can customize the way the database script is generated (for instance, to create an Oracle database or to generate a script that contains only the modifications made to the model since the last time the database script was generated).
It’s now time to talk about the Entity Designer Database Generation Power Pack toolkit.
13.4. Customizing DDL generation
The Database Generation Power Pack installer copies a set of .xaml and .tt files into the Visual Studio template folder. When you open the drop-down lists for the Database Generation Workflow and DDL Generation Template properties, you’ll see many more options, as shown in figure 13.3.
Figure 13.3. The workflows and templates installed by the Database Generation Power Pack

Note
The templates installed by this CTP are written in C# only, so we won’t show VB versions.
This gives you lots of new toys to play with. As you may imagine based on its name, the Generate T-SQL Via T4 (TPH).xaml file is the workflow that generates tables to persist inheritance hierarchies using the TPH strategy. We’re going to talk about this workflow and show you how the Database Generation Power Pack works.
Here’s the Sequence section from the XAML file:
<Sequence>
  <dbtk:CsdlToSsdlTemplateActivity SsdlOutput="[Ssdl]"
    TemplatePath="$(VSEFTools)DBGenCSDLToSSDL_TPH.tt"/>
  <dbtk:CsdlToMslTemplateActivity MslOutput="[Msl]"
    TemplatePath="$(VSEFTools)DBGenCSDLToMSL_TPH.tt"/>
  <ded:SsdlToDdlActivity ExistingSsdlInput="[ExistingSsdl]"
    SsdlInput="[Ssdl]" DdlOutput="[Ddl]" />
</Sequence>
The three activities started here create the SSDL, the MSL, and the DDL. What’s really smart about these workflow actions is that instead of consisting of lots of code, they generate SSDL, MSL, and DDL by running the CSDLToSSDL_TPH.tt, CSDLToMSL_ TPH.tt, and SSDLToSQL10.tt templates, respectively. Let’s take a quick look at each of them so you understand how they work.
13.4.1. Understanding the conceptual-to-storage template
The first node to be created in the storage model is Schema. It needs the data-store namespace, the database type, and the database version. Database information is retrieved via the connection string, and the namespace name is based on the conceptual schema name. This information is available in the template because it’s passed in by the workflow action.
This is the template code that generates the Schema element:
<Schema Namespace="<#=ssdlModelNamespace#>" Alias="Self"
  Provider="<#=providerInvariantName#>"
  ProviderManifestToken="<#=providerManifestToken#>"
  xmlns="<#=ssdlNamespace#>" xmlns:store="<#=essgNamespace#>">
And this is the generated output:
<Schema Namespace="OrderITModel.Store" Alias="Self"
  Provider="System.Data.SqlClient"
  ProviderManifestToken="2008"
  xmlns:store="http://schemas.microsoft.com/ado/2007/12/edm/EntityStoreSchemaGenerator"
  xmlns="http://schemas.microsoft.com/ado/2009/02/edm/ssdl">
Note
The variables ssdlModelNamespace, providerInvariantName, and so on are populated in the template before this piece of code. If you want to see how the variables are populated, look at the template.
After the Schema element, the container and the entity set are created. The code generates a table for each base class and a table for each many-to-many relationship (the famous link table). To easily obtain information about base classes and many-to-many relationships from the EDM, the template uses a set of extension methods that the Entity Framework team has created. For instance, the GetAllEntityTypes method wraps a call to the GetItems<EntityType> method of the EdmItemCollection class. The following listing shows this code.
Listing 13.8. Container and entity-set creation
<EntityContainer
  Name="<#=this.WriteEntityContainerName(csdlModelNamespace)#>">
<#
foreach (EntityType entityType in edm.GetAllEntityTypes()
  .Where(e => !e.IsDerivedType()))
{#>

  <EntitySet Name="<#=WriteEntityTypeName(entityType, edm)#>"
    EntityType="<#=ssdlModelNamespace#>.
    <#=WriteEntityTypeName(entityType, edm)#>" store:Type="Tables"
    Schema="<#=databaseSchemaName#>" />
<#}
foreach (AssociationSet associationSet in edm.GetAllAssociationSets()
  .Where(set => set.GetAssociation().IsManyToMany())) { #>

  <EntitySet Name="<#=associationSet.Name#>"
    EntityType="<#=ssdlModelNamespace#>.
    <#=associationSet.ElementType.Name#>" store:Type="Tables"
    Schema="<#=databaseSchemaName#>" />
<#}
The association sets are also created at this point, but showing that code here would bore you and take up too much space. You can find the code in the template if you’re interested.
The next thing the template does is describe the tables. This involves a lot of code to correctly generate the storage schema:
- Complex properties don’t exist in the database, so their inner properties must be correctly named to avoid conflicts (think about BillingAddress and ShippingAddress in OrderIT’s Customer entity). The pattern used to avoid collisions is ComplexPropertyName_SubPropertyName.
- In tables containing an inheritance hierarchy, a discriminator column must be added.
- Foreign-key columns must be added even if they aren’t specified in the entity, because they’re required in the database to maintain relationships.
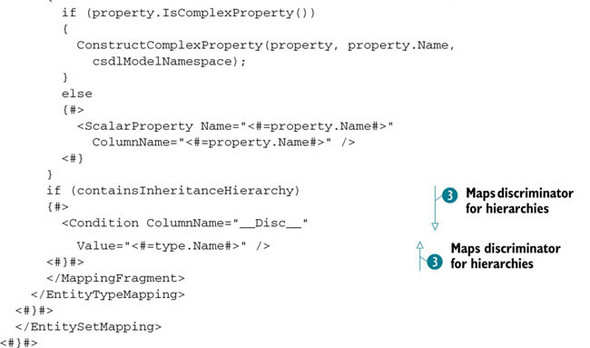
The following listing shows an excerpt of what the template code looks like. The table, key, and discriminator definitions are shown here—the property definition requires a lot more code.
Listing 13.9. Table, primary key, and discriminator definitions

We didn’t cover associations here because they would involve a lot of code. If you want to learn more, look at the template.
That’s pretty much all there is to know about the storage-schema generation. Let’s move on to the mapping schema, which is relatively simpler.
13.4.2. Understanding the conceptual-to-mapping template
The concept that drives the generation of the mapping schema is the same as for the storage schema. Entities are retrieved using metadata, and each standalone entity has a one-to-one mapping with the corresponding table. Entities that are part of an inheritance hierarchy have all their properties grouped into a single table.
Following these principles, writing a template is straightforward, as the following listing demonstrates.
Listing 13.10. Mapping entities to tables

The method names are so self-explanatory that the code is easy to follow. It first retrieves all the entity sets, and for
each one retrieves the table mapping, first for the key properties ![]() , and then for all other properties of the entity that are part of the entity set
, and then for all other properties of the entity that are part of the entity set ![]() . At the end, the discriminator column is mapped if the entity is part of an inheritance hierarchy
. At the end, the discriminator column is mapped if the entity is part of an inheritance hierarchy ![]() .
.
You’ve now seen how the workflow activities generate the EDM (more precisely, how the templates generate text that is saved and encapsulated in the EDMX). The step for us to look at is how the database script is generated from the storage schema.
13.4.3. Understanding the storage-to-database script template
The database-script-generation process is very similar to the process we looked at in the previous section. The template reads metadata from the storage schema and generates DDL script like what you see in the following listing.
Listing 13.11. Generating database tables
<#
foreach (EntitySet entitySet in Store.GetAllEntitySets())
{
  string schemaName = Id(entitySet.GetSchemaName());
  string tableName = Id(entitySet.GetTableName());
#>
CREATE TABLE [<#=schemaName#>].[<#=tableName#>] (
<#
  for (int p = 0; p < entitySet.ElementType.Properties.Count; p++)
  {
    EdmProperty prop = entitySet.ElementType.Properties[p];
#>
    [<#=Id(prop.Name)#>] <#=prop.ToStoreType()#>
    <#=WriteIdentity(prop, targetVersion)#>
    <#=WriteNullable(prop.Nullable)#>
    <#=(p < entitySet.ElementType.Properties.Count - 1) ? "," : ""#>
  <#}#>
);
<#}#>
This code retrieves all the storage entity sets (the database tables) and then builds the CREATE TABLE statements by iterating over all the properties.
Congratulations. You’ve just learned how the Database Generation Power Pack creates the code that builds a database script based on the entities created in the designer.
What you have seen so far is an external extension to the designer; the designer always remains the same. Prepare yourself, because in the next section we’ll show you how to add new behavior to the designer.
13.5. Creating designer extensions
The Entity Framework team has added a lot of extensibility points into the designer. You can plug in custom behaviors via these four interfaces:
- IEntityDesignerExtendedProperty—Allows you to add custom properties to any item on the designer surface: entities, properties, associations, and so on.
- IModelTransformExtension—Lets you customize the EDMX file in two phases: after it’s loaded (but before it’s shown by the designer) and before it’s saved.
- IModelConversationExtension—Lets you transform a mapping file in a custom format to the EDMX format, which is then passed to the designer for visualization. There’s also a reverse method that takes the EDMX and allows you to save it in your format.
- IModelGenerationExtension—Exposes methods that let you customize behavior when the EDMX file is generated by the initial wizard and when it’s updated by the Update Model wizard.
Unless you need very particular customizations, the last three interfaces are of little interest; the first one may save you from having to make some manual EDMX modifications.
Let’s take a step back and look at the SmartAttach<T> extension method created in chapter 12. That method takes an entity as input and decides whether to add or attach it to the context based on the value of the primary key specified in a custom EDM annotation: if the primary-key property value is 0, the method adds the entity to the context; otherwise, the method attaches the entity to the context.
You know that you have to manually modify the EDMX file to add the custom annotation that specifies the value that determines whether the input entity must be added or attached to the context. Wouldn’t it be absolutely fantastic if you could set this value by using the designer, without manually touching EDMX? It would look something like what’s shown in figure 13.4.
Figure 13.4. The custom annotation value is shown in the Property Editor when the entity property is selected.

We bet you’re whispering, “wow.” In the rest of this section, we’ll show you how to build this designer extension.
13.5.1. How the property-extension mechanism works
Customizing a designer is generally thought to be tough work, and often that’s true. Lots of base classes and interfaces to implement, plus a lack of documentation, make thing really difficult sometimes. Fortunately, the Entity Framework designer is an exception. Its extensibility model is built on the Managed Extensibility Framework (MEF), which already takes care of all the plumbing.
The result is that you only have to create two classes to extend the designer. The first (which we’ll call the property class) reads and writes values from and to the EDMX, and the second (often known as the factory) acts as the bridge between the designer and the first class.
When you select an item in the designer and then go to the Properties window, the designer goes to the factory and asks for an object containing the property to be added to the Properties window. The factory instantiates the property class and returns it to the designer.
The designer sends the object to the Properties window, which retrieves the exposed property and shows it in the designer. From that moment on, when you modify the property, the getter and setter work directly with the EDMX. Figure 13.5 illustrates this workflow.
Figure 13.5. The Property window asks the designer for additional properties to display. The designer delegates the factory, which instantiates the property class that is then displayed by the Properties window.

The first step in extending the designer is creating the extension project.
13.5.2. Setting up the project containing the extension
A designer-customization project requires two classes: the manifest file that installs the generated extension, and a couple of references. To create these, follow these steps:
1. Create a new Class Library project inside the OrderIT solution, and name it OrderIT.DesignerExtensions.
2. Delete the Class1.* file.
3. Add a reference to the System.ComponentModel.Composition assembly that’s situated in the .NET Framework 4.0 folder (%ProgramFiles%ReferenceAssembliesMicrosoftFramework.NETFrameworkv4.0).
4. Add a reference to the Microsoft.Data.Entity.Design.Extensibility assembly located in the Visual Studio assemblies folder (%ProgramFiles%Microsoft Visual Studio 10.0Common7IDEPublicAssemblies).
5. Add a new class, and name it InsertWhenValue. It’s the property class that manipulates the EDMX file.
6. Add a new class, and name it InsertWhenFactory. It’s the bridge class, or factory.
7. Add a new XML file, and name it extension.vsixmanifest. It’s needed to install the extension in Visual Studio.
8. Right-click the XML file, and select Properties. In the Properties window, set the Build Action property to VsixContent.
The project is now set up. What you need to do next is put some code inside the classes. We’ll start with the property class that handles the EDMX file; it’s the most important.
13.5.3. Creating the property class
The property class has two purposes: exposing the properties that must be added to the Properties window, and reflecting their values in the EDMX. In this example, when you set the value in the Properties window, the property setter has to create, or update, the custom annotation in the EDMX. Similarly, when the property is read, the getter must retrieve the custom annotation and return its value, which is then shown in the Properties window.
Here’s the code for the property class.
Listing 13.12. Creating the designer property class
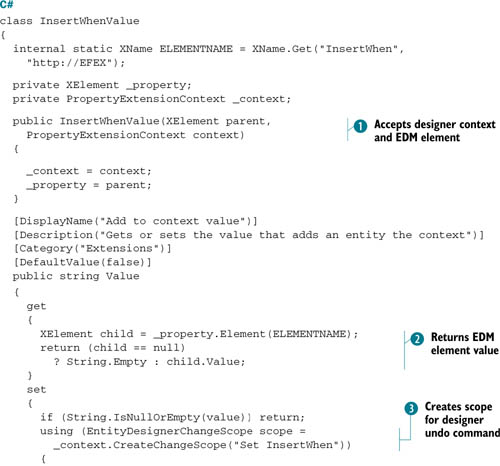
Notice how the class is POCO. You don’t have to implement any interfaces or inherit from any class!
Another important thing to notice is the constructor. It accepts an XElement object, representing the XML element inside the EDMX, and a PropertyExtension-Context object, which carries context information about the designer environment ![]() . As you may imagine, the XElement object is the Property node of the EDMX. Modifying and reading it means modifying and reading the EDMX.
. As you may imagine, the XElement object is the Property node of the EDMX. Modifying and reading it means modifying and reading the EDMX.
When the Properties window needs to show a label for the Value property, it takes the string contained in the DisplayName attribute of that property (it’s the Add to Context Value property in this case, as you can see in figure 13.4). When the Properties window needs the property value, the getter is triggered, and the custom annotation element is searched
for. If found, its value is returned; otherwise, an empty string is returned ![]() .
.
The setter is slightly more complex then the getter. The first thing to notice is its use of the context received by the constructor.
The setter invokes the context’s CreateChangeScope method, which creates a scope that’s needed for Visual Studio to create the undo list, so that any modification can be undone
![]() .
.
Note
Creating the scope is mandatory. Any attempt to modify the XElement outside of a scope throws an exception.
Once inside the scope, the custom annotation is searched for. If it’s not found, it’s added to the property; otherwise, it’s
updated ![]() .
.
The simplicity of this feature may be a surprise to you. You’ll be glad to know that creating the factory class is even easier.
13.5.4. Creating the factory class
The factory class is a very simple class that, in many cases, contains only one line of code! It must implement the IEntityDesignerExtendedProperty interface, and it must be decorated with two attributes, as you can see in this listing.
Listing 13.13. Creating the bridge class
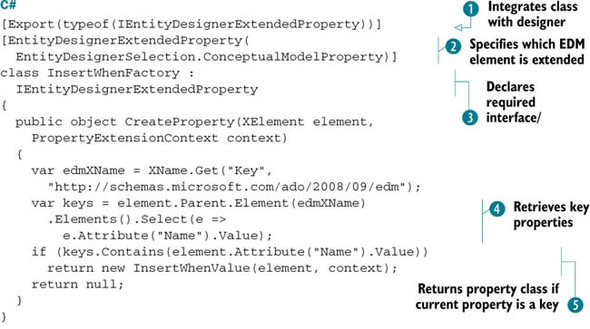

There’s a lot to say about this little listing. First, notice the Export attribute ![]() . It’s defined in the System.ComponentModel.Composition namespace and accepts the implemented interface type.
. It’s defined in the System.ComponentModel.Composition namespace and accepts the implemented interface type.
The EntityDesignerExtendedProperty attribute tells the designer which EDM element the factory class applies to. When the designer invokes the factory class,
the designer also specifies what object is currently selected (an entity, a property, the designer itself, and so on) ![]() . If the selected object doesn’t match the attribute definition, the factory class is ignored.
. If the selected object doesn’t match the attribute definition, the factory class is ignored.
The object to which the factory class applies to is expressed by an enum of type EntityDesignerSelection. It has lots of values, but these are the most important:
- DesignerSurface—The factory class is invoked if the selected object is the designer surface.
- ConceptualModelEntityType—The factory class is invoked if the selected object is an entity.
- ConceptualModelProperty—The factory class is invoked if the selected object is an entity’s property.
- ConceptualModelNavigationProperty—The factory class is invoked if the selected object is an entity’s navigation property.
- ConceptualModelAssociation—The factory class is invoked if the selected object is an association between two entities.
- ConceptualModelComplexType—The factory class is invoked if the selected object is a complex type.
- ConceptualModelComplexProperty—The factory class is invoked if the selected object is an entity’s complex property.
- ConceptualModelFunctionImport—The factory class is invoked if the selected object is a function in the conceptual schema.
- ConceptualModelFunctionImportParameter—The factory class is invoked if the selected object is a parameter of a function in the conceptual schema.
In this example, you’re working on entity properties only.
The factory class has to implement the IEntityDesignerExtendedProperty interface—that’s required by the extensibility mechanism ![]() . This interface has only the CreateProperty method, which is invoked by the designer to obtain the property class. It accepts both the element that represents the property
in the EDMX and a context. These parameters are then passed to the property class constructor when the property class is instantiated.
. This interface has only the CreateProperty method, which is invoked by the designer to obtain the property class. It accepts both the element that represents the property
in the EDMX and a context. These parameters are then passed to the property class constructor when the property class is instantiated.
By default, the factory class applies to all properties of an entity. That means the designer enables you to put the custom
annotation on all of an entity’s properties, and this isn’t what you need; only key properties should have these annotations.
That’s why the code navigates from the property to the parent element (the EntityType element), taking the Key node and retrieving its children, which contain the key properties’ names ![]() .
.
If the current property is in the key properties list, the property class is instantiated and returned. Otherwise, null is returned so that the Properties window doesn’t show any additional properties ![]() .
.
There are about 30–40 lines of real code in this example. That’s all there is to the code—isn’t it great? What still remains is the manifest file.
13.5.5. Creating the manifest extension file
The manifest file is required by Visual Studio to install any extension. It contains basic information, like the author, description, and version, and important information such as the Visual Studio supported version, the range of .NET Framework versions supported, and the assembly containing the extension. Here’s an example of a manifest file.
Listing 13.14. The manifest file
<?xml version="1.0" encoding="utf-8"?>
<Vsix Version="1.0.0"
  xmlns="http://schemas.microsoft.com/developer/vsx-schema/2010" >
  <Identifier Id="OrderIT.DesignerExtensions">
    <Name>OrderIT.DesignerExtensions</Name>
    <Author>Stefano Mostarda</Author>
    <Version>1.0</Version>
    <Description>Add InsertWhen to key properties</Description>
    <Locale>1033</Locale>
    <InstalledByMsi>false</InstalledByMsi>
    <SupportedProducts>
      <VisualStudio Version="10.0">
        <Edition>VST_All</Edition>
        <Edition>Express_All</Edition>
      </VisualStudio>
    </SupportedProducts>
    <SupportedFrameworkRuntimeEdition MinVersion="3.5" MaxVersion="4.0">
    </SupportedFrameworkRuntimeEdition>
  </Identifier>
  <References />
  <Content>
     <MefComponent>OrderIT.DesignerExtensions.dll</MefComponent>
  </Content>
</Vsix>
The XML contains the name of the package, along with the author, the version, a long description, the list of supported Visual Studio and .NET Framework versions, and much more. If you’re accustomed to XML (and we know you are, or the EDM would have scared you to death), this listing will be a piece of cake.
Note
The Entity Framework team has published an ADO.NET Entity Data Model Designer Extension Starter Kit that adds a project template to Visual Studio for creating designer extensions. It’s available here: http://code.msdn.microsoft.com/DesignerExtStartKit.
You’ve now finished from the code point of view, but there are still a few subjects that are worth a look: installing, debugging, and uninstalling.
13.5.6. Installing, debugging, and uninstalling the extension
After you’ve built the assembly, Visual Studio creates the extension as a VSIX file in the bindebug|release folder. The extension is a zip file containing the manifest and the compiled assembly.
To install the extension, you simply need to run it; the next time you open Visual Studio, the extension will be there. When you open the Entity Framework designer and select a key property of an entity in the designer, you’ll see the additional property in the Property window.
To uninstall the extension, open the Extension Manager window, select the OrderIT.DesignerExtensions item, and click the Uninstall button in the box. That’s it.
When it comes to debugging, the procedures are a bit more involved. Because the host of the extension is Visual Studio, you have to debug Visual Studio, which means you need to start a second instance of Visual Studio to debug the first one. By properly configuring the project properties, you can make things go smoothly.
To configure the project properties, follow these steps:
1. Open the project properties by right-clicking the project in the Solution Explorer window and choosing the Properties item.
2. In the project properties form, choose the Debug tab, and select the Start External Program radio button.
3. In the text box next to the radio button, insert the path to the Visual Studio executable file: %ProgramFiles%Microsoft Visual Studio 10.0Common7IDE\devenv.exe. The forms looks like figure 13.6.
Figure 13.6. Configuring the extension project to debug the extension
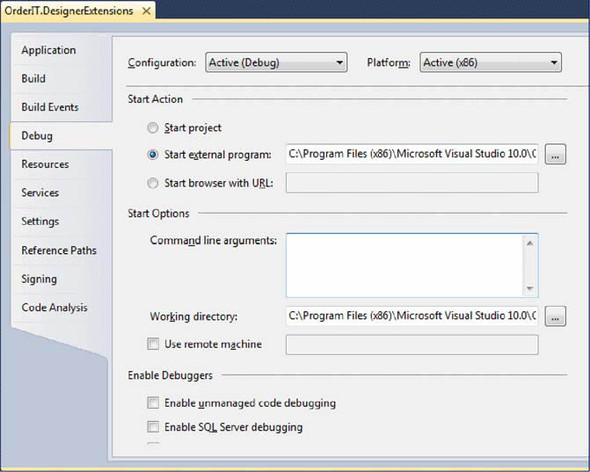
The effect of this configuration is that when you run the extension project, a second instance of Visual Studio will be started, and the debugger will automatically be attached. When the extension code is hit, the first instance enables debugging.
The tricky part comes in when you make modifications and need to debug them. Each time you have to rebuild the extension, you need to uninstall it, close all your Visual Studio instances, reinstall the extension, restart Visual Studio, and rerun the extension project. This is annoying, but it’s the only way to go.
The example you’ve built in this section is very simple, but it should give you an understanding of how extending the designer could simplify your life. With a mix of template customization, database-generation customization, and designer extensions, you can create powerful frameworks that simplify your use of the designer and generate a lot of code for you. This can make the difference between an easily maintainable project and a real nightmare.
13.6. Summary
In this chapter, you learned about features that greatly increase productivity. Code generation isn’t only about POCO classes. You can also write tests, mocks, repositories, and anything else that can be automatically generated. That’s a big step forward. Customizing database generation isn’t a step toward productivity but a step toward a different way of designing models. By using a powerful template, you could perform a match between an existing database and the SSDL and create a script for the differences. It could make model-first design much more usable than it is now.
Finally, customizing the designer makes its usage simpler. By creating ad hoc extensions, you can avoid getting your hands in the EDMX, making everything simpler and less error prone.
Now it’s time to talk about how to design a real-world application that uses Entity Framework to access data.