
Chapter 17. Entity Framework and Windows applications
- Customizing entities for binding
- Data binding with Windows Forms
- Data binding with WPF
In a web application, the browser receives HTML and then renders it. When the rendering is finished, the browser relies on JavaScript to add behavior to the page. There are many JavaScript libraries (jQuery, Ext JS, Scriptaculous, and so on) that can help with this, but whatever your choice is, you work on client-side objects.
Applications that use web services to manage data take the same approach. In the application, you use classes that are generated by the WSDL inspector. These classes contain the same data as the service classes (which can be Entity Framework entities), but they’re just local copies. This means that you always work with objects that aren’t generated by Entity Framework.
But loads of Windows applications don’t have a tiered architecture and directly access the database through Entity Framework. In such situations, you can model your classes to let them interact with the binding capabilities of both Windows Forms and Windows Presentation Foundation (WPF) applications.
These applications have rich binding systems that rely on specific aspects of classes. For instance, if you create a form for manipulating orders, you’ll surely have a grid displaying some orders and a set of components that show the selected order properties. The synchronization between the components, the data grid, and the orders can be completely handled by the binding system.
In this chapter, you’ll learn how to adapt classes to make them binding-aware and what pattern to follow to get the best out of Windows applications. We’ll look at both Windows Forms and WPF technologies. Although Windows Forms is less powerful, it’s still widespread, and tons of applications are based on it, so it’s worth looking at. WPF is the future. Nowadays, creating a new Windows application using Windows Forms is a nuisance; WPF is far more powerful and rich.
Before we look at the technologies, though, let’s look at the example we’ll use in this chapter.
17.1. An example application
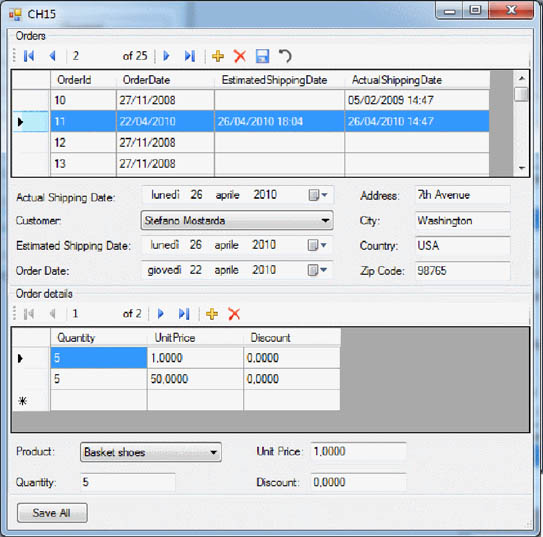
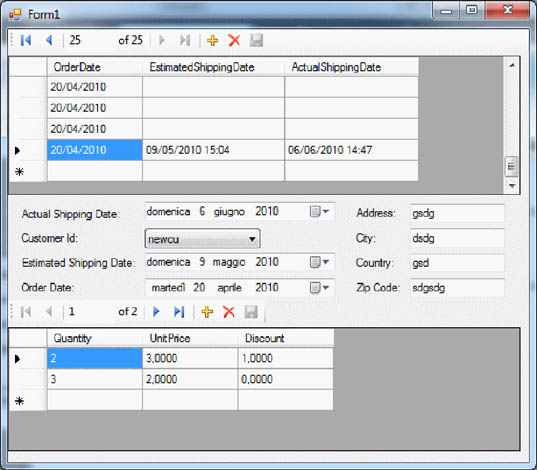
We’re going teo create a form that allows the user to create, modify, and delete orders and their details.Figure 17.1 shows the final result.
Figure 17.1. The Windows form shows orders and their data in the Orders box and the details related to the current order in the Order Details box.
We’ll make extensive use of both Windows Forms and WPF binding capabilities. You’ll see that with some binding-related interfaces, a binding engine, and Entity Framework, you can create such a form in a snap and with few lines of code.
Before you create the form, though, let’s look at what interfaces the model classes must implement to interact with the binding.
17.2. Designing model classes for binding
To fully support the binding capabilities in both Windows Forms and WPF applications, classes must implement a few specific interfaces:
- INotifyPropertyChanged—Notifies a client that the value of a property has been modified
- IEditableObject—Allows an entity to roll back modifications made to a property
- IDataErrorInfo—Lets entity errors flow to the binding system
Mastering these interfaces isn’t difficult. Don’t believe it? Let’s look at the first interface right now.
17.2.1. Implementing INotifyPropertyChanged
When you modify a property, you must notify the binding system so that every related component (data grids, text boxes, and another components) can update their values. For instance, in figure 17.1, when the user modifies the estimated shipping date in the text box, the grid above the text boxes should display the value modified. Similarly, if the user edits a value in the grid showing the orders, the text boxes must be updated as well.
Note
From now on, we’ll discuss the Order class, but the same rules apply to all other classes.
By implementing INotifyPropertyChanged, you can raise an event that sends a change notification to subscribers, which can then react to the modification. In the example, the subscriber is the binding system, and its reaction is to update the components bound to the modified property. The implementation of INotifyProperty-Changed is shown in the following listing.
Listing 17.1. Implementing the INotifyPropertyChanged interface
C#
public partial class Order : INotifyPropertyChanged
{
  public event PropertyChangedEventHandler PropertyChanged;

  protected void NotifyPropertyChanged(String info)
  {
    if (PropertyChanged != null)
      PropertyChanged(this, new PropertyChangedEventArgs(info));
  }
}
VB
Public Partial Class Order
  Implements INotifyPropertyChanged
  Public Event PropertyChanged As PropertyChangedEventHandler
  Protected Sub NotifyPropertyChanged(ByVal info As String)
    RaiseEvent PropertyChanged(Me, New PropertyChangedEventArgs(info))
  End Sub
End Class
Implementing INotifyPropertyChanged is just a matter of declaring the Property-Changed event. The NotifyPropertyChanged method is a convenient way to inform the subscribers of the event (the input parameter represents the name of the modified property).
On its own, this interface is useless. You have to call NotifyPropertyChanged, passing the modified property name to make the binding aware of the modification. This call must be made in the setters of the entity’s properties, which means that you no longer use automatic properties in entities. This listing clearly shows that.
Listing 17.2. Raising the data-changed event

What’s great about this technique is that you don’t have to do anything on the form to update values; you simply configure the connections between the Order properties and the form components at design time, and at runtime the binding system takes care of everything.
INotifyPropertyChanged is trivial to implement. Let’s move on to the next interface.
17.2.2. Implementing IEditableObject
Like everyone else, you’ve probably modified a value in a text box and then wanted to roll back your modifications. This feature is useful, and you can enable it in your application by implementing the IEditableObject interface, which allows transactional modifications of an entity.
Implementing IEditableObject is pretty simple, as you can see in this listing.
Listing 17.3. Implementing the IEditableObject interface
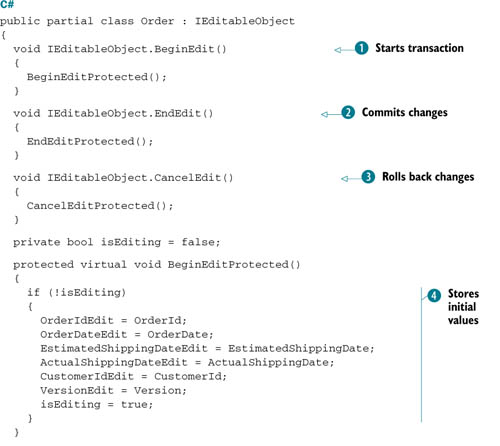
Even though the code is long, it’s pretty simple. There are three interface methods:
- BeginEdit—Invoked when an entity is selected in the grid

- EndEdit—Invoked when the selected entity modifications are committed

- CancelEdit—Invoked when the selected entity modifications are rolled back

Each method internally invokes another method, but that’s not a requirement. The BeginEditProtected method checks whether the selected entity is already in transaction mode. If not, it saves the properties of the entity in
the backup properties ![]() .
.
Note
The *Edit properties are simple duplicates of the original properties. They don’t contain any logic and are used only for transaction purposes. In fact, they’re implemented using automatic property syntax.
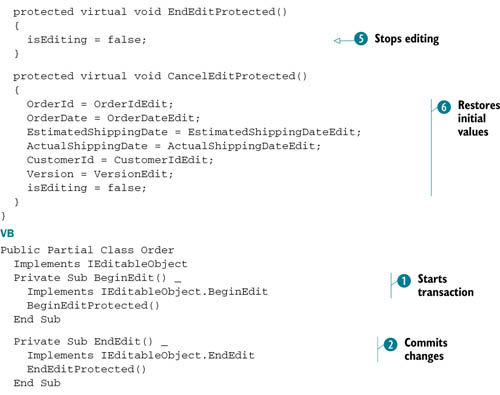
The EndEditProtected method puts the entity in committed mode ![]() .
.
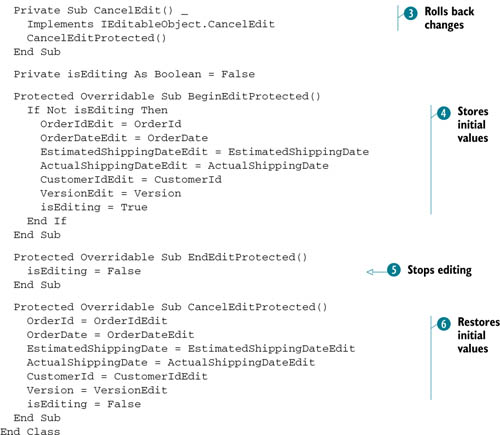
The CancelEditProtected method resets the properties using the backup ones, returning the entity to its initial state when the BeginEdit method was invoked. After that, the entity is put in the committed state ![]() .
.
Note
You’re probably wondering why we created different methods and made them overridable, instead of putting the code in the interface methods. The reason is that if, in the future, you have to create a class that inherits from Order, you can override these methods and add transaction support for additional properties.
Easy, isn’t it? Now let’s move on to the last interface, which is responsible for notifying the binding system of errors in the entity’s properties.
17.2.3. Implementing IDataErrorInfo
When the user sets the actual shipping date of an order, it can’t be earlier than the estimated one. This rule can be enforced in the setter of the ActualShippingDate property. The real question is how to notify the user when an invalid date is entered. The IDataErrorInfo interface is the solution.
The IDataErrorInfo interface is another piece of binding magic. The binding system invokes the interface’s methods to determine whether there are any errors in the entity, and then it dispatches any errors received to the error providers. Here’s the implementation of this interface.
Listing 17.4. Implementing the IDataErrorInfo interface
C#
Dictionary<string, string> errors = new Dictionary<string, string>();

string IDataErrorInfo.Error
{
  get { return errors.Any() ? "There are errors" : String.Empty; }
}

string IDataErrorInfo.this[string columnName]
{
  get
  {
    if (errors.ContainsKey(columnName))
      return errors[columnName];
    else
      return String.Empty;
  }
}
Private errors As New Dictionary(Of String, String)()

Private ReadOnly Property [Error]() As String
  Implements IDataErrorInfo.Error
  Get
    Return If(errors.Any(), "There are errors", String.Empty)
  End Get
End Property

Default ReadOnly Property Item(ByVal columnName As String) As String
  Implements IDataErrorInfo.this
  Get
    If errors.ContainsKey(columnName) Then
      Return errors(columnName)
    Else
      Return [String].Empty
    End If
  End Get
End Property
The interface comprises the Error property and the default property. The Error property returns a string representing an error message related to the entire entity. The default property accepts a property name, and if there’s an error for that property then the default property returns the error message; otherwise, it returns an empty string.
Listing 17.4 shows the interface implementation where the errors are extracted from a dictionary (the errors variable) whose key is the property name and whose value is the error message. But where is the dictionary filled with errors? The answer is obvious: the properties setter. The following listing shows that.
Listing 17.5. Adding errors to the dictionary


VB
As you can see in this listing, the code in the property’s setter checks that the actual shipping date isn’t earlier than
the estimated shipping date. Before performing the check, any error related to the property is removed from the errors dictionary
![]() . Then, if the check fails, a new entry for the property is added to the errors dictionary
. Then, if the check fails, a new entry for the property is added to the errors dictionary ![]() . The binding system invokes the default property once for each property that’s bound, and it uses the returned information
to display the errors.
. The binding system invokes the default property once for each property that’s bound, and it uses the returned information
to display the errors.
The interfaces you’ve seen so far have opened up a brand-new problem: because the code is generated via templates, each time you run the template your customizations are lost. Nevertheless, there’s nothing preventing you from modifying the template to generate the code you need, based on custom annotations in the EDM.
17.2.4. Using a template to generate the binding code
In chapter 13, you learned about code generation. Binding code is another good candidate for template-driven code generation.
Note
We won’t show any code in this section because it would be unnecessarily lengthy. You’ll find the templates in the book’s source code.
Adding code to the INotifyPropertyChanged interface isn’t difficult. Its implementation is static, so the steps are always the same:
1. Modify the class declaration, adding the interface.
2. Add the code for the event.
3. Add the code for the method that notifies subscribers.
4. Modify the properties setter to invoke the preceding method.
The only point you have to remember is that the code in steps 1–3 must be generated only for base classes. For example, the Product class must have those methods and events; but Shirt and Shoes inherit them, so you don’t have to declare them again.
When it comes to adding code for the IEditableObject interface, the situation is slightly different. The steps are similar, but you have to pay more attention to inheritance details:
1. Modify the class declaration, adding the interface.
2. Add the code for the interface methods.
3. Add the code for backup properties.
4. Add the code for the internal methods.
Steps 1 and 2 must be done only for base classes and not in inherited classes, as we discussed before. Step 3 must always be performed, and step 4 is the trickiest. In base classes, you have to declare the internal methods as virtual for C# or Overridable for VB, whereas in inherited classes they must be declared as override for C# or Overrides for VB. What’s more, in inherited classes these methods must invoke the base class implementation to ensure that all properties are backed up.
Adding code for IDataErrorInfo is more complicated than for the other interfaces. Here the code is dynamic, because the rules must be modified by you and can’t be generated unless you create a set of designer extensions, which add new elements to the EDM and then customize the template to read those elements and generate validation code (you saw something similar in chapter 13).
If you opt for writing the code on your own, you must modify the template to place a hook in the property setter to inject the validation code, and here partial methods come to the rescue:
1. Modify the class declaration, adding the interface.
2. Add the code for the method.
3. Add the code for the default property.
4. Add the partial method declaration.
5. Create a partial class where you implement partial methods, adding validation.
In the partial method implementation, you write the validation code and add errors to the dictionary. There’s no need to do anything else, because the rest of the code is template-generated.
Now that you know how to adapt classes for binding, it’s time to start using them in a Windows Forms application, so that you can see the benefits of implementing such interfaces.
17.3. Binding in Windows Forms applications
The form you’ll create enables users to create, modify, and delete orders and details. You have to perform several tasks:
- Create the grid for orders.
- Create the text box for editing orders.
- Create the grid for the selected order’s details.
- Create the components for editing details.
- Link order and detail data to create a master-detail relationship.
- Enable transactional editing, property-changed notifications, and error notifications
Don’t worry, this is going be fun.
17.3.1. Showing orders
The first step is creating the grid for displaying orders and binding it to the orders coming from database. To do this, you have to add a data source to the application, use it to create the order-related controls, and bind them. Follow these steps:
1. From the Visual Studio menus, select Data > Show Data Sources. Visual Studio opens the Data Source window.
2. In the window, click the Add New Data Source button to start the Data Source Configuration Wizard.
3. In the first wizard page, select Object, and click Next.
4. In the second wizard page, shown in figure 17.2, expand the OrderIT.Model assembly node and the OrderIT.Model namespace, select the OrderIT.Model. Order class, and click Finish.
Figure 17.2. The second page of the wizard allows you to select data-source classes.

5. The Data Source window now shows the Order class. Drag it onto the form to insert a grid, a toolbar to navigate through grid rows (we’ll refer to it as the orders toolbar) and a BindingSource component, which points to the Order class.
6. Declare a form-level variable of OrderITEntities type (the context).
7. Add the following code in the Load form’s Load event:
C#
ctx = new OrderITEntities();
orderBindingSource.DataSource = new BindingList<Order>
(ctx.Orders.Include("OrderDetails").ToList());VB
ctx = new OrderITEntities()
orderBindingSource.DataSource = New BindingList(Of Order)(
ctx.Orders.Include("OrderDetails").ToList())
8. Run the example. The form shows the grid with all the orders.
There are a couple of important points to highlight in this code. First, you have a form-level context. Instead of creating a new instance each time you perform a query, you create an instance when loading the form and destroy that instance when closing the form. The result is that all modifications made to objects are tracked by the same context that retrieved them, making things a lot easier.
Note
This is the recommended pattern, and it’s known as the Context-per-Form pattern.
The second thing to notice is the BindingList<T> class. It offers special binding behaviors, and we strongly suggest you use it.
Note
Instead of using the BindingList<T> class, you could use the ObjectSet<T> class’s Execute method, which, like the BindingList<T> class, offers some binding facilities. BindingList<T> is more powerful, because you can create a class that inherits from BindingList<T> and overrides or adds any behavior you need. The Execute method returns an ObjectResult<T> instance, and there’s no way for you to modify the behavior of that class.
Now you can move on the next task: adding a set of controls to the form to display the data for the selected order.
17.3.2. Showing data for the selected order
Showing data for the selected order is pretty simple. You can do that by selecting the properties of the Order class in the Data Source window and dragging them onto the form. The properties are ActualShippingDate, EstimatedShippingDate, OrderDate, CustomerId, and ShippingAddress (this last property is a complex property, so you create a text box for each inner property).
Note
When a property is dropped onto the form, Visual Studio detects the property’s type and automatically uses the best control for it. For instance, DateTime properties are rendered using a DateTimePicker, whereas check boxes are used for Boolean properties. The other properties are rendered as text boxes.
At this point, the form looks like figure 17.3.
Figure 17.3. The form shows the orders and the current order data.

Have you noticed that ugly number in the Customer Id combo box? That’s the ID of the customer who placed the order. In terms of usability, this form is unacceptable. Let’s see how to enable a lookup combo box that shows the customer name and works with the ID behind the scenes.
Adding a Lookup Combo Box for Displaying and Changing a Customer
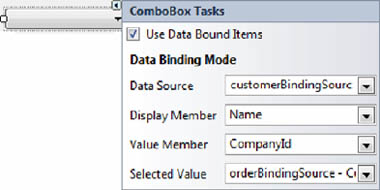
The combo box is the best control to display and change the customer who placed an order, but you have to make it customer-aware.
The first thing to do is to add a data source that points to the Customer class, as you did before for Order. After that, select the combo box smart tag (shown in figure 17.4), and set the Data Source property to the OrderIT.Model.Customer object (this automatically imports a BindingSource into the form), set Display Member to Name, set Value Member to CompanyId, and set Selected Value to the CustomerId property of the orderBindingSource object. This last setting is important, because it binds the CustomerId property of the order to the CompanyId property of the customer, enabling the lookup.
Figure 17.4. Configuring the combo box. The CompanyId and CustomerID properties are bound to enable the lookup.
At this point, you have a form with controls to display and edit order data. The next step is to show the details of the selected order.
17.3.3. Showing details of the selected order
The binding mechanism helps a lot in showing details for the selected order. What you have to do is add a new data source that points to OrderIT.Model.OrderDetail, and then drag it onto the form to create a data grid. (The toolbar used to navigate through the order details, which we’ll refer to as the details toolbar, isn’t created automatically, so you have to add it to the form manually and let it point to the details binding source.)
The data grid points to the details data source, but you have to bind it to the details of the selected order. To do this, you add the following two lines of code in the Load event:
C#
orderDetailBindingSource.DataSource = orderBindingSource;
orderDetailBindingSource.DataMember = "OrderDetails";
VB
orderDetailBindingSource.DataSource = orderBindingSource
orderDetailBindingSource.DataMember = "OrderDetails"
Now run the form, and you’ll see that when you change the selected order in the grid, its details are shown in the second grid. (For clarity, we removed some columns from the order and details grids, but you don’t need to.) Figure 17.5 illustrates the details of the selected order.
Figure 17.5. Details related to the selected order are shown in the second grid.
Naturally, controls to show and edit the current details are needed in this form. Let’s see how to add them.
17.3.4. Showing selected detail information
The binding between the details grid and the controls that show the selected detail’s data can be done at design time. But in this case, you’re binding the details grid to the selected order using code, so you have to do the same for controls that show selected detail information. There’s no rule that states which pattern is better; this is a choice you have to make on a case-by-case basis. Fortunately, the binding engine is easy to use both at design time and runtime.
The first step in binding components that show data of the selected detail to the details data source is adding text boxes for the Quantity, UnitPrice, and Discount properties and a combo box for Product. This combo box must be configured the same way as the combo box that displays the customer that placed the order, with the obvious difference that it must point to a data source related to the OrderIT.Model.Product class and that it must not be bound to the details binding source.
Next, you need to express bindings between the controls and the details binding source in the code. Once again, you can place this code in the Load event, as the following listing demonstrates.
Listing 17.6. Binding controls in code
C#
productBindingSource.DataSource = ctx.Products.ToList();
discountTextBox.DataBindings.Add("Text",
  orderDetailBindingSource, "Discount");
productIdComboBox.DataBindings.Add("SelectedValue",
  orderDetailBindingSource, "ProductId");
quantityTextBox.DataBindings.Add("Text",
  orderDetailBindingSource, "Quantity");
unitPriceTextBox.DataBindings.Add("Text",
  orderDetailBindingSource, "UnitPrice");
VB
productBindingSource.DataSource = ctx.Products.ToList();
discountTextBox.DataBindings.Add("Text",
  orderDetailBindingSource, "Discount")
productIdComboBox.DataBindings.Add("SelectedValue",
  orderDetailBindingSource, "ProductId")
quantityTextBox.DataBindings.Add("Text",
  orderDetailBindingSource, "Quantity")
unitPriceTextBox.DataBindings.Add("Text",
  orderDetailBindingSource, "UnitPrice")
The Add method accepts the bound property, the original data source, and the property of the data source.
You now have the complete form with all grids and controls, but the form simply displays information. Let’s modify it so you can use it to add and modify data.
17.3.5. Adding code to persist modifications
The user must be able to use this form to modify orders, creating new ones or edit or delete existing ones. In this section, you’re see how much little code is required to enable these features.
Modifying an Order
The first operation a user would want to do is modify an order or one of its details. Suppose the user modifies the estimated and actual shipping dates for an order and then wants to save it. You need a Save button at the bottom of the form.
Note
You might consider using the Save button (the one with the disk icon) in the orders toolbar instead of adding one to the form. But that button isn’t database-aware and does nothing on the database; it only commits changes in the data source. You could add code to the toolbar button so it issues commands to the database, but we’re fans of the classic Save button at the bottom-right corner of the form.
In the method that handles the click of the Save button on the form, you call the SaveChanges method of the context instance you declared at form level. Because the context tracks the objects it has read from database and it’s alive for the lifetime of the form, you’re in a connected scenario. The context has tracked all modifications made to objects, so there’s nothing more you need to do.
The same approach applies to details. If the user modifies a detail, the call to SaveChanges will cause that change to be persisted into the database.
Naturally a user can delete an order too, and that requires a bit of extra work.
Deleting an Order
When the user clicks the Delete button in the order toolbar, the order is removed from the data source and disappears from the list but it’s not removed from the database until the user confirms deletion by clicking the Save button. The problem is that if the user clicks the Save button, no command hits the database because even if the order has been removed from the data source, nothing told the context to delete it from the database. To trigger the deletion on the database, you have to handle the click event of the Delete button on the orders toolbar and call the DeleteObject method, passing in the current order obtained via the Current property of the order-related binding source, as shown in this snippet:
C#
ctx.Orders.DeleteObject((Order)orderBindingSource.Current);
VB
ctx.Orders.DeleteObject(DirectCast(orderBindingSource.Current, Order))
As you know, this doesn’t actually delete the order. The physical deletion from the database is triggered only when the user clicks the Save button, which invokes the context SaveChanges method.
Deleting a Detail
When the user clicks the Remove button on the details toolbar, the detail is removed from the order. If the user clicks the Save button, an exception is raised because, as you learned in chapter 7, Entity Framework doesn’t delete the detail but tries to remove the reference to the order, and this isn’t possible in this scenario because you can’t have a detail without an order.
Because only the reference to the order is removed, the Order property of the detail is set to null and its state is Modified. This means that before calling SaveChanges, you have to search all modified entities of type OrderDetail whose Order property is null, and mark them as Deleted. That code is shown in this listing.
Listing 17.7. Detecting deleted details
C#
ctx.ObjectStateManager
  .GetObjectStateEntries(EntityState.Modified)
  .Select(c => c.Entity)
  .OfType<OrderDetail>()
  .Where(c => c.Order == null)
  .ToList()
  .ForEach(c => ctx.DeleteObject(c));
VB
ctx.ObjectStateManager.
  GetObjectStateEntries(EntityState.Modified).
  Select(Function(c) c.Entity).
  OfType(Of OrderDetail)().
  Where(Function(c) c.Order Is Nothing).
  ToList().
  ForEach(Function(c) ctx.DeleteObject(c))
The LINQ query combines Entity Framework methods and several LINQ methods. It first retrieves all entities in the Modified state, then filters them out to retrieve only those of type OrderDetail whose OrderDetail property is null, and finally marks them as Deleted.
Deletions are pretty simple. Let’s move on and see what you need to do to create a new order.
Creating an Order
To create a new order, the user just clicks the Add button in the order toolbar, enters the order information, clicks the Add button in the details toolbar, enters information for the detail, and continues adding more details as necessary. This way, the user can create many orders. When the user has finished creating orders, they click the Save button to send the new orders to the database.
As with deletions, the call to the SaveChanges method causes nothing to be persisted because although the orders and details were added to the data source, nothing told the context to add the objects that were created when the Add button was clicked. What you need to do is add the new orders (which have their OrderId properties set to 0) to the context before invoking SaveChanges when the Save button is clicked. That code is shown in this listing.
Listing 17.8. Marking new orders as added before saving changes
C#
var datasource = ((BindingList<Order>)orderBindingSource.DataSource);
foreach (var order in datasource.Where(o => o.OrderId == 0))
{
  ctx.Orders.AddObject(order);
}
SaveChanges();
VB
Dim datasource =
  DirectCast(orderBindingSource.DataSource, BindingList(Of Order))
For Each order In datasource.Where(Function(o) o.OrderId = 0)
    ctx.Orders.AddObject(order)
Next
SaveChanges()
That’s it. Easy, wasn’t it? With a few lines of code, you have enabled users to manipulate orders in every way they need. That’s productivity.
But you haven’t yet seen how to take advantage of the interfaces you’ve implemented in the entities. That’s the subject of the next section.
17.3.6. Taking advantage of binding interfaces
The advantage offered by INotifyPropertyChanged is that when you modify a property, the binding engine modifies all controls bound to that property. You can easily verify this by modifying the value in the actual shipping date text box, removing the focus from the text box, and noticing that the grid cell that shows the actual shipping date for the current order reflects the new value. This synchronization is very important, because, internally, the binding engine makes extensive use of the INotify-PropertyChanged interface.
Regarding IEditableObject, you have to know that when the user selects a row in the grid, the binding engine checks whether the entity implements the IEditable-Object interface; if so, the binding engine automatically invokes the binding source’s BeginEdit method, which in turns invokes the current object’s BeginEdit method. When you move to another row, the binding engine invokes the EndEdit method, committing the modifications. To let the user roll back modifications to an object, you have to create an Undo button in the order toolbar and in its handler for the click event invoke the CancelEdit method of the related binding source. Because the properties are restored, their setters are invoked and the INotifyPropertyChanged inter-face comes in handy because it triggers updates for all controls, aligning them to the entity properties.
Finally, IDataErrorInfo is completely useless unless you combine it with an ErrorProvider component. By dragging this component onto the form and binding it to the orders binding source (through the DataSource property), the user is automatically notified of errors related to each property, displayed as a red circle next to the control representing the property or a red circle in the cell of the grid.
Although they’re fairly simple to create, Windows Forms applications are doomed. With the advent of WPF and good designers, more and more developers are moving toward this platform. This is why in the next section we’ll show you how to achieve the same results using a WPF application.
17.4. Binding in WPF applications
The WPF binding engine is far more powerful than the Windows Forms one. After reading this section, you’ll probably want to migrate all your applications from Windows Forms to WPF to take advantage of its binding capabilities.
For instance, in Windows Forms, showing inner properties of a complex property in the grid requires you to write code. In WPF, this can be done declaratively. Furthermore, the binding between orders and details is declarative too. You don’t have to write any code. These are the features we’re using in this section, but there’s much more you can do with WPF that you can’t do with Windows Forms.
Note
We won’t show the full XAML code in the examples in this section. We’ll look at the binding-related attributes and ignore the style ones.
Let’s re-create the Windows Forms application using WPF. As before, the first step is creating a grid that displays all orders in the database.
17.4.1. Showing orders
WPF 4.0 has a useful DataGrid control that you can use to show orders easily. This listing shows the XAML needed to use it.
Listing 17.9. A DataGrid that shows orders
<DataGrid
  AutoGenerateColumns="False"
  ItemsSource="{Binding}"
  Name="orderDataGrid"
  CanUserDeleteRows="True"
  CanUserAddRows="True">
  <DataGrid.Columns>
    <DataGridTextColumn Binding="{Binding Path=OrderDate}"/>
    <DataGridTextColumn Binding="{Binding Path=EstimatedShippingDate}"/>
    <DataGridTextColumn Binding="{Binding Path=ActualShippingDate}"/>
  </DataGrid.Columns>
</DataGrid>
The Binding attribute on the DataGrid element is the most important, because it binds the data grid to the data context of the container (the form, in this case). In code you set the context to the orders retrieved from the database.
Binding is also used in the DataGridTextColumn node to bind the column to a property of the source object. It’s worth noticing that you can refer to inner properties by navigating to them, as you would do in code. For instance, the following binding expression retrieves the city of the shipping address:
{Binding Path=ShippingAddress.City}
The code to bind orders to the form context is pretty simple. Because the form exposes a DataContext property, you just need to set it with the result of the query, with a little caveat. Instead of using a BindingList<T> to wrap the data, you use the ObservableCollection<T> class, which is specifically designed to work with WPF binding, as shown in the following snippet:
C#
var orders = new ObservableCollection<Order>
  (ctx.Orders.Include("OrderDetails").ToList());
DataContext = orders;
VB
Dim orders As New ObservableCollection(Of Order)(
  ctx.Orders.Include("OrderDetails").ToList())
DataContext = orders
So far, it’s been straightforward. Now, let’s see how to create controls that show information about the order selected in the grid.
17.4.2. Showing data for the selected order
We said that the WPF binding engine is very powerful—now you’re going to see why. To add data-bound controls to the form, you just add the XAML in the following listing to the form.
Listing 17.10. Controls that show order information
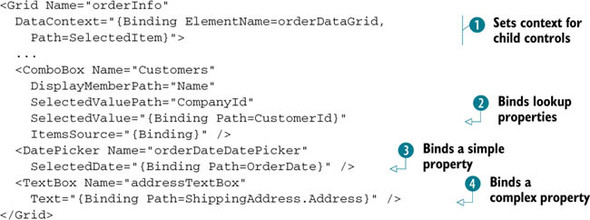
This little snippet contains lots of magic. First, the grid’s DataContext property sets the data context of the controls inside the grid to the order selected in the orders data grid ![]() .
.
The lookup combo box control displays customer names (via DisplayMemberPath) and uses the CompanyId property to perform the lookup with the CustomerId property of the order ![]() . Next, a DatePicker control allows the user to edit the date of the order, and it binds the date to the OrderDate property
. Next, a DatePicker control allows the user to edit the date of the order, and it binds the date to the OrderDate property ![]() . Finally, a text box shows the address property of the shipping address
. Finally, a text box shows the address property of the shipping address ![]() . Notice how easy it is to navigate the complex properties.
. Notice how easy it is to navigate the complex properties.
The combo box control must be filled with customer names from the database, so you must add the following query to the form’s Loaded event:
C#
Customers.ItemsSource = ctx.Companies.OfType<Customer>().ToList();
VB
Customers.ItemsSource = ctx.Companies.OfType(Of Customer)().ToList()
Listing 17.10 shows the XAML code that creates components that display only some properties. The full XAML code is included in the source code for the book.
Now it’s time to display the order details.
17.4.3. Showing selected order details
Showing the details of the selected order is easy. First, you have to create a DataGrid and set its DataContext property using a Binding expression that points to the SelectedItem property of the orders data grid (the current order). Then, you have to set the ItemsSource property to the OrderDetails property of the order. The following snippet shows the XAML code:
<DataGrid Name="detailsDataGrid"
  AutoGenerateColumns="False"
  DataContext="{Binding ElementName=orderDataGrid, Path=SelectedItem}"
  ItemsSource="{Binding Path=OrderDetails}">
  <DataGrid.Columns>...<DataGrid.Columns>
</DataGrid>
There’s nothing more to do. When the user selects an order, the data grid is populated with the details. XAML makes things much easier, doesn’t it?
The last thing to do to complete the form is adding controls to the form so the user can view and edit the detail information.
17.4.4. Showing selected detail information
You can add controls that let the user view and edit information related to the selected order detail the same way you did for orders. The only difference here is that you have to point to the details data grid, as the following listing shows.
Listing 17.11. Controls that show detail information
<Grid
  DataContext="{Binding
    ElementName=detailsDataGrid, Path=SelectedItem}">
  ...
  <TextBox Name="quantityTextBox"
    Text="{Binding Path=Quantity}" />
  <ComboBox Name="Products"
    DisplayMemberPath="Name"
    SelectedValuePath="ProductId"
    SelectedValue="{Binding Path=ProductId}" />
</Grid>
Once again, the Grid control’s DataContext property is set to the current detail, and child controls are bound to properties of the detail.
The lookup combo box needs to be populated with the products. Again, you can use the form’s Loaded event, adding the following code:
C#
Products.ItemsSource = ctx.Products.ToList();
VB
Products.ItemsSource = ctx.Products.ToList()
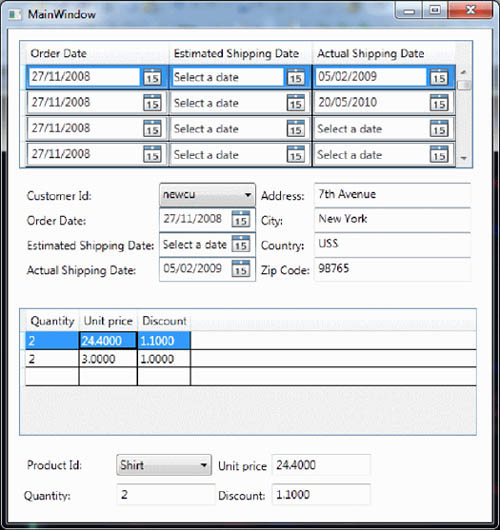
When you run the application, you’ll see the form shown in figure 17.6.
Figure 17.6. The WPF form showing orders and details
Building a display form was simple, thanks to XAML and the WPF binding engine. Now let’s see how you can write code to allow modifications.
17.4.5. Adding code to persist modifications
Persisting modifications is just a matter of adding a Save button and invoking the SaveChanges method when the user clicks it. But even in this case, you have to write some code to notify the context about what objects to add and delete.
Deleting and Adding an Order
The ObservableCollection<T> class you used to populate the form’s DataContext has a CollectionChanged event that’s invoked when items in the collection are added or removed. You can subscribe to this event and in its handler call AddObject when an order is added and DeleteObject when one is deleted. Here’s the code.
Listing 17.12. Intercepting an order’s removal and addition for context notification
C#
orders.CollectionChanged +=
  new NotifyCollectionChangedEventHandler(order_CollectionChanged);
void order_CollectionChanged(object sender,
  NotifyCollectionChangedEventArgs e)
{
  if (e.Action == NotifyCollectionChangedAction.Remove)
    foreach (Order item in e.OldItems)
      ctx.Orders.DeleteObject(item);
  else if (e.Action == NotifyCollectionChangedAction.Add)
    ctx.Orders.AddObject((Order)e.NewItems[0]);
}
VB
AddHandler orders.CollectionChanged, AddressOf order_CollectionChanged

Private Sub order_CollectionChanged(
  ByVal sender As Object, ByVal e As NotifyCollectionChangedEventArgs)
    If e.Action = NotifyCollectionChangedAction.Remove Then
        For Each item As Order In e.OldItems
            ctx.Orders.DeleteObject(item)
        Next
    ElseIf e.Action = NotifyCollectionChangedAction.Add Then
        ctx.Orders.AddObject(DirectCast(e.NewItems(0), Order))
    End If
End Sub
The situation changes when you want to notify the context about removing an order detail. In this case, you can’t rely on the CollectionChanged event because it doesn’t get fired when an order is modified (the ObservableCollection<T> class monitors orders, not their details).
Deleting a Detail
When a detail is removed from an order, the reference is deleted, its Order property is set to null, and its state is Modified. This means that before calling SaveChanges, you have to use the same code as in listing 17.7 to mark orphan details as Deleted.
This can be accomplished without many problems. As you have seen, Entity Framework–related code isn’t very invasive, so you can concentrate mostly on your business code. Once again, that means productivity.
17.5. Summary
If you’re an experienced Windows Forms or WPF developer, you have surely been happy to discover that Entity Framework gracefully integrates with the binding engines of both technologies. You can even create classes that inherit from Binding-List<T> and ObservableCollection<T> and handle context communication internally, so you don’t have to write anything in your form.
Thanks to POCO support, you can easily implement interfaces and customize code so that binding is even easier. Most of this code can be generated via templates, so things have been simplified a lot. All this simplicity means you can write very little Entity Framework–related code in your form and concentrate your effort on the business code.
Now that you’ve seen how to use Entity Framework in web applications, web services, and Windows applications, it’s time to move on to another important subject: testing.