
Chapter 18. Testing Entity Framework
- Unit-testing basics
- Dependency isolation and mock objects
- Persistence testing with Entity Framework
Testing is a critical part of the software development lifecycle—development can’t be considered complete until you’ve verified that the code you wrote works as expected. Unfortunately, testing code is rarely a trivial task for two main reasons:
- Test complexity strongly depends on the complexity of the application itself. It tends to grow in a nonlinear manner as you add functionality, objects, tiers, or dependencies with external systems.
- Fixing bugs or adding new features can potentially lead to regressions, harming your software stability and reliability. In these cases, you can’t be sure you didn’t damage existing functionality until you’ve reexecuted all the tests on them.
But what does “testing” a feature or a portion of code involve? It can mean launching your application and using UI to verify whether an order is correctly placed and that the stock of a given product is correctly adjusted, or it can mean building small console applications that invoke a method, so you can debug it and step through its code to check it behaves as expected. Or it can mean something smarter and automated, such as a durable and stable test suite that you can run on a daily basis (or after every build) to check that everything is working properly.
This chapter focuses on this last technique, showing the tools you can use and how you should design the code of an application using Entity Framework so it’s effectively testable.
18.1. Unit tests at a glance
Automatic unit testing is a well-established concept in computer programming. It was initially introduced in Smalltalk, and then spread to a number of different technologies, including .NET. Today, unit testing is considered a fundamental step in quality software development.
A unit test is no more than a series of methods that execute some code from the application being tested, providing well-known inputs and checking the outputs. In OrderIT, for example, you’ll often need to handle an order total, perhaps because you want to show it to the end user or because you need to send it to a credit card payment service. You already implemented a simple read-only property within the Order class that performs the calculation on the fly and returns the order total.
Listing 18.1. Calculating an order total
C#
public decimal Total
{
  get
  {
    decimal result = 0;
    this.OrderDetails.ForEach(d => result += d.UnitPrice * d.Quantity);

    return result;
  }
}
VB
Public ReadOnly Property Total() As Decimal
  Get
    Dim result As Decimal = 0
    Me.OrderDetails.ForEach(
      Function(d)
        result = result + d.UnitPrice * d.Quantity
      End Function)

    Return result
  End Get
End Property
Because this is such a critical part of the application, you want to be sure it always behaves as expected, so it needs to be tested. You could run the application, create an order, and see if the Total property shown in the page was correct, but you’d have to deal with all sorts of details (like authenticating in OrderIT, or selecting items that are in stock) that you don’t want to be concerned with. An easier path is creating a simple console application that references the OrderIT.DomainModel assembly. You can write code like the following listing.
Listing 18.2. Console application that tests order’s Total calculated property

Although this is only a few lines of code, it has a great result—a durable test method that you can run from time to time to make sure you haven’t broken any working logic (for example, after introducing support for discounts within Order.Total).
We call this a unit test because it tests a simple and atomic part of the application. Order.Total doesn’t rely on external resources to perform its task, like methods of external classes, databases, or web services. Later in this chapter, we’ll talk about faking dependencies and perform integration testing, which do test how different pieces of code work with each other. For now, you only need to notice that, if the test fails, you can assert with certainty that one or the other of the following is true:
- There’s a bug in the method being tested, and the test method was able to track it and identify it.
- The test method has a bug.
Bugs are something you want to absolutely avoid, and one of the best ways to do that is to keep the logic of the test method as simple as possible.
Although we’re just starting to look at testing, it’s already clear that having bug-free unit tests is essential; and the first rule to achieving this is keeping the test methods as simple as possible. That means avoiding if branches and cycles and using inheritance and other object-oriented peculiarities such as polymorphism or overrides as moderately as possible.
An interesting extreme programming technique, called test-driven development (TDD) consists of writing tests prior to the programming unit; when you have the test, the next step is writing the application code to let the test project compile, but without implementing any kind of logic. The purpose is making the test fail, so you can check out its effectiveness; if the test doesn’t fail when the logic has not yet been implemented, that probably means there’s something wrong with it. Only after a test failure do you code the new method.
Another recent trend is using fault injection, such as by using the CLR’s Profiler API to artificially let the code under test return the wrong results. A sample library that allows you to do this is an open source project called TestApi, which can be downloaded from CodePlex at http://testapi.codeplex.com/.
A typical enterprise application needs hundreds of unit tests to verify its features properly, and using a console application for this would be inappropriate. Moreover, there are advanced development scenarios in which unit tests are completely integrated into the source control system (in some organizations, you need to provide the test code along with the application code in order to check a new feature into the source control) or into the build process (after every build, the tests are executed, and only if they all pass will the new version be released to customers).
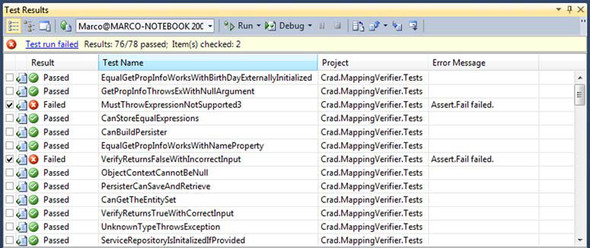
A test tool is essential for writing, managing, and executing tests because it provides a runtime environment for executing the test code and producing reports like the one shown in figure 18.1, which allows you to immediately identify and locate errors in the code.
Figure 18.1. A typical test report
There are a number of unit-testing tools out there, with NUnit and MSTest being the most widely used today. NUnit is an open-source port of the well-established Java JUnit test framework, and MSTest is provided by Microsoft and is completely integrated into the Visual Studio IDE. It’s included in every edition of Microsoft Visual Studio 2010, and it’s the one you’ll use for the rest of this chapter.
In the next section, you’ll see how to use MSTest to effectively test OrderIT.
18.2. Writing a test suite in Visual Studio 2010
The first step in testing the OrderIT project is creating a new test project in Visual Studio 2010. You can do that by selecting the Test Project template from the New Project dialog box shown in figure 18.2. Name the new project OrderIT.DomainModel.Tests, because it will contain all the tests for the classes belonging to OrderIT.DomainModel.
Figure 18.2. Creating a new test project in Visual Studio 2010

This is the first naming convention we’ll introduce in this chapter, and others will follow. Good naming of test projects and classes is critical in real-world scenarios because, as we stated before, it’s common to have hundreds of tests scattered among different assemblies, and naming them correctly helps identify which part of your application is failing.
Now it’s time to dive into the code and writing your first test class.
18.2.1. Testing a simple method
As a first example, let’s test the Total property we introduced at the beginning of the chapter. Because it belongs to the Order class, you’ll add a new class to the test project that will be conventionally named OrderTests.
In order to make the class recognizable to the test framework, you need to decorate it with the TestClass attribute. Here’s the code.
Listing 18.3. OrderTests class


The method’s name is, once again, built according to a naming convention that allows it to be absolutely self-explanatory. The name is composed of three parts:
- The program unit being tested
- The action being taken and any other useful information (in this example, that’s the fact that you aren’t considering discounts in the test)
- The expected result
The method’s body follows a pattern called Arrange, Act, Assert (AAA), which consists in setting up the environment ![]() , executing the code
, executing the code ![]() , and then verifying the result obtained
, and then verifying the result obtained ![]() . It’s similar to what you wrote in the console application in listing 18.2, but this uses Assert.AreEqual instead of Debug.Assert. With Assert.AreEqual, you can express the conditions of the failure or success of the test.
. It’s similar to what you wrote in the console application in listing 18.2, but this uses Assert.AreEqual instead of Debug.Assert. With Assert.AreEqual, you can express the conditions of the failure or success of the test.
The testing framework is completely integrated into the Visual Studio IDE. Because the method in listing 18.3 has the TestMethod attribute, after building the project, you can execute it by right-clicking its name and selecting the Run Tests option from the context menu. Visual Studio will run the code and, we hope, will return a test-passed report similar to the one in figure 18.3.
Figure 18.3. Order.Total test-results report

Based on the test report, you may decide to run another test, debug a failing one, check out a detailed test report, or even get a historic view of the results of every test.
But those aren’t the sole advantages of using this test tool. In the following section, we’ll look at some other useful features you can take advantage of while building a test suite.
18.2.2. Advanced features of Microsoft’s Unit Testing Framework
In chapter 14, you designed a class called DiscountPolicy that analyzes an order to determine if the customer deserves a discount. Its method EvaluateDiscount accepts an instance of an Order and, as a coding best practice, should throw an Argument-NullException if invoked with a null argument.
Because testing the raising of expected exceptions is as important as testing the correctness of a method’s results, every test framework provides built-in support for doing this. In Microsoft’s Unit Testing Framework, for example, you can decorate the test code with the attribute ExpectedException, as shown in this listing.
Listing 18.4. Testing the raising of an exception
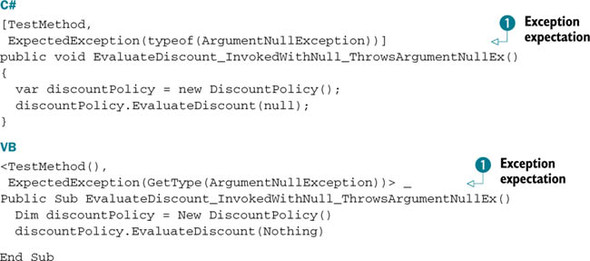
Notice that, although this test don’t have an Assert method, this is still code that can fail or succeed because the assertion part of the AAA pattern is written in a declarative
manner. It has an attribute ![]() that is then consumed and checked by the runtime itself.
that is then consumed and checked by the runtime itself.
In many other cases, while testing the DiscountPolicy class, you must provide a valid Order instance, perhaps also adding some details and assigning a customer to it. We’re probably talking about several lines of code for the arrange stage. Even if you build a helper method like this
Order order = buildTestOrder();
you’d still have to put it in every test method of your DiscountPolicyTests class.
To avoid this code redundancy, you can write an initialization method like this.
Listing 18.5. Test initialization method
C#
private Order order;

[TestInitialize]
public void Init()
{
  this.order = new Order();

  this.order.Customer = new Customer
  {
    Name = "Marco De Sanctis"
  };

  // more initialization code here...
}
VB
Private order As Order

<TestInitialize()> _
Public Sub Init()
  Me.order = New Order()

  Me.order.Customer = New Customer()
  Me.order.Customer.Name = "Marco De Sanctis"

  ' more initialization code here...

End Sub
Because the method is marked with the TestInitialize attribute, the runtime will automatically execute it before every test method, so every test will be provided with its own new and isolated instance of the Order class. Should you need to execute code at the end of a test method, the TestCleanup attribute serves this purpose. Similar attributes exist to execute custom code before the first test method and after the last one of an entire test class (ClassInitialize and ClassCleanup) or of a whole assembly (AssemblyInitialize and AssemblyCleanup).
At this point, you’re able to use Microsoft’s Unit Testing Framework to write your test code and keep it simple and easy to maintain. But so far we’ve only dealt with atomic code units, which don’t rely on external dependencies to perform their tasks. In the next section, we’ll remove this limitation and still keep the test execution independent of these resources.
18.3. Isolating dependencies
We usually design applications with classes that cooperate with each other or that access external resources. For example, when accepting a new order in OrderIT, you need to check the database to see if the items are in stock, and when the order is placed, you want to notify the customer by sending an email. Moreover, providing a delivery-tracking system means querying the carrier’s web service.
Suppose you wanted to implement this last requirement and query the web service. You might write a method within the Order class similar to the one shown here.
Listing 18.6. Accessing a remote web service to check delivery status
C#
public DeliveryStatus CheckDeliveryStatus()
{
  CarrierWebService service = new CarrierWebService();

  string res = service.GetTracking(this.TrackingTicket);

  if (res == "delivered")
    return DeliveryStatus.Delivered;

  return DeliveryStatus.Dispatching;
}
VB
Public Class Order
  ' more code here

  Public Function CheckDeliveryStatus() As DeliveryStatus
    Dim service As New CarrierWebService()

    Dim res As String = service.GetTracking(Me.TrackingTicket)

    If res = "delivered" Then
       Return DeliveryStatus.Delivered
    End If

     Return DeliveryStatus.Dispatching
  End Function

End Class
Effectively testing such a method is nearly impossible. First, you need to know which ticket number to send to the web service. Usually, service suppliers provide developer environments with services operating on dummy data, and this could ease your job. But even in this case, you’d probably end up with a poor test that would be slow to run and, worse than that, could fail for a number of reasons:
- There’s a bug in the CheckDeliveryStatus method.
- The network is down when you run the test.
- The remote service is offline.
- The remote service has a bug and throws an exception.
The CheckDeliveryStatus method depends on external systems, so there’s a dependency problem. Unfortunately, there is nothing you can do with the implementation of CheckDeliveryStatus shown in listing 18.6. Let’s modify it slightly to make it more testable.
18.3.1. Refactoring for testability
What’s wrong with the current CheckDeliveryStatus implementation is that there’s no way to avoid the call to the remote service. You could replicate it locally and modify a configuration file to invoke its URL, but you’d still have to rely on an external component that runs in a web server, and that wouldn’t solve any of the issues introduced in the previous section.
It would be much better to simulate the service with a plain .NET class that has the same interface; this class could work in-process and provide hard-coded results to known inputs. To do this, you must modify CheckDeliveryStatus, as in the following listing, to inject the fake service instance at runtime,
Listing 18.7. A testable version of CheckDeliveryStatus
C#
internal DeliveryStatus CheckDeliveryStatus(ITrackingService service)
{
  string res = service.GetTracking(this.TrackingTicket);

  if (res == "delivered")
    return DeliveryStatus.Delivered;

  return DeliveryStatus.Dispatching;
}

public DeliveryStatus CheckDeliveryStatus()
{
  return this.CheckDeliveryStatus(new CarrierWebService());
}
VB
Friend Function CheckDeliveryStatus(ByVal service As ITrackingService) As
     DeliveryStatus
  Dim res As String = service.GetTracking(Me.TrackingTicket)

  If res = "delivered" Then
    Return DeliveryStatus.Delivered
  End If
  Return DeliveryStatus.Dispatching
End Function

Public Function CheckDeliveryStatus() As DeliveryStatus
  Return Me.CheckDeliveryStatus(New CarrierWebService())
End Function
This code still provides an overload without parameters, which allows you to keep the same interface you had before towards a normal caller. The internal (or Friend in VB) overload can be left visible only to the assembly that holds all the unit tests by decorating the assembly with the InternalsVisibleTo attribute, as in the next snippet:
C#
[assembly:InternalsVisibleTo("OrderIT.DomainModel.Tests")]
VB
<Assembly: InternalsVisibleTo("OrderIT.DomainModel.Tests")>
In order to compile the code without errors, you still have to let the service implement ITrackingService. This can be done directly on the service’s proxy class if the auto-generated code is a partial class, or you can build a simple wrapper. With this small refactoring, you’re finally able to build a stub for your tracking service.
Stub
A class or a method that mimics the behavior of an external dependency, accepting the same inputs and providing likely outputs. You can use a stub to replace that dependency for testing purposes, and you can also use stubs to temporarily substitute for code that has yet to be written.
For example, the fake service in the following listing is a stub for ITrackingService, simulating the service’s behavior and providing hard-coded results.
Listing 18.8. The ITrackingService interface and its fake implementation
C#
public interface ITrackingService
{
  string GetTracking(string trackingTicket);
}

public class FakeTrackingService : ITrackingService
{
  public string GetTracking(string trackingTicket)
  {
    return "delivered";
  }
}
VB
Public Interface ITrackingService

  Function GetTracking(ByVal trackingTicket As String) As String

End Interface

Public Class FakeTrackingService
  Implements ITrackingService
  Public Function GetTracking(ByVal trackingTicket As String) As String
    Return "delivered"
  End Function

End Class
The advantage of the refactoring is that CheckDeliveryStatus will consider the fake service to be a valid tracking service. Now, writing the unit test is straightforward, as you can see.
Listing 18.9. Unit test for CheckDeliveryStatus
C#
[TestMethod]
public void CheckDeliveryStatus_WhenOrderIsDelivered_ReturnsDelivered()
{
  var order = new Order();

  DeliveryStatus result = order.CheckDeliveryStatus(
    new FakeTrackingService());

  Assert.AreEqual(DeliveryStatus.Delivered, result);
}
VB
<TestMethod()> _
Public Sub CheckDeliveryStatus_WhenOrderIsDelivered_ReturnsDelivered()
  Dim order = New Order()

  Dim result As DeliveryStatus = order.CheckDeliveryStatus(New
     FakeTrackingService())

  Assert.AreEqual(DeliveryStatus.Delivered, result)
End Sub
Building stubs and refactoring the application code so it’s loosely coupled with external resources is the way to successfully build unit test that execute quickly and that are reproducible and independent of the environment’s conditions.
In doing this, though, you ended up with an additional class (FakeTracking-Service) that can potentially contain bugs. More than that, it represents more code to be maintained. Fortunately, this is something you can avoid. There are many frameworks out there that allow you to dynamically build stubs at runtime, and we’ll look at them next.
18.3.2. Using a mocking framework to fake dependencies
A mocking framework is a library you can use to dynamically replace your dependencies and set up their behavior without needing to pollute your test assemblies with fakes like FakeTrackingService. As for unit-testing tools, various mockers are available on the market, some of them free and open source, and others sold as commercial products. Among the first group, the de facto standard is Rhino Mocks, built by Oren Eini and freely downloadable at www.ayende.com/projects/rhino-mocks.aspx.
To better understand how such a tool can help in writing tests, let’s rewrite the previous example and use Rhino Mocks to build the stub. All the concepts we have introduced to loosely couple CheckDeliveryStatus with the web service remain valid, because you still need to inject a test stub in the code. Here’s the new version of the test method.
Listing 18.10. Testing with a Rhino Mocks stub

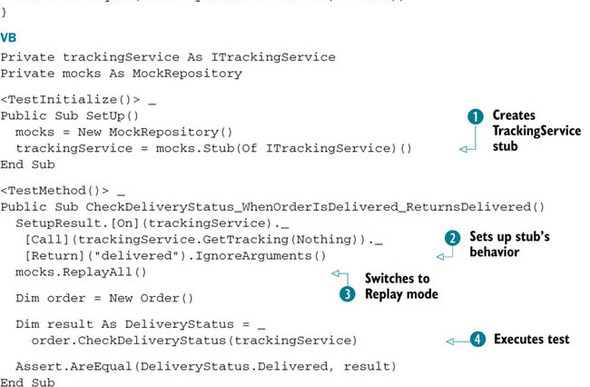
This listing uses a TestInitialize method ![]() to create a stub of the service, which is then stored in a local field. The arrange phase
to create a stub of the service, which is then stored in a local field. The arrange phase ![]() of the subsequent test configures that stub to simulate the service; notice the fancy fluent interface instructing it that
a call to the GetTracking method should return delivered no matter what arguments it’s invoked with. Then, after placing the stub in replay mode
of the subsequent test configures that stub to simulate the service; notice the fancy fluent interface instructing it that
a call to the GetTracking method should return delivered no matter what arguments it’s invoked with. Then, after placing the stub in replay mode ![]() , the code unit is executed
, the code unit is executed ![]() , exactly as if it were working with a handmade fake class.
, exactly as if it were working with a handmade fake class.
The main advantage of using a mocking framework is that instead of building and maintaining a fake class, you have a dynamic stub whose responses can be easily configured. But there’s still something you can improve on in the test code. You now know that the method can correctly parse results returned by the service, but you don’t have any code to verify that it’s invoked with the correct input. The best way to do that is to use a mock instead of a stub.
Mock
A class dynamically generated by a mocking framework, which you can configure to provide results to well-known inputs, similar to a stub. In addition, a mock has the ability to set up expectations on the members being called, and to verify them at the end of the test.
With Rhino Mocks, building a mock is similar to building a stub; the only difference is that with a mock you can set up and verify your expectations, as in the following listing.
Listing 18.11. Testing with a mock
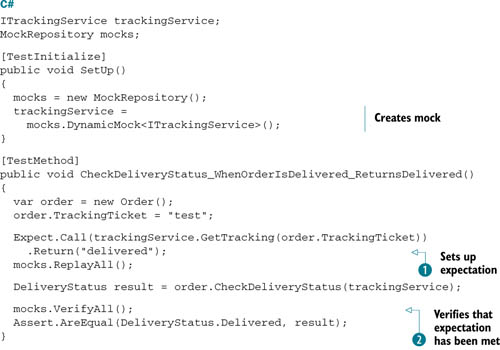
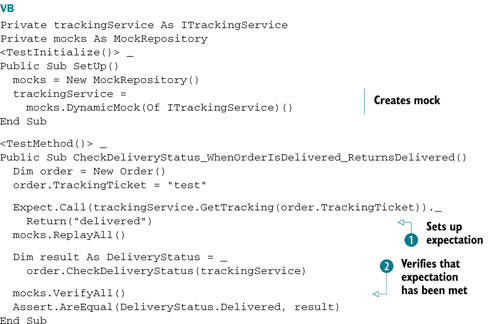
If the code under test doesn’t invoke the service’s GetTracking method, providing test as an input, according the expectation ![]() , mocks.VerifyAll would throw an exception causing the test to fail
, mocks.VerifyAll would throw an exception causing the test to fail ![]() , which would result in a report like the one in figure 18.4.
, which would result in a report like the one in figure 18.4.
Figure 18.4. A mock is able to track unexpected invocations.

As you can see, mocks and stubs give you the chance to dynamically fake external dependencies to isolate the code being tested. Stubs are useful if you want to replace a dependency and provide hard-coded results, whereas mocks are also able to check whether the external method was invoked as expected or not. Both are essential tools when you have complex code, and you’re going to use them in the next section, where you’ll use them with Entity Framework to test the data layer.
18.4. Unit-testing the data access layer
Before you start writing tests for the data layer, you need to identify which parts of it deserve to be tested. When you build an object model using the Entity Framework designer, you have a lot of automatically generated code, including the ObjectContext and all the entities.
The test that may first come to mind is whether the O/RM tool is able to correctly get those entities from and persist them to the database. Because such tests require interactions with external resources, they’re considered integration tests. They’re as important as unit tests, and we’ll cover them later this chapter.
When we talk about unit-testing the data access layer, we don’t mean verifying whether a customer is correctly stored in its table; we mean checking whether our infrastructure interacts with Entity Framework in the way we expect.
18.4.1. A test infrastructure for a repository
In chapter 14, you designed the domain layer so it wasn’t directly exposed to the Entity Framework classes and API. You created a set of repositories, which use Entity Framework to access the data source, but provide to the upper layer an abstract collection-like interface. Repositories were designed to contain a lot of logic, such as logic to check the uniqueness of a customer’s email address while creating it, so they deserve their own test suite.
As a first step, you’ll test that when the repository’s Add method is invoked, the entity is added to the underlying object set by calling AddObject. You can see the Add method in the excerpt in listing 18.12. Notice that, for the sake of simplicity, you’re not checking whether the entity already belongs to the object set, as you should do in a real-world scenario.
Listing 18.12. Repository’s Add method
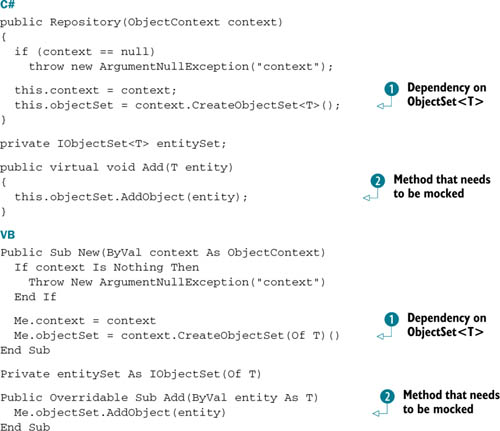
This code has dependencies on two external classes that need to be mocked:
- ObjectContext—It needs to be faked because it’s used to create an Object-Set<T>
 , but you don’t need to check anything on it, so it can be a stub.
- IObjectSet<T>—You need to check whether this object invokes its AddObject method
 , so it needs to be a mock.
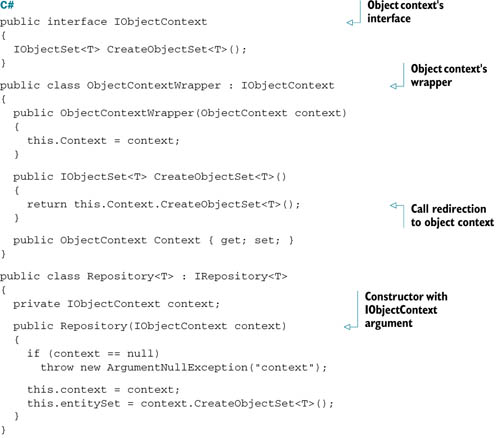
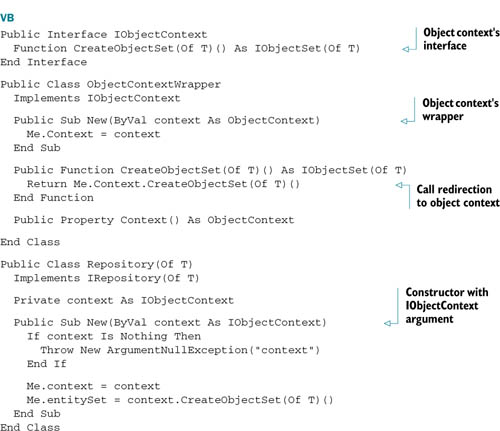
Unfortunately, Rhino Mocks can’t effectively mock concrete entities unless they have only virtual methods. This is because the repository and its context are tightly coupled. But you can easily work around this by creating an IObjectContext interface and a wrapper around the real ObjectContext. The new class diagram is shown in figure 18.5.
Figure 18.5. Repository and ObjectContextWrapper
Supporting the new IObjectContext interface obviously requires a little refactoring on the Repository constructor, but the result is that everything is loosely coupled and so is testable. Listing 18.13 shows the new version of code.
Listing 18.13. Refactoring the RepositoryConstructor
Now it’s time to return to the main goal, which is testing the repository’s Add method. The test code is pretty simple to write, because you’re allowed to mock all the repository dependencies. The following code is completely isolated from all Entity Framework classes.
You might disagree with building a wrapper instead of implementing the interface directly on the designer-generated ObjectContext using partial classes. In this example, the same result could be achieved in both ways; but in a real-world scenario, repositories depend also on ObjectStateManager, which is another tightly coupled non-testable class within the Entity Framework assembly. Using a wrapper is the only way to successfully abstract the ObjectStateManager. The full code is omitted here for the sake of simplicity, but it’s included in the book’s source code.
You should avoid inserting any kind of logic into those wrappers and keep them as simple as possible; ideally, they should only forward the calls. Otherwise, you’d need to test them too, and this isn’t possible because of the tight coupling with untestable classes such as ObjectContext and ObjectStateManager.
Listing 18.14. Test code for the Add method
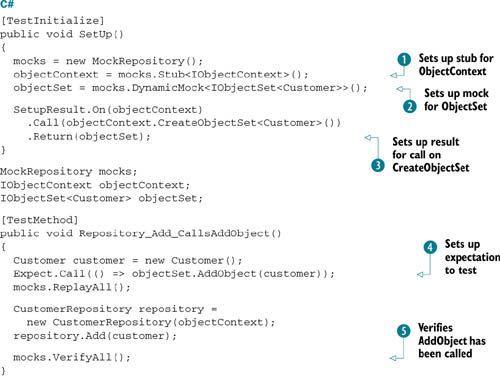
The test initialization builds a stub ![]() and a mock
and a mock ![]() for the ObjectContext and the ObjectSet<T>, respectively. They’re then injected into the repository via its constructor, after setting up the ObjectContext to return the mock on
for the ObjectContext and the ObjectSet<T>, respectively. They’re then injected into the repository via its constructor, after setting up the ObjectContext to return the mock on ![]() . Next comes the test, which is straightforward and verifies that the AddObject method
. Next comes the test, which is straightforward and verifies that the AddObject method ![]() is called before repository.Add
is called before repository.Add ![]() is invoked. You can easily verify that modifying repository.Add to artificially introduce a bug results in the test failing.
is invoked. You can easily verify that modifying repository.Add to artificially introduce a bug results in the test failing.
This test infrastructure was worth the effort of building it. In the next section, you’ll see that it’s flexible enough to cover a wide range of needs.
18.4.2. Testing LINQ to Entities queries
Mocks work perfectly when you know exactly how the object under test interacts with the mocked instance, but you get into trouble when dealing with the extension methods LINQ is built on. Let’s take the Repository.Query method in this listing as an example.
Listing 18.15. Query method of Repository<T>
C#
public virtual IEnumerable<T> Query(Func<T, bool> predicate)
{
  return this.objectSet.Where(predicate);
}
VB
Public Overridable Function Query(ByVal predicate As Func(Of T, Boolean)) _
  As IEnumerable(Of T)
  Return Me.objectSet.Where(predicate)
End Function
If Where was an ObjectSet<T> instance method, Query would be trivial to test, because you would only have to build a mock object and check that this call happens. Unfortunately, despite the syntax, Where is an extension method that belongs to a class named System.Linq.Queryable, whose implementation is anything but simple! (You can check it out using a tool like Reflector.) Mocking such a call, testing that arguments are passed correctly, and setting up method results would be tricky. Although less precise, using a fake data source to test LINQ queries is preferable.
Let’s dig more into this additional technique. When customers register in OrderIT, they must provide a valid and unique email address. The following code belongs to the CustomerRepository’s Add method, and it checks that the email address is unique in the database by executing a simple query.
Listing 18.16. The CustomerRepository.Add method
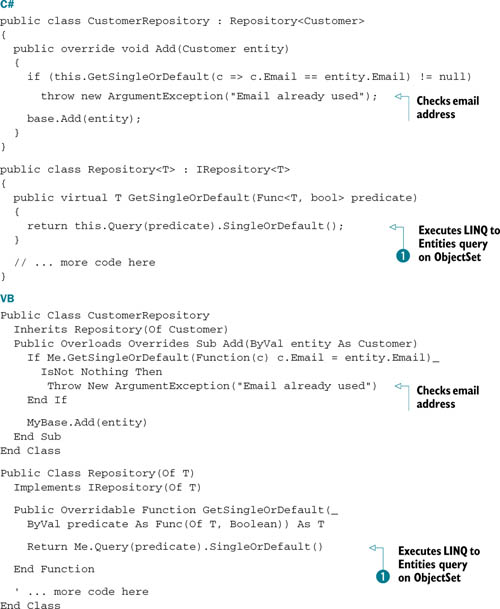
The code at ![]() uses the Query method, which relies on the ObjectSet<T>. The idea is to fake the object set, in terms of having a class that implements IObjectSet<T> but does its job with in-memory and hard-coded data. You can easily query such an object as you’d do with the database, but
without worrying about data or transactions, and you can reset it for every test by building another instance.
uses the Query method, which relies on the ObjectSet<T>. The idea is to fake the object set, in terms of having a class that implements IObjectSet<T> but does its job with in-memory and hard-coded data. You can easily query such an object as you’d do with the database, but
without worrying about data or transactions, and you can reset it for every test by building another instance.
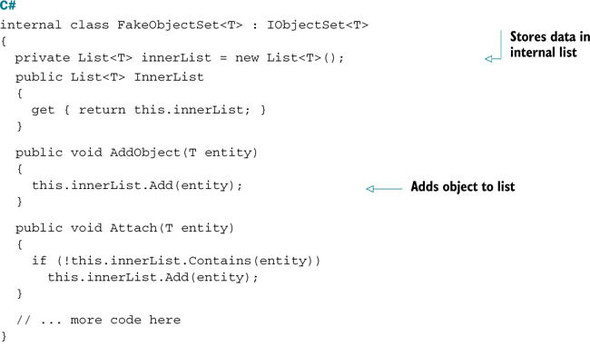
Building a fake object set is trivial, although it’s a bit tedious because of the many methods IObjectSet<T> requires to be implemented. The following listing contains an excerpt from the FakeObjectSet class.
Listing 18.17. FakeObjectSet implementation (an excerpt)
As we mentioned before, you can inject the fake object set into a repository using an ObjectContext stub. Then, using it in a test is only a matter of providing some fake data to work on. For example, testing the email address while adding a new customer looks like this.
Listing 18.18. Testing CustomerRepository.Add method with FakeObjectSet


This test expects an exception to be thrown ![]() by the repository, and it uses a Fake-ObjectSet containing a sample customer
by the repository, and it uses a Fake-ObjectSet containing a sample customer ![]() . At
. At ![]() it tries to add another customer with the same email address. Internally, the repository queries the ObjectSet<T> and, in this case, throws an ArgumentException.
it tries to add another customer with the same email address. Internally, the repository queries the ObjectSet<T> and, in this case, throws an ArgumentException.
Testing a repository built on Entity Framework isn’t a trivial task, because although the 4.0 release brings some improvements to testability, there are still classes that aren’t directly mockable. In the last two sections, we presented two different strategies for working around this limitation and writing effective unit tests: one was more rigorous and exclusively based on mocks and stubs, and the other used fake object sets to work with in-memory data. The first solution should be always the preferred option, unless mocking becomes too complex. When that happens, fake object sets offer a good alternative.
In the next section, we’ll drop the isolation requirements. We’ll test whether entities are correctly stored and retrieved in the database. You’re going to use integration tests to test the whole system as an ensemble, to make sure all the components integrate perfectly.
18.5. Testing the persistence and retrieval of an entity
Making sure all your repositories work as expected is only half the job of testing a data access layer. That doesn’t prove whether Entity Framework is correctly parsing the mapping and successfully generating queries for the CRUD operations against the database. Even if it works now, that doesn’t shield you from trouble in the future, because schemas evolve with time. Having a test suite that constantly verifies that Entity Framework’s data is constantly up to date with the storage schema is valuable and is worth a little effort to build.
The basic idea is simple, and it’s illustrated in figure 18.6. You build a new entity, save it to the database, fetch it back, and test whether its property values match what you originally stored.
Figure 18.6. Conceptual flow of a persistence test

A persistence test that applies this workflow to a Customer entity would look like this.
Listing 18.19. Persistence test for the Customer entity
C#
[TestMethod]
public void Customer_IsStoredAndRetrievedCorrectly()
{
  Customer original = new Customer
  {
    Name = "Marco De Sanctis",
    Email = "[email protected]"
  };

  using (Context context = new Context())
  {
    context.AddToCustomers(original);
    context.SaveChanges();
  }

  using (Context context = new Context())
  {
    Customer customer = context.Customers
      .Where(c => c.Id == original.Id).Single();

    Assert.AreEqual(original.Name, customer.Name);
    Assert.AreEqual(original.Email, customer.Email);
    //...
  }
}
<TestMethod()> _
Public Sub Customer_IsStoredAndRetrievedCorrectly()
  Dim original As New Customer()

  Using context As New Context()
    context.AddToCustomers(original)
    context.SaveChanges()
  End Using

  Using context As New Context()
    Dim customer As Customer = context.Customers._
     Where(Function(c) c.Id = original.Id)._
     [Single]()

    Assert.AreEqual(original.Name, customer.Name)
    Assert.AreEqual(original.Email, customer.Email)
    '...

  End Using
End Sub
This test could work, at least the first time; there will likely be a unique constraint on the Email column on the Company table, so the second time you run it, you’re going to get a SqlException due to a constraint violation. Every execution perturbs the test environment, so the test isn’t repeatable.
You could get around this problem by using a TestCleanUp method and deleting the new Customer, but a far better solution is using transactions to ensure database consistency among different tests. This is pretty easy to do by using the Test-Initialize and TestCleanUp attributes, as in the following listing.
Listing 18.20. Using transactions in persistence tests
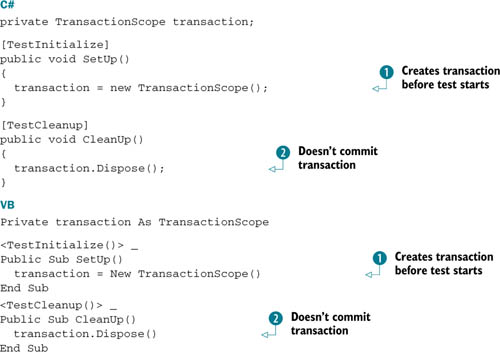
This code starts a transaction ![]() , under which you can execute the test code. Then you release it without committing it
, under which you can execute the test code. Then you release it without committing it ![]() , ensuring that nothing remains in the database. But from test to test, this will involve a lot of repetitive code, because
the flow in figure 18.6 will repeat a number of times.
, ensuring that nothing remains in the database. But from test to test, this will involve a lot of repetitive code, because
the flow in figure 18.6 will repeat a number of times.
To address this issue, we’ve built a simple tool called EF Mapping Verifier; the original idea behind it belongs to Fluent NHibernate, one of the many open source projects born around this famous .NET O/RM. The tool uses lambda expressions to write persistence tests in a simple, concise, and intuitive way. EF Mapping Verifier supports a more versatile set of expressions, and it’s included in the book’s source code.
After you’ve referenced EF Mapping Verifier’s assembly in your test project, the previous example of customer persistence looks like this.
Listing 18.21. Persistence test of the Customer entity using EF Mapping Verifier
C#
[TestMethod]
public void Customer_IsStoredAndRetrievedCorrectly()
{
  using (Context context = new Context())
  {
    VerifyMapping.For<Customer>(context)
      .Test(c => c.Name, "Marco De Sanctis")
      .Test(c => c.Email, "[email protected]")
      .Execute();
  }
}
VB
<TestMethod()> _
Public Sub Customer_IsStoredAndRetrievedCorrectly()
  Using context As New Context()
    VerifyMapping.For(Of Customer)(context)._
      Test(Function(c) c.Name, "Marco De Sanctis")._
      Test(Function(c) c.Email, "[email protected]")._
      Execute()
  End Using
End Sub
In this example, the EF Mapping Verifier creates a new instance of Customer and sets its properties to the values provided by the test method. Then it uses the given context instance to store and subsequently retrieve the Customer instance, automatically checking whether all the properties match. This testing tool supports a wide range of use cases: it can test lookup relationships, master-detail relationships, and complex types.
18.6. Summary
This chapter covered a wide range of topics related to automatic testing of software. A test suite is worth the effort of building it, because it gives you a chance to react to changes, avoiding that sense of uncertainty when you need to modify the code. With a test tool, you can effectively and constantly monitor how those changes affect the application.
We first looked at the challenges of writing unit tests, starting from the first trivial examples and then moving deeper to more complex cases. We looked at some techniques you can use to refactor the code to make it more testable, making it more feasible to build mocks and stubs to fake the dependencies on external resources.
Then, we focused on Entity Framework and the testing of the data access layer in general. We applied the concepts discussed before to writing unit tests for the repositories we introduced in chapter 14.
Finally, we looked at integration testing. We examined how you can check whether Entity Framework is able to store and retrieve your entities, and we introduced an open source tool that can help you write simple, readable, and concise integration code.