
Appendix B. Entity Framework tips and tricks
Mastering Entity Framework doesn’t only mean knowing its set of APIs and their internal behavior. It also means finding the best ways to use it and to simplify development. This appendix is all about that.
We won’t cover a specific subject here; we’ll touch on various subjects, offering tips and tricks that couldn’t be included in previous chapters. Here you’ll find a set of classes and extension methods that let you write less code, making that code more readable and easier to maintain.
You’ll read about an extension method for simplifying the process of attaching entities, you’ll learn how to perform specific actions once an entity is persisted on the database, and you’ll discover how to perform full-text searches. You’ll also see how to transform some string-based methods to lambda-based methods (such as Include and SetModifiedProperty), and much more.
Let’s start with a smarter way to attach entities to the context.
B.1. A smart way of attaching entities
In chapter 12, you created an extension method that, using EDM and a bit of reflection, adds or attaches an entity to the context depending on the value of the entity’s key property. When the entity is attached, it goes to the Unchanged state, and you then need to modify a property or use context or state manager methods to mark it as Modified or Deleted.
If you know what the entity state should be after it’s attached, wouldn’t it be better to set it immediately in the same call?
B.1.1. Attaching an entity as Modified or Deleted
To mark the entity as Modified or Deleted, you need to call the ChangeState method immediately after attaching the entity to the context. You’ve seen this several times in the book.
But to specify whether you want the entity to be marked as Modified, you need to pass a new parameter to the SmartAttach method, whose signature is as follows:
C#
public static void SmartAttach<T>(this ObjectSet<T> os, T input,
   AttachState state)
VB
Public Shared Sub SmartAttach(Of T)(os As ObjectSet(Of T), input As T,
  state As AttachState)
The state parameter is of type AttachState. It’s an enum that specifies what state the entity must be set to after it has been attached. These are its values:
- Unchanged—The entity remains unchanged
- Modified—The entity is changed to Modified state
- Deleted—The entity is changed to Deleted state
This way, you can set the state of the entity using the code in the following listing. (We haven’t included the first part of the method here, but you can find it in chapter 12.)
Listing B.1. Marking the entity as Modified or Deleted after attaching it
C#
if (id.Equals(Convert.ChangeType(value, idType)))
  os.AddObject(input);
else
{
  os.Attach(input);
  var entry = set.Context.ObjectStateManager.GetObjectStateEntry(input);
  if (state == AttachState.Modified)
    entry.ChangeState(EntityState.Modified);
  else if (state == AttachState.Deleted)
    entry.ChangeState(EntityState.Deleted);
}
VB
If id.Equals(Convert.ChangeType(value, idType)) Then
  os.AddObject(input)
Else
  os.Attach(input)
  Dim entry = os.Context.ObjectStateManager.GetObjectStateEntry(input)
  If state = AttachState.Modified Then
    entry.ChangeState(EntityState.Modified)
  ElseIf state = AttachState.Deleted Then
    entry.ChangeState(EntityState.Deleted)
  End If
End If
This method is pretty cool. Now you can attach an entity to the context and have it marked as Modified or Deleted in a single call. (The same method can be used to add an entity too, in which case the state parameter is ignored.) The following snippet marks the entity as Modified:
C#
ctx.Orders.SmartAttach(order, AttachState.Modified);
VB
ctx.Orders.SmartAttach(order, AttachState.Modified)
But that’s not enough. You know that when you use the ChangeState method to mark an entity as Modified, not only does ChangeState mark the entity, but it also marks all the entity’s properties as Modified. Sometimes you don’t want to mark all the properties, just some of them. In that case, you need to use the SetModifiedProperty method of the state-manager entry.
B.1.2. Modifying only selected properties after attaching
The SetModifiedProperty method is as useful as it is badly designed, because it accepts the property name as a string. Thanks to lambda expressions, we’re living in the strong-typing age. Why not create a new overload of the SetModifiedProperty method that accepts a lambda?
Take a look at this listing.
Listing B.2. Strongly typed extension method for marking a property as Modified
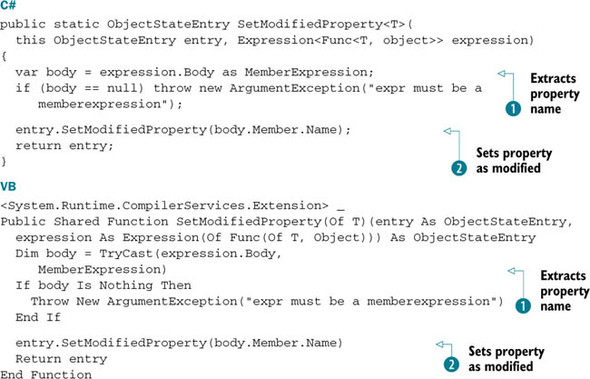
This extension method accepts a lambda expression that specifies the property name. It then extracts the property name as
a string ![]() and passes it to the string-based SetModifiedProperty method
and passes it to the string-based SetModifiedProperty method ![]() . Now you can use the following code to call the method:
. Now you can use the following code to call the method:
C#
entry.SetModifiedProperty(o => o.ShippingAddress);
VB
entry.SetModifiedProperty(Function(o) o.ShippingAddress)
The code in the previous listing can’t be included in the SmartAttach method because it’s a generic method that must handle any type of entity. You must enable the caller of the SmartAttach method to specify which properties must be marked for update.
To do that, you need to add another parameter to the SmartAttach method so you can pass in a list of properties (in a typed manner). The new signature is shown in the following snippet:
C#
private static void SmartAttach<T>(this ObjectSet<T> os,
  T input, AttachState state,
  params Expression<Func<T, object>>[] modifiedProperties)
VB
Private Shared Sub SmartAttach(Of T)(os As ObjectSet(Of T),
  input As T, state As AttachState,
  ParamArray modifiedProperties As Expression(Of Func(Of T, Object))())
As you can see from the signature, SmartAttach now accepts an array of Expression objects. Each object specifies the property to be modified using the lambda expression. When the array isn’t null or empty, the code iterates over it and passes the expression to the extension method in listing B.2. The following listing shows this code.
Listing B.3. Adding code to mark the selected properties
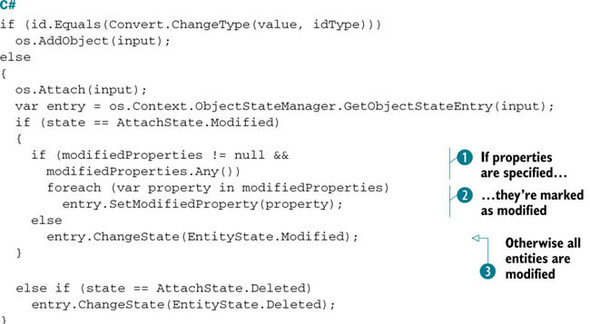
The only part of this code that has been modified is that related to the modification of the entity. If some properties are
passed ![]() , they’re marked as Modified
, they’re marked as Modified ![]() ; otherwise, the classic ChangeState method is used
; otherwise, the classic ChangeState method is used ![]() , and all properties are marked as Modified.
, and all properties are marked as Modified.
Now you can invoke SmartAttach method as in the following snippet:
C#
ctx.Orders.SmartAttach(order, AttachState.Modified,
  o => o.ShippingAddress
  o => o.ActualShippingDate);
VB
ctx.Orders.SmartAttach(order, AttachState.Modified,
  Function(o) o.ShippingAddress,
  Function(o) o.ActualShippingDate)
We have been using the SmartAttach extension method for the last couple of years and it works pretty well. It also helps in cutting down several lines of code. We strongly recommend you use it.
Now let’s move on and see how you can inject some logic before and after persistence.
B.2. Building an auditing system
One of the questions that developers often ask on forums or at live events is: how can we build an auditing mechanism to know when an entity is persisted? In chapter 6, you saw a basic solution to this problem, but here we’ll expand on that idea and make it more robust and reusable.
This will take several steps because it uses many features of Entity Framework:
- Create an attribute to mark the auditable entities.
- Customize the designer to let the user visually specify what entities must be audited.
- Customize the template that generates entities to mark the auditable entities with an attribute.
- Create a class that inherits from ObjectContext and that overrides SaveChanges, invoking a method to handle the entities to be persisted.
- Modify the template that generates the context to let the generated context inherit from the context created in step 4.
There’s a lot to do, but once we’ve finished, you’ll understand how easy it is.
B.2.1. Creating an attribute to mark auditable entities
Most of the time, you don’t want to audit all entities. For instance, you don’t want to keep track of modifications made to the details, just to the orders. To do that, you can use an attribute to mark the entities you want audited.
Note
You may consider this to be plumbing code that should stay out of the entities. Although this is theoretically true, it’s a little tweak that doesn’t create any problems and simplifies things.
Creating the attribute class is simple, as you can see in the next snippet:
C#
public class AuditableAttribute : Attribute { }
VB
Public Class AuditableAttribute
  Inherits Attribute
End Class
When you have the attribute, you just need to mark the auditable entities with it. Instead of creating partial classes or modifying the code generated by the template (remember that modifications will be lost when the code is regenerated), you can save this information in the EDM. But modifying the EDMX file is tedious, so why not create a designer extension?
B.2.2. Customizing the designer
Creating a designer extension is simple. Chapter 13 covered everything you need to know about this subject.
The only difference between that example and this one is that here the custom property applies to the entity and not to one of its key properties. This difference is expressed in the EntityDesignerExtendedProperty attribute of the designer extension’s factory class, which you can see in the following listing.
Listing B.4. The factory for the custom property of the entity in the designer

The code is simple. It creates a custom property for each entity in the designer.
The AuditableValue class isn’t complex either, as you see in the next listing.
Listing B.5. Class that manages the auditable custom annotation for the entity
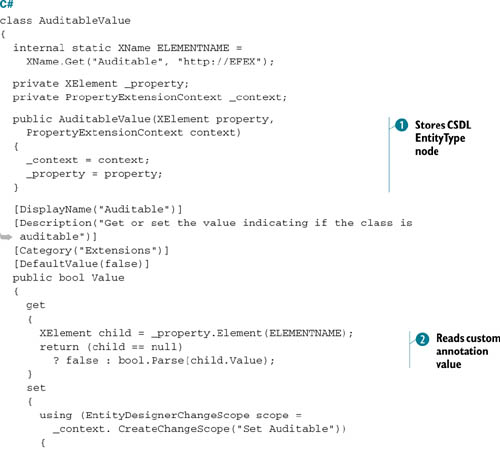
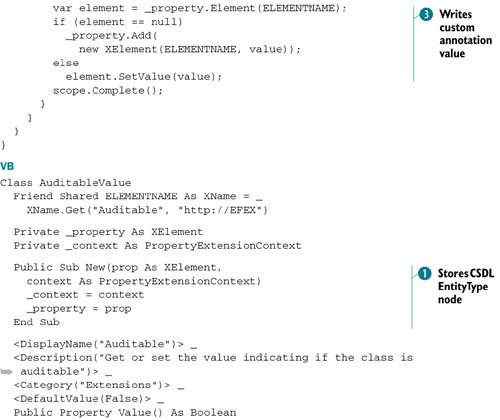
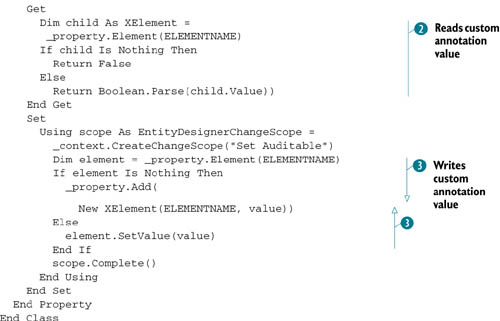
The AuditableValue class constructor receives and stores the EntityType node and the context from the factory ![]() . The property getter retrieves the value of the custom annotation
. The property getter retrieves the value of the custom annotation ![]() (if it exists), and the setter writes, in the scope of a transaction, the custom annotation
(if it exists), and the setter writes, in the scope of a transaction, the custom annotation ![]() .
.
The result is that when you click an entity, the custom property is shown in the property window; and once you set it, the following XML code is written in the CSDL:
<EntityType Name="Order">
  ...
  <efex:Auditable>true</efex:Auditable>
</EntityType>
Now that you have the custom annotation in the CSDL, you need to modify the template that generates entities to let it read the custom annotation and generate the attribute.
B.2.3. Customizing the template that generates entities
Modifying the template that generates entities isn’t hard. Before writing entity code, you need to check whether the custom annotation exists. If it exists and its value is true, you add the Auditable attribute. The following snippet shows the template code (C# only):
<#
var auditableElement = entity.MetadataProperties
  .FirstOrDefault(p => p.Name == "http://EFEX:Auditable");
if (auditableElement != null &&
  bool.Parse(((XElement)auditableElement.Value).Value)){
  #>
  [Auditable]
  <#
}#>
That’s all you need to do. On the entity side, you’re finished. Now you have to work on the context.
B.2.4. Overriding the persistence process with a custom context
Next, you need to create a class, ExtendedObjectContext, that inherits from ObjectContext and that adds auditing behavior. This can be done by overriding the SaveChanges method and placing the code in there. You can then let the generated context inherit from ExtendedObjectContext, and you’re done.
Not only does this design enable you to handle auditing, but it also lets you perform any operation before or after persistence. To perform any operation before or after persistence, you can create an IObjectPersistenceNotification interface that exposes two methods: one invoked before persistence and one invoked after. This interface is shown in the next snippet:
C#
public interface IObjectPersistenceNotification
{
  void BeforePersistence(ObjectStateEntry entry, ObjectContext context);
  void AfterPersistence(ObjectStateEntry entry, ObjectContext context);
}
VB
Public Interface IObjectPersistenceNotification
 Sub BeforePersistence(entry As ObjectStateEntry, context As ObjectContext)
 Sub AfterPersistence(entry As ObjectStateEntry, context As ObjectContext)
End Interface
As you can see, the methods accept a single entry. This means they’re invoked once for each entry in the Added, Modified, or Deleted state.
After that, you need to create the PersistenceNotification class, which implements the IObjectPersistenceNotification interface and writes to audit tables. This class is shown in the following listing.
Listing B.6. The class that writes auditing data


Again, the code is simple. The BeforePersistence method does nothing; the AfterPersistence method is where the auditing works. If the entity is marked with the Auditable attribute ![]() , the code extracts the modified properties (only if the entity is in the Modified state)
, the code extracts the modified properties (only if the entity is in the Modified state) ![]() and invokes the auditing stored procedure, passing in the entity name, the timestamp, the username, the entity’s state, and
the modified properties
and invokes the auditing stored procedure, passing in the entity name, the timestamp, the username, the entity’s state, and
the modified properties ![]() .
.
Note
As we said before, this technique can be used for other purposes than auditing. For example, you can enable logical deletes. You can mark an entity as Deleted in the code, but before persistence you mark it as Modified and set the logical cancellation flag to true. This way, the code is much easier to write (and read).
The next step is to create the ExtendedObjectContext class we mentioned at the beginning of this section. The first thing you have to create in the ExtendedObjectContext class are its constructors that accept an IObjectPersistenceNotification parameter. This way, whoever uses the context just needs to create an instance of the PersistenceNotification class, pass it to the context, and they’re done.
The second thing you have to do to create the ExtendedObjectContext class is to override SaveChanges so it invokes the methods of the IObjectPersistenceNotification interface before and after the actual persistence of the objects. The code of the ExtendedObjectContext class is shown in the following listing.
Listing B.7. The new context class
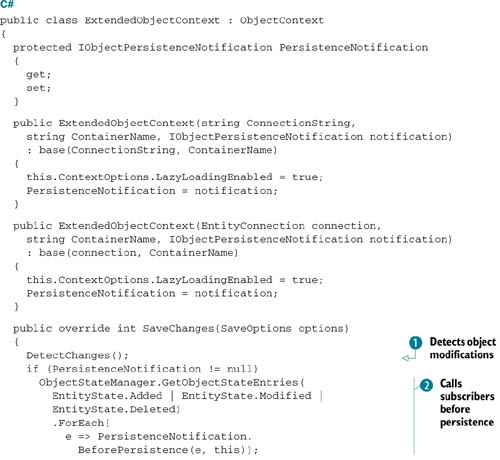


Constructors are simple; they take as input an IObjectPersistenceNotification instance. What’s interesting here is the SaveChanges method. First, you use the DetectChanges method to sync the state manager with the entities ![]() . Then, you detect the entities that are ready to be persisted and invoke the BeforePersistence method for each of them
. Then, you detect the entities that are ready to be persisted and invoke the BeforePersistence method for each of them ![]() . You then invoke the base implementation of the SaveChanges method, passing in the SaveOptions.None parameter
. You then invoke the base implementation of the SaveChanges method, passing in the SaveOptions.None parameter ![]() . This ensures that the DetectChanges and AcceptAllChanges methods aren’t invoked. Next, you call the AfterPersistence method for each persisted entity
. This ensures that the DetectChanges and AcceptAllChanges methods aren’t invoked. Next, you call the AfterPersistence method for each persisted entity ![]() . Finally, if the input parameter states that AcceptAllChanges must be invoked, you call that method
. Finally, if the input parameter states that AcceptAllChanges must be invoked, you call that method ![]() .
.
The last step needed to build the auditing system is to modify the context template to generate a class that inherits from ExtendedObjectContext and that calls the constructors correctly.
B.2.5. Customizing the context template
Modifying the context template is pretty simple. The first step is changing the name of the base class and adding its namespace to the using list, as follows (only the C# code is shown for brevity):
using OrderIT.Model.Notifications;

<#=Accessibility.ForType(container)#> partial class
  <#=code.Escape(container)#> : ExtendedObjectContext
When that’s done, you need to modify the generation of the existing constructors to invoke the base constructors and pass a null value to the IObjectPersistenceNotification parameter. You also need to modify the template to create new constructors that accept the same parameters as the existing ones plus an IObjectPersistenceNotification parameter that’s then passed to the base constructor. The following listing shows the template code for the default parameterless constructor, and the code for the constructor that accepts an IObjectPersistenceNotification parameter.
Listing B.8. Template code for generating correct constructors
public <#=code.Escape(container)#>()
  : base(ConnectionString, ContainerName, null)
{
  <#WriteLazyLoadingEnabled(container);#>
}

public <#=code.Escape(container)#>(
  IObjectPersistenceNotification notification)
  : base(ConnectionString, ContainerName, notification)
{
  <#WriteLazyLoadingEnabled(container);#>
}
For the sake of brevity, we haven’t shown the code for all constructors. The preceding listing contains all you need to know to create them, and the complete code is available in the book’s source code.
That’s it for the auditing system. Now you just need to write code to use the classes you’ve created.
B.2.6. Using the code
Writing code that to use the classes we created in the previous section is simple. You just need to create an instance of the PersistenceNotification class and pass it to the context constructor, as you can see in this listing.
Listing B.9. The code that uses the new infrastructure
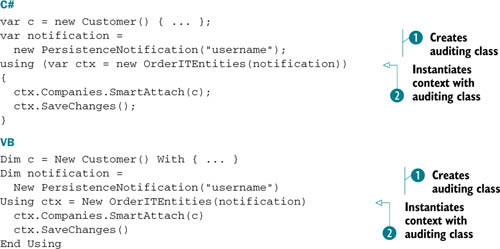
In this code, you create a Customer instance, create the auditing class ![]() and pass it to the context constructor
and pass it to the context constructor ![]() , attach the customer to the context (the ID is 0, so it will be in Added state), and persist it. Now, when you execute the code and open the Audit table in the database, you’ll see a record saying that a new customer has been added.
, attach the customer to the context (the ID is 0, so it will be in Added state), and persist it. Now, when you execute the code and open the Audit table in the database, you’ll see a record saying that a new customer has been added.
Easy as pie, isn’t it? The solution we presented in this section can be further extended. You could create a method that first creates a PersistenceNotification instance, then creates a context passing in the PersistenceNotification instance, and finally returns the context. This way, the code is even shorter than listing B.9 and you wouldn’t even be aware of the auditing class.
That was a long trip, but the solution was worth the effort. Next, let’s talk about two subjects related to querying: the Include method and full-text searches.
B.3. Two tips for querying data
In this section, we’ll talk about two features that are important in many applications:
- The Include method, which enables eager loading in LINQ to Entities queries
- Full-text search capability, which enables fast searching in text columns
We’ll improve the Include method, making it more usable, ;and we’ll look at how to use the full-text search capabilities of the SQL Server database.
B.3.1. Improving the Include method
Let’s face it: the Include method is as useful as it is badly designed. Its string-based nature makes it ugly, because using a string to specify which properties to load in the strong-typing age is horrible. We need to do something to improve this.
In section B.1.2, you saw how to pass a lambda expression to a method to specify what property should be marked Modified. Using the same idea, you can create an Include method that accepts a lambda expression to specify what navigation property you want loaded. Here’s the code.
Listing B.10. The code that uses the new infrastructure
public static ObjectQuery<T> Include<T, TProp>(
  this ObjectQuery<T> oq, Expression<Func<T, TProp>> expression)
{
  var body = expression.Body as MemberExpression;
  if (body == null)
    throw new ArgumentException("Parameter expression must be a memberexpression");
  return oq.Include(body.Member.Name);
}
VB
<System.Runtime.CompilerServices.Extension> _
Public Shared Function Include(Of T, TProp)(oq As ObjectQuery(Of T),
  expression As Expression(Of Func(Of T, TProp))) As ObjectQuery(Of T)
  Dim body = TryCast(expression.Body, MemberExpression)
  If body Is Nothing Then
    Throw New ArgumentException("Parameter expression must be a memberexpression")
  End If

  Return oq.Include(body.Member.Name)
End Function
The Include method shown in the previous code accepts a lambda expression, then takes the property name as a string, and invokes the real Include method of the ObjectQuery class.
Now you can write Include as in this snippet:
C#
ctx.Orders.Include(o => o.OrderDetails);
VB
ctx.Orders.Include(Function(o) o.OrderDetails)
This is much better than passing the OrderDetails string. If you refactor your code, having a lambda expression helps a lot.
What’s bad about this expression is that you can load only first-level properties. For instance, you can eager-load the details and the customer related to the order, but you can’t go deeper, loading products related to the details. To do that, you need to create another extension method that applies to navigation properties and that lets you define a deeper hierarchy.
Writing such a method isn’t that difficult, but it requires a deep knowledge of expression trees, which is one of the toughest subjects in the entire .NET Framework. The preceding code gives you the fundamentals, and you can use it as a base for writing a more clever method.
Now that you know how to improve the Include method, we can move on to full-text searches.
B.3.2. Enabling full text search in Entity Framework
Entity Framework doesn’t provide any native way to integrate itself with the full-text search capabilities of SQL Server. This means you have to let stored procedures perform full-text queries, and then use these stored procedures from the code. Entity Framework doesn’t even know that inside the stored procedure there’s a full-text search query. Easy as pie!
Alternatively, you can also use a defining query that takes data from a table-valued function (as you did in chapter 11). But although this gives you more flexibility in the querying phase, it makes the code and the EDM harder to write and maintain. Stored procedures are generally much easier to use.
Now, let’s look at how to handle database data types that aren’t natively understood by Entity Framework.
B.4. Working with special database types
Entity Framework doesn’t understand all the data types that some databases use. Try this experiment. Create a table with an int and a Geometry column, and import it into the designer. The designer will shows an entity with just one column: the int column. If you open the EDMX as XML, you’ll see the following warning in the SSDL before the entity description:
<!--Errors Found During Generation:
  warning 6005: The data type 'geometry' is not supported; the column 'geom'
     in table 'OrderIT.dbo.GeometrySample' was excluded.
-->
This happens because Entity Framework can’t translate the Geometry database type into a .NET type it understands. So the question is, how do you handle this type of data if Entity Framework itself doesn’t know how to handle it? There are two easy solutions.
The first solution is to create a view where the Geometry data type is converted to a varbinary(max) column. You can then import the view instead of the table, and Entity Framework will map the binary column to an array of bytes that it knows how to handle. Here’s the query for the view:
SELECT StateID, StateName, CONVERT([varbinary](MAX), geom, 0) SpatialData
FROM dbo.state
The second option is useful when you can’t modify the database to create the view. In this case, you create a defining query using the same SQL code you would write for the view. You then use the designer to create a class that maps to the defining query, and you’re done. The defining query is declared as follows:
<EntitySet Name="GeometrySample"
  EntityType="OrderITModel.Store.GeometrySample">
  <DefiningQuery>
    SELECT Id, CONVERT([varbinary](MAX), SpatialData, 0) SpatialData
    FROM dbo.GeometrySample
  </DefiningQuery>
</EntitySet>
In both cases, the entity (GeometrySample) that maps to the database is the one shown in figure B.1.
Figure B.1. The class that maps to the table. It exposes the Id as Int32 and SpatialData as an array of bytes.

Querying with a view or a defining query is like querying a table, so nothing changes there. When it comes to persistence, some extra work is required because you have to use stored procedures or EDM embedded commands. It’s not too difficult; you saw how to do this in chapter 10.
What’s tedious is that instead of working with a property of SqlGeometry type (the SqlGeometry type is defined in the Microsoft.SqlServer.Types assembly), you have to work with the byte[] type. Let’s improve things by reusing what you’ve learned throughout the book.
What you can do is extend the GeometrySample class (the one mapped to the table) through a partial class. In the partial class, you can define a property, say TypedSpatialData, of SqlGeometry type. In its getter, you can take the SpatialData property, convert it to a SqlGeometry instance, and return it. In the setter, you go the opposite way: you create an array of bytes from the input value. Here’s the code.
Listing B.11. The partial class that defines the TypedSpatialData property
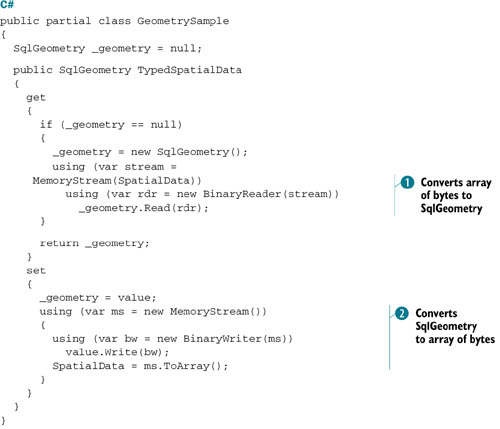
To perform the conversion, you have to use streams. To convert an array of byes into a SqlGeometry type, you have to fill a memory stream with the bytes and then pass the stream to a binary reader, which is then used by
SqlGeometry to populate itself ![]() .
.
To convert a SqlGeometry instance to an array of bytes, you do the opposite. You create a stream and pass it to a writer that the SqlGeometry instance writes to. You then set the SpatialData property with the array of bytes of the stream ![]() .
.
When you use the GeometrySample class, you can use the TypedSpatialData property without any problems, because it automatically synchronizes with the SpatialData property:
C#
var entity = ctx.GeometrySamples.First();
var geometries = entity.TypedSpatialData.STNumGeometries();
VB
Dim entity = ctx.GeometrySamples.First()
Dim geometries = entity.TypedSpatialData.STNumGeometries()
Always remember that because the TypedSpatialData isn’t defined in the EDM, you can’t use it in LINQ to Entities or EntitySQL queries.
We have used this technique for the Geometry data type, but you can use the same approach for any type you have. It’s a pretty cool pattern, isn’t it?