
Chapter 8. Configuring security
- Spring Security concepts
- Configuring security
- Generating configuration files
- Protecting URLs
- Customizing authorization credential storage
- Creating user and role management pages
- Implementing authentication to resources
- Enabling security event logging
Most applications have to provide some level of security to prevent unauthorized users or external programs from accessing the system. In traditional Java EE applications, developers would delegate security to the application server infrastructure. Although there’s a standard API for Java security—the Java Authentication and Authorization Service, or JAAS—it doesn’t standardize the entire process of implementing the application security. As a result, integrating security into applications ends up being a one-off affair for each application server a team encounters.
Spring developers know there’s a better solution: configure the Spring Security API. Originally called ACEGI Security (and later acquired by SpringSource), the Spring Security API is a platform-neutral, general-purpose, security API that can be hosted on any Java application server without changing the code written by a developer.
In this chapter, you’ll learn about the Spring Security API and how to install it within a Spring Roo application, including the web URL security and a customized login page. You’ll review the security artifacts and how to tailor security configurations to suit your needs. You’ll also learn how to turn on security event logging, which logs all security-related activity, allowing you to run security analytics and receive alerts to any unauthorized access to your application.
Let’s get started by installing Spring Security in the Roo application.
8.1. Installing Spring Security
Security commands aren’t available until you install the web components of a Roo application. After you’ve typed in the controller command, the Roo framework will generate the controller classes and configuration files. Now you’re ready to install and configure the security API in the Roo application.
To configure the Spring Security API in Roo, follow these three steps:
1. Issue a security setup command inside the Spring Roo shell, and install the framework.
2. Configure a Spring context file to define your security rules.
3. Enable special security annotations and tag libraries.
To install Spring Security in an existing Roo application, issue the command security setup:
roo> security setup
Security commands are contained in the org.springframework.roo.addon.security.SecurityCommands class.
Roo will automatically configure these features in your application. As you’ll see, Roo installs the following security elements:
- Proper Maven dependencies for the Spring Security JARs, including springsecurity-core, spring-security-config, spring-security-web, and springsecurity-taglibs.
- A brand-new Spring application context file to store the security configuration, META-INF/spring/applicationContext-security.xml.
- A login page (called login.jspx) and a views.xml layout file. The views.xml file has the tile definitions for different views in the application.
- An updated web.xml web descriptor file, which includes the Spring Security servlet filter.
- Extra web URL protection settings in webmvc-config.xml.
Because Spring Security follows the convention-over-configuration philosophy to enable authentication and authorization in web applications, Roo’s security configuration command doesn’t create or modify any Java classes. It generates only the Spring Security configuration XML file and the view components (JSPX files) of the application.
Let’s take a look at some of these changes in detail, starting with the new security context file.
8.1.1. The security context file
The following listing details the new applicationContext-security.xml Spring Security context file.
Listing 8.1. The Spring Security context configuration file
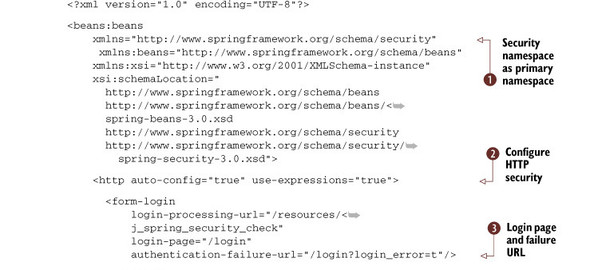

The first part of the previous listing uses the Spring Security namespace (http://www.springframework.org/schema/security) ![]() as the primary namespace, so you don’t have to use a separate prefix when defining the Spring Security XML elements. You’ll
use the HTTP element
as the primary namespace, so you don’t have to use a separate prefix when defining the Spring Security XML elements. You’ll
use the HTTP element ![]() to configure HTTP security, basic authentication, and other defaults. It also supports scripting in security elements with
SpEL. From an authentication standpoint, you’ll use the form-login
to configure HTTP security, basic authentication, and other defaults. It also supports scripting in security elements with
SpEL. From an authentication standpoint, you’ll use the form-login ![]() and logout
and logout ![]() elements to enable a login page, with a login failure URL and a security logout page, respectively, for your web application.
elements to enable a login page, with a login failure URL and a security logout page, respectively, for your web application.
When you use the form-based login approach, it’s important to note that the form submit must be encrypted to protect the user’s
password, and the credentials must be sent in encrypted form rather than in plain text. The URL patterns you want to secure
are defined using the interceptor-url ![]() element. Note that this configuration element also takes care of the role-based authorization for specific web pages (URLs).
The next section in the configuration file deals with authentication details, such as the authentication manager
element. Note that this configuration element also takes care of the role-based authorization for specific web pages (URLs).
The next section in the configuration file deals with authentication details, such as the authentication manager ![]() , an in-memory database
, an in-memory database ![]() , an administrator user named admin
, an administrator user named admin ![]() , and another user named student
, and another user named student ![]() , who will have public access to the website.
, who will have public access to the website.
The password encoder hash configuration in listing 8.1 uses the SHA-256 algorithm. SHA-256 is more secure than other password hashing algorithms such as MD5, so the password hash algorithm specified here uses the industry-recommended hashing algorithm. Note that the passwords should be hashed using salt, which makes the hashed passwords more secure. Without salt, the hashed passwords are vulnerable to security attacks like SQL injections, dictionary attacks, and brute-force attacks. Though beyond the scope of this book, you should become familiar with the many other implementation best practices in the application security space. Websites such as OWASP’s (The Open Web Application Security Project) Top Ten Project list security vulnerabilities and provide helpful discussions of application security best practices.
Ben Alex discusses another authentication option in his blog post on a wedding RSVP application (http://mng.bz/9z4D). He suggests you configure the authentication setup to have the password ignored. This is useful when you want to let users access the web application using a single credential like a token, or as in Ben’s sample application, the RSVP confirmation code. This security configuration is shown in the following listing.
Listing 8.2. Spring configuration snippet with special identification for anonymous users

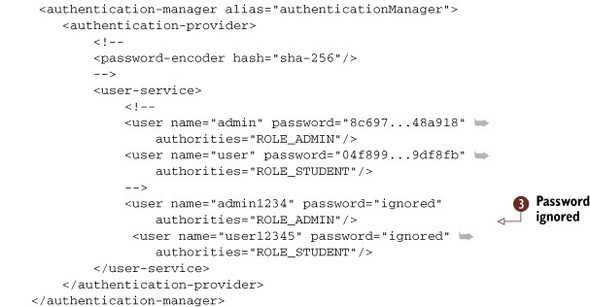
When you set the password value in the previous listing to ignored, you make the authentication occur based only on the username. For this to work, you also need to edit the login page (src/main/webapp/WEB-INF/views/login.jspx) to change the password HTML field (j_password) to be a hidden field and remove the password label. Don’t forget to comment out the password-encoder element as well; otherwise, the authentication will fail, with a message such as Bad Credentials.
The file applicationContext-security.xml is the heart of the Spring Security configuration. It defines the overall security configuration, which consists of two key facets that drive the security engine: the authentication and authorization settings.
Authentication
Authentication is the act of verifying the identity of the agent requesting access to your system. In Spring Security, authentication can be tied to various physical security mechanisms, such as BASIC authentication, form-based security, certificate-based authentication (CERT), or SSH-based key pairs.
In listing 8.2, the <http> tag ![]() establishes that you are going to use HTTP-based authentication. It tells Spring Security to automatically configure the
default settings for security, which allows for a basic form-based login, a special identification of anonymous (or non-logged-in users
establishes that you are going to use HTTP-based authentication. It tells Spring Security to automatically configure the
default settings for security, which allows for a basic form-based login, a special identification of anonymous (or non-logged-in users ![]() ), a logout URL, the ability to remember sign-in sessions for two weeks, and HTTP basic authentication. In addition to these
settings, Roo also configures the use-expressions attribute of the http element
), a logout URL, the ability to remember sign-in sessions for two weeks, and HTTP basic authentication. In addition to these
settings, Roo also configures the use-expressions attribute of the http element ![]() , which allows you to express your security constraints using the Spring Expression Language (SpEL).
, which allows you to express your security constraints using the Spring Expression Language (SpEL).
Note that in both form-based and basic authentication the user credentials are sent unencrypted to the web server. You can use a secure HTTP (HTTPS) mechanism to address this concern by enabling the SSL certificates. But unlike basic authentication, with form-based authentication you have the flexibility to add or modify any custom security event–related auditing, as well as user attributes and level of logging for your requirements. You can set limits so the login page is SSL-encrypted, but for your website’s other pages that contain only static content and no user-sensitive information, you can use HTTP. Finally, a login form allows you to present a page with a look and feel consistent with your overall application. The basic authentication option only provides a dialog, which you can’t customize.
Authorization
Authorization (also known as access control) is the process by which Spring Security checks whether or not a given authenticated user has access to a given resource. Completely decoupled from the authentication process, authorization can be defined in a number of ways: using the <intercept-url> tag to protect controllers, pages, and other web resources; using the @Secured annotation (org.springframework.security.access.annotation package) to protect various Spring bean methods or classes; or using AOP pointcut expressions to protect code by convention.
As you’ve learned, Spring Security has already configured both authentication and authorization. The users are defined in an in-memory data store, and two roles are defined as ROLE_ADMIN and ROLE_STUDENT. These roles are attached to the admin and user logins.
The security descriptor doesn’t function on its own. You have to install Spring Security in the container. Let’s take a look at how this is done.
8.1.2. Web configuration elements
You can install the Spring Security engine into any web container using a standard servlet filter. Here’s the Roo-generated configuration, defined in src/main/webapp/ WEB-INF/web.xml:
<filter>
   <filter-name>springSecurityFilterChain</filter-name>
   <filter-class>org.springframework.web.filter.<DelegatingFilterProxy</filter-class>
</filter>
...
<filter-mapping>
   <filter-name>springSecurityFilterChain</filter-name>
   <url-pattern>/*</url-pattern>
</filter-mapping>
Installing the DelegatingFilterProxy filter allows the web application to make requests to the Spring Security configuration when web requests are issued. As you can see with the URL pattern of /*, all URLs pass through the filter, which means Spring Security can protect more than just controllers.
The security setup command also adds a login page. Let’s take a look at an excerpt of that page, login.jspx:
<c:if test="${not empty param.login_error}">
  <div class="errors">
    <p>
      <spring:message code="security_login_unsuccessful" />
      <c:out value="${SPRING_SECURITY_LAST_EXCEPTION.message}" />
      .
    </p>
  </div>
</c:if>
...
<spring:url value="/resources/j_spring_security_check" var="form_url" />
<form name="f" action="${fn:escapeXml(form_url)}" method="POST">
...
    <input id="j_username" type='text' name='j_username' style="width:150px"/>
...
    <input id="j_password" type='password' name='j_password'
         style="width:150px"/>
    <spring:message code="button_submit" var="submit_label" />
    <input id="proceed" type="submit" value="${fn:escapeXml(submit_label)}" />
</form>
Despite a hefty amount of formatting and validation code, the sole purpose of the login page is to submit to a special Spring security URL, j_spring_security_check, and send two parameters, j_username and j_password. This is similar to how a traditional Java EE web security implementation works. The login form is submitted to the URL j_spring_security_check. If the security system recognizes the credentials of the passed user, Spring Security marks this fact and authenticates the user. Otherwise, the error is passed back to the page, and rendered in the errors div above the form.
This security configuration can be extended and customized by adding more JSTL scriptlets and conditions using the Expression Language (EL). For example, you can implement a feature called Remember Me so the application remembers the identity of a logged-in user between sessions (a feature supported in the Spring Security framework). Also, once you modify and customize the configuration files, Roo remembers those changes and doesn’t override them the next time you run the Roo commands.
Now that you’ve been briefed on the configuration elements, let’s discuss how to use Spring Security to configure security in a simple application.
8.2. Securing a sample application
Let’s discuss the application security module of the Course Manager application. In this application, you’ll use one of the two preinstalled roles, ROLE_ADMIN, and a new custom role called ROLE_STUDENT:
- ROLE_ADMIN—Able to create new courses, and manage all the existing courses
- ROLE_STUDENT—Able to view course details, and register for a specific course or courses
You can also define additional roles like ROLE_INSTRUCTOR and ROLE_TRADING_PARTNER, which are useful in a Course Manager application. You’ll learn more details about these later in the book.
With these application security requirements in the areas of authentication and role-based authorization defined, you’re ready to secure the web application.
8.2.1. Restricting URLs
First, you have to replace the default URL protections installed by Spring Security. You’ll change the intercept-url tags to something that makes sense for your application, such as
<intercept-url pattern="/coursecatalog/**" access="permitAll" />
<intercept-url pattern="/coursecatalog/**" method="DELETE"
    access="hasRole('ROLE_ADMIN')" />
<intercept-url pattern="/courses/**" method="GET" access="permitAll" />
<intercept-url pattern="/courses/**" method="POST"
     access="hasRole('ROLE_ADMIN')" />
<intercept-url pattern="/courses/**" method="PUT"
     access="hasRole('ROLE_ADMIN')" />
<intercept-url pattern="/courses/**" method="DELETE"
     access="hasRole('ROLE_ADMIN')" />
<intercept-url pattern="/**" access="permitAll" />
These patterns create the following rules:
- Both roles may view the course catalog and course details, but only the admin can delete them.
- Any web request can access the GET method on /coursecatalog, making it effectively public.
This is a specific set of choices, but one that can be easily tweaked by modifying the tags in the previous code.
Note that the access attribute is populated with a permitAll value for some of the URL patterns. This configuration allows all users access to the URLs matching the pattern value specified in the pattern attribute of the intercept-url element. In real-world applications, you shouldn’t allow access to URLs that aren’t explicitly protected. If a user tries to access a URL that’s not specified, you should use a denyAll value to prevent access to the pattern that the URL matches. This approach gives you better control over what URLs in the application are accessible to a specific group of users and results in a more secure web application.
Roo is based on version 3 of the Spring Security framework, which includes several built-in expressions (as of 3.0.5) for web and method-level security. The expressions you can use in the access= tag are listed in table 8.1.
Table 8.1. Common, built-in expressions in Spring Security
|
Expression |
Description |
|---|---|
| hasRole(rolename) | Allows only principals with the rolename role |
| hasAnyRole(rolename1, rolename2,...) | Allows principals with any role listed |
| permitAll | Disables Spring Security for this URL pattern and allows access to all |
| denyAll | Refuses entry to the given URL for any user |
| isAnonymous() | Allows entry only if no security context is established for the given principal (that is, they’re not logged in) |
| isAuthenticated() | Allows access for any authenticated user |
You can also apply more arbitrary expressions in this configuration, but this list will do for simple security configurations.
You can also use Spring Security JSP tag library tags to control access to the elements (and to hide or show them) on the web page, as shown in the JSPX script snippet in the following listing.
Listing 8.3. Spring Security JSP tag library to control access to web page elements

To use Spring Security tags detailed in the previous listing, you’ll first specify the tag library namespace (http://www.springframework.org/security/tags) ![]() and then use security tags such as authorize
and then use security tags such as authorize ![]() with an attribute like ifAllGranted to specify the role or roles that will have access to the specific web page element (in this case, the delete menu item).
with an attribute like ifAllGranted to specify the role or roles that will have access to the specific web page element (in this case, the delete menu item).
This will address the access control requirements in the view components, but what about the controller layer? You can restrict access to the delete and update use cases for a scaffolded entity by adjusting the @RooWebScaffold annotation (located in the org.springframework.roo.addon.web.mvc.controller package) in the specific controller class, adding delete and update attributes, and setting them to false. This will cause the Roo shell to automatically remove the delete and update methods from the controller class and update the corresponding JSPX view components:
@RooWebScaffold(path = "coursecatalog",
               automaticallyMaintainView = true,
               formBackingObject = CourseCatalog.class,
               delete=false, update=false
)
@RequestMapping("/coursecatalog")
@Controller
public class CourseCatalogController {
}
The next step is to define a more permanent authentication storage mechanism by persisting roles and principals into a database. Also, many real-world applications use a Lightweight Directory Access Protocol (LDAP)-based repository such as Microsoft Active Directory or Sun Directory Server Enterprise Edition (DSEE), or an open source LDAP product such as the OpenDS Directory Server, for storing user credentials. Later in this chapter, you’ll also learn how to configure LDAP-based authentication in a Roo application.
8.2.2. Storing roles and users in a database
In a real system, you’d never configure security credentials within a configuration file, because you’d have to redeploy every time you needed to add a new user. Instead, you can use Roo to do this. First, you’ll create entities and controllers to manage your security credentials. Figure 8.1 shows how your security model will look.
Figure 8.1. The Course Manager application security model
![]()
The database tables that these entities (Principal, AuthorityPrincipal-Assignment, and Authority) correspond to are security_principals, security_authorities, and security_role_assignments, respectively.
First, let’s create the Principal entity:
entity jpa --class ~.model.security.Principal
    --table security_principals
field string  --fieldName username --notNull --sizeMax 50 --sizeMin 3
field string  --fieldName password --notNull --sizeMax 50 --sizeMin 3
field boolean --fieldName enabled
This Roo script defines a table, security_principals, with username, password, and enabled fields.
Next, you have to define your roles. Here’s another entity that accomplishes the task:
entity jpa --class ~.model.security.Authority
    --table security_authorities
field string --fieldName roleId --notNull --sizeMax 10 --sizeMin 8
field string --fieldName authority --notNull --sizeMax 50
    --sizeMin 8 --regexp ^ROLE_[A-Z]*
And next, create your intersecting entity, AuthorityPrincipalAssignment:
entity jpa
    --class ~.model.security.AuthorityPrincipalAssignment <--table security_role_assignments
field reference --fieldName username --type ~.model.security.Principal
field reference --fieldName roleId --type ~.model.security.Authority
For all of these entities, let’s define the controller classes using the web mvc scaffold command:
web mvc scaffold --class ~.web.security.UserController --backingType ~.model.security.Principal --path /security/users
web mvc scaffold --class ~.web.security.RoleController --backingType ~.model.security.Authority --path /security/roles
web mvc scaffold --class ~.web.security.RoleMappingController  --backingType ~.model.security.AuthorityPrincipalAssignment --path /security/assignments
As discussed in chapters 5 and 6, you can improve the application’s appearance by editing application.properties and changing the labels for menus and fields to more user-friendly names like Role, User, and Role Assignment.
You should also secure these new URLs so that only ROLE_ADMIN users can access them. Add the following intercept-url entry to protect all URLs below /security:
 <intercept-url pattern="/security/**"
     access="hasRole('ROLE_ADMIN')" />
Security Protection by Path
You’ll note that it’s easy to protect the whole set of security controllers by putting all of them under the same URL path.
You can do this by using the --path /security/pathname element in the webmvc scaffold Roo command, which automatically places controller request URLs and view paths in the pathname path, within the /security superpath.
It’s important to note that the Roo add-on community is working on automating the steps required to use JDBC-based authentication configuration, which will make the job of enabling database-driven user authentication much easier in the future.
At this point, you’ve defined your database entities and the controllers to manipulate them. But, so far, you haven’t attached them to the security system.
8.2.3. Database-backed authentication
Spring Security lets you define user services to access your user databases. Because the concept of a principal has been abstracted, you can plug in any kind of implementation: database-managed, LDAP, or flat-file. Spring Security also supports external single sign-on (SSO) systems such as Central Authentication Service (CAS), OpenSSO, and SiteMinder.
First, you’ll configure your users using a relational database, accessing entities defined within the same Roo application. To do this, you’ll have to update your Spring Security configuration file, applicationContext-security.xml. You’ll add a real, data source–backed authentication database, as illustrated in the following listing, before the original user-service tag.
Listing 8.4. Database-backed authentication
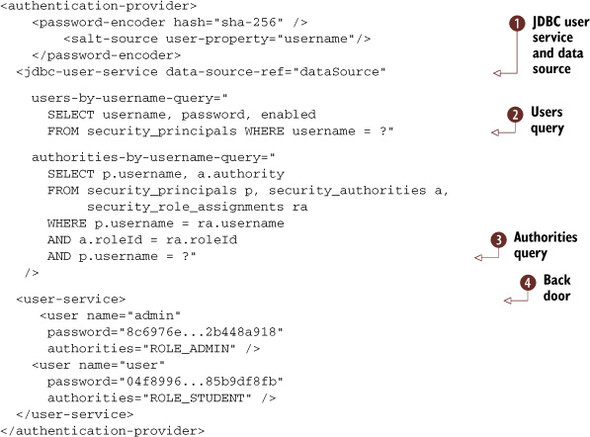
The previous listing shows how to configure the database-backed authentication. You specify the SQL queries to retrieve user
details and user roles in the users-by-username-query ![]() and authorities-by-username-query
and authorities-by-username-query ![]() attributes of jdbc-user-service, respectively. Notice the second user service
attributes of jdbc-user-service, respectively. Notice the second user service ![]() behind it is a “back door.” If a user can’t be found in the primary user service
behind it is a “back door.” If a user can’t be found in the primary user service ![]() , Spring Security will search the next one.
, Spring Security will search the next one.
This approach is great for development-time databases, but you may want to consider making this an optional security configuration element, and leave it out when you get ready to move to a real production environment.
Note that the password values in the security_principals table should never be stored in plain text. They should be stored using a hash algorithm like SHA-256. The password-encoder element in the previous listing will authenticate the users by retrieving the password (which was stored after hashing the plain-text password value using the SHA-256 hash algorithm) from the table and un-hashing it to compare it with the password entered on the login screen. Also, when using the hashed passwords, it’s a good security practice to use a salt value to protect against dictionary attacks. You’ll want to use a randomly generated salt value for each user, which will allow you to use the username property for generating the salt. Then you’ll configure all of this in the salt-source element in the Spring Security configuration file.
8.2.4. LDAP-based authentication
Spring Security provides support for LDAP-based authentication and authorization out of the box. To enable the LDAP authentication, you’ll need to make a few minor edits to the applicationContext-security.xml file.
To use Spring Security LDAP authentication, you’ll first need to add the following Spring LDAP dependencies in the Maven pom.xml file:
<dependency>
    <groupId>org.springframework.security</groupId>
    <artifactId>spring-security-ldap</artifactId>
    <version>${spring-security.version}</version>
</dependency>
<dependency>
    <groupId>org.springframework.ldap</groupId>
    <artifactId>spring-ldap-core</artifactId>
    <version>1.3.0.RELEASE</version>
</dependency>
<dependency>
    <groupId>org.springframework.ldap</groupId>
    <artifactId>spring-ldap-core-tiger</artifactId>
    <version>1.3.0.RELEASE</version>
</dependency>
Next, add the tags for the ldap-server and ldap-authentication-provider elements to the applicationContext-security.xml file, as shown in the following listing.
Listing 8.5. LDAP authentication configuration
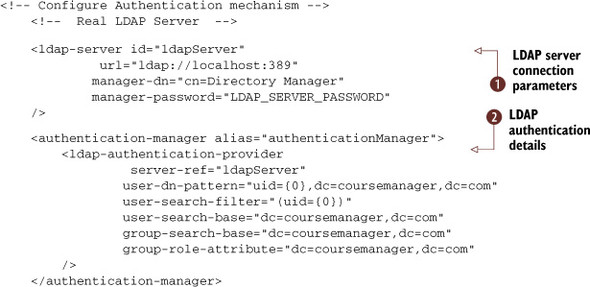
There are two main elements to review in the previous listing: the LDAP server connection details ![]() , which include the server URL where the LDAP repository is running, the LDAP connection user id (manager-dn), and the password (managerpassword); and the LDAP-based authentication manager
, which include the server URL where the LDAP repository is running, the LDAP connection user id (manager-dn), and the password (managerpassword); and the LDAP-based authentication manager ![]() . In the authentication provider element, you specify the following attributes:
. In the authentication provider element, you specify the following attributes:
- User distinguished name (DN) pattern
- User and group search base values
- Group role attribute
- User search filter (in this case, the search filter is based on the user id that corresponds to the LDAP attribute uid)
You can use an open source LDAP server such as the OpenDS directory server for testing the previous LDAP user authentication configuration. The OpenDS server documentation (https://docs.opends.org/2.2) has instructions on how to install, configure, and launch the open source LDAP server. Refer to the readme.txt file in the sample application code provided with this book for instructions on how to configure and run the OpenDS server.
If your organization has a user data repository in a legacy system that doesn’t support JDBC- or LDAP-based authentication, you can use a custom authentication provider for user authentication. In this scenario, the authentication configuration would look like the following:
<beans:bean id="customAuthenticationProvider"
   class="com.rooinaction.samples.security.authentication.        MyCustomAuthenticationProvider">
   <beans:property name="adminUser" value="admin" />
   <beans:property name="adminPassword" value="test" />
</beans:bean>
<authentication-manager alias="authenticationManager">
   <authentication-provider ref="customAuthenticationProvider" />
</authentication-manager>
Your custom authentication provider MyCustomAuthenticationProvider class would extend the Spring Security framework’s abstract class Abstract-UserDetailsAuthenticationProvider (located in the org.springframework.security.authentication.dao package).
As noted previously in this chapter, in Roo you have to manually configure and customize the security configuration to use a JDBC- or LDAP-based authentication. Roo’s security setup command doesn’t provide any customization options. Adding the ability to specify LDAP or JDBC options as additional command-line parameters when running Roo’s security command makes for enhancement of the security command. These additional parameters can be used to specify the type of authentication (for example, JDBC, LDAP, or custom authentication) and other nondefault authentication details.
After you’ve updated the authentication provider configuration using either a JDBC-based or an LDAP-based authentication provider and you run the application, you’ll see the authentication and authorization functionality in action.
In the next section, you’ll find out how to handle the access denied errors by displaying a customized error page rather than the 403 error page.
8.2.5. Handling access denied errors
There are two more steps to take before you’re ready to test your security configuration. First, if you try to log in as user to access a restricted URL (for example, http://localhost:8080/coursemanager/registrations/), you’ll get the following error message:
HTTP Status 403 - Access is denied

description Access to the specified resource (Access is denied) has been forbidden.
To handle this error more gracefully, let’s create a new view page called AuthzError.jspx with a user-friendly message, such as the one shown in the following code snippet:
<html>
    <head>
        <title></title>
        <meta http-equiv="Content-Type" content="text/html; charset=UTF-8">
    </head>
    <body>
        <h2>Error:</h2>
        You are not authorized to execute this function.
    </body>
</html>
Let’s also create a user-friendly error page (called Error.jspx) for handling the HTTP 404 errors.
<html>
    <head>
        <title></title>
        <meta http-equiv="Content-Type" content="text/html; charset=UTF-8">
    </head>
    <body>
        <h2>Error Occurred.</h2>
        Please contact a technology support team member.
    </body>
</html>
Now you need to add these custom error pages to the web.xml file, as shown in the following:
<error-page>
        <error-code>403</error-code>
        <location>/AuthzError.jspx</location>
    </error-page>
    <error-page>
        <error-code>404</error-code>
        <location>/Error.jspx</location>
    </error-page>
The last step in making your code example a complete web application is to add links in the footer section for the login URL.
8.2.6. Adding login links
Note that the links in the footer tile of the web page don’t display the login link. The footer tile displays only the logout link when you’re already logged in. You’ll have to type the URL http://localhost:8080/coursemanager/login in the browser window to navigate to the login page of the Roo application. To add a new link for the login view in the footer section of each web page, you’ll first need to add a new message code for the login link in the messages.properties file (located in srcmainwebapp WEB-INFi18n folder):
# New spring message code for login
security_login=Login
Then you’ll add the following JSTL code in the footer.jspx file (located in the srcmainwebappWEB-INFviews folder) below the home link:
<!--  Login link in the footer tile.  -->
    <c:if test="${pageContext['request'].userPrincipal == null}">
        <c:out value=" | "/>
        <span>
            <spring:url value="login" var="login"/>
            <a href="${login}">
                <spring:message code="security_login"/>
            </a>
        </span>
    </c:if>
Now the login link will display next to the home link when the user isn’t logged in.
8.3. Testing security setup
Now that you’ve completed all of the security configuration steps in this chapter, it’s time to build the application running the mvn package command. After a successful build, launch the servlet container using the mvn tomcat:run command. Then navigate to the login page using the URL http://localhost:8080/coursemanager/login to authenticate into the Roo application.
Navigate to the main page of the web application and verify that the restricted menu items aren’t visible. To do this, log in as user and make sure that only the menus that the ROLE_STUDENT role is allowed to view are visible. Log out and log back in as admin and you should now see all the menus that the ROLE_ADMIN role is authorized to access.
8.4. Adding security event logging
If you’re interested in logging all of the security events (when a user logs in or logs out of the Roo application), you can do so by adding the LoggerListener Spring bean provided by the Spring Security framework. Security event logging is a requirement in several organizations, especially those that must be compliant with regulatory standards such as the Sarbanes-Oxley Act (SOX) or the Federal Information Security Management Act (FISMA).
The LoggerListener class (which is located in the org.springframework.security.authentication.event package) outputs authentication-related application events to the logger. All the authentication events are logged at the warning (WARN) logger level.
Note that this security event logger is part of Spring Security and not a Spring Roo feature, but it’s included in the discussion here because most real-world applications require logging for troubleshooting as well as security compliance purposes. The following configuration snippet shows how to add the security event logging in the applicationContext-security.xml file:
<!--  Security event logging -->
<beans:bean id="loggerListener"
   class="org.springframework.security.authentication.event.LoggerListener" />
The following log output snippet shows the security event logger output messages after you enable LoggerListener:
2010-11-27 18:52:05,202 [http-8080-1] WARN
 org.springframework.security.authentication.event.LoggerListener -
 Authentication event AuthenticationSuccessEvent: user;
 details: org.springframework.security.web.authentication.
          WebAuthenticationDetails@380f4:
 RemoteIpAddress: 0:0:0:0:0:0:0:1; SessionId: 74CAE479AA7B10ABAAB3155EAB14D53B

2010-11-27 18:52:05,206 [http-8080-1] WARN
 org.springframework.security.authentication.event.LoggerListener -
Authentication event InteractiveAuthenticationSuccessEvent: user;
details: org.springframework.security.web.authentication.
         WebAuthenticationDetails@380f4:
RemoteIpAddress: 0:0:0:0:0:0:0:1; SessionId: 74CAE479AA7B10ABAAB3155EAB14D53B
The default logger level in the generated log4j.properties file is ERROR, so you’ll need to modify the logger level to either WARN or INFO to be able to view the security event log messages. Run the following Roo commands to change logging level from the ERROR to the INFO level. Make sure that the ERROR log level is set for the application that’s running in the production environment and set the INFO level to run only in nonproduction environments:
roo> hint logging
You can easily configure logging levels in your project.

Roo will update the log4j.properties file to control your logging.

Type 'logging setup' then hit TAB twice. Consider using 'DEBUG' level.
You may wish to specify the optional --package argument (defaults to 'ALL').

Remember to type 'hint' for further hints and suggestions.
roo> logging setup --level
logging setup --level
required --level: The log level to configure; no default value
roo> logging setup --level

DEBUG    ERROR    FATAL    INFO     TRACE   WARN
roo> logging setup --level INFO
Managed SRC_MAIN_RESOURCESlog4j.properties
roo>
The logging command shown in the previous example defaults to all packages in the web application, but you can use the optional --package argument to specify the package that you want to set the logging level. The following example provides the logging command again, but this time it specifies the package name for the classes in the Roo project (using the variable PROJECT, which maps to the org.rooinaction.coursemanager package):
logging setup --level DEBUG --package PROJECT
This will add the following line to the log4j.properties file:
log4j.logger.org.rooinaction.coursemanager=DEBUG
If you want to modify the log level for Spring Security Java classes, specify SECURITY as the value for the package argument in the setup command and it will add the DEBUG level to the org.springframework.security package. This is helpful for trouble shooting any security-related bugs in the application.
The following listing shows the complete configuration with all of the custom changes discussed in this chapter for the applicationContext-security.xml security configuration file.
Listing 8.6. Security configuration for Course Manager application
<?xml version="1.0" encoding="UTF-8"?>
<beans:beans xmlns="http://www.springframework.org/schema/security"
    xmlns:beans="http://www.springframework.org/schema/beans"
    xmlns:xsi="http://www.w3.org/2001/XMLSchema-instance"
    xsi:schemaLocation="
      http://www.springframework.org/schema/beans
      http://www.springframework.org/schema/beans/spring-beans-3.0.xsd
      http://www.springframework.org/schema/security
      http://www.springframework.org/schema/security/spring-security-3.0.xsd">
    <http auto-config="true" use-expressions="true">
        <form-login login-processing-url="/resources/j_spring_security_check"
            login-page="/login"
            authentication-failure-url="/login?login_error=t"/>
        <logout logout-url="/resources/j_spring_security_logout"/>

        <intercept-url pattern="/coursecatalog/**" method="DELETE"
            access="hasRole('ROLE_ADMIN')" />
        <intercept-url pattern="/coursecatalog/**"
            access="hasAnyRole('ROLE_ADMIN', 'ROLE_STUDENT')" />
        <intercept-url pattern="/coursedetails/**" method="POST"
            access="hasRole('ROLE_ADMIN')" />
        <intercept-url pattern="/coursedetails/**" method="PUT"
            access="hasRole('ROLE_ADMIN')" />
        <intercept-url pattern="/coursedetails/**" method="GET"
            access="permitAll" />
        <intercept-url pattern="/coursedetails/**" method="DELETE"
            access="hasRole('ROLE_ADMIN')" />
        <intercept-url pattern="/coursedetails/**"
            access="hasAnyRole('ROLE_ADMIN','ROLE_STUDENT')" />
        <intercept-url pattern="/**" access="permitAll" />

    </http>

    <ldap-server id="ldapServer"
        url="ldap://localhost:389"
        manager-dn="cn=Directory Manager"
        manager-password="test123"
    />

    <authentication-manager alias="authenticationManager">
        <ldap-authentication-provider
            server-ref="ldapServer"
            user-dn-pattern="uid={0},dc=coursemanager,dc=com"
            user-search-filter="(uid={0})"
            user-search-base="dc=coursemanager,dc=com"
            group-search-base="dc=coursemanager,dc=com"
            group-role-attribute="dc=coursemanager,dc=com"
        />
    </authentication-manager>

    <beans:bean id="loggerListener"
        class="org.springframework.security.authentication.event.      LoggerListener" />
</beans:beans>
As you can see in the previous listing, almost all of the application security aspects—such as the user authentication, the role-based access (RBAC) to different web pages (URLs) in the application, the expression language–based access control, and the security event logging—can be defined in the XML file without having to write a single line of Java code. This is the power the Spring Security framework brings to the table, and Roo takes complete advantage of this approach. The Spring Security framework makes the job of every application architect and developer easier, because they can spend their focus, time, and effort on the business logic part of the application instead of getting bogged down with all the security configuration details and other boilerplate infrastructure tasks.
8.5. Summary
In this chapter, you learned how to implement security (which includes authentication and authorization aspects) in a Roo application. You reviewed the Spring Security concepts and the configuration details of application security in a Roo application. You also learned how to change the authentication provider configuration from the hardcoded username and password values that are used for testing purposes to a real-world user-credentialed data store like a relational database or an LDAP repository.
You looked at how to protect and restrict URLs and adjust the views for different web pages in the application based on what type of user is accessing that specific web page. Finally, you enabled the security event logging in the application to view the authentication event details as and when users log in to your web application.
In the next chapter, we’ll switch gears a bit and discuss Roo’s testing facilities. We’ll review unit, integration, and web tests, and you’ll learn how to test Roo services, entities, and web pages using JUnit and Selenium.
8.6. Resources
OpenDS directory server home page (http://www.opends.org)
OWASP Top Ten Project (http://mng.bz/yXd3)
Spring In Action, Third Edition, by Craig Walls (http://mng.bz/6xB2)
Spring LDAP project (http://mng.bz/759N)
Spring Security website (http://mng.bz/AWNl)