
Chapter 7. RIA and other web frameworks
In the last chapter, we discussed how the Roo custom tag libraries add dynamic behaviors such as client-side validation, and how you could customize the form elements, messages, layout, and look and feel of your web pages.
In this chapter you’ll learn how to work with more advanced web frameworks in Roo. You’ll set up a simple Ajax interaction using the Dojo Toolkit and Spring MVC’s Ajax support. Then we’ll discuss some of the other web platforms available to Roo developers today via add-ons: Google Web Toolkit, Vaadin, and JSF.
7.1. JavaScript and Ajax
Roo can provide dynamic, rich application features out of the box, providing both client-side widgets such as tab folders and tree views, and server-side support for Ajax. It does this by installing two key technologies in every Spring Roo web application: Spring JavaScript and Spring MVC Ajax support.
In this section, you’ll learn how Roo mounts Spring JavaScript and how the Roo tag libraries use it to create rich widgets. Then you’ll wire a text field to an Ajax server-side method and invoke it using a JavaScript event.
7.1.1. Spring JavaScript
Roo includes the Spring JavaScript library when it generates a Spring MVC web application. This library includes the following components:
- The Dojo Toolkit —A JavaScript API that provides Ajax support, dozens of user interface widgets, a common event handling system, graphing, and a lot more. The Dojo scripts are mounted in the /resources/dojo, /resources/dojox and /resources/dijit URIs within Roo web applications. All form elements and panels in Spring Roo are built using Dojo, and Dojo validation routines provide dynamic, client-side error messages to your forms.
- Spring JavaScript API —A set of Spring-developed utility JavaScript methods to install Dojo widgets and perform automatic client validation. Spring JavaScript APIs are located in /resources/spring/ URIs.
- Resource handling support —This used to be a Spring JavaScript feature, but was moved into the Spring Core in version 3.0.4. The <mvc:resources/> tag in the webmvc-config.xml file defines the various classpath directories to search when requesting a URL starting with /resources. Spring will cache these resources and serve them to the client automatically.
The Spring JavaScript resources JAR is automatically added when Roo installs Spring MVC support. It’s installed as the Maven artifact named spring-js-resources. Roo mounts the scripts to provide these libraries to each page in the default.jspx layout file, by calling the <util:load-scripts /> tag.
7.1.2. Calculating Course cost with Ajax
To add a more dynamic nature to your forms, let’s create an Ajax interaction between your page and the server. As you probably know, Ajax is a label for technology that calls web services from a previously loaded page. Ajax calls can be performed synchronously or asynchronously.
The example is trivial but shows the minimum plumbing required to set up an Ajax call. You’ll use the Dojo framework to wire changes to a course duration field to trigger calls to a Spring MVC method. Every time you modify the field value, the Ajax method will calculate the list price of your course.
Spring MVC has full support for Ajax on the server side, as does Dojo on the client. You’ll use a specially annotated Spring MVC method to handle the server-side call, but first you need to wire up the input field to trigger a JavaScript method every time you type a digit.
7.1.3. The JavaScript event handler
We’ll use Dojo event handling to wire changes in the duration field to a method that executes the Ajax call. First, add a <spring:url> tag at the top of the page, which you use to define the URL path to the Ajax call on the server side:
<spring:url value="/courses/calcCostByDay?days=" var="ajax_url" />
Next, you’ll add the code inside a Dojo addOnLoad() methodaddOnLoad() script block. This block is executed after the page is fully loaded, but before the user can access it. In this block of code, you look up your duration field and connect a Dojo event handler to it, which calls your Ajax method.
Listing 7.1. Responding to duration onKeyUp event

The dijit.byId() method call ![]() tells Dojo to hold a reference to the JavaScript object representation of the Dojo component for the duration field, which
is a Dojo ValidationTextBox.
tells Dojo to hold a reference to the JavaScript object representation of the Dojo component for the duration field, which
is a Dojo ValidationTextBox.
You then use the dojo.connect method ![]() to wire up an onKeyUp event, which fires each time the user presses and releases a key. The connect method’s third parameter is an anonymous function
which handles the event.
to wire up an onKeyUp event, which fires each time the user presses and releases a key. The connect method’s third parameter is an anonymous function
which handles the event.
The dojo.xhrGet method executes a GET call as an Ajax method. In this example, it sends the amount typed as a URL parameter you’ll construct beforehand ![]() , and it expects the return as a text value. The call is handled asynchronously, and results in a call to the anonymous function
specified in the load parameter
, and it expects the return as a text value. The call is handled asynchronously, and results in a call to the anonymous function
specified in the load parameter ![]() . In that method, you place the returned value in your listPrice text field. You do so by using the dijit.byId method to locate the listPrice field and then calling the listPrice.set
. In that method, you place the returned value in your listPrice text field. You do so by using the dijit.byId method to locate the listPrice field and then calling the listPrice.set ![]() method to modify the Value attribute, which is what holds the HTML form field data for the list price. If an error occurs, the function assigned to
the error parameter is called instead.
method to modify the Value attribute, which is what holds the HTML form field data for the list price. If an error occurs, the function assigned to
the error parameter is called instead.
Javascript Anonymous Functions
For the uninitiated, or those who haven’t read Douglas Crockford’s Javascript, the Good Parts, an anonymous function in JavaScript serves the same function as an anonymous inner class method in Java, or a closure or block in Groovy or Ruby. The method can be defined and used in-line. Further, you can assign an anonymous function as a property of an object, which is what you’re doing in the xhrGet() method above in the load and error properties
Your last step is to actually implement the Ajax calculation method. That turns out to be the easiest part.
7.1.4. Easy Ajax with Spring MVC
To calculate the list price, you’ll use the Spring MVC @ResponseBody annotation. This annotation tells Spring MVC to return the result of the method as the output, and not trigger traditional view resolution. Place this method in your CourseController:
@RequestMapping(method = RequestMethod.GET, value="calcCostByDay")
public @ResponseBody String calcCostByDay(@RequestParam Integer days) {
    return String.valueOf(days * 50);
}
In this method, mapped to the URL /courses/calcCostByDay, Spring MVC accepts a single integer, days, as a request parameter, calculates the list price, and then returns it as a String response. That’s the entire Ajax server method—of course, the server-side developers have it easier than the web developers do in this case.
Save your controller and kick off your application with the mvn tomcat:run command. Try changing the duration of the class—if the list price changes, everything’s working. If not, open up Firebug and check the console—chances are you have a scripting error. You can also use the console.log method and the JavaScript debugger to troubleshoot the page.
This code has a subtle bug. If you try to type anything other than numbers into the numDaysduration field, the listPrice field will be replaced with a large amount of HTML text.
The text returned is actually a standard HTML error page that reports an invalid mapping; because your method was coded to accept an integer parameter, it didn’t find a suitable method to map to the incoming request, which, since specified as a set of characters, was not numeric.
There are a number of ways to solve this little problem. The easiest is to simply zero out the field if the user submits invalid data. You can change your method in the CourseController to look like this:
public @ResponseBody String calcCostByDay(@RequestParam String days) {
   try {
      int val = Integer.parseInt(days);
      return String.valueOf(val * 50);
   } catch (NumberFormatException e){
      return "0";
   }
}
Javascript and Console Debugging
Many new JavaScript developers like using the alert function because it brings up a dialog that displays information. But unless you want to give yourself repetitive stress injuries from hitting Enter, the better way to debug is to use the excellent FireBug JavaScript development plug-in tool in FireFox, or one of the other provided debuggers in Chrome or Safari.
The console.log method is your logging method for JavaScript, and anything you put in there automatically ends up in the JavaScript log output in FireBug’s Console pane. Be careful to remove these statements if you’re going to host your application on an older browser such as Internet Explorer 6.0, or you may find error messages about not finding a console object when the page loads.
The create.jspx file can be customized the same way; the major difference is that you don’t have to carry along hidden id and version fields, and you use the POST method to create a new course using the /courses URL.
So far, you’ve learned how to configure Dojo widgets and handle Ajax requests and responses. Now let’s switch gears and take a look at two other web frameworks available to Roo developers. We’ll start with Roo’s support for the Google Web Toolkit.
We’re Only Scratching the Surface Here
Ajax and JavaScript user interfaces are a huge topic, worthy of an entire series of chapters. We have more information available online on the book website, http://manning.com/rimple, including articles on using the Dojo framework, passing data with JSON, and more.
7.2. Google Web Toolkit
GWT is a highly dynamic web application framework developed by Google. It’s used to build many of their applications, including GMail and Wave. GWT gives Java programmers access to Ajax-based web programming techniques, using Java and XML. Swing developers will feel right at home with the familiar Java, event-driven API, and XML. Rather than programing in JavaScript, GWT’s client-side API is cross-compiled into JavaScript code, HTML, and CSS. Developers use Java, XML, and some HTML for pages and layouts, and Java for composition of client-side user interface components, event handling, and interaction with the server layer.
GWT is a powerful web application development framework, but it can be a challenge to configure. You’ll use the Roo shell to install a GWT user interface in your Course Manager application, and then we’ll walk through the implementation. In future MEAP (Manning Early Access Program) posts we’ll outline how to customize the scaffolded interface elements.
7.2.1. The GWT Course Manager
Roo provides a simple, one-line installation command, gwt setup, that installs the GWT compiler, server-side infrastructure, and build instructions. You’ll use your Course Manager Roo starter schema to build out a GWT application. You’ll create a project and run the course-manager-schema-setup.roo script (available in the Example-Code/roo-scripts directory) to prep your application configuration. Then use the one-line command to install GWT:
roo> web gwt setup
Roo responds by building out your GWT application, installing the GWT Maven plug-in and dependencies in the pom.xml file, and generating a scaffolded GWT web application.
You’ll need to decide whether you want to let Roo generate your GWT components using a scaffold, or whether you want to roll your own. Table 7.1 lists the commands you can use to set up your GWT code.
Table 7.1. Roo GWT commands
|
Shell command |
Functionality |
|---|---|
| web gwt scaffold | Generates all code for a single entity. |
| web gwt all | Generate scaffolds for all entities. |
| web gwt proxy web gwt request |
These commands can be used to create and maintain the infrastructure for remoting your entities, but allow you to write your own GWT frontend code. |
| web gwt gae | Installs or updates your GWT environment and adds or updates support for Google App Engine. |
These commands may take one or more of these options:
- --proxyPackage—The GWT proxy classes will be located in this package.
- --requestPackage—The GWT request classes will be generated here.
- --type—The Roo entity to scaffold.
After the GWT application is generated, or you’ve developed your GWT code to suit, Roo is able to execute your GWT application from the Maven command line. Go ahead and execute it by running the following commands:
mvn gwt:run
GWT cross-compiles Java code into a series of small JavaScript applications, tailored for each supported browser. These applications are referred to as permutations, as you may see during the build phase:
[INFO] Compiling module org.rooina.ria.gwt.ApplicationScaffold
[INFO]    Compiling 12 permutations
[INFO]       Compiling permutation 0...
[INFO]       Process output
[INFO]          Compiling
[INFO]             Compiling permutation 1...
[INFO]       Compiling permutation 2...
....
After a significant amount of processing, the application will start in an embedded Maven Jetty container. GWT automatically detects your browser type and runs the GWT application generated for your environment when you hit the entry point page. Browse to that page now:
http://localhost:8080/course-manager-gwt
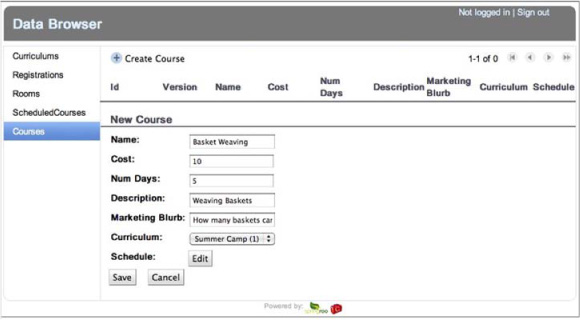
If you use the gwt scaffold or gwt all commands to generate your GWT frontend, the user interface will be ready to test. The frontend presented will act more like a desktop application than a typical website. Figure 7.1 illustrates this with an example of the Courses pane.
Figure 7.1. The Data Browser
GWT and Roo—An Evolving Relationship
As of the current edition of Roo in Action, the GWT add-on is undergoing heavy development, and these notes refer to lots of in-flight features. Please refer to the Roo forums to gain details on the current version of this framework. Also, track any Roo GWT JIRA issues at the Roo project issue tracker at http://mng.bz/rQlu.
You can also run the GWT application out of an exploded EAR by issuing
mvn jetty:run-exploded
In this mode, GWT runs as a web application only, in the same way it will run on web application servers in test or production.
7.2.2. Supporting browser types
GWT frontend applications are built using the GWT APIs and the GWT cross-compiler, which takes the Java and XML code and transforms it into HTML and JavaScript code. GWT has support for every major browser on the market, and even includes support for nontraditional user interfaces such as mobile phones.
Each of these permutations is a copy of the application, targeted for a supported browser type. You can control which browsers you target by modifying your GWT configuration file, ApplicationScaffold.gwt.xml, which is held within the root package in the src/main/java directory of your project.
To target a specific browser only, such as Safari, add the following configuration entry:
<?xml version="1.0" encoding="UTF-8"?>
<!DOCTYPE module PUBLIC "-//Google Inc.//DTD Google Web Toolkit 2.0.1//EN"
    "http://google-web-toolkit.googlecode.com/svn/tags/2.0.1/distro-source/core/src/gwt-module.dtd">
<module rename-to="applicationScaffold">
   ...
   <set-property name="user.agent" value="safari" />
    ...
</module>
7.2.3. Summary—GWT
We’ve looked at Spring Roo’s support for building GWT-based scaffolded user interfaces. The Roo development team worked closely with Google to implement the Model-View-Presenter pattern, and Roo uses the most up-to-date, state-of-the-art version of GWT. The Roo GWT add-on lets developers see what a modern implementation of Google’s RIA platform looks like.
Now let’s move on to another web platform. Roo has support for the standard Java EE web framework, JavaServer Faces.
7.3. Using JavaServer Faces
Roo provides support for JavaServer Faces (JSF), the Java EE web framework, in version 1.2. It allows for selection of the Oracle Mojarra or Apache MyFaces implementations, and can use a number of predefined UI themes.
JSF is a component-based framework, similar in concept to Swing, in that each element of a page is nested inside an outer element, and the user interface is driven by views, rather than a direct controller mechanism.
JSF developers build page beans, which expose data and react to events on a given page. The pages themselves, known as facelets, are composed of containers and components.
Roo uses the PrimeFaces JSF widget library (http://www.primefaces.org), which provides a wide array of JSF components.
Let’s take a look at how to set up JSF as an alternative web framework.
7.3.1. Installing JSF
To install JSF on an existing JAR-based project, use the web jsf setup command:
roo> web jsf setup
Roo responds by installing the JSF framework using the Oracle Mojarra implementation of JSF, with a JSF theme named south-street. Of course, you can override these choices:
roo> web jsf setup --theme  [TAB]
 ARISTO              BLACK_TIE        BLITZER         BLUESKY
CASABLANCA          CUPERTINO        DARK_HIVE       DOT_LUV
EGGPLANT            EXCITE_BIK       FLICK           GLASS_X
HOT_SNEAKS          HUMANITY         LE_FROG         MIDNIGHT
MINT_CHOC           OVERCAST         PEPPER_GRINDER  REDMOND
ROCKET              SMOOTHNESS       SOUTH_STREET    START
SUNNY               SWANKY_PURSE     TRONTASTIC      UI_DARKNESS
UI_LIGHTNESS        VADER

roo> web jsf setup --implementation  [TAB]
APACHE_MYFACES    ORACLE_MOJARRA
You can change these options later if you want to experiment with the other implementation or themes.
7.3.2. JSF installation details
JSF is configured primarily in the web.xml Java EE descriptor file. JSF is not a Spring subsystem, but relies on facelets (views) and page beans to provide their implementation. This means the architecture is inverted when compared with traditional Spring MVC.
Roo installs JSF files in several directories under the src/main/webapp directory, including
- Pages —All JSF pages for your views are stored in here. They’re defined in an XML page format named facelets, which have the extension.xhtml.
- Templates —The header, footer, menu, and container views are based on template files. These files, similar in concept to Tiles components, live here. Face-lets define the templates they use for a given view.
- WEB-INF/faces-config.xml —This file is used in Roo to define localization rules, and defines the directory within WEB-INF where the localization files are stored.
We won’t go into the depths of JSF in this book. There are plenty of resources we can point you to. But let’s take a look at how Roo can scaffold JSF interfaces and dissect a scaffolded view and a page bean.
7.3.3. Scaffolding in JSF
As with Spring MVC, Roo offers scaffolding in JSF. You can use the web jsf scaffold command to scaffold a single entity, or web jsf all to scaffold all entities.
To scaffold all entities at once:
roo> web jsf all --package ~.jsf
To scaffold a single entity:
roo> web jsf scaffold --class ~.jsf.CourseBean --entity ~.model.Course
In either case, Roo will generate page beans and pages in the appropriate directories. Let’s take a look at a typical page bean.
7.3.4. The CourseBean page bean
This file, backed by ITDs, is quite empty:
package org.rooinaction.coursemanager.pagebeans;

import org.rooinaction.coursemanager.model.Course;
import org.springframework.roo.addon.jsf.managedbean.RooJsfManagedBean;

@RooJsfManagedBean(entity = Course.class, beanName = "courseBean")
public class CourseBean {
}
Of course, by now you should assume the heavy lifting is provided by an ITD, and that the ITD is generated by the presence of an annotation. This annotation, @RooJsfManagedBean, defines the entity to scaffold (entity =) and the name of the bean in the container (courseBean).
One of the bean methods, allCourses(), is called when the course view is initially rendered. Here’s a fragment of that method:
public List<Course> CourseBean.getAllCourses() {
  return allCourses;
}
Observant Spring developers will see that these page beans are stateful. Somehow, the allCourses collection was loaded before the view requested the course list.
JSF page beans can be defined as stateful objects, where each instance is closely attached to the view page code that manipulates it. In some ways, this is a simpler, more Swing-like programming model than the typical MVC approach.
Table 7.2 outlines some key methods generated by the scaffolding.
Table 7.2. Key scaffolded page bean methods
|
Method name |
Usage |
|---|---|
| init() | In Roo, provides the field properties used for the fields within the view. |
| getters/setters for properties | Used to set or fetch the values of a single edited entity value. These methods are called to data-bind the form fields of the form view to the page bean before persisting or displaying a single entity. |
| getAllCourses() | Displays the values for the list view of the page. |
| populateViewPanel() | Creates the JSF widgets, dynamically, to define the elements of a single entity view dialog. |
| populateCreatePanel() | Creates the JSF widgets to show a single entity create dialog. |
| populateEditPanel() | Creates the JSF widgets to show a single entity editing dialog. |
JSF uses these methods and a number of others to manage the JSF view. More advanced JSF users may choose to remove the dynamic widget definitions from the populate methods and define them in the view itself by pushing in the method and modifying the code in the bean’s Java class.
Now let’s take a quick look at the JSF facelet for your course page bean.
7.3.5. The Course page view
We won’t go into the deep details of the page view, but keep in mind that it handles processing for the entire view. And, unlike JSP-based views, the Roo JSF facelets contain views for all CRUD operations in the same.xhtml page.
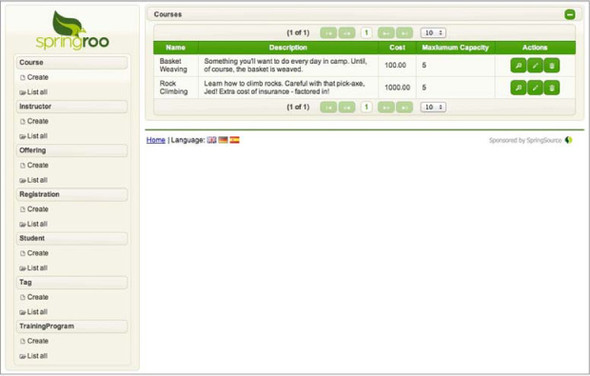
Figure 7.2 shows the page layout of the JSF user interface, and displays the Course list scaffolded view.
Figure 7.2. The JSF layout—course listing view
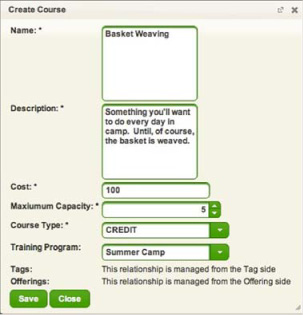
Roo uses a mechanism similar to the MVC list view, embedding all columns in each row and providing icons to delete, edit, and view each row in a form view. There’s currently no create icon; you’ll have to use the Create menu option to trigger the operation. The form views are essentially modal dialogs, as shown by the create view in figure 7.3.
Figure 7.3. The Course list view
Because this is a new web framework implementation for Roo, expect a number of changes in the view configuration.
7.3.6. The facelet itself
Let’s take a quick look into a few elements of the facelet view, WEB-INF/ pages/course.xhtml.
First we’ll take a look at the list view. This is provided by the table of results and is bound to the getAllCourses() method in the page bean as shown next.
Listing 7.2. The Course list view
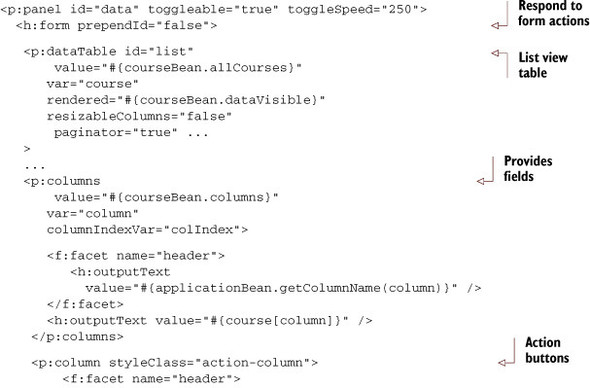
The list view is driven by the getAllCourses() method in the backing bean. The fields are provided using the Java EE @PostConstruct method init(), which you can push-in and customize to provide a custom list of fields to display.
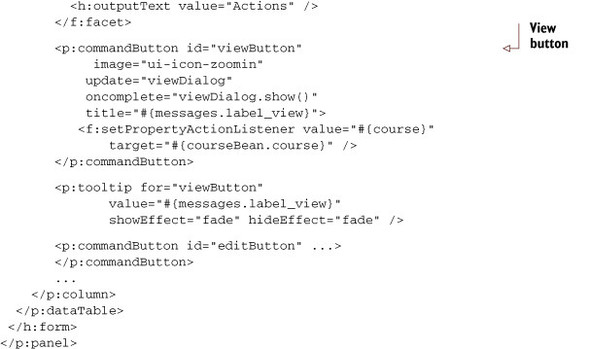
A column is defined with the various action buttons, such as view, edit, and delete. Events are bound, such as the backing bean viewDialog method, which constructs the components to display a view.
The appeal of JSF is the use of a view to provide the driving force for events. Rather than relying on a controller to intercept the FORM post and determine the view to display, JSF components are driven from the view outward, with the view defining which events are bound and methods are called.
To wrap up, let’s look at one of the embedded dialogs, the create dialog, which lives within the panel just after the list view definition:
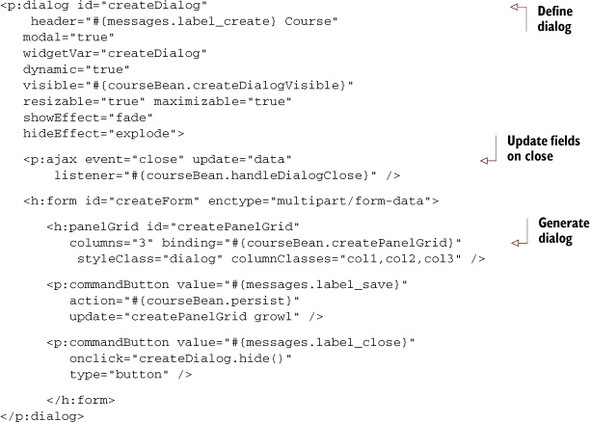
The code created for the rest of the JSF implementation is beyond the scope of this book, but you can see the patterns in the example. The dialog is defined in the backing bean, and is invoked when one of the grid action buttons is clicked.
Although support for JSF is early, the feature set is rather complete, and you have the ability to define your own custom JSF views as needed.
7.3.7. JSF developer guidelines
Unlike MVC, the JSF add-on takes a slightly different approach to scaffolding. You don’t have the z= tags anymore. If you’re adding additional tag elements to the view, be careful not to remove the form views for editing, creating, and viewing.
As with Spring MVC, you don’t have to use the scaffolding; just drop your views and page beans in the appropriate places and go to work. The best way to learn is to push-in a page bean and review the interaction between it and the facelet it backs.
7.4. Other Roo UI frameworks
Roo provides support for several other key frameworks. They range from HTML and JavaScript-based frontends to platforms such as the Flex API. Here are some you may wish to research:
- Spring Web Flow —Roo provides support for building flow-based applications using Spring Web Flow. Using web flow setup from the Roo shell, you can get Roo to generate the proper installation scripts, and mount a new Web Flow script. Visit our book website (manning.com/rimple) for some examples and an article describing how to use Spring Roo with Web Flow.
- Vaadin (http://www.vaadin.com) —Based on GWT’s component model, but implemented in a more lightweight fashion, Vaadin is a very interesting platform. The developers originally distributed a Roo add-on for Roo 1.1. Vaadin includes a set of Eclipse IDE extensions to perform drag-and-drop editing of components and user interfaces. Check out the add-on using the addon search command, which we discuss in chapter 11.
- Flex —Flex is a true client/server development platform when coupled with a smart application tier such as Roo. The Roo Flex add-on, which configures Spring BlazeDS remoting (a super-fast binary API), is currently being taken over by the Roo community. As of the time of this writing, it doesn’t work out of the box with Roo. Check the Flex forum on SpringSource.org for details on the current state of the add-on. Flex users don’t need to use the Flex Roo add-on to program in Flex. They can just install the powerful Spring BlazeDS library directly and use it themselves. However, once the Flex add-on is finalized, Flex developers can enjoy automatic scaffolding of entities in Flex ActionScript and manual or scaffolded user interface views.
Write Your Own Web Framework Integration
You may develop your own Roo add-ons to support web frameworks such as Wicket, Stripes, and others. Refer to the source code of the Spring MVC, WebFlow, JSF, and GWT add-ons to see how it’s done. We cover how to write your own Roo add-ons in detail in chapters 11 and 12.
More web and rich internet platforms will surely appear in the future, so make sure you keep up to date with the Roo add-ons by visiting the Roo forums.
7.5. Summary
Spring Roo has support for a number of rich internet APIs. From roll-your-own JavaScript and Ajax components and using Spring’s excellent support for partial server requests, to the embedded rich web components and Ajax libraries in Spring JavaScript and Dojo, to sophisticated frameworks like GWT, Vaadin, and Flex, you have tons of options to choose from.
If you’re looking to support a rich user interface but don’t want the sophistication of a GWT or Flex approach, the Dojo and/or other JavaScript toolkit approaches will serve you well. But it would be wise for your team to bone up significantly on JavaScript mastery, because there are many pitfalls awaiting the Java developer who attempts to treat JavaScript as just another programming language. Crockford’s JavaScript, the Good Parts is an essential read.
If your development team consists mostly of Java Swing developers, GWT is a great alternative to the HTML/CSS/JavaScript programming model. The downside is that the current MVP design causes a ton of code generation and can be difficult for the uninitiated programmer to approach. A more easy-to-grasp alternative is JSF, because it nests in the same way Swing components do, and has a component-driven lifecycle.
7.6. Resources
Books
- There are a number of books available on Dojo, including Mastering Dojo: JavaScript and Ajax Tools for Great Web Experiences, by Rawld Gill, Craig Riecke, and Alex Russell (The Pragmatic Programmers, 2008), and Getting StartED with Dojo by Kyle Hayes and Peter Higgins (Springer-Verlag, 2010), which also includes a very good introduction to JavaScript.
- For JavaScript, Douglas Crockford’s JavaScript, the Good Parts (O’Reilly, 2008) is essential reading. Also see Secrets of the JavaScript Ninja (Manning Publications, 2008) by John Resig, or the new Third-Party JavaScript (Manning Publications, 2012) by Benjamin A. Vinegar and Anton A. Kovalyov, both of which are in Manning Early Access status at the time of this publication.
Web
- For more information about Dojo, visit http://dojotoolkit.org.
- The folks at SitePoint (http://www.sitepoint.com) support and write about Dojo.
- Douglas Crockford has abundant resources, including extensive videos, at http://www.crockford.com.