
Chapter 3. Database persistence with entities
In the last chapter, we discussed Spring Roo from a developer’s perspective. We discussed the various component types, and how the Roo shell creates and maintains objects in your projects, hiding tedious, repetitive code behind AspectJdriven.aj files.
In this chapter, you’ll learn how to store and load data from relational databases. You’ll start by defining object-relational mapping (ORM) APIs and the standard Java Persistence API, and then learn how to configure persistence in a project using the Roo shell. Next, you’ll define Roo entities, which are an enhanced version of the standard JPA Entity class. You’ll create entity components in the shell, and we’ll show you how to load, persist, and remove them, using Roo’s JUnit-based integration test framework.
Next, you’ll use the Bean Validation Framework to configure automatic data validation in your entities. We’ll discuss both built-in and custom validations, and how to provide validation messages. We’ll discuss finders—methods that allow for searching for properties within a Roo entity. We’ll wrap up by discussing JPA Repositories.
3.1. Your business objects and persistence
No matter how cool your application architecture is, it often boils down to loading data from a database, editing it, and then saving it back again with changes from the user or external system. The challenge is to get the data to flow between your object-driven Java application server and the relationally mapped database server.
3.1.1. The Java Persistence API
The Java Persistence API, or JPA for short, was created to provide a standard programming interface for object-oriented database mapping. Hibernate, EclipseLink, Open-JPA, and other frameworks implement the JPA 2.0 specification, which allows developers to write code to a single API regardless of the implementing vendor. JPA defines the following components:
- The JPA entity —A Java class that’s mapped to a database table, using either annotations or XML.
- The persistence context —A storage area assigned to an individual session or thread, this is the workspace that keeps track of changes to relational data.
- Persistence annotations —The javax.persistence.* annotations define mapping instructions such as tables, relationships, primary key generation techniques, and query mapping.
- The EntityManager API—Provides access to a persistence context.
- The JPA configuration file —JPA-compliant ORMs are configured using the special file, META-INF/persistence.xml.
JPA was originally developed as part of the Java EE 1.5 specification, as a replacement for the more vendor-specific and heavyweight Enterprise JavaBeans. Spring provides a factory to configure the JPA API, whether or not the Spring application is running as a standalone application or within a Java EE application server like WebSphere or JBoss.
More on the Java Persistence API
Although a full review of JPA is beyond the scope of this book, Spring Roo uses JPA 2.0, which is documented as part of the Java community process. The specification, JSR-317, is available at http://mng.bz/FU7w. There are a number of books available on the subject of JPA 2.0.
Now let’s use the Roo shell to set up JPA. Then you can get started coding against relational databases, Roo-style.
3.1.2. Setting up JPA in Roo
Configuring JPA in a traditional Spring project involves setting up various configuration elements and programming directly to the JPA API. Spring Roo configures all of these features for you using the jpa setup command. This command will configure a JDBC DataSource, Spring transaction management features, the JPA 2.0 API, JPA entities, inter-type declarations, and validations via the Bean Validation Framework. You don’t even have to manually wire up a configuration at all!
In this chapter, you’ll begin to configure your application, the Course Manager, which manages a set of courses for a fictitious training company. If you’re following along, you can start by creating your own project with the project command, naming the project coursemanager.
Let’s use the jpa setup command to set up your database. We’ll assume you don’t have a database engine installed on your machine; for simplicity, let’s use the Hypersonic SQL standalone database. Here’s the proper Roo shell command. We’ll assume you’ve already set up the project itself with the name of coursemanager and a base package of org.rooinaction.coursemanager:
roo> jpa setup --database HYPERSONIC_PERSISTENT --provider HIBERNATE
Save Some Typing
Remember, in the shell, you can type the first two or three characters of this command—for example, jp [TAB]—and Roo will complete the command for you. This goes for your options and values as well. You can type -- [TAB] to see what options are available, and when when an option such as database is selected, you can hit [TAB] to get the available options.
As we described in the quick-start in chapter 2, the jpa setup command performs a number of configuration steps. Roo will
- Include the dependent JAR files in your Maven pom.xml configuration file for the selected JDBC driver, the JPA API, and a number of Hibernate JARs (and their dependencies)
- Configure a JDBC data source, Spring transaction manager, and a Spring JPA configuration in META-INF/spring/applicationContext.xml
- Configure META-INF/persistence.xml with settings relating JPA to the database using Hibernate configuration settings
- Install the JSR-303 Bean Validation Framework, which provides annotation-based validations
Let’s look at the jpa setup command in a little more depth. Listed in table 3.1 are the key parameters.
Table 3.1. JPA setup command parameters
|
Option (prefixed with) |
Required |
Options/Notes |
|---|---|---|
| provider | Yes | The JPA provider to configure. Includes HIBERNATE, ECLIPSELINK, OPENJPA, and DATANUCLEUS (required for use with Google App Engine). |
| database | Yes | The database to configure. DB2, DERBY, ORACLE, SYBASE, MSSQL, HYPERSONIC_PERSISTENT, and many more. Please note: Oracle and some other proprietary database drivers aren’t provided by the Maven public repository. You’ll have to manually install the Oracle driver by downloading it, installing it into Maven manually, and adjusting the pom.xml file to reference the appropriate groupId, artifactId, and version of the installed JAR. |
| applicationId | No | For Google App Engine (DATANUCLEUS) provider, the Google application ID. |
| hostName, databaseName, userName, password | No | Values to override that are set in src/main/resources/database.properties. |
| jndiDataSource | No | If using JNDI, the data source to reference in your Java EE application server. For JDBC data sources this isn’t required. |
| persistenceUnit, transactionManager | No | Advanced usage. You can use several data sources, each linked to individual transaction managers. For each one, a separate JPA environment is set up. The --persistenceUnit parameter names the JPA environment, and the --transactionManager specifies which Spring transaction manager to use. We don’t cover this configuration in the book. |
Using [TAB] completion, you’ll be prompted for the appropriate parameters. The most useful options of course are --provider and --database. Of particular note, when running Spring Roo on an application server such as WebSphere, WebLogic, or JBoss, you can take direct advantage of a JNDI data source; just put the proper data source name in the --jndiDataSource option.
You can run the jpa setup command over and over again. Each time it will replace the configuration entry and reconfigure JPA to support whatever settings you’d like to change. This makes the ORM implementation changeable without affecting your code, and lets you mix and match combinations of the various persistence providers and JDBC drivers to find the best fit for your application. Note that this will rewrite your database.properties file, so be prepared to reenter your connection information.
One way this makes your life easier as a developer is that you can quickly get going using HIBERNATE against a HYPERSONIC_PERSISTENT database to provide a simple relational database. Later, you can modify your persistence provider by running again and selecting another JPA vendor such as ECLIPSELINK or OPENJPA. Later, when setting up your desired environment’s database, you may switch to ORACLE, MYSQL, or any other database supported by your ORM provider.
When using Google’s cloud database, you would use DATANUCLEUS to support running Roo on Google App Engine.
Your database properties are configured and stored in database.properties, located in src/main/resources/META-INF/spring. Colons (:) may be escaped in the file with a preceding backslash (). To view, change, or set properties, either edit the file yourself, or use the Roo properties shell commands. To view properties, issue the properties list command:
roo> properties list --name database.properties --path SPRING_CONFIG_ROOT
databasedriverClassName = org.hsqldb.jdbcDriver
databasepassword =
database.url = jdbc:hsqldb:file:coursemanager;shutdown=true
database.username = sa
To add a property, use properties set:
roo> properties set --name database.properties --path SPRING_CONFIG_ROOT --key password --value f00b@r
Updated SRC_MAIN_RESOURCES/META-INF/spring/database.properties
To remove a property, use properties remove:
roo> properties remove --name database.properties --path SPRING_CONFIG_ROOT --key password
Updated SRC_MAIN_RESOURCES/META-INF/spring/database.properties
The properties shell command can manipulate any properties file, and takes a symbolic --path attribute for the various paths in a Roo application. Explore it with tab completion to view various files in your application.
3.1.3. Schema management settings
Another file Roo creates for you is the standard JPA configuration file, META-INF/persistence.xml. JPA uses this file to configure the persistence unit, or JPA configuration, to use when accessing the database. In the current example, this file passes along configuration parameters to your selected ORM API, Hibernate. You can use this file to send configuration information to the ORM layer, controlling settings such as schema generation.
When using Hibernate, the hibernate.hbm2ddl.auto property controls whether the tables are re-created on startup. It can be found within a <properties> tag:
<property name="hibernate.hbm2ddl.auto" value="create"/>
The settings available include create, create-drop, update, validate, and none. Here’s a list of the settings:
- create—This creates the database tables on startup. Drops them first if they already exist.
- create-drop—This creates the database tables on startup. On shutdown, Hibernate will attempt to drop the tables.
- update—Only adds new fields and tables to the schema; doesn’t remove existing columns or tables if removed from the Hibernate table definitions.
- validate—Uses the discovered table definitions to validate the database model. If any table or field is incorrectly named, typed, or configured, throws an exception and reports the problem. This is good if you’re using Hibernate against a preconfigured database.
- none—Does no validation or modification of the database on startup. Can speed startup against a known database but often developers choose validate to spot changes in the database that may cause problems against the defined schema.
The default setting, create, drops and re-creates tables on startup. Change this value to update to allow restarting your application and preserving existing data, since Hibernate won’t delete the data from the tables for you automatically. Note that this option won’t delete columns you remove from your mappings; it will only add or alter existing columns.
Other persistence APIs have differing options. For example, when configuring EclipseLink, Roo defines this property to determine whether to drop or create tables:
<property name="eclipselink.ddl-generation" value="drop-and-create-tables"/>
As you switch JPA drivers, Roo will define the appropriate DDL generation configuration syntax for you automatically.
Now you’re ready to start creating some entities and writing some code. You’ll start by defining the courses for your Course Manager application.
3.2. Working with entities
The Course Manager application primarily focuses on delivering courses to students. In this section, you’ll define the Course class as a persistent entity and configure it with the appropriate fields. We’ll then discuss how to use and test the Course in a Roo application.
3.2.1. Creating your first entity
Let’s define the Course entity, which will hold your course definitions. If you were doing this by hand, you would have to annotate a class with @Entity and define primary key attributes such as @Id and perhaps a @GeneratedValue annotation to handle key generation. Also, you’d have to define field settings, table names, and other settings via the javax.persistence annotations.
But here’s some good news! The Roo shell has a command for that, jpa entity. You can open up the Roo shell and execute this:
roo> entity jpa --class ~.model.Course --testAutomatically
Created SRC_MAIN_JAVA/o.r.c/model
Created SRC_MAIN_JAVA/o.r.c/model/Course.java
Created SRC_TEST_JAVA/o.r.c/model
Created SRC_TEST_JAVA/o.r.c/model/CourseDataOnDemand.java
Created SRC_TEST_JAVA/o.r.c/model/CourseIntegrationTest.java
Created SRC_MAIN_JAVA/o.r.c/model/Course_Roo_Configurable.aj
Created SRC_MAIN_JAVA/o.r.c/model/Course_Roo_ToString.aj
Created SRC_MAIN_JAVA/o.r.c/model/Course_Roo_Jpa_Entity.aj
Created SRC_MAIN_JAVA/o.r.c/model/Course_Roo_Jpa_ActiveRecord.aj
...
~.model.Course roo>
Roo just created your Course entity, a suite of AspectJ ITDs to manage it, and a set of files for testing purposes. This includes the integration test and a strangely named series of files labeled DataOnDemand—we’ll get to those later. For now, we’ll focus on adding fields to the generated Course entity. Here it is:
package org.rooinaction.coursemanager.model;

import o.s.roo.addon.javabean.RooJavaBean;
import o.s.roo.addon.jpa.activerecord.RooJpaActiveRecord;
import o.s.roo.addon.tostring.RooToString;

@RooJavaBean
@RooToString
@RooJpaActiveRecord
public class Course {
}
Rather short, isn’t it? We’ve abbreviated org.springframework to o.s. in the imports to save space. We’ll cover the Roo annotations and what they mean shortly, but for now, you need to define the fields in order for this class to be useful to anybody.
What’s with the Extra Stuff in the ROO> Prompt?
See how the Roo shell prompt moves from roo> to ~.model.Course roo> when you create the Course entity? That’s because the shell keeps the context of the last entity it’s been working on, known as the focus. Any modifications you make, such as adding additional fields, will take place with that entity by default. You can set the focus on a particular entity by using the focus command, or use the --class option when creating a field element.
Even though you don’t know how Roo does it, you probably figured out from the annotations that Roo provides several automatic services for this entity: something about JavaBean support, a toString() method, the JPA code, and an equals method. Each of these resides in a separate ITD:
Course_Roo_Configurable.aj
Course_Roo_Jpa_ActiveRecord.aj
Course_Roo_Jpa_Entity.aj
Course_Roo_ToString.aj
We’ll talk about all of those things in a little bit. But for now, let’s go ahead and add some fields to this entity.
3.2.2. Adding fields to the Course
To add database fields to the Course entity, you use the field shell command. This command adds the appropriate variables to your Course.java class, and also maintains the various generated methods in your Course ITD files.
Let’s add five fields to the Course:
field string --fieldName name
field number --fieldName listPrice --type java.math.BigDecimal
field string --fieldName description
field number --fieldName maximumCapacity --type java.lang.Integer
field date --fieldName runDate --type java.util.Date --persistenceType JPA_DATE --dateFormat SHORT
With these five commands, you’ve just added five fields to the Course class: name, description, listPrice, maximumCapacity, and runDate. Let’s take a bird’s-eye view of the Course.java entity Roo just updated.
Listing 3.1. The Course entity
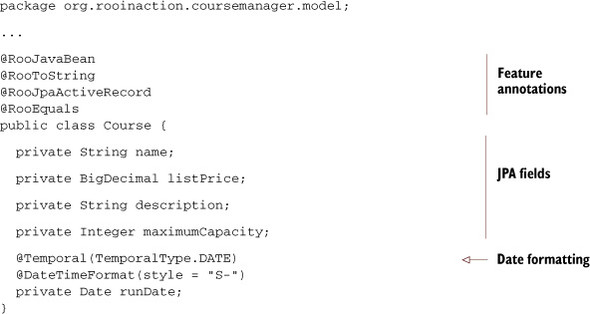
Let’s walk through each of the key features of the Roo entity defined in the listing. For each feature, we’ll show the code snippet that corresponds to the feature itself.
Javabean Support
All Roo entities are automatically Java beans. For example, the fields you’ve defined via your command are implemented as private member variables:
private String name;

private BigDecimal listPrice;

private String description;

private Integer maximumCapacity;

...
Though you see no getters or setters, Roo has generated them, in the Course_Roo_JavaBean.aj file:
privileged aspect Course_Roo_JavaBean {

    public String Course.getName() {
         return this.name;
    }

    public void Course.setName(String name) {
         this.name = name;
    }

    public String Course.getDescription() {
        return this.description;
    }

    public void Course.setDescription(String description) {
        this.description = description;
    }
...
}
Roo built this file when it detected at least one private member variable in your class definition, which was annotated with @RooJavaBean.
Date Conversion
Roo can handle date conversion issues. For example, the runDate field uses two annotations, @Temporal and @DateTimeFormat:
@Temporal(TemporalType.DATE)
@DateTimeFormat(style = "S-")
private Date runDate;
The @Temporal annotation tells JPA that this is a date field. Roo did this for you when you defined the field with field date. Roo also added the TemporalType.DATE parameter when you used the field option --persistenceType JPA_DATE. Finally, the @DateTimeFormat annotation was generated based on the --dateFormat SHORT option, which will help Spring MVC and other user interfaces parse and format the date. We’ll discuss this in more detail in chapter 6.
Database Code
Roo also detected the @RooJpaActiveRecord annotation, added as part of the standard jpa entity command:
@RooJpaActiveRecord
public class Course {
  ...
}
In response, Roo generated three files:
- Course_Roo_Configurable.aj, which provides basic Spring bean support when creating new instances of the Course automatically
- Course_Roo_Jpa_ActiveRecord.aj, which provides helpful JPA-based methods such as findAll(), countCourses(), and persist()
- Course_Roo_Jpa_Entity.aj, which provides an automatically defined JPA primary key, id, and a version field to detect changes made to stale data
You’ll see later in the chapter how Roo can also generate true JPA repositories, in a more traditional tiered approach to application software development. In that case, a different combination of ITDs are generated.
String Representations of Entities
A common task in programming involves printing the string representation of data within a given object. Roo provides this feature using the @RooToString annotation:
@RooToString
This annotation tells the Roo shell to generate a toString() method in the Course_Roo_toString.aj ITD. This a typical informational method, useful for logging or diagnostic information. Here’s the one generated for the Course entity:
privileged aspect Course_Roo_ToString {

  public String Course.toString() {
    return ReflectionToStringBuilder.toString(
           this, ToStringStyle.SHORT_PREFIX_STYLE);
    }

}
Roo 1.2 uses the Apache commons-lang3 library to generate the string using reflection. If you don’t like this strategy, you can push-in the toString() method and/or remove the annotation, and write your own.
Putting It All Together
Let’s take a bird’s-eye view of the ITDs as they relate to the Course entity. Figure 3.1 shows how the generated ITD files relate to the Course class.
Figure 3.1. Course ITDs
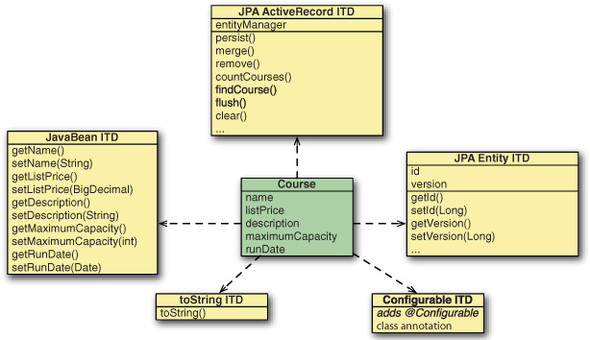
Roo provides you convention-over-configuration, but without doing it dynamically. All of these files are viewable, and with Roo’s support for push-in refactoring, you can migrate any generated method to the Course Java source file itself and override the implementation.
This approach gives the developer visibility of the key details, such as the course fields themselves, and relegates the boilerplate code to the ITDs; an elegant, but accessible approach.
Browse Source in Eclipse/Springsource Tool Suite
If using STS/Eclipse, use CTRL-SHIFT-T (CMD-SHIFT-T on Mac) to bring up the class browser and type in the Course class name. You can enter fragments of your class name to look up the entries (even using the capital letters only) to locate a class. And you can use this shortcut (or CTRL/CMD clicking on a class name) to browse the open source frameworks (JPA, Bean Validation, Spring) the entity is based on.
3.2.3. Adding the course type enum
Let’s add one more field: an enumerated data type, courseType. You’ll support seminars, courses for college credit, and continuing education seminars:
enum type --class ~.model.CourseTypeEnum
Created SRC_MAIN_JAVA/org/rooinaction/coursemanager/model/CourseTypeEnum.java
 ~.modelCourseTypeEnum roo>
When you create the CourseTypeEnum field, you’ll see Roo change the shell’s focused type to ~.model.CourseTypeEnum, so that your next command, enum constant, operates on that type.
Now, let’s add the fields:
enum constant --name SEMINAR
enum constant --name CREDIT
enum constant --name CONTINUING_EDUCATION
Browse to the class, which looks like
package org.rooinaction.coursemanager.model;
public enum CourseTypeEnum {
    SEMINAR, CREDIT, CONTINUING_EDUCATION
}
Do I Need to Use Roo to Create Simple Classes Like Enums?
No, but for setting up model objects it’s a way to script the creation process. You can just build your Java classes normally, even adding Roo annotations, and the Roo shell will keep up, manipulating ITDs as needed.
Now you’ll add the field to your entity, using that enum type. First, you’ll switch the focus back to your Course,
focus --class ~.model.Course
and then you’ll add the field:
field enum --fieldName courseType --type ~.model.CourseTypeEnum --enumType STRING
Roo adds the following field definition to Course:
@Enumerated(EnumType.STRING)
private CourseTypeEnum courseType;
Do it by Hand!
You can also skip the Roo commands and add this property by hand. Roo will update the Course_Roo_JavaBean.aj ITD to add the appropriate getters and setters.
Now you can use CourseTypeEnum to define values for your courseType field. While not always practical, this is handy for values that don’t often expand, such as Boolean selections and static discrete values (active/inactive, normal, warning, error). In coming chapters you’ll see how to establish relationships between Course and other tables, and how to use the user interface to expose lists of values to select from.
Isn’t all of this Code Slow?
No. Remember, all of these ITD files are woven into the class at compile time using the Maven AspectJ compiler. As such, the code is compiled into the Course directly. Roo projects have the same runtime dependencies as normal JPA projects, with no Roo runtime libraries.
So far, so good. Now let’s actually write some code to use our Course. As you’ve seen above, the @RooJpaActiveRecord annotation generated all of the JPA code we need. In fact, technically it is already built into the class itself.
3.2.4. Exercising the Course entity
In chapter 5, we’ll explore how Spring Roo can help you quickly build web applications to interact with your newly created JPA Course entity. But rather than make you wait, and in the spirit of testing early and often, let’s use the power of Roo’s Active Record persistence API to interact with your model.
Let’s write some code in the automatically generated JUnit test class, Course IntegrationTest.java, to exercise the API. The Roo shell created this class when you specified --testAutomatically on the entity jpa command. Here’s the class definition:
package org.rooinaction.coursemanager.model;

import org.junit.Test;
import org.springframework.roo.addon.test.RooIntegrationTest;

@RooIntegrationTest(entity = Course.class)
public class CourseIntegrationTest {

  @Test
  public void testMarkerMethod() {
  }
}
Looks pretty empty, doesn’t it? Actually, it’s backed by an AspectJ ITD, CourseIntegrationTest_Roo_IntegrationTest.aj, which is chock-full of tests against the methods in the entity ITDs, thanks to the Roo shell and the @RooIntegrationTest annotation.
Here’s a small fragment of generated test ITD code for one of the methods, testPersist():
@Test
public void CourseIntegrationTest.testCountCourses() {
   Assert.assertNotNull(
      "Data on demand for 'Course' failed to initialize correctly",
      dod.getRandomCourse());

  long count =
    org.rooinaction.coursemanager.model.Course.countCourses();

  org.junit.Assert.assertTrue(
     "Counter for 'Course' incorrectly reported there were no entries",
      count > 0);
}
This method woven into CourseIntegrationTest, checks to see that the test data is initialized, calls the Course entity ITD method countCourses(), and then checks to make sure that courses are returned.
We’ll get to how this all works in a moment. First, you should probably run the tests:
- Maven users —Issue an mvn test OS shell command from the root of the Roo project, or issue the Roo shell command, perform tests.
- STS/Eclipse —Right-click on the CourseIntegrationTest class, select Run As... and then select JUnit Test. The more adventurous among you may want to use Debug As... instead and set breakpoints, tracing through the code. We encourage this!
You’ll see a number of tests execute (and hopefully pass). To review the test output, Maven users can browse the project’s target/surefire-reports directory and review files for each test, ending in.txt, and STS users can review the JUnit Runner output in STS, illustrated in figure 3.2 in the STS JUnit test results view.
Figure 3.2. Tests from the Roo entity test framework

We’ll discuss the Roo integration test framework in greater detail in chapter 9. For now, you’ll use it to form a base for running your own integration tests, so that you can exercise your newly created Course entity.
Not only can you run your tests without leaving the shell with perform tests, but Roo provides some other very useful perform commands:
- perform package—This packages up your application. In this stage, being only a JAR file, the application will merely be a JAR of all classes and resources, but when deploying to the web, this command will create a WAR file. The packaged JAR will live in the target directory.
- perform assembly—If you’ve configured the Maven assembly plug-in (to distribute a ZIP file for example), this command will perform that action.
- perform clean—This will clean the project by removing the target directory.
- perform command—Executes a specific Maven lifecycle command or plug-in goal (for example, perform command --mavenCommand pmd:pmd will run the PMD code metrics report).
Roo 1.2 also includes the handy ! command to execute any operating system command. For example,
roo> ! ls target
on Unix-like systems will execute the ls command to list files in the target directory.
3.2.5. Exploring the Course entity API
You might be thinking that this is all smoke and mirrors. You may also be concerned that the code isn’t optimally written. To allay your fears, we’ll dig a bit deeper and review the JPA code that Roo generates.
For example, the testPersist(Course) and testFindCourse(Long id) methods in the CourseIntegrationTest ITD exercise the methods persist(Course) and findCourse(Long id). But if you look inside Course.java you don’t see anything but your attributes. You need to find and review the generated code. As we mentioned before, this code is hidden within AspectJ ITD files.
Let’s review a JPA entity method. Look at Course_Roo_Jpa_ActiveRecord.aj, located in the org.rooinaction.coursemanager.model package of the src/main/java directory. Review the Course.persist() method, which should be similar to the following code:
@Transactional
public void Course.persist() {
  if (this.entityManager == null) this.entityManager = entityManager();
  this.entityManager.persist(this);
}
This is a simple method that calls the persist() JPA method. JPA developers will note that the entityManager is held as a member variable, which is defined in the ITD. This means each instance of a Course can persist itself. Although this method looks simple, the key benefit of Roo’s entity ITD code is that you’re not directly writing JPA code yourself.
The Active Record Pattern
By default, Roo uses a design pattern for entities called Active Record. This pattern was defined by Martin Fowler in the book, Patterns of Enterprise Application Architecture (see http://mng.bz/7pG8). In this pattern the entities are treated as first-class objects that contain their own data, and know how to load and persist themselves. You’ll see later how they can even implement their own validation rules.
If Spring Roo needs to modify the code for persisting the data in a future version, your calling code doesn’t have to change. And although this is code you’d normally have to write yourself, why should you? It is purely mechanical. Another method findCourse(Long id), looks like this:
public static Course Course.findCourse(Long id) {
  if (id == null) return null;
  return entityManager().find(Course.class, id);
}
This static method fetches a Course by the primary key value. Roo works a little harder here; JPA stipulates that if the row isn’t found, it returns null, but Roo also returns null if the primary key passed in is null as well.
What is this Static Entitymanager() Method?
This method constructs an empty Course and then returns the Spring-injected entityManager instance. If you write static helper methods for your entities, you can just use the entity-Manager() method to fetch a valid entity manager to use for persistence.
How was Roo able to inject a JPA entity manager into a brand-new, developer-created Course instance? The secret is that Roo entities are annotated with the @Configurable annotation, woven into the definition by the Roo_Jpa_ActiveRecord.aj ITD. The @Configurable annotation, coupled with Spring’s <context:component-scan /> configuration element, triggers Spring’s dependency injection when an instance is instantiated by a constructor, rather than by Spring itself.
How many times do you think you’ve written methods like that by hand? Roo automatically defines it for you, assuming you’ll likely need to use it in the future. And it does it the same way for all Roo entities, by default.
3.2.6. Roo’s Active Record entity methods
Let’s review the complete list of Active Record–driven JPA entity methods (as of Roo 1.2) provided in your sample Course_Roo_Entity.aj ITD in table 3.2.
Table 3.2. Some Spring Roo entity methods (example uses as the entity)
|
Method |
Usage |
Comments |
|---|---|---|
| countCourses() | Counts the number of rows in the table that backs the Course entity. | Issues a select count(o) from Course o query and returns the result. |
| findAllCourses() | Queries the entire table and returns as a list. | Be careful not to use this method against tables with many rows. |
| findCourse(Long id) | Returns a single Course by primary key id. | If not found, returns null. |
| findCourseEntries (int firstResult, int maxResults) | Returns a range of courses, starting with the row position (not primary key value) of firstResult, for maxResults rows. | If no rows found, returns an empty list. Used to paginate results in Roo web applications by default. |
| flush() | Forces the persistence provider to issue any SQL statements to update data changed within the persistence context. Note, this includes any entities, not just Course. | May throw validation exceptions if any modified entities have not yet been flushed. |
| clear() | Resets the persistence context and clears any cached entity rows. | Useful for testing purposes. Also useful in conditions where you want to cancel any potential changes that may have been made in the cache before it is flushed. |
| merge() | Updates the data in the persistence context using data provided in the entity. | The merge operation loads data from the database matching the primary key of the detached entity. It then replaces any data in the loaded entity with data from the detached class. Keep in mind that it overwrites data from the data in the database that may have changed since the detached instance was loaded. |
| persist() | Marks an entity as ready to persist in the persistence context. | May throw validation exceptions if the data scheduled is persisted at the time of this call (see section 3.3). |
| remove() | Marks a course for removal in the persistence context. | May cause errors if data constraints are violated. This may not happen when calling this method, as JPA may remove at flush time. |
| entityManager() | Provides access to the JPA entity manager. | You may use this API to provide your own JPA methods in the Course.java source code file. |
The Roo product developers may add more methods in the future. You’ll get them automatically when you upgrade to the newest version of Roo by running the new Roo shell against your existing project.
Other ITDs provide additional generated code. For example, the Course_Roo_Jpa_Entity.aj ITD contains the definition of the primary key and version fields, as well as their getters and setters. You should review all Roo ITDs and become familiar with their APIs, since you can use them directly in code that accesses these classes.
Repositories and Services—Traditional Spring Development in Roo?
If you’re not enamored of the Active Record pattern, you don’t have to work this way. More advanced users can take advantage of Roo 1.2’s repository and service features. We’ll discuss using Spring-based JPA repositories in section 3.5, and transactional Spring services in chapter 4.
Now let’s write some code against the entity API, using Roo’s support for JUnit testing.
3.2.7. Using the entity API
Writing code against the Roo entity API is a cinch. Beyond the automatically generated calls you’ll see when you wire up a Roo web application in chapter 5, you can get started coding right away using JUnit.
Conceptually, working with Roo entities is a straightforward process. For example, to get a list of all Course objects in a method, you’d simply have to write
List<Course> courses = Course.findAllCourses();
To load a Course by ID, modify the class capacity, and update it, you could do this:
Course course = Course.findCourse(1L);
course.setMaximumCapacity(500);
course.merge();
To create a new Course, you only need to construct it, set the fields, and call persist():
Course course = new Course();
course.setName("Stand-up Comedy");
course.setMaximumCapacity(8);
course.setDescription("It'll make you laugh...");
c.setCourseType(CourseTypeEnum.CONTINUING_EDUCATION);
c.persist();
To delete the Course you’ve built, you just call the remove() method:
c.remove();
By now, you should see where we’re going. Roo provides a useful API for the CRUD-based work you usually end up doing in most data-driven applications.
3.2.8. Writing a JUnit Roo entity test
Let’s try adding a course and retrieving it from the database using your pregenerated JUnit test. Add the following method to the CourseIntegrationTest.java class as shown here (use your IDE’s Fix Imports feature to discover the org.junit.Assert static import as well as the org.springframework.transaction.annotation.Transactional annotation):
Listing 3.2. Adding and fetching a Course
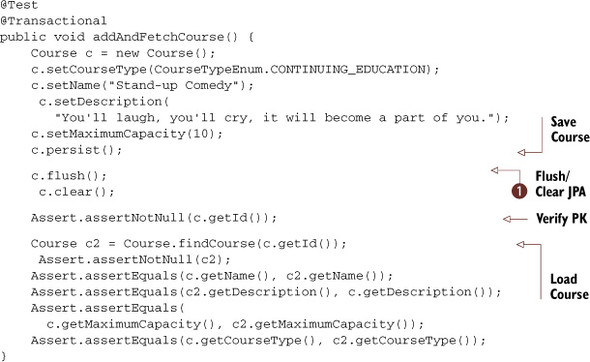
In the preceding sample, you create a new Course, set the fields to valid values, and persist it to the database. You flush and clear your persistence context ![]() , which executes the SQL INSERT statement to persist the data to the database and clears the cached entity. This detaches the Course instance, c, but at the same time fills in the primary key value in the id field.
, which executes the SQL INSERT statement to persist the data to the database and clears the cached entity. This detaches the Course instance, c, but at the same time fills in the primary key value in the id field.
Finally, you query for the same data using the Course.findCourse(Long id) method, and make sure that it was saved appropriately using assertions to check the field values. Not too shabby for just a few lines of code.
Roo marks the test class as @Transactional (which you can find in the Test ITD), so that the unit tests automatically roll back any changes. You can test this code again and again without worrying about adding duplicate data rows. This is a Spring Framework test best practice, automatically implemented by Roo.
Now that you’ve seen some of the power of Roo for creating entities, and some of the code generated by the tool, let’s discuss how to add validation logic to your entity using the Bean Validation Framework.
3.3. Validating Courses with Bean Validation
Validation is a difficult topic for any application architecture. You may ask yourself a bevy of questions, such as these:
- Where do I perform validation—at the web layer, in the middle tier, or in my database?
- How do I validate? Should I use a validation rules engine, scripted code, data-driven rules, or annotations?
- How will my errors be returned? Should I localize the messages?
There are many APIs available to implement validation rules. Spring MVC has it’s own validation API, but it’s MVC-based, and doesn’t necessarily suit itself to embedding rules within the entities. You want to do this, as it helps you to encapsulate the behavior of validation within the entity tier. A more object-driven approach is needed. Enter the Bean Validation API.
The Bean Validation API is a recent standard. Created by the Java EE Expert Group, it was developed to address the lack of a standard validation API on the Java EE platform. This API uses Java annotations to define specific rules, which are attached to attributes of a Java bean. Some validations are built in to the framework, such as @NotNull, @Null, @Min, @Max, @Past, @Future, @Pattern, and @Size. You can also define your own classes for validation purposes, and register custom validation methods using @AssertTrue or @AssertFalse.
3.3.1. Validating Courses
Spring Roo supports automatic validation of Roo entities, if annotated with Bean Validation annotations. Roo entities are automatically validated when a persist or merge method call is executed. Any errors will result in the throw of a Constraint-ViolationException, which contains all ConstraintViolation instances for errors encountered during the validation process.
Let’s redefine the Course entity fields. With the Roo shell already fired up, open up a source code editor and delete all of the field definitions in the Course entity. Then add them back in, this time with Bean Validations:
field string --fieldName name --sizeMin 1 --sizeMax 60 --column course_name
field string --fieldName description --notNull --sizeMax 1000
field number --fieldName listPrice --type java.math.BigDecimal --decimalMin 0.0 --decimalMax 99999.99 --digitsFraction 2 --digitsInteger 5 --notNull
field number --fieldName maximumCapacity --type java.lang.Integer --min 1 --max 9999 --notNull --column max_capacity
field date --fieldName runDate --type java.util.Date --dateTimeFormatPattern MM/dd/yyyy
field enum --fieldName courseType --type ~.model.CourseTypeEnum --enumType STRING --notNull
You’ve just added back in your fields, but this time you set some constraints, as outlined in table 3.3.
Table 3.3. Course entity constraints
|
Field |
Constraint |
Annotation |
Notes |
|---|---|---|---|
| name | --notNull --sizeMin 1 @Size(min = 1, max = 60) --sizeMax 60 |
@NotNull @Size(min = 1, max = 60) |
Sets the minimum and maximum characters of text. |
| description | --notNull --sizeMax 1000 |
@NotNull @Size(max = 1000) |
Must contain a value, and cannot exceed 1000 characters. Note: an empty or all-spaces string is still a value. |
| listPrice | --notNull --decimalMin 0.0 --decimalMax 9999.99 --digitsFraction 2 --digitsInteger 5 |
@NotNull @DecimalMin("0.0") @DecimalMax("99999.99") @Digits(integer = 5, fraction = 2) |
Use --decimalMin and --decimalMax annotations to define validation constraints, and --digitsInteger and --digitsFraction to provide JPA column data settings. |
| maximumCapacity | --notNull --min 1 --max 9999 |
@NotNull @Min(1L) @Max(9999L) |
Note this is a numeric range, whereas sizeMin/sizeMax are text-based. |
| courseType | --notNull | @NotNull | Must contain a value. Values are defined by the enum and can only be set as Enum values. |
And now the entity contains Bean Validation annotations, as shown next.
Listing 3.3. Course entity fields—with Bean Validation annotations
@Column(name = "course_name")
@Size(min = 1, max = 60)
private String name;

@NotNull
@Size(max = 1000)
private String description;

@NotNull
@DecimalMin("0.0")
@DecimalMax("99999.99")
@Digits(integer = 5, fraction = 2)
private BigDecimal listPrice;

@NotNull
@Column(name = "max_capacity")
@Min(1L)
@Max(9999L)
private Integer maximumCapacity;

@Temporal(TemporalType.TIMESTAMP)
@DateTimeFormat(pattern = "MM/dd/yyyy")
private Date runDate;

@NotNull
@Enumerated(EnumType.STRING)
private CourseTypeEnum courseType;
Each option in the Roo shell turns into a similar annotation in the Java source code. From the @NotNull annotation to force an entered value, to @Min and @Max for the numeric range in maximumCapacity, to @Size to define a String length range for name and description, the Roo command options are merely ways to get Roo to generate the appropriate Bean Validation annotations. If you forget to set them during creation, you can edit the source file and add them later.
3.3.2. Testing Course validations
To test failure cases, you can write some tests in your CourseIntegrationTest class. First, you’ll build a simple test to prove that you’re running validations. You’ll just create a test that defines a Course, and not set any field values, which should trigger the @NotNull validations:
@Test(expected = ConstraintViolationException.class)
public void testInvalidCourse() {
    Course c = new Course();
    c.persist();
}
If you’re following along, use STS and choose to automatically fix/optimize imports with CTRL-SHIFT-O. When resolving the exception class, choose the one from the javax.validation package over the Hibernate one.
The test should throw a ConstraintViolationException, which will contain a series of ConstraintViolation instances, one for each error. In the preceding test, the fact that the test threw this exception causes the test to pass.
For a more detailed look at the errors returned by Bean Validation, look at the more detailed test in the following listing.
Listing 3.4. Testing Course violations

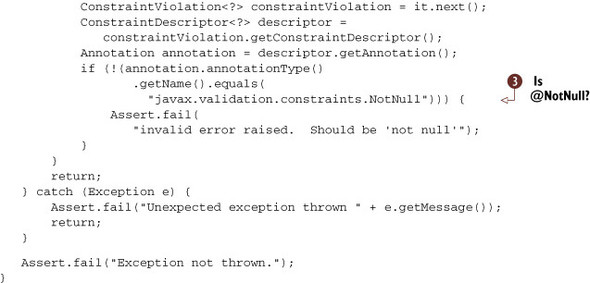
In the example, you trigger the validation exception by passing nulls to the name and description fields ![]() and attempting to persist the data. The Bean Validation throws a ConstraintViolationException, and the framework loads each violation into that exception as an implementation of the ConstraintViolation interface, held in the constraintViolations property.
and attempting to persist the data. The Bean Validation throws a ConstraintViolationException, and the framework loads each violation into that exception as an implementation of the ConstraintViolation interface, held in the constraintViolations property.
You create an iterator ![]() and fetch each ConstraintViolation, which contains a constraintDescriptor member detailing the error. You then test the annotation property of the descriptor, checking the annotation type name. If the name of the annotation isn’t the class name of your
annotation type, in this case javax.validation.NotNull
and fetch each ConstraintViolation, which contains a constraintDescriptor member detailing the error. You then test the annotation property of the descriptor, checking the annotation type name. If the name of the annotation isn’t the class name of your
annotation type, in this case javax.validation.NotNull ![]() , then the test fails.
, then the test fails.
A list of the available attributes of the ConstraintViolation is defined in table 3.4.
Table 3.4. attributes
As you’ll see in chapter 5, Roo can configure and generate a web application that includes CRUD operations for your entities automatically. It generates automatic error handling for form elements, populating the page with messages when these Bean Validation errors occur. Further, Roo generates client-side validations based on these annotations, which will appear whenever a user attempts to enter an invalid value.
3.3.3. Bean Validation annotations
There are a number of validation annotations available in the javax.validation package. In addition, Hibernate Validator, the reference implementation, includes several of its own in the org.hibernate.constraints package.
The validations in table 3.5 are built into the Bean Validation API.
Table 3.5. Built-in Bean Validation annotations
|
Annotation (javax.validation) |
Datatypes supported |
Description |
|---|---|---|
| @AssertTrue, @AssertFalse | boolean and Boolean | Item must evaluate to true/True or false/False. |
| @DecimalMin and @DecimalMax | BigDecimal, BigInteger, String, byte, short, int, long, and wrappers | Define a lower and upper boundary for the range of a number. Support datatypes such as BigDecimal, BigInteger, String, byte, short, int, long, and the wrapper types. |
| @Digits | BigDecimal, BigInteger, String, byte, short, int, long, and wrappers | Defines the integer and fractional digits of a given fixed-point decimal or scalar number. |
| @Future, @Past | java.util.Date or java.util.Calendar | Ensure the date is either later than or before the current system date at the time of validation. |
| @NotNull | Any type | Ensures the element is not null. |
| @Null | Any type | Ensures the element is null. |
| @Pattern | String | Validates against a regular expression pattern. |
| @Size | String, Map, Collection, Array | Validates against a minimum/maximum size. For String, compares string length. For Array, Map, and Collections, validates against number of elements. |
Some of these validations may not make sense on the surface—why would you want to define a @Null validation if it makes the field unsettable? That’s because in the specification, the Bean Validation Framework supports the concept of validation groups. In the current release of Roo, the only validation group supported is Default, so unless Roo entities begin to support validations with multiple groups, this particular validation won’t really be easily used.
So far we’ve looked at implementing validations, and we’ve seen how Spring Roo automatically executes validation checks before saving an entity. Now let’s take a look at how you can create your own validator annotations.
3.3.4. Using the @AssertTrue annotation
The Bean Validation API provides an @AssertTrue annotation that can make expressing one-off rules like the one above quite easy. Instead of that three-step process we discussed earlier, you can just build a Boolean method and annotate it with the @AssertTrue annotation. If the method returns true, the entity is valid. If not, it fails validation.
Here’s the same validation logic, expressed with an @AssertTrue annotated method within the Course entity:
public class Course {
  ...

  @NotNull
  @DecimalMin("0.0")
  @DecimalMax("99999.00")
  @Digits(integer = 5, fraction = 2)
  private BigDecimal listPrice;

  ...

  @AssertTrue(message =

    "Price is invalid. No fractional values allowed.")
  public boolean isPriceValid() {
    if (listPrice == null) return true;
    BigDecimal remainder = listPrice.remainder(new BigDecimal("1.0"));
    return remainder.compareTo(new BigDecimal("0")) == 0;
                .compareTo(new BigDecimal("0.0")) == 0;
  }
...
}
Believe it or not, that’s it. You can also interrogate any field in the entity. This is the easiest way to build multifield and one-off validations. But there are several rules you must adhere to:
- The method must have no arguments and return a Boolean value. It can have any visibility level, including private.
- The method must have a standard JavaBeans name compatible with a Boolean getter. Specifically, the method name must start with get or is, as in getValidity() or isValid().
- The @AssertTrue annotation must provide an error message (which can be localized, as you’ll see in chapter 5).
Tip
If you define this validation you may have to modify any automatically generated DataOnDemand tests to provide a valid value for your price. Push in the setPrice method in the CourseDataOnDemand_Roo_DataOnDemand.aj file and set a valid, nonfractional price. The rest of the samples assume this has been done.
You can test this method with the same test suite; it has the same effect. Run your CourseIntegrationTest suite to make sure you’re validating appropriately. As you can see, this mechanism is much easier to deal with than defining your own Bean Validation annotations and validators. But it may cause other tests to fail, because the Roo test framework can’t introspect the valid values of any method marked with @AssertTrue.[1]
1 To fix this, push-in refactor the getNewTransientCourse(int index) method of CourseDataOnDemand_RooDataOnDemand.aj, and return a valid value for the fields you’re using for the assertion.
There are still other ways to trigger validation in any Spring project. For example, you could either implement your own custom bean validators, or use Spring’s programmatic Validator framework.
To write your own bean validators in JSR-303 style, you define an annotation to represent your validation rule, attach it to a class that extends javax.validation.ConstraintValidator, and implement the isValid() and initialize() methods.
We’ll briefly discuss the Spring MVC validation framework in chapter 5.
3.3.5. Bean Validation in review
As you’ve just seen, if you need to validate your beans before persisting them, you can use the Bean Validation Framework. Try to stick to a few simple rules:
- Validation by composition —When building validation for a particular bean, go ahead and stack validators on a field. If you’d like to compose your own grouped validation, just build a validation annotation that’s comprised of the validators you need. You can get a lot done by using a combination of @NotNull, @Size, and @Pattern, for example.
- Be sparing in your processing power —Just because you can call a stored procedure behind a service to validate an entry in that list, doesn’t mean that you should. Realize that if you’re saving a collection of objects, this validation will be called on each item within the list, thus causing many calls to the same procedure.
- Use @AssertTruefor multicolumn checks —A quick way to get your complex, logic-based validation to work is to build a Boolean test method within your entity, annotating it with @AssertTrue. Within this method you have access to other fields in the entity.
- Use your own custom validations sparingly —When you have a cross-cutting validation rule, such as a business-driven primary key, complex part number, or other complex validation, you can build your own validators and annotations. Use this technique sparingly because these are more complex to build, and spread out your validation away from the entities themselves.
More Validation Options
If you are familiar with Spring MVC’s programmatic validation routines, you can use those in a Roo web application as well. See how to build and apply Spring validators in the “Spring Framework Reference,” sections 5.2, “Validation using Spring’s Validation Interface,” and 5.7.4.2, “Configuring a Validator for use by Spring MVC” at http://mng.bz/B9G3.
Now that you’ve seen how to define well-validated entities with the Bean Validation framework, let’s switch gears a bit and discuss how to enable users of your entities to locate entities that they’ve created, using the finder Roo shell command.
3.4. Searching with finders
Searching for data in a database-centric application generally involves writing a lot of queries: fetching a list of items, pulling back a single item by a particular key, joining data together from various tables. In pre-ORM days, people wrote a lot of SQL to do this task. But JPA aims to simplify the query process by providing the JPA-QL (JPA Query Language) API.
This API treats the database as an object graph, but still allows you to express queries in a SQL-like language. Here’s an example query, which fetches all Courses within a range of priorities:
Query q = entityManager.createQuery(
                "SELECT course FROM Course AS course " +
                "WHERE course.maximumCapacity BETWEEN :min AND :max",
                Course.class);
q.setParameter("min", 2);
q.setParameter("max", 3);
List<Course> results = q.getResultList();
There are some key differences in the way regular SQL and JPA-QL operate:
- SQL references tables, but JPA-QL references entities. Use the name of the entity in the query and the mapped table will be substituted at query time.
- JPA-QL can dig deep into related entity graphs. For example, query patterns such as course.catalog.name = "Fall Catalog" are completely acceptable. For collections, developers can define JOIN statements to query between associations. JPA-QL will actually write out the proper SQL joins or queries to pull the data from the related tables.
- Since JPA-QL runs on top of JPA, it manages all connection information for the developer through the persistence context. Developers need not concern themselves with setting up and tearing down connections.
Now you can write your own JPA-QL queries and place them in methods on an entity or service bean object. Let’s look at how easy it is to have Roo write them for you.
3.4.1. A sample Roo finder
Roo finders provide methods to search your entities, which are attached to the entities automatically like the JPA methods defined in the beginning of this chapter. You create them with the Roo shell using the finder command. There are generally two steps involved in generating a finder: First, you get a list of all of the methods that Roo can generate for your entity. Next, you tell Roo to generate a finder with a specific name and using that name, the Roo shell will write an ITD and weave it into the entity for you.
Creating a Finder
Let’s take a look at an example that implements the search we just discussed, one that searches the name field in your Course object. First you’ll ask Roo for a list of finders that you can generate:
roo> focus ~.model.Course
~.model.Course roo> finder list --filter name
findCoursesByNameEquals(String name)
findCoursesByNameIsNotNull()
findCoursesByNameIsNull()
findCoursesByNameLike(String name)
findCoursesByNameNotEquals(String name)
 ~.model.Course roo>
This is simply a mechanical list of all finders Roo can generate for you, filtering on the fields that contain the search term name. Let’s use finder add to create a method that uses the SQL LIKE keyword, comparing the value passed to the name field, findCoursesByNameLike:
~.model.Course roo> finder add --finderName findCoursesByNameLike
Updated SRC_MAIN_JAVA/org/rooina/coursemanager/model/Course.java
Created SRC_MAIN_JAVA/[...]/Course_Roo_Finder.aj
Spring Roo adds a parameter to the @RooJpaActiveRecord annotation, finders, that tells the Roo shell to generate a finder:
@RooJpaActiveRecord(finders = { "findCoursesByNameLike" })
The shell then generates the finder and places it in Course_Roo_Finder.aj, where it’s immediately mixed into the Course object, as Course.findCoursesByNameLike.
Reviewing the Finder Code
Let’s take a look at the code that the Roo finder add method set up.
Listing 3.5. The Course_Roo_Finder.aj ITD
package org.rooinaction.coursemanager.model;

import java.lang.String;
import javax.persistence.EntityManager;
import javax.persistence.TypedQuery;
import org.rooinaction.coursemanager.model.Course;

privileged aspect Course_Roo_Finder {
  public static TypedQuery<Course>
                Course.findCoursesByNameLike(String name) {
    if (name == null || name.length() == 0)
        throw new IllegalArgumentException(
                    "The name argument is required");
    name = name.replace('*', '%'),
    if (name.charAt(0) != '%') {
      name = "%" + name;
    }
    if (name.charAt(name.length() -1) != '%') {
        name = name + "%";
    }
    EntityManager em = Course.entityManager();
    TypedQuery<Course> q = em.createQuery(
           "SELECT Course FROM Course AS course
           WHERE LOWER(course.name) LIKE LOWER(:name)", Course.class);
    q.setParameter("name", name);
    return q;
  }
}
The finder rejects null or empty parameters, allows using * or % at the end of the search string, and prefixes % to the beginning. This makes the like command search anywhere in the name field. Instead of writing the JPA-QL queries yourself, Roo can generate them for you, saving you a significant amount of activity. But what about multifield queries?
Testing the Finder
Here’s the test that exercises the finder, which we’ve added to CourseIntegration-Tests:
@Test
public void testFindByNameFinder() {
   Course c = new Course();
   c.setName("Basket Weaving");
   c.setCourseType(CourseTypeEnum.SEMINAR);
   c.setDescription("Weaving baskets is an essential skill.");
   c.setMaximumCapacity(100);
   c.setRunDate(new Date());
   c.setListPrice(new BigDecimal("100"));
   c.persist();

   c.flush();
   c.entityManager().clear();

   List<Course> courses =
      c.findCoursesByNameLike("Bas").getResultList();

    Assert.assertEquals(1, courses.size());

}
Most of that test method involved test setup, but in the end it resulted in a one-line call to your pregenerated finder. Note the fact that after you call the finder, you chain a call to the QuerygetResultList() method; the finder doesn’t know whether you want a single result or a list, so it lets you choose.
3.4.2. Multifield finder queries
Roo makes it easy to build multifield queries. The finder command includes the --depth option, which lets you ask for combinations of finders for several fields at the same time. Keep in mind that the output begins to get a bit voluminous after a depth of two, or with entities that have a large number of attributes. You can use the --filter method to list the attributes you wish to see, separated by commas, to limit the output. Let’s see the finders Roo can generate for a combination of both the courseType and runDate fields:
~.model.Course roo> finder list --depth 2 --filter courseType,runDate

findCoursesByCourseTypeAndRunDate(CourseTypeEnum courseType, Date runDate)
findCoursesByCourseTypeAndRunDateBetween(CourseTypeEnum courseType,
     Date minRunDate, Date maxRunDate)
findCoursesByCourseTypeAndRunDateEquals(...)
findCoursesByCourseTypeAndRunDateGreaterThan(...)
findCoursesByCourseTypeAndRunDateGreaterThanEquals(...)
...
The one you’re interested in is findCoursesByCourseTypeAndRunDateBetween, which finds any course of a particular CourseTypeEnum within an offer date range. To install that finder, issue the following command:
~.model.Course roo> finder add --finderName findCoursesByCourseTypeAndRunDateBetween
Updated SRC_MAIN_JAVA/org/rooina/coursemanager/model/Course.java
Updated SRC_MAIN_JAVA/[...]/model/Course_Roo_Finder.aj
This command results in the following additional finder method in Course_Roo_Finder.aj:
public static TypedQuery<Course> Course. findCoursesByCourseTypeAndRunDateBetween(
         CourseTypeEnum courseType,
         Date minRunDate,
         Date maxRunDate) {
  if (courseType == null)
    throw new IllegalArgumentException("courseType is required");
  if (minRunDate == null)
    throw new IllegalArgumentException("minRunDate is required");
  if (maxRunDate == null)
    throw new IllegalArgumentException("maxRunDate is required");
  EntityManager em = Course.entityManager();
  TypedQuery<Course> q = em.createQuery(
      "SELECT Course FROM Course AS course
       WHERE course.courseType = :courseType AND
             course.runDate BETWEEN :minRunDate AND :maxRunDate",
             Course.class);
  q.setParameter("courseType", courseType);
  q.setParameter("minRunDate", minRunDate);
  q.setParameter("maxRunDate", maxRunDate);
  return q;
}
Now finding all courses of a particular type, within a particular date range, is as simple as calling the static Course method findCoursesByCourseTypeAndRunDateBetween, passing three parameters, the CourseType enum value, and a minimum and maximum date to establish the search range.
3.4.3. More complex finders
Finders can make simple queries relatively easy to build. The finder list command is simply there to make your job easier by showing you potential combinations. But if you happen to understand the pattern, you can issue finder commands to build queries like those in table 3.6.
Table 3.6. Sample finder query patterns
|
Pattern |
Query result |
|---|---|
| ByRunDateGreaterThan (Date) | course.runDate >:runDate |
| ByDescriptionLike | LOWER(course.description) like LOWER(:description) |
| ByDescriptionIsNotNull | course.description IS NOT NULL |
| ByDescriptionIsNullAndCourseTypeEquals | course.description IS NULL and course.courseType = :courseType |
You can even tie three or four fields together, if you know the pattern. In this way, you can save yourself from having to write boilerplate JPA query code. Since finders are added to the entity along with the persistence code and validation rules, they help you to contain your complex data query logic within the entities themselves.
The finder feature is currently limited to defining finders on fields within the same entity. But using the finder to generate the bulk of your code, you can always use push-in refactoring to bring the code into the entity itself, and then modify it to suit your needs. You could also use more advanced features of JPA, such as querying by example, which are beyond the scope of this book.
3.5. Leaving Active Record—JPA repositories
What if you don’t like the approach of encapsulating your JPA code within each entity? Perhaps you have a more complex model, one where the boundaries for queries and transactions is a bit more blurred, and some of the code fits best manipulating or querying more than one entity at a time? If this is your situation, or if you prefer a layered approach that separates the data logic from your entity classes, you can tell Roo to build JPA repositories for you.
Roo repositories are built using the relatively new Spring Data API. Spring Data provides support for dynamically generated proxy classes for a given entity, and those classes handle all of the methods you’re used to coding by hand (or using in the Active Record entities).
It is quite easy to generate a repository. Let’s build a repository to back the Course entity:
repository jpa --interface ~.db.CourseRepository --entity ~.model.Course
This command generates a repository class:
package org.rooinaction.coursemanager.db;

import org.rooinaction.rooinaction.coursemanager.model.Course;
import org.springframework.roo.addon.layers.repository.jpa.RooJpaRepository;

@RooJpaRepository(domainType = Course.class)
public interface CourseRepository {
}
There are no methods defined in this interface; it exists merely as a holding place for the @RooJpaRepository annotation. The interface is backed by an ITD. In this case, the file is named CourseRepository_Roo_Repository.aj:
package org.rooinaction.rooinaction.coursemanager.db;

import java.lang.Long;
import org.rooinaction.rooinaction.coursemanager.model.Course;
import org.springframework.data.jpa.repository.JpaRepository;
import org.springframework.data.jpa.repository.JpaSpecificationExecutor;
import org.springframework.stereotype.Repository;

privileged aspect CourseRepository_Roo_Jpa_Repository {

  declare parents: CourseRepository extends JpaRepository<Course, Long>;
  declare parents: CourseRepository extends JpaSpecificationExecutor<Course>;

  declare @type: CourseRepository: @Repository;

}
These two files may be a bit baffling to you if you’re used to coding your own repositories. Roo uses the typical Spring pattern of annotating the repository with @Repository, which marks it as a Spring bean and provides exception translation, but it also extends it with two additional interfaces—JpaRepository and JpaSpecificationExecutor. Let’s take a look at each one, starting with JpaRepository.
3.5.1. The JpaRepository API
Look at the methods implemented by the JpaRepository class:
java.util.List<T> findAll();
java.util.List<T> findAll(org.springframework.data.domain.Sort sort);
java.util.List<T> save(java.lang.Iterable<? extends T> iterable);
void flush();
T saveAndFlush(T t);
void deleteInBatch(java.lang.Iterable<T> tIterable);
These are all methods to search, save, and remove data from the entity. Note that the <T> designation is a Java generic type. Since the CourseRepository is defined as implementing JpaRepository<Course, Long>, all of the generic <T> methods will take Course entities as arguments, and expect a Long-based primary key.
Let’s test this API using a JUnit test. Add the following test to your Course-IntegrationTest class:
@Test
@Transactional
public void addAndFetchCourseViaRepo() {
  Course c = new Course();
  c.setCourseType(CourseTypeEnum.CONTINUING_EDUCATION);
  c.setName("Stand-up Comedy");
  c.setDescription(
    "You'll laugh, you'll cry, it will become a part of you.");
  c.setMaximumCapacity(10);

  courseRepository.saveAndFlush(c);
  c.clear();

  Assert.assertNotNull(c.getId());

  Course c2 = courseRepository.findOne(c.getId());
  Assert.assertNotNull(c2);
  Assert.assertEquals(c.getName(), c2.getName());
  Assert.assertEquals(c2.getDescription(), c.getDescription());
  Assert.assertEquals(
    c.getMaximumCapacity(), c2.getMaximumCapacity());
  Assert.assertEquals(c.getCourseType(), c2.getCourseType());
}
So now you can use a Roo repository to implement your JPA code. The methods save-AndFlush() and getOne(Long) are provided dynamically at runtime via the Spring Data API.
3.5.2. Queries with JpaSpecificationImplementor
But wait, there are more features to explore here. What does the second interface, JpaSpecificationImplementor, provide?
T findOne(Specification<T> tSpecification);
List<T> findAll(Specification<T> tSpecification
Page<T> findAll(Specification<T> tSpecification, Pageable pageable);
List<T> findAll(Specification<T> tSpecification, Sort sort);
long count(Specification<T> tSpecification);
This interface provides access to the Spring Data features for providing criteria-based query and paging support. The methods accept a Specification class, which is used to define the search criteria to pass to the repository to find, sort, and page through a list of entities, or fetch a single entity. For example, to provide a predicate that expects a non-null run date:
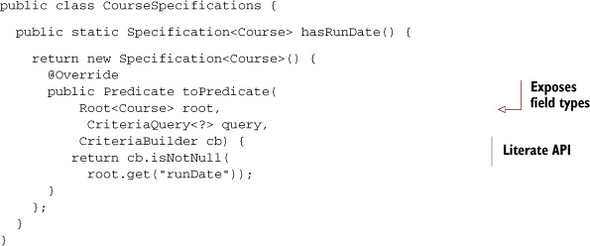
The toPredicate() method takes a Root<Course>, which provides access to the types in the JPA entity, a JPA CriteriaQuery, which is built by Spring and passed into the method automatically at runtime to be executed, and a CriteriaBuilder, which allows you to add predicates to the query using English language–like calls, such as cb.isNotNull above.
To use the specification, you just need to call the static CourseSpecifications
List<Course> courses = courseRepository.findAll(
                           CourseSpecifications.hasRunDate());
This approach is similar to writing criteria-based JPA queries, but is in marked contrast to Roo finders, which are attached normally to Active Record entities annotated with @RooJpaActiveRecord.
3.5.3. Annotation-driven queries with @Query
One of the most powerful features of the Spring Data JPA API is providing annotation-driven queries. Since Spring Data builds the implementation class at runtime, you can define methods in your interface that Roo can use to implement custom queries and even updates.
Let’s look at an example method. You can define a query method in your Course-Repository interface to find all student registrations for a given student and date range (we define the Registration entity in chapter 4, but this code shows you more complex queries):
@Query("select distinct r from Registration as r " +
    "where r.student.id = :studentId " +
    "and r.offering.offerDate between :start and :end")

@Transactional(readOnly = true)
List<Registration> findStudentRegistrationForOfferingsInDateRange(
      @Param("studentId") long studentId,
      @Param("start") Date start,

      @Param("end") Date end);
Roo implements the code for this method at runtime, based on the Spring Data @Query annotation. All parameters in the example above are defined using the @Param annotation, and the type returned is defined as the return type of the method, List<Registration>. Note that you’ve also passed the @Transactional annotation, and marked the query as a read-only transaction.
You can perform updates using the @Query method as well, as long as you mark the method as @Modifying:
@Query("update Registration r set attended = :attended " +
       "where r.student.id = :studentId")
@Modifying
@Transactional
void updateAttendance(
      @Param("studentId") long studentId,
      @Param("attended") boolean attended);
In this example, you’ve marked your interface method with @Modifying to signify that you’re expecting a data manipulation statement, not just a simple SELECT statement. You also define your method with @Transactional, so that it’s wrapped with a read/write transaction.
Spring Roo builds the implementation classes automatically, based on a Spring configuration file in META-INF/spring named applicationContext-jpa.xml. This file contains the Spring Data XML configuration element, <repositories/>, which scans for and mounts interface-driven repositories:
<repositories base-package="org.rooinaction.coursemanager" />
The package defined in this Spring XML configuration element is your root project package. You can now add repositories in whatever subpackage makes sense. You don’t have to use Roo to generate your Spring Data classes either, so if you’re already a Spring Data or JPA expert, just code away!
For more about the Spring Data JPA API, visit the project website at http://mng.bz/63xp.
3.5.4. Repository wrap-up
As you’ve seen, you can use repositories in a more traditional Spring layered application instead of applying the Active Record pattern. Roo even rewrites your automated entity integration tests automatically, when it detects that you’ve added a repository for a given entity. You can always fall back to the typical interface-and-implementation JPA repository where necessary.
As an added bonus, you can skip the Active Record generation for Roo entities by issuing the --activeRecord false attribute when defining an entity:
roo> entity jpa --class ~.model.Course --activeRecord false
If You’ve been Using Active Record and Want to Migrate...
Just edit your entity, and replace @RooJpaActiveRecord with @RooJpaEntity. Fire up the Roo shell and watch it remove all of those Active Record ITDs. Follow up by creating a JPA repository and you’re all set. If you take advantage of Roo’s web interface scaffolding, Roo will even reroute calls in the controller to the repository after you create one.
In the next chapter, we’ll show you how to use Roo’s service support to automatically provide a wrapper service around your repositories.
3.6. Code samples
The examples we used around the Active Record Course object are contained in the github samples repository under the directory /chapter-03-jpa/coursemanager. This includes the Course ITD, the Course finder, the integration tests for Course, and the finder. We also include the repository samples under /chapter-03-jpa/coursemanagerrepository.
All of these examples work against the Hypersonic SQL database by default, but feel free to re-execute the jpa setup command and switch to your favorite database.
Now let’s review the topics we covered in this chapter.
3.7. Summary
In this chapter, we discussed the two major ways that Roo provides access to database entities—the Active Record pattern and via repositories. You’ve seen that Roo provides a rich database API called Spring Data, which is distributed as part of the Spring JPA container beginning in Roo 1.2. With this container, you saw that you can define queries using annotations and Java interfaces. You can also extend other interfaces, such as JpaRepository, which provide automatically generated CRUD methods.
Just think of all the things Roo does for you as a Spring developer:
- Roo generates entities automatically using a simple entity command.
- Roo also uses AspectJ ITD files to wrap entities with JPA persistence code, adding methods to entities such as persist, findCourse, merge, and flush.
- Roo gives you the ability to use your own JPA code, or to harness the power of the Spring Data JPA API, to manage your persistence layer.
- Roo has a comprehensive system testing facility, enabled by the Spring JUnit Test Runner. You can either execute the standard Spring JUnit Test Runner, or allow Roo to scaffold tests automatically by using the @RooIntegrationTest annotation.
- Roo supports JSR-303, the Bean Validation Framework API, and executes validation processing whenever an entity is persisted or updated.
- Roo supports adding finders to your entities, which provide results for various searches enabled as simple Java methods.
In the next chapter, we’ll take a look at how to relate entities to each other. You’ll also see some of the more advanced features of the JPA persistence framework and how you can make them work in Roo.
3.8. Resources
The online reference for the Spring Data JPA project: http://mng.bz/Q9X4
The Spring Data JPA project home page, which includes references to blog entries by Oliver Geirke, Gordon Dickens, and others: http://mng.bz/63xp