
Chapter 4. Relationships, JPA, and advanced persistence
In chapter 3, we discussed how to install Roo’s JPA-based persistence engine, create entities, and manipulate them using Roo’s domain-driven entity ITD methods such as persist(), find(), and merge(). You saw how to validate entities using the Bean Validation API and how to generate search queries using the finder facility. You also saw how to build Spring-based repositories so that developers who want a separation of application layers can still provide a data layer for their applications.
In this chapter, you’ll learn how to relate entities to each other, building JPA relationships via the Roo shell. You’ll use the field reference and field set commands, which establish JPA relationships via various annotations, collections, and references. You’ll explore several mapping strategies, including one-to-many, many-to-many, many-to-one, and inheritance hierarchies. You’ll see how to use the reverse engineering facility to automatically create entities from an existing database. You’ll then see how to build Spring-based services to expose the repositories and to create a traditional, layered, service-based architecture.
Let’s begin by reviewing how JPA manages relationships between database entities.
4.1. Object relations: it’s all relative
Courses can’t just live in the world all by themselves; they need students, rooms, teachers, offerings, and registrations. In a relational database, you relate data from one table to another table via special columns called primary and foreign keys. But in the object-oriented world, you relate entities via references to each other through object references, composition, and aggregation. That’s where object-relational mapping (ORM) comes in—it defines a mapping strategy to relate these Java objects to relational tables.
JPA defines relationships using field and collection annotations, such as @OneTo-Many, @ManyToOne, and @OneToOne. To make the process of mapping easier for the developer, Spring Roo provides variants of the field shell command that define references between entities. These commands can map either a single object reference or a collection of elements of a particular type.
JPA supports the major relationship types and their variants as shown in table 4.1.
Table 4.1. JPA relationship categories
|
Type |
Definition |
|---|---|
| One-to-many | Relates a row in a parent table to zero or more rows in a child table. The relationship can either be defined as bidirectional or unidirectional. |
| One-to-one | A single row in one table is related to a single row in another table. Often database tables are partitioned into multiple smaller tables for performance or security reasons, and if that’s warranted, the one-to-one relationship can manage this for you. |
| Many-to-many | Rows from each table are related to rows in another table. For example, tracking the authors for a series of books, where books can be authored by more than one author, and an author can write any number of books. |
| Many-to-one | A reference from a child entity back to its parent. |
| Inheritance hierarchies | JPA supports object-based inheritance and provides several physical models to map this onto a database. |
Let’s use the Roo shell commands to create and relate other entities to your Course. You’ll use several relationship types and let the Roo shell configure the JPA annotations for you. We’ll begin by reviewing the Course Manager database requirements.
4.2. A sample Course Manager database
In your Course Manager application there are more than just courses. You need to track training programs, tags to describe your courses, students, instructors, and course offerings. Let’s review some of the requirements. You need to be able to perform the following activities:
- Assign courses to a particular training program
- Tag courses with various labels or keywords
- Schedule courses in your training locations
- Assign a trainer to a course offering
- Register students to attend a specific course offering
To better understand where you’re going, let’s take a look at a proposed database diagram of a superset of entities you’ll be manipulating throughout the book, illustrated in figure 4.1.
Figure 4.1. The Course Manager data model
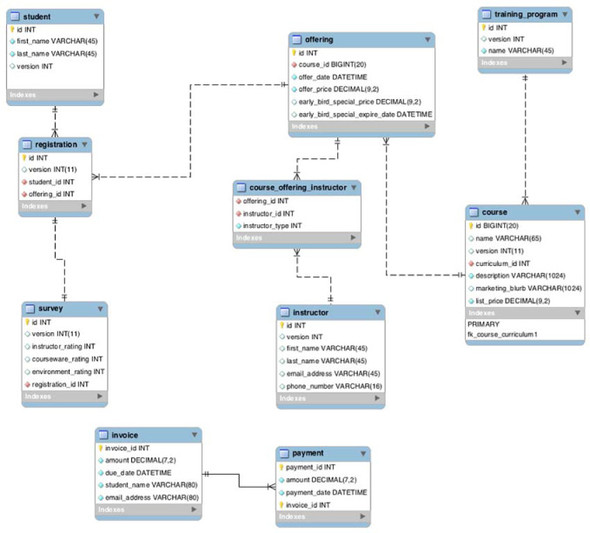
Most of these relationships are connected in some way to a Course entity—the training program it’s related to, the offerings of the courses themselves, registrations of students in the courses, and the instructors. Although you may not implement all of these entities in the book, this gives you a model to practice with when creating your own sample applications.
All the JPA that’s Print to Fit...
We don’t have enough space to teach all of the JPA in this chapter, but we focus on some of the major relationship types that you’ll use on a regular basis. We refer you to a number of books at the end of this chapter to help you continue your JPA learning journey.
Let’s dive right in and create some entities and relationships. You’ll start by adding a TrainingProgram entity so that you can group courses together.
4.3. Course Manager relationships
Your Course Management application is comprised of a number of JPA entities, related together via a combination of relationship types, such as one-to-many, many-to-one, and many-to-many. You’ll use this model to put Roo’s entity command through its paces.
4.3.1. One to many: training programs to courses
The training company wants to offer collections of courses, which they call training programs. To support this requirement, you need to add another entity, TrainingProgram, and relate it to your Course entity. Let’s begin by defining the TrainingProgram:
roo> entity jpa --class ~.model.TrainingProgram --testAutomatically
[entity created]
~.model.TrainingProgram roo> field string --fieldName name
[field created]
The resulting TrainingProgram entity:
package org.rooinaction.coursemanager.model;

...

@RooJavaBean
@RooToString
@RooJpaActiveRecord
public class TrainingProgram {
private String name;
}
Next let’s create the relationship between TrainingProgram and the Course entity. You’ll make a bidirectional, one-to-many relationship, meaning that you can navigate from training programs to courses, and from courses to their training program. This is a two-step process.
First you establish the one-to-many side of the relationship, using the field set command. This command creates a Course-typed Java set in the TrainingProgram entity:
~.model.TrainingProgram roo> field set --fieldName courses --type ~.model.Course --cardinality ONE_TO_MANY --mappedBy trainingProgram
Here’s the resultant set in the TrainingProgram entity:
@OneToMany(cascade = CascadeType.ALL, mappedBy = "trainingProgram")
private Set<Course> courses = newHashSet<Course>();
The @OneToMany annotation tells JPA that a relationship is established between Course and TrainingProgram, so that when queries are issued, JPA can write the proper SQL statements. You’ve used the mappedBy attribute, which describes the name of the attribute in the Course object that represents the related TrainingProgram. This is done so that JPA manages the relationship at the many end, which you’ll configure next.
In order to complete this relationship, you need to define the reverse side: the many-to-one relationship between the Course and the TrainingProgram, which you’ll do by defining a trainingProgram attribute using Roo’s field reference command:
~.model.TrainingProgram roo> focus --class ~.model.Course
~.model.Course> field reference --fieldName trainingProgram --type ~.model.TrainingProgram --cardinality MANY_TO_ONE
Now the relationship has been established. Here’s the attribute definition in the Course entity:
@ManyToOne
private TrainingProgram trainingProgram;
You’ve now established the following rules:
- Training programs contain sets of courses in a collection named courses.
- Courses reference their training program in the reference variable training-Program.
- Any change to the training program, including adding a course, cascade. Removing a training program will remove its courses.
- If you use a JPA query to load a training program, JPA will fetch courses for you when you call the getCourses() method from the TrainingProgram_Roo_Javabean.aj ITD.
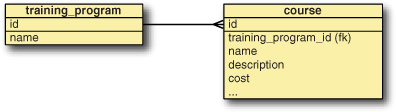
Figure 4.2 illustrates what you’ve done in Java.
Figure 4.2. How Java sees your relationship—using a reference and a set

From the Java perspective, a TrainingProgram holds a Set of Course objects. The Course object holds a reference to a TrainingProgram. But, in the database, you relate these objects using primary and foreign keys, as in figure 4.3.
Figure 4.3. Database relationship, established via the training_program_id foreign key
Remember: Stay Focused!
If you restart Roo, or want to switch to adding fields to another entity, you can use the focus Roo shell command to switch the entity you’re working on. Forgetting to switch back to the Course entity when adding the reference to TrainingProgram will add the reference to the TrainingProgram entity. You won’t receive a warning because Roo doesn’t know you made a modeling mistake!
Alternatively, use the --class parameter to apply the field or reference to another entity and ignore the currently focused class.
Let’s test this relationship straight away. You’ll add the code in listing 4.1 to the TrainingProgramIntegrationTest class, which Roo added when you defined your TrainingProgram with the --testAutomatically option of Roo’s entity jpa command.
Listing 4.1. Testing the TrainingProgram-to-Course relationship
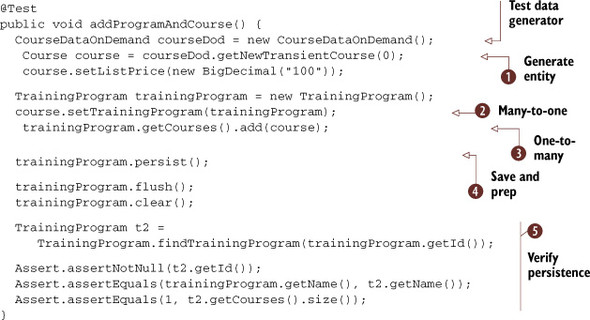
In this test you assert that you can store and retrieve a one-to-many relationship between a training program and a related
course. You create an instance of Course-DataOnDemand, which is used to create an unsaved transient instance of an entity ![]() , saving you the work of creating a course by hand.
, saving you the work of creating a course by hand.
Next you create an instance of your TrainingProgram ![]() , and set the reference to your Course instance.
, and set the reference to your Course instance.
You still need to add the course to the collection, so ask the TrainingProgram for the set of Course instances with getCourses() and add your Course to the collection ![]() . Now, both sides of the relationship are satisfied, from both Java and JPA perspectives.
. Now, both sides of the relationship are satisfied, from both Java and JPA perspectives.
Next you make sure the data is persisted, and the JPA context is cleared for the verification process ![]() . You’ll call save() on the training program so that it persists to the database, and so that the foreign key can be properly populated. At this
time, JPA needs to create the course that you’ve added to the training program too, so that will generate an insert.
. You’ll call save() on the training program so that it persists to the database, and so that the foreign key can be properly populated. At this
time, JPA needs to create the course that you’ve added to the training program too, so that will generate an insert.
Calling flush() will force JPA to execute your SQL statements, and clear() will reset the context, so any future requests will have to come from the database and not the JPA session cache.
Finally you attempt to reload the training program from scratch and verify that the name that you loaded matches the name
that you created, and that you have one course attached to the training program ![]() .
.
4.3.2. More on database keys
Databases relate these same entities using a primary and foreign key. To see this in action in Hibernate, you can add the following entry to your log4j.properties file:
log4j.logger.org.hibernate.tool.hbm2ddl=debug
Now run your JUnit tests again, using mvn test.
The log setting above causes the actual DDL to be emitted in the STS console, and in log output files in target/surefire-reports, such as CourseIntegrationTest-output.txt. Here’s sample output from a configuration using the MySQL database, which includes both primary and foreign key definitions:
create table course (id bigint not null auto_increment, ...
    training_program bigint, primary key (id)) ENGINE=InnoDB
create table training_program (id bigint not null auto_increment,
 name varchar(255), ...
 primary key (id)) ENGINE=InnoDB
alter table course add index FKAF42E01B903B83EE (training_program),
 add constraint FKAF42E01B903B83EE
 foreign key (training_program) references training_program (id)
As you can see, you can focus on configuring and manipulating Java objects, and let the persistence layer figure out how to generate the appropriate SQL statements, both to create and manipulate your database tables.
Here are some tips when dealing with Roo’s relationship mapping commands:
- Though Roo generates some baseline sanity tests against your entities, always exercise your entities and relationships before you start coding services and user interface code. JPA relationship mappings are sometimes hard to understand, and may not behave the way you think they will. Just because the built-in test goes green doesn’t mean it does what you want it to.
- If you’re defining a bidirectional one-to-many mapping as you did in the preceding example, make sure to use the --mappedBy attribute so that JPA keeps the relationship defined with two physical tables. See the tip below for more details.
- Don’t forget to switch focus when adding relationships. You may be adding the inverse relationship to the same class if not. You can also use the --class attribute on the field set or field reference commands to define the relationship on a particular class directly.
Two Tables or Three?
If you forget to specify the --mappedBy setting in the one-to-many mapping, you might find that you’ll end up with three tables in this relationship: training_program, course, and training_program_course, with the extra table containing both the course_id and training_program_id.
This is an alternate form of mapping for a one-to-many relationship that allows for switching later to a many-to-many relationship without major restructuring of your data. But it’s not a typical database table design. So, when defining one-to-many relationships, be sure to use the --mappedBy option unless you expect this behavior.
For more information about the details of JPA 2.0 mappings, consult the books we refer to at the end of this chapter.
Now you’ve seen how to define a basic, bidirectional one-to-many relationship in Roo. Let’s explore some other mapping options, starting with a many-to-many relationship.
4.3.3. Many-to-many relationship: courses to tags
The administrators also want to tag courses with a set of keywords, assigning predefined labels such as developmental skills, advanced, beginner, and expert. The end users would then be able to search by these tags to find courses of interest.
You’ll hold your predefined keywords in a Tag entity. Because tags can be used by many courses, and courses can be assigned a number of tags, the association is logically defined as a many-to-many relationship.
You have two options for how to define your relationship in JPA:
- Using three entities. You can define an intersecting entity that associates Tag entities to Course entities using two @OneToMany relationships.
- Using two entities, and a @ManyToMany relationship.
Although the three-entity solution allows you to define attributes in the intersecting entity, you’ll use the simpler many-to-many relationship instead. Regardless of how you map the entities, the relational database will require three tables, as shown in figure 4.4.
Figure 4.4. How databases resolve a many-to-many relationship
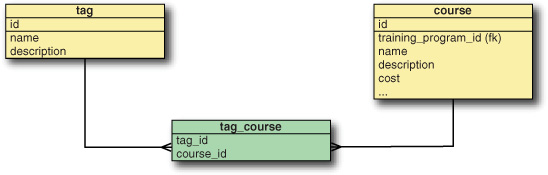
Let’s create this relationship as a bidirectional, many-to-many relationship, so you can easily fetch the courses for a given tag, or the tags assigned to a particular course.
You’ll begin by defining the Tag entity:
entity jpa --class ~.model.Tag --testAutomatically
field string --fieldName tag --sizeMin 1 --sizeMax 25 --notNull
field string --fieldName description --sizeMax 250 --notNull
Roo responds by creating the Tag entity and adding the fields, as shown in the following listing.
Listing 4.2. The Tag entity
package org.rooinaction.coursemanager.model;
...
@RooJavaBean
@RooToString
@RooJpaActiveRecord
public class Tag {

    @NotNull
    @Size(min = 1, max = 25)
    private String tag;

    @NotNull
    @Size(max = 250)
    private String description;
}
Next you need to relate the Tag to your Course entity. Assume your Roo shell focus is still on the Tag entity:
field set --fieldName courses --type ~.model.Course --cardinality MANY_TO_MANY
Can I Tell the Field Command to Work on a Specific Entity?
Yes, you can. Just use the --class argument to specify the target entity.
The preceding command defines a Java Set collection, named courses, on the Tag entity:
@ManyToMany(cascade = CascadeType.ALL)
private Set<Course> courses = newHashSet<Course>();
To test your association, let’s add a method to the TagIntegrationTest JUnit test, shown in the next listing, that creates several courses and assigns a tag.
Listing 4.3. Testing the Tag to-Course association
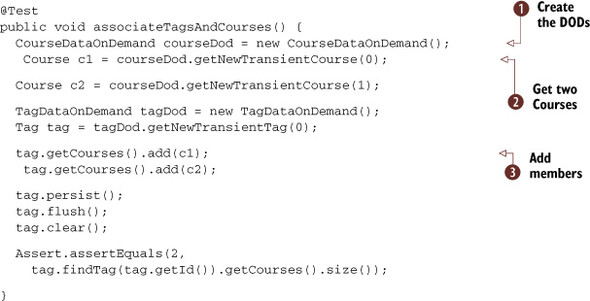
The test is remarkably similar to the preceding tests, except that you use a little more of your DataOnDemand testing framework. First you create your CourseDataOnDemand object ![]() , which allows you to get access to a number of Course entities, prefilled with legal data values. You use the getNewTransientCourse(int index) method
, which allows you to get access to a number of Course entities, prefilled with legal data values. You use the getNewTransientCourse(int index) method ![]() to generate two Course instances, c1 and c2. The getRandomCourse() method you saw earlier may return the same Course twice, so you can’t use it here.
to generate two Course instances, c1 and c2. The getRandomCourse() method you saw earlier may return the same Course twice, so you can’t use it here.
You also generate a single random Tag object, which is the focus of your test. You then add the course to both tags using your convenience method, Tag.addCourse() ![]() .
.
Finally, you save the tag instance, which cascades into saving the courses. To test, you flush and clear the entity manager and then reload the Tag from the database, verifying that it is attached to two courses.
Get to know the Dataondemand Classes
These classes are pretty handy for generating test entities. In fact, if you look at the Course_Roo_IntegrationTest.aj ITD you’ll see that it uses the CourseDataOnDemand class extensively. Both the test and the CourseDataOnDemand class have backing AspectJ files.
All of this is great, but what about the reverse relationship? What if your users need to fetch the tags assigned to a given course? In that case, you need to define the collection in Course that will contain the associated tags.
4.3.4. The inverse many-to-many: courses have tags
To define your Course to Tag mapping, you’ll create another @ManyToMany relationship. But this time you’ll add the --mappedBy option so that you can define this as the inverse relationship. An inverse relationship provides a way to navigate between entities, but doesn’t automatically persist changes by itself:
focus --class ~.model.Course
field set --fieldName tags --type ~.model.Tag --cardinality MANY_TO_MANY --mappedBy courses
The inverse relationship, defined on the Course entity, looks like this:
@ManyToMany(cascade = CascadeType.ALL, mappedBy = "courses")
private Set<Tag> tags = new HashSet<Tag>();
As you can see, the mappedBy attribute defines the name of the set within the Tag entity and establishes that Course is not in charge of persisting the Tags. In a bidirectional many-to-many relationship, one side must be the primary, and the other side must be the inverse side. The inverse side is indicated here as Course, because it defines the mappedBy attribute.
Now that the relationship is bidirectional, you need to modify both sides to make Java and JPA happy. The JUnit test method, added to CourseIntegationTest, is shown next.
Listing 4.4. Testing tag persistence from Courses
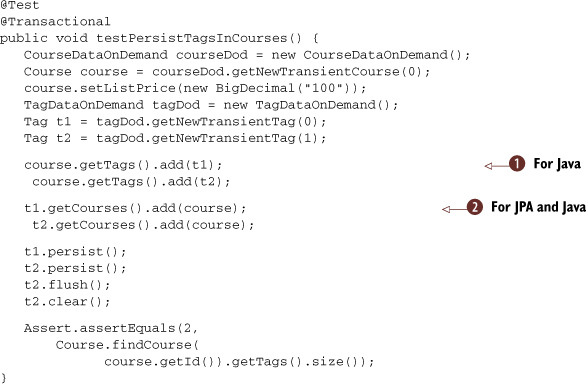
You’ll notice that you add the tags to the tags collection on course ![]() , and also ask each tag for its courses collection, adding the course to that collection as well
, and also ask each tag for its courses collection, adding the course to that collection as well ![]() . This satisfies both sides of the relationship. As before, you then flush and clear the persistence context via the course, and try to load the course again to verify that it contains a reference to two tags.
. This satisfies both sides of the relationship. As before, you then flush and clear the persistence context via the course, and try to load the course again to verify that it contains a reference to two tags.
It turns out that this code wouldn’t work if you only updated the tags collection in course. Try it out by commenting out the two lines that add the course to the tags. The assertion would fail, because the Course entity isn’t the active side of the relationship.
Because the active side is the Tag entity, when you add a course to t1 and t2, JPA will see this change and generate SQL INSERT statements for the new course entity. JPA can’t watch both sides of the relationship; otherwise it might actually insert the same rows twice. You need to know which side is active; updating the inverse side may not actually trigger JPA persistence, but updating the active end will always do so.
Did we Pick the Right Owner?
In the example, Tag is the owning side of the relationship, which means that any changes to Tagcourses entries get automatically flushed to the database. You picked this side by making the other side define the mappedBy annotation attribute.
For most bidirectional one-to-many relationships, the appropriate active end is the many side, as the foreign key lives in the child. For many-to-many relationships, the choice is arbitrary and something you need to decide on a case-by-case basis.
Next you’ll deal with registering students for your courses, which will help you learn about inheritance hierarchies and JPA.
4.3.5. Putting the people in courses...
Now you’ve come to a very important part: actually registering students and tracking instructors. Courses would be useless unless you provide both instructors and students. You will define your students and teachers by using JPA entity inheritance. This feature allows you to define common fields in a base class, while placing fields specific to an entity in the refined subclass.
To implement entity inheritance in your model, you’ll define an abstract Person entity, with typical fields such as firstName and lastName, and then define separate entities for Instructors and Students, which will extend the Person entity.
While you could use the Roo shell to define your fields, in this example you’ll just enter the field definitions in the editor. You can use the STS Organize Imports feature ([CTRL/CMD]-SHIFT-O) to automatically find your annotations. This technique is used during rapid prototyping and enables developers to make changes to a data design quickly.
Other Relationship Types
Although Roo’s persistence engine supports any JPA construct you can create, the web scaffolding we discuss in chapter 5 doesn’t support every potential construct. Nor may the automatic integration testing system. Features such as embedded components aren’t properly supported yet. When defining a complex data model, generate your integration tests and prototype a user interface using the scaffolding to see what Roo can support out of the box.
You have several additional entities to create—students, instructors, and course registrations. Let’s start this process by defining the people who are taking and teaching courses.
4.3.6. People teach and attend courses—inheritance
All of the relationships we’ve discussed so far are either “has-a” (one-to-many, many-to-many) or “belongs-to” (many-to-one) relationships. Sometimes an instance of one entity is a more specific instance of another (referred to by the moniker isa”). JPA supports defining these hierarchical relationships. These are exposed in Roo using the familiar entity and field commands.
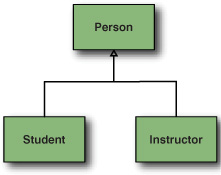
You have two types of people that you track in your system—students and instructors. Both have some common elements, so you can define an inheritance hierarchy to collect the common elements in a parent entity.
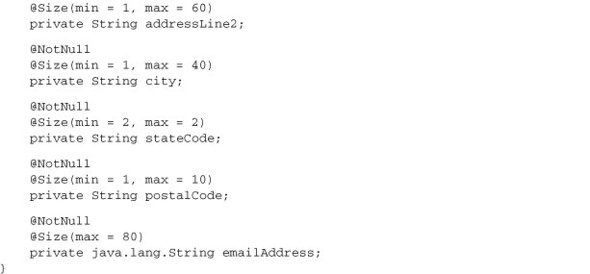
You’ll define this hierarchy using three entities, as shown in figure 4.5. You’ll use Person to hold common elements: address information and a name, for example. For Students, you need to track dietary preferences and emergency contact information. You’ll also need to track your Instructors’ tax ids, and whether they are still active trainers within your organization. You’ll define these attributes in the Student and Instructor entities, which you’ll inherit from Person.
Figure 4.5. The Person hierarchy
From the Java side, this is a straightforward inheritance design. Student and Instructor entities can simply extend the Person entity. But JPA needs additional information to map this hierarchy to a database. JPA gives you three distinct ways to map an inheritance relationship: as a single table, a table for each child class, and tables for all classes. Table 4.2 outlines the mapping options, which you can specify with the Roo entity attribute, --inheritanceType.
Table 4.2. Inheritance models available from --inheritanceType
|
inheritanceType |
Description |
|---|---|
| SINGLE_TABLE | Puts all data from the parent and child classes into a single table. Each row is identified with a discriminator that defines which entity to create when fetching the row from the database. You’ll need to tell JPA how to locate the rows,
using a combination of @DiscriminatorColumn, @Discriminator-Formula, and @DiscriminatorValue annotations. Consult your provider’s
JPA reference manual for an example. Note that each field must be nullable in the child classes, so that the SQL statement can insert the row without those columns. |
| TABLE_PER_CLASS | Also known as “Table per concrete class,” this strategy only creates the tables of the child classes in the relationship. All parent entity data is defined in each physical child table. Parent classes can be abstract or concrete. Fields can be nullable or required in the child tables. JPA simply inserts rows into the appropriate table based on the mappings for the class of the child entity. |
| JOINED | This is the fully database normalized version of the hierarchy. The JPA provider will create the parent and child tables for the relationship, and use SQL joins to fetch the data for a given entity. |
One important issue with Roo and the hierarchical relationships is that it doesn’t completely support all settings in the entity shell command. For example, Roo doesn’t have a command to let you configure the discriminator for the SINGLE_TABLE model, so you’ll just have to edit the classes and add the proper annotations yourself.
For this relationship, you’ll choose the TABLE_PER_CLASS option, since you’re not going to query across the different subtasks on a regular basis. You don’t want to incur either the overhead of the joins in the JOINED relationship, or the nullability requirement on child entity columns in the SINGLE_TABLE arrangement.
First, let’s define the Person entity. You’ll use the Roo entity command:
entity jpa --class ~.model.Person --abstract --inheritanceType TABLE_PER_CLASS
This command is slightly different than the ones before it. You make the person abstract because you don’t want anyone to create a generic one. You also select the TABLE_PER_CLASS inheritance type.
You’ll just add the fields and annotations to this class directly, rather than running the Roo shell commands. The completed Person entity is shown in the following listing. Keep your Roo shell running so that it can adjust your ITDs once you save the changes to Person.
Listing 4.5. The completed Person entity
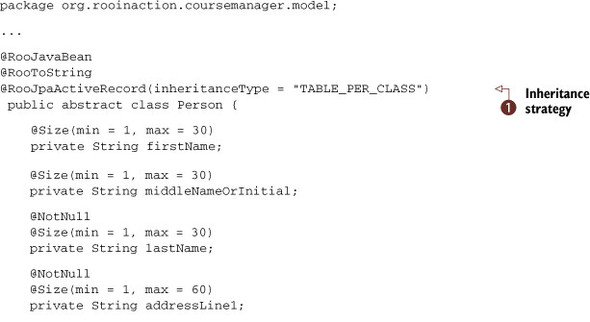
You used the @RooJpaActiveRecord annotation ![]() to define both the fact that Roo manages the entity and that you’re using the TABLE_PER_CLASS strategy.
to define both the fact that Roo manages the entity and that you’re using the TABLE_PER_CLASS strategy.
Now you’ll define each of your subclasses. First you’ll create your Student:
entity jpa --class ~.model.Student --extends ~.model.Person --testAutomatically
You’ll fill it in with the appropriate field definitions in the IDE:
package org.rooinaction.coursemanager.model;

...

@RooJavaBean
@RooToString
@RooJpaActiveRecord
public class Student extends Person {

    @NotNull
    @Size(min = 1, max = 30)
    private String emergencyContactName;

    @NotNull
    @Size(min = 1, max = 80)
    private String emergencyContactInfo;

    @Size(max = 30)
    private String dietaryRestrictions;

}
The difference between this and any other entity is minimal; the extends is the only part of the code that changes. But because of Java inheritance, Student now includes fields from Person. In JPA, all of these fields are combined into a new table in the database named student.
Let’s do the same for the Instructor:
entity jpa --class ~.model.Instructor --extends ~.model.Person --testAutomatically
Here’s the Instructor class. You’ve added the fields by hand:
package org.rooinaction.coursemanager.model;

...

@RooJavaBean
@RooToString
@RooJpaActiveRecord
public class Instructor extends Person {

    @NotNull
    @Size(min = 9, max = 9)
    private String taxNumber;

    @NotNull
    private boolean active;
}
Just Edit the Java Files!
If you already know what you want, and are in an IDE, the quickest way to develop is to just plop the fields into the class. If your Roo shell is running it will immediately update the ITDs.
Nothing different again, except the fact that it extends Person.
4.3.7. Testing your inheritance hierarchy
Because you defined both Student and Instructor using the --testAutomatically flag, you just have to run the integration tests to verify their behavior. From Spring-Source Tool Suite, just open up the InstructorIntegrationTest entity and run the tests. Repeat this for the StudentIntegrationTest class. If you want to run all tests for the project at once, either use the Roo perform tests command or Maven’s mvntest command.
All tests should pass, unless you’re using Hypersonic SQL, Derby, Sybase, or a SQL Server database engine. If you’d like to write more complex tests, ones that use the Student with other entities, feel free to do so.
My Tests Didn’t Pass...
So, you’re one of the unlucky ones...
Roo uses JPA annotations to define the primary key of each entity, holding them in the Jpa_Entity.aj ITD. From your Course entity:
@Id
@GeneratedValue(strategy = GenerationType.AUTO)
@Column(name = "id")
private Long Course.id;
On database engines that use an IDENTITY data type, such as MySQL, you can’t use the AUTO key generation strategy.
When using Hibernate as the persistence engine, your integration tests will fail when running on these databases, due to a database mapping failure on startup (see http://mng.bz/PpLH for details).
Correcting the Mapping
To fix this problem, you can manually copy the id field and the getId() and setId() methods from the Roo_Jpa_Entity.aj file, paste them into the Person.java class, and change the key generation strategy. You can use another generation strategy, such as TABLE or SEQUENCE (with databases that support it). The additional code you’ll add to your Java entity class when selecting the TABLE strategy looks like this:
@Id
@GeneratedValue(strategy = GenerationType.TABLE)
@Column(name = "id")
private Long id;

public Long getId() {
    return id;
}

public void setId(Long id) {
   this.id = id;
}
The TABLE strategy defines a table that keeps track of the next highest value for a given entity’s primary key. The SEQUENCE strategy uses a high performance internal number sequence, which the database will increment automatically when creating the primary key. On databases that support sequences, you’ll get far higher performance by selecting the SEQUENCE strategy.
STS Users: Use Push-In Refactoring
If you’re using STS, open up the Package Explorer, make sure you’re showing your Roo Generated ITDs, and click on id(), getId() and setId(Long id), and right-click on one of the methods. There you can select Refactor... Push-In Refactor and Roo will move the elements for you.
You can make the change above and rerun the Roo shell. Roo will detect the implementation of the primary key and remove it from the Person_Roo_Entity.aj file. Roo will also remove the getter and setter from the Person_Roo_JavaBean.aj file automatically.
For More Information on JPA Inheritance
More information on JPA inheritance models can be found in a number of books on JPA. Remember that Spring Roo currently uses JPA 2.0, so you have the full range of features provided in that release.
4.3.8. JPA providers and your database schema
Let’s take a look at the database tables that Roo generated for the Student and Instructor entities. You configured your database for MySQL using the persistencesetup command and then used the mysql client tool to describe your tables. First let’s look at the student table:
mysql> desc student;

+-----------+-------------+------+-----+------------+
| Field                  | Type        | Null | Key |
+------------------------+-------------+------+-----+
| id                     | bigint(20)  | NO   | PRI |
| address_line1          | varchar(60) | NO   |     |
| address_line2          | varchar(60) | YES  |     |
| city                   | varchar(40) | NO   |     |
| first_name             | varchar(30) | YES  |     |
| last_name              | varchar(30) | NO   |     |
| middle_name_or_initial | varchar(30) | YES  |     |
| postal_code            | varchar(10) | NO   |     |
| state_code             | varchar(2)  | NO   |     |
| version                | int(11)     | YES  |     |
| dietary_restrictions   | varchar(30) | YES  |     |
| emergency_contact_info | varchar(80) | NO   |     |
| emergency_contact_name | varchar(30) | NO   |     |
+------------------------+-------------+------+-----+
All of the fields from the Person entity appear, as well as fields specific to the Student such as dietary_restrictions, emergency_contact_info, and emergency_contact_name. You can see in this example that Roo changes camel-cased variables to underscored table field names when generating the DDL.
Interestingly, if you choose EclipseLink as your JPA provider, you get a slightly different schema:
mysql> desc student;

+----------------------+--------------+------+-----+
| Field                | Type         | Null | Key |
+----------------------+--------------+------+-----+
| id                   | bigint(20)   | NO   | PRI |
| LASTNAME             | varchar(255) | YES  |     |
| MIDDLENAMEORINITIAL  | varchar(255) | YES  |     |
| EMERGENCYCONTACTINFO | varchar(255) | YES  |     |
| STATECODE            | varchar(255) | YES  |     |
| ADDRESSLINE2         | varchar(255) | YES  |     |
| ADDRESSLINE1         | varchar(255) | YES  |     |
| DIETARYRESTRICTIONS  | varchar(255) | YES  |     |
| CITY                 | varchar(255) | YES  |     |
| version              | int(11)      | YES  |     |
| POSTALCODE           | varchar(255) | YES  |     |
| EMERGENCYCONTACTNAME | varchar(255) | YES  |     |
| FIRSTNAME            | varchar(255) | YES  |     |
+----------------------+--------------+------+-----+
Note that your datatypes are all completely different—the Hibernate provider honored your @Size attributes and @NotNull directives, but EclipseLink did not. EclipseLink also uppercased all fields except the primary key id and version columns. Roo defines a @Column annotation for the id and version attributes, each of which defines the field name in lowercase.
You should always take a good look at your database table mappings and learn to use your JPA provider effectively. Since you don’t specify the @Column annotation for your fields, EclipseLink’s defaults kick in, which are different than Hibernate’s defaults.
Although Hibernate honors the schema settings in your Bean Validation annotations, all JPA providers pay attention to the @Column mapping. The Bean Validation API isn’t a part of JPA itself; rather, it’s part of Java EE 6. To be 100% portable, you’d need to define your fields with both sets of annotations, even though this leads to duplication and potentially errors between these settings. For example, the emergency-ContactName field should be defined as follows:
@NotNull
@Size(min = 1, max = 30)
@Column(length = 30, name = "emergency_contact_name", nullable = false)
private String emergencyContactName;
This will cause the proper mapping for the field in all JPA systems, regardless of whether they support Bean Validation. Also, when you build your Spring MVC web interface, the bean validations will be used to generate client-side web browser validation logic, as you’ll see in chapter 5.
Now the EclipseLink mapping looks like this:
mysql> desc student;

+------------------------+--------------+------+-----+
| Field                  | Type         | Null | Key |
+------------------------+--------------+------+-----+
...

| emergency_contact_name | varchar(30)  | NO   |     |
...

+------------------------+--------------+------+-----+
Let’s wrap up by reviewing the instructor table:
mysql> desc instructor;

+------------------------+-------------+------+-----+
| Field                  | Type        | Null | Key |
+------------------------+-------------+------+-----+
| id                     | bigint(20)  | NO   | PRI |
| address_line1          | varchar(60) | NO   |     |
| address_line2          | varchar(60) | YES  |     |
| city                   | varchar(40) | NO   |     |
| first_name             | varchar(30) | YES  |     |
| last_name              | varchar(30) | NO   |     |
| middle_name_or_initial | varchar(30) | YES  |     |
| postal_code            | varchar(10) | NO   |     |
| state_code             | varchar(2)  | NO   |     |
| version                | int(11)     | YES  |     |
| active                 | bit(1)      | NO   |     |
| tax_number             | varchar(9)  | NO   |     |
+------------------------+-------------+------+-----+
Again, you see the tax_number and active fields from the Instructor entity and the common fields from the Person entity.
4.3.9. The rest of your schema
You have a few more entities to define. We’ll show their JPA entity definitions for completeness. By now you should be able to use the Roo shell to create the empty entity definition and just type in the fields themselves.
Course Offerings
Course offerings define each run of a course. Students and instructors are assigned in this entity:
@RooJavaBean
@RooToString
@RooJpaActiveRecord
public class Offering {

    @Temporal(TemporalType.DATE)
    @NotNull
    private Date offerDate;

    @NotNull
    @Size(min = 1, max = 80)
    private String locationName;

    @ManyToOne(cascade = CascadeType.ALL)
    private Course course;

    @ManyToOne(cascade = CascadeType.ALL)
    private Instructor instructor;
}
Registrations
Whenever a student registers for a course, you enter a row in the registration table via the Registration entity:
@RooJavaBean
@RooToString
@RooJpaActiveRecord
public class Registration {

    @ManyToOne
    private Student student;

    @ManyToOne
    private Course course;

    private boolean paymentMade;

    private boolean attended;

}
This schema gives you a good combination of data to experiment with. In chapter 5, you’ll learn to use Roo’s user interface features to build a web-based frontend to this database.
Spring Roo makes it easy to work with JPA relationships and hierarchies. A full reference of JPA relationship definitions goes beyond the scope of this book; but exploring the Roo shell field commands alongside this book and a good JPA reference will give you everything you need to start building your persistence model. Remember to write integration tests to confirm your assumptions about related data. This will help you when you begin to build your web application layer in the next chapter.
What if you’re given a separate database schema, and you need to reverse engineer it into your current entity model? Roo has this covered using the database reverse engineering add-on.
4.4. Reverse engineering your database
Using the database reverse engineer Roo shell command, you can scan an existing database and have Roo generate entities automatically. As your database evolves, Roo can keep the database and your entity model in sync.
Suppose you have to interface into a payments system via two SQL tables, invoice and payment. If these tables exist in your current schema, you can have Roo generate entities for them automatically using the database reverse engineer command:
database reverse engineer --schema coursemgrch04 --includeTables "invoice payment" --package ~.model --testAutomatically
The preceding command takes several parameters, as shown in table 4.3.
Table 4.3. Important options for database reverse engineer
|
Command |
Use |
Notes |
|---|---|---|
| --schema | Provides the name of a database schema to use | This operates on the configured database connection in database.properties. |
| --includeTables | The list of tables to include when reverse engineering | By default, all tables are included, except those listed by the --excludeTables option. This option can list multiple tables,
separated by spaces, in quotes. Example: --includeTables "invoice payment" |
| --excludeTables | The list of tables to exclude when reverse engineering | By default, no tables are excluded. Use this when you wish to exclude a certain table or set of tables. Takes the same syntax
as --includeTables above. |
| --package | The target Java package that will contain the reverse engineered entities | You can use thê. wildcard to refer to the base package name. Example: --package ~.model.reveng |
As with other entities, you can generate automated tests with --testAutomatically.
The first time you run this command against your database, you’ll receive an error message about a missing driver. You’ll need to install a piece of software known as an add-on, which will provide the JDBC driver for your database. The Roo shell uses this JDBC driver to perform the database reverse engineering process.
What if My Database doesn’t have an Add-On?
The Roo team provides add- on drivers that support a number of databases, including (at the time of this writing) JTDS (for Sybase and Microsoft SQL Server), PostgreSQL, Firebird, MySQL, AS400JDBC, Derby, and H2. But if you’re not using one of those databases, you can follow a series of steps to OSGi-ify a JDBC driver for use by the reverse engineering process. See chapter 11, section 6 for details on creating an OSGi wrapper add-on.
For example, when you run this command against a project that points to a MySQL database, you get this (cleaned up for print) message:
Located add-on that may offer this JDBC driver
1 found, sorted by rank; T = trusted developer; R = Roo 1.1 compatible
ID T R DESCRIPTION ----------------------------------------------
01 Y Y 5.1.13.0001 #jdbcdriver driverclass:com.mysql.jdbc.Driver...

[HINT] use 'addon info id --searchResultId ..' to see details about a
       search result
[HINT] use 'addon install id --searchResultId ..' to install a specific
       search result, or
[HINT] use 'addon install bundle --bundleSymbolicName TAB'
       to install a specific add-on version
JDBC driver not available for 'com.mysql.jdbc.Driver'
Roo is telling you that the Roo add-on #01 is actually a JDBC Driver for MySQL. You can install this add-on into the Roo shell so that it can communicate with MySQL. The command to install the driver is
addon install id --searchResultId 01
Roo installs the driver as shown here:
roo>
...
Downloaded 0% of ....o.s.roo.wrapping.mysql-connector-java-5.1...jar
Downloaded 100% of....o.s.roo.wrapping.mysql-connector-java-5.1...jar
Downloaded 0 kB of lookup
Downloaded 11 kB of lookup
Target resource(s):
-------------------
   Spring Roo - Wrapping - mysql-connector-java (5.1.13.0001)

Deploying...done.

Successfully installed add-on: Spring Roo - Wrapping -
   mysql-connector-java [version: 5.1.13.0001]
[Hint] Please consider rating this add-on with the following command:
[Hint] addon feedback bundle --bundleSymbolicName
   org.springframework.roo.wrapping.mysql-connector-java
   --rating ... --comment "..."
More about Add-Ons
Add-ons provide additional functionality to the Roo shell. We devote two chapters to writing add-ons in this book.
Now rerun the database reverse engineer command. If you’re successful, Roo will generate JPA entities automatically, as well as define a set of tests.
You can now run your suite of tests again, using the Maven mvn test command. If Roo can properly test the entities, you can then write further tests to assert whether your mappings are properly defined.
The Roo reverse engineering features heavily rely on the quality of the database schema. If your schema has nontraditional database keys, mappings, or data types, expect that you might run into trouble.
Roo defines your database schema data in a file under src/main/resources, dbre.xml. This is an XML file that is managed by the database reverse engineer command. You may also decide to push-in your generated JPA fields, which are contained within an EntityName_Roo_DbManaged.aj file.
To detach a Roo entity from the reverse engineering system, you need to perform the following steps:
. Copy the field definitions from the Entity_Roo_DbManaged.aj file into your entity Java class, or use the push-in refactoring feature in STS.
. Remove the @RooDbManaged annotation.
. Rerun the Roo shell, which should delete the unused ITD.
So far, we’ve looked at how to create your own entities and database elements, and how to relate them to each other using one-to-many, many-to-one, many-to-many, and inheritance mapping strategies. You also saw how to reverse engineer them from an existing schema. Roo makes coding applications using this persistence model rather easy—just create or look up entities using their ITD findbyId, merge, persist, and remove methods, or define a finder.
You could code this logic directly in a web-based controller, for simple applications. And Roo actually will do this automatically, using the web scaffolding feature we discuss in chapter 5. But you can also take advantage of your Spring platform and define business methods so that you can expose services to your web and other client tiers in a more organized fashion. Now let’s use that technique to define a service layer in your Roo application.
4.5. Adding a service layer
If you recall from chapter 3, Roo can provide repositories to back your objects, rather than using the Active Record approach we’ve been focusing on. You were able to create repositories, based on the Spring Data API, that you could then inject into other Spring components.
You can define services in your application in two ways:
- Using the service create command, which fronts one or more entities and/ or their repositories with a Spring service bean automatically
- Writing the service yourself, using the @Service annotation
Both approaches give you a traditional Spring bean for wiring to components such as controllers and web service interfaces.
4.5.1. Building services with service create
Your services can either directly interact with your Active Record models or use a repository. Roo will automatically detect the correct approach and write the service code appropriately.
Defining a service to expose the Course entity is quite simple:
service --entity ~.model.Course --interface ~.service.CourseService
Roo builds several files:
- CourseService.java—The interface that defines your service. This component will contain an annotation, @RooService, which defines the entities exposed by your service:
@RooService(domainTypes = { org.rooinaction.coursemanager.model.Course.class })
public interface CourseService {
} - CourseService_Roo_Service.aj—Contains the method signatures for the methods you’d normally find in your Active Record API:
privileged aspect CourseService_Roo_Service {
public abstract long CourseService.countAllCourses();
public abstract void CourseService.deleteCourse(Course course);
public abstract Course CourseService.findCourse(Long id);
...
} - CourseServiceImpl.java—This class implements the interface. Any user-defined business methods can be defined here, provided you expose the method
definition in the CourseService.java interface:
public class CourseServiceImpl implements CourseService {
} - CourseServiceImpl_Roo_Service.aj—The heavy lifting is done here. In this aspect, which we omit for brevity, the CourseServiceImpl is weaved with the @Service annotation, marking it as a Spring Bean, and the @Transactional annotation, marking all methods transactional by default; also the code for managing persistence is woven into the class.
For repository-based entities, methods delegate to an injected Repository bean:
public void CourseServiceImpl.deleteCourse(Course course) {
courseRepository.delete(course);
} For Active Record–based entities, the entity itself is used:
public void CourseServiceImpl.deleteCourse(Course course) {
instructor.remove();
}
If you want to write your own service methods, Roo has already provided the interface and a stub implementation class, so you can place your signature in CourseService and the implementation code in CourseServiceImpl. Your service methods will just come along for the ride. They can use the @Transactional annotation, but keep in mind the implementation ITD weaves @Transactional into all methods automatically, so you’ll generally only need to use @Transactional(readOnly = true) to speed up queries.
Again, Roo saves you a lot of time and coding effort. Although you could do these operations by hand using @Service, with the Spring Data–based repository APIs and the handy Service builder command, you can put your data and service layers together in a jiffy.
4.6. Using JPA directly
You may find that you want more control over your persistence code, or want to access JPA or provider-specific features yourself. Since Roo is a Spring JPA application development platform, there’s no reason why you can’t use JPA code yourself.
If you’ve reviewed the entity ITD files, such as Course_Roo_Entity.aj, you’ve seen that Roo uses an entity manager object to do its work. You can also access the entity manager and make calls yourself. There are two basic approaches you can use to gain access to the entity manager:
- Ask an entity for the entity manager with the entityManager() method.
- Tell Spring to inject an entity manager into your repository.
You’ve already seen the first way in your Registration.java custom query method; you used Registration.entityManager() to tell Roo to give you a preconfigured instance. That’s great if you’re in the middle of coding against the Roo APIs in your own service, and just need to make a single call to JPA that isn’t provided by the ITD.
But if you wanted to move your query into a formal Spring Repository, and separate it from the Roo entity itself, you need to
- Create an interface to define the repository with the finder method signature.
- Implement the interface and move the finder implementation method into it.
- Inject an entity manager using the Java EE @PersistenceContext annotation.
- Use this injected persistence context to access the database.
- Use the @Autowired annotation in your controller or service class to inject the repository.
The next listing shows this technique, defining both the CourseQueryRepository interface and an implementing class, CourseQueryRepositoryJPA.
Listing 4.6. The course query repository
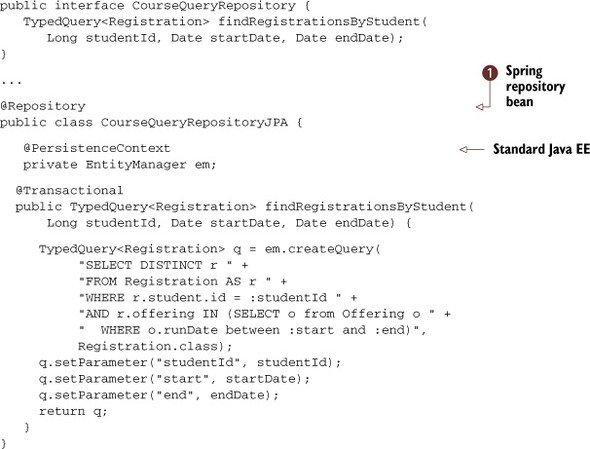
The finder method is largely the same as it would be in the finder itself. The difference is that you’re starting to use some
of the more familiar Spring Framework conventions. First you define a business interface, CourseQueryRepository, to define your exposed Spring bean method, findRegistrationsByStudent(). You annotate the implementation class with the @Repository annotation ![]() which, in addition to mounting it as a Spring bean, provides translation of all persistence exceptions to Spring’s DataAccess-Exception exception hierarchy. You mark the method as @Transactional, in case the method is called by any external services.
which, in addition to mounting it as a Spring bean, provides translation of all persistence exceptions to Spring’s DataAccess-Exception exception hierarchy. You mark the method as @Transactional, in case the method is called by any external services.
You can now use the CourseQueryRepository bean by autowiring it into your controllers. Simply use the following syntax to inject it:
private CourseQueryRepository repository;
@Autowired
public void setCourseQueryRepository(CourseQueryRepository repository) {
  this.repository = repository;
}
Remember—Roo applications are Spring applications, and therefore you can do anything you’re used to doing in Spring. You don’t even need to use Roo’s entities, controllers, or services. You can treat Roo like a big army knife; use it as you see fit.
A word of warning, though: Roo may not support the automatic generation of web-based applications based on handwritten services and repositories. The scaffolding feature in chapter 5 will only work against the Roo-generated ITDs.
Finally, we should point out that you can even use Roo with JDBC. Just configure your Spring application with the appropriate JDBC driver and data source, and then start using the Spring JdbcTemplate API, or MyBatis (a common SQL-mapping API), or even a non-SQL database platform. You may not get all of the baked-in features of Roo, such as automatic website generation, but perhaps future add-ons will support these APIs.
Be Careful when Mixing JDBC and JPA
Because JPA caches data in the persistence context, it may decide to write the data to the database periodically during a flush operation. If you query that data using SQL before it’s been written, you may not find the data you’re looking for. Always be careful about using SQL and JPA together. At a bare minimum, consider executing the flush() method on the entity or entity manager before executing SQL queries.
We discuss more complex tests, such as integration tests against services and repositories, in chapter 9.
4.7. NoSQL databases with MongoDB
Added in Roo 1.2 is support for NoSQL databases using the NoSQL Spring Data APIs. NoSQL databases[1] attempt to address a number of challenges inherent in using a relational database, such as these:
1 The term NoSQL was coined by Carlo Strozzi in 1998 as a name for his nonrelational, RDB derivative database. This project is ongoing, and can be visited at http://www.strozzi.it.
- Normalization kills query performance —Because relational data is normalized, or factored in to the least duplicated form, it can become hard to query across a number of entities. Consider the performance issues with querying an overly normalized database that leads to a crazy 10 table joins.
- Rigid database structure —Relational databases require structure to perform properly. Each column must be defined with a specific type, and the database engine optimizes indexing and performance around this structure.
- Difficulty querying large volumes of data quickly —Although some database vendors have rolled out text searching capabilities, and other developers are using tools such as Lucene to index their data, databases themselves can’t quickly search through large volumes of loosely structured text without scanning vast amounts of data. This makes them less than ideal for searching through content stored in XML or JSON format.
For these and other reasons, the NoSQL movement was born. A number of types of NoSQL databases have been developed, but they generally fall into several types, as outlined in table 4.4.
Table 4.4. Several NoSQL database variants
|
Type |
Description |
Examples |
|---|---|---|
| Document store | Each entry in a document store is a single document. Stored in a format such as JSON, XML, or even binary JSON (BSON), these databases are geared toward quickly searching content within the document stores and storing internally structured data. | MongoDB, CouchDB, SimpleDB |
| Graph | Data is related in a node-to-node graph structure, and can be quickly navigated across these nonfixed relationships. Great for storing associations of data elements where the network of data can be reorganized quickly. A favorite of some semantic web developers. | Neo4J |
| Column store | Places focus primarily on the column, rather than collected rows of data. Powers huge websites such as Facebook, Twitter, Digg, and others. Google pioneered column-based storage with BigTable when indexing the internet through linear means proved too difficult.[a] | Cassandra, HBase, BigTable |
| Key/Value store | If the world is a hashmap, this is your database. The objects can be structured in anyway possible, such as primitive values or serialized objects, and are fetched by unique keys. | Redis, MemcacheDB |
a Facebook created Cassandra, a column store NoSQL database, and open sourced an implementation. See http://mng.bz/5321.
We won’t get into the religious debates about which NoSQL variant or engine to choose in this book. But as Roo supports at least one (at the time of publication) NoSQL database, we will show you how to use it as a database store.
4.7.1. Persistence with MongoDB
As discussed earlier, document store NoSQL databases treat each element as a searchable document. Roo supports accessing these databases using the Spring Data MongoDB API (http://mng.bz/rLm9), which is part of the larger Spring Data project. To use this data store, you’ll need to install a MongoDB engine, configure it, and then use a variant of the entity command to create your Mongo-based entities.
Native MongoDB data is stored in a JSON data format, and can be accessed using a number of APIs. The Mongo default client uses JavaScript. Here’s a sample code snippet from this client that creates and then retrieves a document from the data store:
> db.people.save( {
... "name" : "Ken",
... "age" : 42,
... "city" : "Philadelphia"
... })

> db.people.find({ "name" : "Ken"})
{ "_id" : ObjectId("4e7df1f0a3c4b6fc99496731"),

  "name" : "Ken", "age" : 42, "city" : "Philadelphia" }
The first block of code creates a new element in the newly defined db.people object. The data held within it is defined as a JSON string. Later, in the second statement, we use a fragment of that string, { "name": "Ken" }, to find all of the people with the name of Ken. We didn’t have to predefine the object, or field definitions, or even the database. MongoDB just took our data and stored it.
4.7.2. Setting up MongoDB
Let’s get started and set up MongoDB. Like other servers, you’ll install the database engine and client by downloading it and configuring it as a standalone service.
To install MongoDB, visit the project website at http://mongodb.org and download the server for your operating system. We’ve used the OS X utility, brew,[2] to install it on our machines with a minimum of fuss. You’ll also have to configure an empty database directory, /data/db by default. We recommend reading and using the “Getting Started” guide and the basic tutorial to get a sense of how to start up the server, mongod, and how to access the client, mongo. After you’ve created several documents and experimented with the client, you should be ready to build your first MongoDBbased application.
2brew installs MongoDB. That’s it. Really.
Our tutorial assumes that you’ve configured a working MongoDB database and that your mongod daemon process is running when you work with MongoDB and Roo.
4.7.3. MongoDB and Roo
Obviously, Java programmers need a bit more structure than that. First of all, they deal mostly with classes in the real world, so one way of approaching a MongoDB implementation would be to serialize and deserialize JSON using a Java POJO.
That’s where Roo’s support for the Spring Data MongoDB API comes in. Instead of using a relational data store and the @Entity pattern, Roo uses a new annotation, @RooMongoEntity, which is configured when using the entity mongo shell command. To build your course with Mongo support, you’d first set up your MongoDB database layer:
roo> mongo setup
This configures support for MongoDB, assuming that the engine is running on the same machine, on the default port. It also assumes that security is not enabled. You can use parameters to adjust your MongoDB settings, or edit them later in database
.properties.
Using Cloud Foundry?
If you’re using Cloud Foundry, use the --cloud-Foundry true option to configure support for the Cloud Foundry MongoDB instance.
After your configuration is updated, you’ll see a new configuration file, applicationContext-mongo.xml, which contains the Spring Data Mongo API configuration elements. Now you’re ready to create MongoDB-based entities.
4.7.4. A MongoDB Course entity
Let’s build a Course object using MongoDB. You’ll start by defining the entity with the new entity mongo shell command:
entity mongo --class ~.model.Course --testAutomatically
Roo responds by building your MongoDB entity:
package org.rooinaction.coursemanager.model;

import org.springframework.roo.addon.javabean.RooJavaBean;
import org.springframework.roo.addon.layers. repository.mongo.RooMongoEntity;
import org.springframework.roo.addon.tostring.RooToString;

@RooJavaBean
@RooToString
@RooMongoEntity
public class Course {

}
Comparing this entity with the others, the major difference is the @RooMongoEntity annotation. Beyond this, you can treat it the same way as your other entities. Let’s add some fields and a relationship to a simplified Offer object. First, the Course fields:
private String name;
private String description;
private BigDecimal listPrice;
private Integer maximumCapacity;
private CourseTypeEnum courseType;
private Set<Offering> offerings =
   new HashSet<Offering>();
Next, you’ll define your Offering POJO, for embedding within your Course:
package org.rooinaction.coursemanager.model;
@RooJavaBean
@RooToString
public class Offering {
    private Date offerDate;
}
Note, this is just a simple Java POJO which you’ll embed into your database.
4.7.5. Generating a Course MongoDB repository
To enable access to your Roo MongoDB entity, you need to build a repository. You can do this via the repository mongo command:
roo> repository mongo --entity ~.model.Course --interface ~.repositories.CourseRepository
This command will build a CourseRepository interface and build an ITD, CourseRepository_Roo_Mongo_Repository.aj, to back it. The repository definition:
@RooRepositoryMongo(domainType = Course.class)
public interface CourseRepository {

    List<org.rooinaction.coursemanager.model.Course> findAll();
}
The other methods, such as find(BigInteger), save(Course), and update(Course) are provided by the ITD, which uses Spring Data MongoDB calls to perform the persistence activities. These calls are enabled by the annotation @RooRepositoryMongo. They’re similar in feature to the JPA repository CRUD methods. But they act on a NoSQL database, so the method signatures aren’t an exact match. You should thoroughly research MongoDB before writing an application that uses it for persistence.
You can then execute code against the repository, as in this test, which uses a method, createCourseWithOffering(), to create the Course and a single offering:
@Autowired
private CourseRepository courseRepository;

...

@Test
public void testPersistCourseUsingRepository() {
  Course course = createCourseWithOffering();
  courseRepository.save(course);
  Assert.assertTrue(courseRepository.count() > 0);
  Course course2 = courseRepository.findOne(course.getId());
  Assert.assertEquals( course.getId(), course2.getId());
  Assert.assertEquals(1, course.getOfferings().size());
}
4.7.6. Creating a service for your MongoDB repository
Creating a service is the same procedure, whether you are using a JPA or MongoDB repository. Simply issue the service command:
roo> service --interface ~.service.CourseService --entity ~.model.Course
If you aimed your tests against the service, your methods would look similar to the SQL-based service wrapper methods. Roo tries to normalize the method names a bit. Here’s the same test, but focused on a service instead:
@Autowired
private CourseService courseService;
@Test
public void testPersistCourseWithOffering() {
  Course course = createCourseWithOffering();
  courseAndOfferingService.saveCourse(course);
  Assert.assertTrue (courseAndOfferingService.countAllCourses() > 0);
  Course course2 = courseAndOfferingService.findCourse(course.getId());
  Assert.assertEquals( course.getId(), course2.getId());
  Assert.assertEquals(1, course.getOfferings().size());
}
The major differences between NoSQL and regular database services are
- NoSQL databases don’t participate in transactions. The @Transactional annotation is ignored for methods called by Spring Data NoSQL stores.
- Tests don’t clean up after themselves. You’ll need to use JUnit annotations such as @Before and @After to remove or reset data.
- Relationships will behave differently and may need special supporting code. The example above just nests an Offering POJO within each Course, and doesn’t attempt to create a true two-way relationship similar to JPA.
This feature is quite new, and may change in the future. But SpringSource is committed to the Spring Data API and to supporting both SQL and non-SQL data stores. For more information, please refer to the Spring Data project and the various subprojects for databases of interest.
4.8. Summary
In this chapter, we discussed how Spring Roo enables quick creation of JPA relationships and hierarchies. We showed how to work with transactions, and to create a traditional layered, service-based architecture that you’ll usually find in other web-based applications using services and repositories.
We also discussed the support in Roo 1.2 for MongoDB, via the new Spring Data API. Spring Data will prove to be a huge asset to Spring Roo projects, as you saw in this chapter, and also enhance standard JPA, as you saw in the previous chapter.
Coming up in chapter 5, we’ll begin to discuss web-based application development using Spring Roo. You’ll configure your project as a web-based application, and learn how to leverage Roo to generate and manage your web user interfaces.
4.9. Resources
Books
- Keith, Mike, and Merrick Schincariol. Pro JPA 2: Mastering the Java Persistence API (Apress, 2009) Yang, Daoqi, Ph D. Java Persistence with JPA (Outskirts Press, 2010)
Web
- A great, open source reference site for the JPA 2 standard and all of the myriad implementations is the JPA Wikibook—http://mng.bz/1a1v.
- The Spring Data MongoDB API—http://mng.bz/rLm9. Pay close attention to the various GIT repositories that contain examples for the various features of the API.