
Chapter 13. Cloud computing
- Defining cloud computing
- Using the platform as a service model
- Understanding Cloud Foundry
- Deploying a Roo add-on to Cloud Foundry
In the previous two chapters, you learned how to write and install custom Roo addon components, both simple and advanced add-on types.
In this chapter, you’ll learn how to package and deploy the sample Roo application to an external hosting service using a new web application deployment paradigm called cloud computing (CC). We’ll discuss this new paradigm and the cloud service offering from VMware[1] called Cloud Foundry.
1 The parent company of the SpringSource team who created the Spring Roo framework.
Roo includes an add-on component for Cloud Foundry to help developers with the tasks of deploying Roo applications to the cloud. We’ll show you how to configure and deploy your Roo applications using the Cloud Foundry add-on.
Why are organizations turning to cloud computing? Scalability (for scaling up as well as down on demand) is one reason. Another is that using cloud computing means no equipment, maintenance, or operational costs.
Interest in cloud computing has steadily increased over the last few years, as companies discover that hosting applications on an external network provider is a cost-effective method of deploying an application without having to invest in the operational infrastructure. Let’s look at the different service and deployment models offered by cloud computing; but first we’ll define CC.
13.1. What is cloud computing?
Cloud computing (or cloud hosting) has moved up the chart of software implementation options to become the third most popular choice for developers, just behind build and buy. Organizations are attracted to the option of hosting their applications on the cloud because it offers them a low-cost and highly scalable implementation.
There are three types of service models in cloud computing.
The infrastructure as a service (IaaS) model helps organizations to outsource the whole infrastructure used to support their operations (including storage, hardware, servers, and networking components). The cloud service provider owns and maintains the equipment and charges the clients on a per-use basis (see http://mng.bz/DR1h). Amazon’s Elastic Computing Cloud (EC2) is an example of an IaaS model.
In a platform as a service or PaaS model, web applications are developed in-house and deployed to an external hosting site to be hosted on the cloud. Google App Engine (GAE), Microsoft’s Azure, VMware’s Cloud Foundry, and Heroku are examples of PaaS cloud computing offerings.
In the third cloud architecture model, called software as a service, or SaaS, applications are developed, hosted, and maintained as third-party programs by an external vendor. SalesForce.com and Google’s GMail are examples of SaaS solutions.
In this chapter, you’ll learn how to deploy the Roo sample Course Manager application you’ve developed to the Cloud Foundry server environment. Here again, Roo provides excellent support to perform the steps necessary to run the Roo application in the externally hosted server environment.
13.1.1. Platform as a service
The National Institute of Standards and Technology (NIST) defines[2]cloud computing as follows:
2 NIST Special Publication 800-145: The NIST Definition of Cloud Computing (Draft).
Cloud computing as a model for enabling ubiquitous, convenient, on-demand network access to a shared pool of configurable computing resources (for example, networks, servers, storage, applications, and services) that can be rapidly provisioned and released with minimal management effort or service provider interaction. This cloud model promotes availability and is composed of five essential characteristics, three service models, and four deployment models.
For more information on these characteristics refer to NIST Special Publication 800-145 that defines cloud computing and describes the different cloud computing models.
NIST defines the platform as a service model as follows:
The capability provided to the consumer is to deploy onto the cloud infrastructure consumer-created or acquired applications created using programming languages and tools supported by the provider. The consumer does not manage or control the underlying cloud infrastructure including network, servers, operating systems, or storage, but has control over the deployed applications and possibly application hosting environment configurations.
Several PaaS cloud providers can deploy Java-based web applications to the cloud infrastructure, including Heroku, CloudBees, and Cloud Foundry.
Heroku
Heroku started as a cloud provider for Ruby on Rails–based web applications, but now it also supports Java applications. Its architecture is based on isolated processes called Dynos, which receive web requests from a routing (load balancer) component, connect to application resources via environment variables, and write output to a logging component called LogPlex. There are two types of Dynos: A web dyno is a web process running the application code and responding to HTTP requests. More web dynos provide more concurrency to access the web application. The second type is a worker dyno, which is a background process that runs the application code and processes jobs from a queue.
Heroku’s architecture model also includes a routing component, fine-grained control of DNS, custom domains, and SSL features. Heroku has logging and visibility capability to monitor the application’s operations with real-time logging and auditing, process status inspection, and an audit trail. To deploy and manage the Java applications and their operations, Heroku provides the following interfaces:
- Command-line interface
- Web console
- REST API
Heroku supports databases like PostgreSQL, and the add-on features include support for NoSQL databases like Redis, MongoDB, and Neo4J; scheduling support; caching frameworks like memcached; and messaging products like RabbitMQ.
Cloudbees
The CloudBees PaaS lets developers build, test, and deploy Java web applications in the cloud. CloudBees allows development teams to move their development and production activities to the cloud without infrastructure costs or overhead. It provides integration with the Jenkins continuous integration (CI) tool for application builds, and it also offers a private cloud option if organizations prefer to install a cloud infrastructure within their network.
Cloud Foundry, the third cloud provider we mentioned earlier in this section, will get more attention later in this chapter. For information on other available PaaS cloud providers, review the list of websites in the Resources section at the end of this chapter.
First, we’ll look at how the Cloud Foundry product is different from other cloud solutions and what it offers to application developers and operations teams.
13.2. Cloud Foundry
Cloud Foundry is an open source PaaS cloud solution from SpringSource, the same organization behind the Spring Roo framework. It allows the deployment of applications written using Spring, Rails, and other modern frameworks. Cloud Foundry supports different programming models and services from VMware and third parties.
The Cloud Foundry application platform includes an application execution engine, an automation engine for application deployment and lifecycle management, and a scriptable command-line interface. It provides integration with development tools like Spring Tool Suite (STS) to help with development and deployment processes.
Figure 13.1 shows the open PaaS application architecture model of Cloud Foundry described by VMware’s Rod Johnson in his blog post (http://mng.bz/G8Sk) that announced the release of the Cloud Foundry product. It shows all of the programming models, application services, and deployment options that Cloud Foundry brings to the table.
Figure 13.1. Cloud Foundry’s open PaaS architecture model
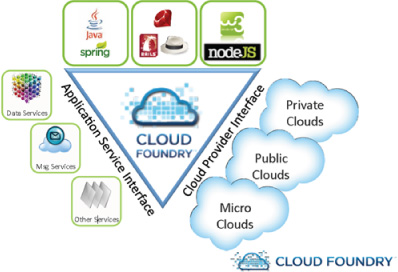
As you can see from the architecture model diagram, the Cloud Foundry platform offers diverse services in the areas of cloud deployment models, programming languages, and enterprise application services. In the deployment area, Cloud Foundry currently has three offerings:
- CloudFoundry.com —This is the VMware-hosted, manage-and-support service. It provides a multitenant PaaS that runs on the vSphere cloud platform.
- CloudFoundry.org —This is the open source community site for developers to collaborate and contribute to the Cloud Foundry project.
- Micro Cloud Foundry —The Micro Cloud Foundry (http://mng.bz/LCcz) is a local version of the Cloud Foundry service. It runs in a virtual machine on a developer’s Mac or PC. Developers can use Micro Cloud Foundry to run a cloud on their own computers for development and testing purposes. You can build cloud applications locally and deploy them to Cloud Foundry without changing the code.
13.2.1. Hosting
Cloud Foundry supports the following program models for developing cloud-based applications:
- Spring and Java
- Ruby (Rails and Sinatra)
- Node.js
- Other JVM languages and frameworks, including Groovy, Grails, and Scala
13.2.2. Database support
As you can see, Cloud Foundry supports a diverse set of programming languages and runtime environments. It also supports the following databases for data storage and persistence requirements:
- MongoDB
- MySQL
- Redis
- PostgreSQL
MongoDB is one of the NoSQL databases (also known as nonrelational databases or NRDBMS), and it’s gaining in popularity for storing document-based, unstructured data.
PostgreSQL database support was added in Spring Roo 1.2 to provide another choice (in addition to MySQL) of open source relational database services offered by Cloud Foundry.
13.2.3. Messaging
Messaging services such as RabbitMQ are also offered as part of the Cloud Foundry service infrastructure. Messaging patterns play a significant role in developing loosely coupled application architectures, which is a big part of cloud computing models. You can expect to see more integration and innovation in this area in future versions of cloud computing architectures.
The deployment process of moving a web application to Cloud server instances involves several steps. These steps include uploading the web application to the server and binding various services—like database, messaging, scheduling, and monitoring services—to the application. Performing these steps manually takes a great deal of time and effort because there are many environment variables that need to be set up correctly for the application to function as expected on remote servers.
It would be nice to take these steps in a more automated manner using simple commands. Here is where the Cloud Foundry Roo add-on comes to the rescue. The add-on makes it easy to deploy Java applications from the Roo console.
In the next section, you’ll learn how to install and use the Cloud Foundry Roo addon component. You’ll also deploy and manage the cloud services from the Roo command shell using the add-on.
13.3. Roo add-on for Cloud Foundry
The Cloud Foundry add-on[3] is well integrated with Cloud Foundry services. Using the Roo add-on commands, you can perform various Cloud Foundry tasks, such as logging in to Cloud Foundry, viewing the already deployed applications, binding to services, and deploying new applications. There are several Cloud Foundry commands added to the Spring Roo shell to make it easy to view, deploy, and monitor your cloud applications.
3 Available since the Roo 1.1.3 release.
Let’s look at how to install the Cloud Foundry add-on so you can start issuing the commands provided by the add-on component.
13.3.1. How to install the Cloud Foundry add-on
Before you start developing Roo applications to deploy to the cloud, you need to create an account on Cloud Foundry. You can do this by signing up for a Cloud-Foundry.com account at http://www.cloudfoundry.com/. Using the new credentials you receive from the Cloud Foundry team, you can log in to the website to deploy applications to the cloud. You can also download the virtual image of Micro Cloud Foundry to test the applications locally on your PC or Mac.
To get started, you need to run the pgp automatic trust command to enable automatic PGP key trusting, and ensure that the signed bundles needed by the Cloud Foundry add-on can be installed on your system. Because you don’t want to leave the system with this setting, as soon as the add-on files are installed, you should disable the automatic PGP trusting by running the same command again:
pgp automatic trust
Here’s the output of the pgp command:
roo> pgp automatic trust
Automatic PGP key trusting enabled (this is potentially unsafe); disable by typing 'pgp automatic trust' again
roo>
Then you run the addon install command to instruct Roo to download and install the Cloud Foundry support. When you see the “Deploying...done. Successfully installed add-on: Spring Roo - Addon - Cloud Foundry [version: 1.1.5.RELEASE]” message on your screen, you’ll know you’ve successfully installed Cloud Foundry support:
addon install bundle --bundleSymbolicName org.springframework.roo. addon.cloud.foundry
This command takes a few minutes to download all of the required JAR files. Here’s the output of the add-on install command:
roo> addon install bundle --bundleSymbolicName org.springframework. roo.addon.cloud.foundry

Target resource(s):
-------------------
Spring Roo - Addon - Cloud Foundry (1.1.5.RELEASE)

Required resource(s):
---------------------
Spring Beans (3.0.5.RELEASE)
jcl-over-slf4j (1.6.1)
slf4j-nop (1.6.1)
Spring AOP (3.0.5.RELEASE)
Servlet Specification API (2.5.0)
Spring Core (3.0.5.RELEASE)
Jackson JSON processor (1.6.2)
Data mapper for Jackson JSON processor (1.6.2)
Spring Context (3.0.5.RELEASE)
Spring Roo - Wrapping - aopalliance (1.0.0.0010)
Spring Web (3.0.5.RELEASE)
slf4j-api (1.6.1)
Spring Roo - Wrapping - Cloud Foundry API (0.0.1.0010)

Optional resource(s):
---------------------
Spring Expression Language (3.0.5.RELEASE)
Spring ASM (3.0.5.RELEASE)

Deploying...done.

Successfully installed add-on: Spring Roo - Addon - Cloud Foundry [version: 1.1.5.RELEASE]
[Hint] Please consider rating this add-on with the following command:
[Hint] addon feedback bundle --bundleSymbolicName org.springframework.roo.addon.cloud.foundry --rating ... --comment "..."
roo>
Now, type the pgp automatic trust command again to disable key trusting. Here’s the output of this command showing the PGP key trusting is now disabled:
roo> pgp automatic trust
Automatic PGP key trusting disabled (this is the safest option)
roo>
You’re ready to execute the Cloud Foundry commands. Type in the command cloud foundry and press TAB twice. You’ll see displayed the available Cloud Foundry commands, as shown in the following snippet:
roo> cloud foundry

cloud foundry clear     cloud foundry login
Now that you’ve installed Cloud Foundry support, you can begin to issue any of the 30-plus Cloud Foundry Roo add-on commands to perform various tasks in the cloud application development lifecycle. In the next section, you’ll find more details about some of these commands and learn how to use them to deploy and run your application in the Cloud Foundry server environment.
13.3.2. Add-on commands
As you can see in the following example, the Cloud Foundry add-on offers various commands to manage the applications on the cloud server instances. These commands are used for different tasks to deploy and monitor cloud applications:
cloud foundry bind service
cloud foundry clear login details
cloud foundry create service
cloud foundry delete app
cloud foundry delete service
cloud foundry deploy
cloud foundry files
cloud foundry info
cloud foundry list apps
cloud foundry list instances
cloud foundry list services
cloud foundry login
cloud foundry map url
cloud foundry restart app
cloud foundry start app
cloud foundry stop app
cloud foundry unbind service
cloud foundry unmap url
cloud foundry update app memory
cloud foundry view app memory
cloud foundry view app stats
cloud foundry view crashes
cloud foundry view crash logs
cloud foundry view logs
You’ll use the key commands required to deploy your sample application. You’ll use commands to log in to Cloud Foundry website, deploy the new application, and verify that the application has been deployed correctly. You’ll also test the application from the Cloud Foundry site using the application URL you specify during the deployment step. The following section provides a step-by-step approach to all of the add-on commands you’ll use in the application deployment process.
Cloud Foundry also offers a command-line interface (CLI) called vmc, which allows you to interact with the Cloud Foundry instance from the command shell.
13.3.3. Cloud Foundry command-line interface
With the vmc tool you can deploy Java-, Ruby-, and Node.js-based web applications to the Cloud Foundry servers. You can also configure the deployed applications to use the built-in services provided by the Cloud Foundry platform.
The interface is written in Ruby, so you’ll need Ruby and Ruby Gem installed before you can use the CLI commands. The following list contains the vmc commands you can use to deploy and manage the applications in Cloud Foundry:
vmc info
vmc apps
vmc services
vmc frameworks
vmc runtimes

cd myapp
vmc push <appname>
vmc instances <appname>
vmc instances <appname> 3

vmc create-service <service> <name> <app>
bind-service <servicename> <appname>
update <appname>
map <appname> <url>
logs <appname>
stats <appname>
target <url>
For more information on the vmc tool, check the support page (http://mng.bz/SfWG) on the Cloud Foundry community website.
You now have the add-on installed and ready for use. Let’s see how to deploy the sample application using the new Cloud Foundry add-on commands.
13.4. Deploying the Course Manager application to the cloud
You’ll use the Cloud Foundry credentials sent to you to log in to the Cloud Foundry site and deploy the Roo application using the Roo commands from the shell, or from the STS IDE tool, or using the command-line tool vmc.
13.4.1. Cloud Foundry login
To deploy the Roo application to the cloud, first log in to the Cloud Foundry site, which you can do by running the following command on the Roo command shell:
cloud foundry login --email CLOUD_FOUNDRY_EMAIL_ADDRESS --password CLOUD_FOUNDRY_PASSWORD
This command takes in three arguments: email, password, and cloudControllerUrl. When logging in to Cloud Foundry for the first time, the email and password arguments are mandatory parameters. Roo will store the login credentials locally for subsequent logins so you aren’t required to enter the email and password every time you log in. The cloudControllerUrl parameter is optional. It defaults to the cloud service provided by VMware (http://api.cloudfoundry.com). You can change it to point to other private Cloud Foundry server instances. Here’s the console output for the login command:
Credentials saved.
Logged in successfully with email address CLOUD_FOUNDRY_EMAIL_ADDRESS
roo>
If you want to clear the login credentials stored in memory, you can run the command cloud foundry clear login details, which will remove the email and password values from the cache and will prompt for user account credentials the next time you try to log in.
Now you can type commands like cloud foundry info to get the usage details of your user account at VMware’s cloud application platform. You can also run the command cloud foundry list with one of three options (apps, instances, or services) to get the details on deployed applications, the number of instances where an application is deployed to, and the list of system services available to use in your cloud applications. For example, type the command cloud foundry list apps and you should see the following output on the console:
===================================== Applications ====================

Name        Status    Instances   Services   URLs
----        ------    ---------   --------   ----
hello       STARTED   1                      hello.cloudfoundry.com
hellotest   STARTED   1                      hellotest.cloudfoundry.com
Alternatively, you can type the command cloud foundry list services to see the following output on the console. The services command shows the name, description, and version of each system service available in the current release of Cloud Foundry:
======================= System Services ========================

Service       Version      Description
-------       -------      -----------
redis         2.2          Redis key-value store service
mongodb       1.8          MongoDB NoSQL store
rabbitmq      2.4          RabbitMQ messaging service
postgresql    9.0          PostgreSQL database service (vFabric)
mysql         5.1          MySQL database service
13.4.2. Deploying the Course Manager application
The command you use to deploy applications to the Cloud Foundry instances is cloudfoundry deploy. The deploy command has a number of command-line parameters:
- appName
- path
- urls
- instances
- memory
The parameters appName and path are required. Here’s the command for deploying the Course Manager application:
cloud foundry deploy --appName coursemanager --path CREATE
The CREATE option in the previous example will trigger the Maven build commands to clean, compile, and package the application. The deploy command will also move the WAR file to the Cloud Foundry instance. If all of these steps complete successfully, you should see the following message at the end of the Maven build process:
The application
coursemanager
 was successfully pushed
Now, to verify that the coursemanager Roo application has been successfully deployed, let’s run the cloud foundry list apps command again to view all of the applications currently deployed. Here’s the output of this command, which shows that the new application, coursemanager, has been deployed with a web URL of coursemanager.cloudfoundry.com and with a status of STOPPED:
===================================== Applications ====================

Name          Status   Instances  Services   URLs
----          ------   ---------  --------   ----
hello         STARTED  1                     hello.cloudfoundry.com
hellotest     STARTED  1                     hellotest.cloudfoundry.com
coursemanager STOPPED  1                     coursemanager.cloudfoundry.com
Let’s start the application by issuing the command cloud foundry start app --appNamecoursemanager. If you run the cloud foundry list apps command one more time, you’ll see that coursemanager, has been started and is ready to receive web requests.
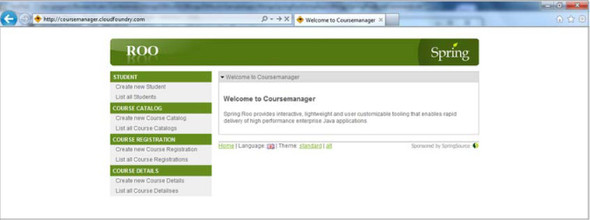
You can access Course Manager application running on the cloud by using the specified URL (http://coursemanager.cloudfoundry.com) as shown in figure 13.2.
Figure 13.2. Course Manager Roo application running on Cloud Foundry
After you’ve deployed the application, you’ll need to check runtime statistics like the JVM-related information, add new services like a database, and bind them to your web application. The following section covers these topics and shows how to perform them using the add-on commands.
13.5. Managing cloud services
Let’s take a look at the add-on command to get statistics, such as number of cores, memory, disk space, and uptime of the application.
13.5.1. Application statistics
The following command displays the resource information such as number of CPUs (1), cores (4), memory, disk (30 MB), and the application uptime:
cloud foundry view app stats --appName coursemanager
Here’s the output of the command:
============================== App. Stats ==============================

Instance    CPU (Cores)      Memory (limit)     Disk (limit)   Uptime
--------    -----------      --------------     ------------   ------
0           0.9 (4)          231.58M (256M)     30.0M (2048M)  1d:
The next step is to bind services provided by Cloud Foundry to your application. As you saw earlier with the command cloud foundry list services, these services include databases (both relational and NoSQL databases) and messaging services.
13.5.2. Binding services
To provision a new service, you use the following command by specifying the name and the type of the service. Let’s create a new service to store and retrieve MongoDB from the NoSQL database, which is used to store document-based, unstructured data. In this example, these values are mymongodb and mongodb, respectively:
cloud foundry create service
Here’s the command output on the Roo console:
roo> cloud foundry create service --serviceName mymongodb --serviceType mongodb
The service 'mymongodb' was successfully created
Now you need to look at the list of available and provisioned services by running the list services command you ran before (cloud foundry list services). Here’s the new output of this command showing the new MongoDB service you created:
======================= System Services ========================

Service        Version     Description
-------        -------     -----------
rabbitmq       2.4         RabbitMQ messaging service
mongodb        1.8         MongoDB NoSQL store
redis          2.2         Redis key-value store service
postgresql     9.0         PostgreSQL database service (vFabric)
mysql          5.1         MySQL database service


= Provisioned Services =

Name          Service
----          -------
mymongodb     mongodb
To bind your application coursemanager to this new service, use the following command:
cloud foundry bind service --serviceName mymongodb --appName coursemanager
After the application is bound to a service, you can start using the service in the application functionality.
Let’s restart the application after binding the service using the following command:
cloud foundry restart app --appName coursemanager
If you need to delete an existing service, you can use the following command specifying the service name:
cloud foundry delete service --serviceName mymongodb
Let’s do a quick check on what you’ve accomplished so far. You’ve deployed the application to the Cloud Foundry environment and created a new service to bind the application. Your application is up and running now, so the next step is to monitor the application running in the cloud. Since the application isn’t hosted in the organization’s network boundaries, it’s critical to monitor its status and respond to any production problems as and when they occur.
13.6. Application monitoring in the cloud
The Cloud Foundry add-on provides some monitoring commands to keep an eye on how the application is performing, if it’s up and running, and other aspects.
13.6.1. View application logs
The application log information can be obtained by running the command cloud foundry view logs --appName coursemanager --instance 0.
If you want to see if your application had any crashes, you can run the command cloud foundry view crashes. Here’s this command and its console output:
roo> cloud foundry view crashes --appName coursemanager
The application 'coursemanager' has never crashed
roo>
You can use the command cloud foundry view crash logs to view the log information about when application crashes happened. This gives operations and developer teams the ability to check the availability and uptime of their applications in the cloud and troubleshoot any outages (crashes) that may occur during the application usage.
13.6.2. Provisioning memory
You can view the current memory setting of a cloud application, and update memory if you need to, from the cloud foundry view app memory --appName coursemanager command. This command allows you to see the memory used by the application (256MB).
To change the allocated memory you can run cloud foundry update app memory--appName coursemanager with the new memory setting.
As you can see, the Cloud Foundry add-on commands are extensive and useful in deploying and monitoring cloud applications.
13.7. The road ahead
Cloud Foundry is a relatively new technology and is growing in terms of new features with every product release. You can expect to see more integrations with popular technologies and application frameworks such as the Neo4J graph database (there’s already a Roo add-on for Neo4J database integration in the works) and other frameworks in the areas of messaging, workflow, enterprise application integration, security, and social computing.
Heroku recently released beta support for Scala (http://mng.bz/4zb5) and Play (http://mng.bz/QXEx) frameworks and its roadmap for the future includes polishing support and the general release of the feature. There’ll be some additional Heroku tooling needed for Spring Roo applications. The Heroku team is also working on aligning the cloud computing framework with continuous delivery. They are working on creating a deployment platform that supports continuous delivery, while allowing developers to use a framework of their choice among the supported frameworks, with few changes to developer experience and workflow.
13.8. Summary
In this chapter, you learned about Cloud Foundry, the cloud computing product from VMware, and how to install the Cloud Foundry add-on in Roo. You used the add-on commands to deploy to a Cloud Foundry instance. You found out how to view the application logs, memory settings, and information on system crashes.
You also used the other add-on commands to perform tasks such as starting and stopping applications and binding services.
Cloud Foundry is based on the open source PaaS cloud computing model and has great potential to innovate in the cloud computing space. It allows developers to increase their productivity without getting bogged down with infrastructure setup and maintenance overhead. Cloud Foundry’s integration with Roo gives you the ability to develop applications on your local development environment (which should be easier when you use Micro Cloud Foundry), and the means to deploy and manage applications, all from within the Roo command shell.
The next chapter builds on discussions from previous chapters and focuses on the integration Roo provides when working with Spring Integration. This framework is used for Enterprise Service Bus (ESB) and workflow-based use cases.
13.9. Resources
Amazon Elastic Computing Cloud (http://aws.amazon.com/ec2/)
CloudBees (http://www.cloudbees.com/)
Cloud Foundry (http://www.cloudfoundry.com/)
Google App Engine (http://code.google.com/appengine/)
Heroku (http://www.heroku.com)
Micro Cloud Foundry (http://mng.bz/LCcz)
Microsoft Azure (http://www.windowsazure.com/en-us/)
Platform as a service—the NIST definition (http://mng.bz/4LQu)
SalesForce.com (http://www.salesforce.com/)