
Chapter 1. What is Spring Roo?
You’re about to be introduced to a powerful new tool that makes your life as a Java application developer less stressful and more productive. That tool is Spring Roo. With a simple command-line shell, Roo can create and manage Spring-based applications, adding and configuring features such as the Java Persistence API (JPA), the Java Message Service (JMS), email, and Spring Security. Roo generates Spring MVC web applications. These allow you to manage and edit your database data, configure tests using frameworks such as JUnit and Selenium, and choose from a variety of ORM APIs and databases. At the same time, Roo reduces the amount of code written by you and rolls out efficient, customizable generated code.
In this chapter, we discuss the challenges of working with Enterprise Java applications, create a sample application with the Roo shell, and take a quick tour of Roo’s features. We then review the Roo sample script file and discuss the architectural models available to you when crafting your application.
By the end of this chapter, you’ll see how Roo helps you get rid of much of the tedium Java EE application development demands. You’ll see that you can gain much of the productivity available in dynamic-language, convention-over-configuration platforms such as Ruby on Rails and Grails. This all comes without sacrificing the benefits of Java compile-time type safety, compiled code, and debuggability.
Let’s begin our journey by discussing one of the major reasons why Java-based development projects sputter: the complexity of configuring an application architecture.
1.1. Configuration is a burden
Putting together a Java-based application can be a difficult task these days. Where do you start? There are many things to consider: build scripts, dependency management, architectural patterns, framework selections, database mapping strategies, and much more.
In traditional Enterprise Java development efforts, architects pull together a hodgepodge of open source technologies and standards-driven platforms such as JDBC, the Servlet and JavaServer Pages (JSP) APIs, and Enterprise JavaBeans (EJB) using a build tool such as Ant or Maven. If they’re more advanced, they’ll use an application framework such as Struts and EJB, Seam, or Spring. Many starting templates, IDE shortcuts, and architectural and/or design patterns can be used to make development more efficient, but most of the work involves a lot of coding, physical build configuration, and design work.
Contrast this with your friends programming in dynamic language platforms, such as Ruby on Rails or Grails, who take about 15 minutes to get a basic application shell up and running. That shell usually includes a web application, database data and validation, and some basic business and navigation logic. Unlike a lot of Java application prototypes, theirs is usually the beginning of the final project, whereas Java developers have to try and throw away a fair number of APIs and platforms manually until they get to a point where they’re comfortable assigning a team to the project. The bottom line is that it just takes a long time to write a Java-based application.
1.1.1. Spring reduces the pain
The Spring Framework, a development platform that uses interface-driven development, dependency injection, aspect-oriented programming, and a number of helper APIs and services, significantly reduces the complexity of your Enterprise Java code. If you haven’t heard of Spring by now, we strongly suggest you put this book down and read up on the framework before you dig deeply into Roo. Craig Walls’ excellent Spring in Action is a great companion to this book.
Spring operates on the principle of making your development less about busy work and more about writing business logic. Spring application developers define interface-driven beans that are then implemented as Plain Old Java Objects (POJOs) and mounted in a Spring container using XML, annotations, or Java-based configuration directives.
Here’s an example business interface:
package org.rooinaction.coursemanager.services;

...

public interface CourseManager {
  void addCourse(Course c);
  List<Course> getAllCourses();
}
Spring developers then create an implementation class:
package org.rooinaction.coursemanager.services;

...

public class CourseManagerDefaultImpl {
   public void addCourse(Course c) {
      // some logic here
   }

   public List<Course> getAllCourses() {
      // retrieve logic here
   }

}
One way you can use this bean is to autowire it as shown next:
package org.rooinaction.coursemanager.web;

...

public class CourseInputComponent {

  @Autowired
  private CourseManager courseManager;

  public void createACourse(String name) {
    Course c = new Course();
    c.setName(name);
    courseManager.addCourse(c);
  }
}
We’re leaving out the configuration here, but the basic idea is a simple one: let Spring find and mount your component, deal with it at the interface level, and just write a POJO both to expose and use your component.
You can use any Java API you can think of inside a Spring application, but you’re still required to add dependent JAR files and configuration to simplify the programming tasks later.
1.1.2. Shifting from code to configuration
Even Spring can’t save you from all of the tedium involved in building an application. There are many decisions that you need to make, as shown in figure 1.1.
Figure 1.1. The number of choices when working in an Enterprise Java application is mind-numbing!
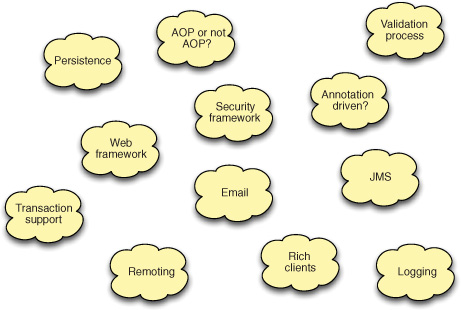
Spring makes those tasks easier and shifts some of them to configuration, rather than coding, such as these:
- Configuring a web framework such as Spring MVC, JavaServer Faces, GWT, or Flex
- Configuring a persistence tier
- Building web components such as forms, menus, templates, localization, and themes
- Exposing data for Ajax or web service calls
- Reverse engineering a database model from an existing database
- Handling messages from a message queue
- Sending email
- Integrating a new API or framework
Since Spring is so configurable, it almost provides you with too many choices of how to implement your solution. It’s an extremely flexible platform for development, but it can be difficult to make a good decision on how to move forward. The more choices developers are faced with when attempting to make a decision, the more difficult that decision becomes. Some developers may just begin to select a configuration option at random, or start experimenting with several, comparing the results. All of this takes time and can really hold up a project.
1.1.3. Spring makes development less painful
Spring can wrap or enable access to other APIs, even though you’re still working with those APIs and platforms to some degree. A crucial tenet of Spring is providing template beans for complex APIs in order to help simplify them.
For example, the Spring JDBC API component, JdbcTemplate, provides method calls to query, insert, update, and delete data, which can be as short as a single line. Rather than writing long try... catch... finally... blocks and worrying about whether you should close a connection when faced with an exception, Spring does the setup and tear-down work for you.
Here’s the Spring JDBC template method to fetch a single value from a SQL statement:
int numSales = jdbcTemplate.queryForString(
               "select sum(price) from sales_order");
Simple, isn’t it? The JDBC template does all of that boilerplate work for you and throws a translated Spring runtime exception if the query fails so that you don’t have to write tedious try... catch statements in your application.
Spring eliminates the layers of exception hierarchies such as your application data-layer exception, service-layer exception, and web-layer exception. Sound familiar? If not, it’s likely because you’ve been working with Spring, which pioneered using runtime exceptions over declarative ones.
Another way Spring helps is by providing factory beans to easily configure enterprise APIs. Those of you who’ve configured Hibernate applications by hand will appreciate Spring’s ability to set up Hibernate this way:
<bean class="org.s.o.jpa.LocalContainerEntityManagerFactoryBean"
      id="entityManagerFactory">
  <property name="dataSource" ref="dataSource"/>
</bean>
Book Convention: What’s with the org.s.o.jpa in the Class Name?
Spring (and Roo) code is a challenge to show in book format because the names of fully qualified classes often run quite long. We may abbreviate those names because we know that most developers can use an IDE or even Google to look up the packages of well-known classes such as the one above. By the way, it’s LocalContainerEntityManagerFactoryBean, which is located in the org.springframework.orm.jpa package.
You can use this entityManagerFactory bean to fetch a JPA entity manager, which is the API used to interact with a JPA-supported database:
@PersistenceContext
private EntityManager em;

...
public List<Customer> fetchCustomers() {
  List<Customer> results =
    em.createQuery("select c from Customer c")
       .getResultList();
  return results;
}
Note that you use a Java EE annotation here; @PersistenceContext communicates with the entity manager factory and requests that it fetch or create an entity manager for use by the developer. Spring can use Java EE annotations to expose and consume resources.
1.1.4. Batteries still required
From the programmer’s perspective, things are better under Spring. But even Spring applications require hands-on configuration activities.
Somebody still has to configure JPA for the project, come up with a persistence strategy, and show the other developers how to use it. Let’s see how much work you would still have to do by hand in a Spring-based application:
- Include dependent JAR files in the project for the JPA API, as well as a number of ORM vendor JAR files.
- Install a JDBC data source, and include the JAR files for the data source and the database driver.
- Configure a transaction management strategy in Spring to associate with the database data source and JPA.
- Configure META-INF/persistence.xml with settings relating JPA to the database using Hibernate configuration settings.
- Configure a Spring LocalContainerEntityManagerFactoryBean to install a JPA container, and configure the transaction management to honor the JPA entity manager.
That’s a significant amount of work. To actually use the JPA API in your project, you’d have to do the following:
- Create an entity class that represents the table, annotating it with JPA annotations.
- Create a repository class, and inject it with an EntityManager instance from the configuration above.
- Write methods to retrieve, save, update, delete, and search for entities.
- Develop a Spring Service class to provide transactional services that coordinate access to one or more calls to the repository.
You can see why it takes an average Java, or even Spring development, project a fair amount of time to set up a framework such as JPA. Because the Enterprise Java universe is a decentralized, highly compartmentalized set of libraries, it has to be wrestled with just to get a basic application in place.
Spring itself helps tremendously, but the standard Java application programmer has been steadily losing little bits of work to those other guys—the developers using rapid application development frameworks and writing code in oddly named languages like Ruby, Groovy, or Python.
1.1.5. Those other guys—RAD frameworks
Rapid application development frameworks, such as Ruby on Rails or Grails, narrow choices and implement programming patterns in a simple yet predictable way. They also focus on removing repetitious configuration and coding from your application. As a result, they are wildly popular.
You’ve probably seen the “Twitter in 15 minutes” or “Writing a blogging engine in 1 hour” talks. You’ve probably met the Java developer who says, “I’m never coming back to Java. I just did my first Rails application in 30 days and it was a joy to program.”
Now, we’re not here to bash any frameworks or approaches. But since we’re discussing Roo, which is a framework written in Java, for Java developers, it’s worth discussing some of the differences.
Most of these platforms use runtime type checking and are based on interpreted languages. The languages lack a compilation step, and problems usually occur at runtime, putting more of a burden on testing.
It’s a big switch for a developer to begin thinking in a dynamic programming language, and because many parts of these platforms are convention-based, it can be difficult for new programmers to seamlessly drop into a project without a lot of time spent learning the approaches given on that project.
1.1.6. Java needs RAD
In our opinion, Spring is certainly the biggest leap forward for Java developers in the past five years. Coupled with tools like Maven, which helps manage project configuration and dependencies, and strong ORM frameworks like Hibernate or JPA, it can really improve code quality and developer productivity.
Various teams have attempted to use Maven templates to build starting applications,[1] and even the SpringSource Tool Suite includes a Maven archetype-based application starter.
1 See Matt Raible’s project, AppFuse, at http://www.appfuse.org.
Though useful, these tools only provide a starting point. They’re only as good as the template maintainer’s diligence provides. Once you create your project from the template, there generally is no easy way to upgrade it. Plus, you still end up spending time manually configuring Spring for additional features needed by your application.
And unlike RAD tools such as Rails or Grails, where adding a new feature is as simple as installing a plug-in and following the conventions to use it, this is all done by hand in Spring. This is a key reason people are moving to these rapid application development platforms.
What Spring and Java need is the ability to make it easier to configure and add features to a project, and to remove or hide any generated or mechanical code so you can easily focus on your actual business logic.
Wouldn’t it be great if you could match RAD agility and still use Spring’s highly productive APIs? What if you had a tool that was the equivalent of a seasoned architect, available on demand, who could take over the job of implementing your infrastructure and project architecture? What if this tool could deal with the mundane tasks of managing your application dependencies, wiring up services like JPA, email, JMS, and a database persistence layer? What if you had a virtual “Spring Design Patterns” expert available at your beck and call?
1.2. Enter Spring Roo
Into the often tedious landscape of Java and Spring programming enters Spring Roo—a tool that acts like a really smart Spring and Java EE expert, or pair programmer, consistently nudging you in the right direction.
Roo configures and manages the infrastructure of a Spring project, hides repetitive code, manages your build process, and generally helps you focus on solving your business problems.
In short, Roo gives Java developers the same productivity that other RAD platforms have. And in some ways, it gives them more options.
Roo makes life easier for the average Spring programmer by managing the busy work and implementing the code with sound architectural patterns. Here are some examples of things Roo makes easier:
- When you ask Roo to set up your persistence tier, it responds by adding JPA, Hibernate, validations, transaction management, and a pooled data source.
- When you ask Roo to install the MVC web framework, it implements Spring MVC and pre-creates a web framework complete with layout templates, localization, themes, menu navigation, and client-side validation.
- When you need to send or receive JMS messages, a single command in Roo sets up your JMS listener or templates, and you can immediately get to work coding your sending or receiving bean.
The Roo tool provides an add-on system that enables developers to add new features, such as web application frameworks, databases, enterprise APIs, and more. You can write your own add-ons and use them for your own projects, or even contribute them to the public directory.
Roo projects are extremely flexible. If you don’t like a feature provided by Roo, customize it or remove it. Roo will do as much or as little as you want.
From a developer’s perspective, Roo pulls the tedious code out of your classes and into files that it manages for you. For example, your JPA entities will contain only the code that defines the fields, validation rules, and specific logic you require. Behind the scenes, Roo will implement the setters, getters, persistence management, and even toString() methods in hidden files. You can choose to write these elements yourself, but the advantage of doing so is eliminated for the majority of your code.
Have we whetted your appetite? Then let’s get going! We’ll start by installing the Roo shell.
1.2.1. Installing the Roo shell
To show you just how powerful Roo is, you’ll create and review one of the sample applications provided by the Roo team—the Pizza Shop. But first you have to install the Roo shell.
To install the Roo shell, first visit the SpringSource project site at http://springsource.org/spring-roo and download the latest released version. Unpack it to a directory on your machine.
What Version of Roo Does this Book Cover?
The book focuses on Spring Roo version 1.2.1. All version 1.2 releases should be compatible with the code samples within the book, but if not, please visit the author forum at http://manning.com/rimple and let us know your issue in the reader forum.
Make sure you have at least the Java Development Kit (this book was written using JDK 1.6, but Roo 1.2.1 supports development and deployment on Java 1.7) and are running Maven 3.0.3 or higher. You can verify that both are properly installed by typing
java -fullversion
and
mvn -v
For Windows users, set your operating system path to include the unpacked Roo distribution’s bin folder.
On Unix and Mac systems, you can just make a symbolic link to the file roo_directory/bin/roo.sh as /usr/bin/roo, breaking it and replacing it with one from a new distribution whenever you upgrade:
ln -s /opt/spring-roo-1.2.1/bin/roo.sh /usr/bin/roo
1.2.2. Launching the shell
After installing the Spring Roo path into your environment, open an operating system command line in an empty directory. Launch Roo using the roo command. Roo will respond with a banner and a roo> prompt:
$ roo
    ____  ____  ____
   / __ / __ / __
  / /_/ / / / / / / /
 / _, _/ /_/ / /_/ /
/_/ |_|\____/\____/    1.2.1

Welcome to Spring Roo. For assistance press TAB or type
"hint" then hit ENTER.
roo>
Congratulations! You’ve installed and configured Roo. You may quit the shell with the quit command.
The Roo shell does the heavy lifting of configuring and maintaining your project. Once launched, you interact with the shell by entering configuration commands, and Roo responds by modifying or creating the necessary files in your project.
The Shell in an Ide
In addition to launching the shell as a standalone, command-line tool, SpringSource Tool Suite and IntelliJ users can launch a Roo shell within their IDEs. The advantage is that an IDE will instantly see changes made by the Roo shell. We discuss this in chapter 2.
In the next chapter, we discuss how to create your own project from scratch. But for now, we’ll use the Roo script command, which executes a script provided to it by the user. Let’s use this command to set up a sample application.
1.3. Roo by example—the Pizza Shop
To illustrate how much Roo can help you boost your productivity on the Spring platform, let’s take a quick dive into Spring Roo by running one of the sample scripts, pizzashop.roo, provided by the Roo project team. This file is located in the Roo installation folder called samples, along with a number of other example scripts.
To experiment with a more complex model, create additional empty directories and experiment with the following prebuilt scripts:
- bikeshop.roo—This is a sample website for a bicycle shop that uses the JSF web framework.
- clinic.roo—The Pet Clinic is a simple Spring sample application that shows off a somewhat complex set of relationships.
- embedding.roo—This shows examples of embedding various media objects from Twitter, YouTube, UStream, Google Video, and others.
- expenses.roo—This is an expense tracking system, using Google Web Toolkit and Google App Engine.
- multimodule.roo—This shows off Roo’s support for multimodule Maven projects.
- vote.roo—This is a simple voting system, using Spring MVC and Spring Security.
- wedding.roo—This sets up a wedding planner system, and includes Selenium web tests, email support, and security.
You can find these scripts in the /samples folder of the Roo software installation directory. Anything placed in this directory is available for execution using the script command.
1.3.1. The pizzashop.roo sample
The pizzashop.roo sample is a simple demonstration application that simulates a basic pizza shop. It allows the user to define bases, toppings, pizzas, and orders.
Let’s run the script to create the application. Create an empty directory somewhere called pizzashop, and open your OS command-line shell in that directory. Fire up the Roo shell with the roo command:
$ roo script pizzashop.roo
[lots of activity and output]
Script required 33.005 seconds to execute
$
Running a Script from the Command Line
If you want to run a Roo script file, you can just use roo script scriptfile and Roo will execute the script.
You’ll see Roo go to work, executing commands and building your project. If you’re watching the directory from a file manager, you’ll see it quickly expand into a full-fledged project structure.
What just happened? Everything! Roo just built a fully configured Spring application with the following features:
- A JPA container, using EclipseLink as the backing object-relational mapping (ORM) API
- Four JPA entities, which are classes that map to tables in databases, namely Pizza.java, Base.java, Topping.java, and PizzaOrder.java
- Four JPA repositories that persist data to the database (commonly known as data access objects—DAOs—outside of the JPA world)
- A Spring MVC web application to input and display data, interacting with the four JPA entities via the repositories
Now that we’ve let Roo do its magic, let’s build the application, launch it, and kick the tires on your new application.
1.3.2. Running the Pizza Shop with Maven
Believe it or not, you’re ready to run the application. Roo configures a complete Maven-based build, even preconfiguring both the Tomcat and Jetty web servers for you to experiment with. Let’s use the Jetty web server to launch the application:
$ mvn jetty:run
Maven replies by building the application, and then runs the Jetty web server on port 8080.
If Tomcat is Your Preference...
You can run Tomcat just by changing the command above to mvn tomcat:run. Roo configures both Jetty and Tomcat web servers for your testing. You can also deploy a Roo application on any application server that accepts a WAR deployment. Just use the mvn package command to generate your WAR, which will be located in the target folder.
Open your browser to http://localhost:8080/pizzashop and view the home page as shown in figure 1.2.
Figure 1.2. The Pizza Shop home page
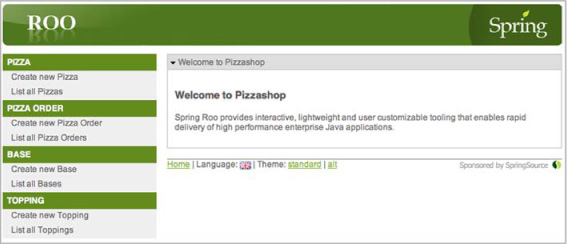
This looks like a typical CRUD-based application, but looks can be deceiving. This application is a fully configured Spring MVC web application, complete with the latest version of Spring (3.0.6 at the time of writing), JPA 2.0 persistence, the EclipseLink JPA Provider, an in-memory Hypersonic database instance, entities, controllers, views, a service and persistence tier, and even a JSON-based web service interface.[2]
2 CRUD—create, read, update, delete—just the basics of managing application entities
1.3.3. Creating toppings—forms
Let’s create a new topping by clicking on the Create New Topping menu item on the left-hand menu system. Click on the Name: field. You’ll see a prompt to enter the name because it’s a required field. Refer to figure 1.3. (We’ve omitted the full-page view on these images to focus on the important elements. All pages show a full menu, title bar, and footer.)
Figure 1.3. Required field checks appear visually

Try clicking on SAVE without entering a topping. Spring should have turned the input field yellow and marked it with a triangle warning, as depicted in figure 1.4.
Figure 1.4. Warnings for missed fields displayed in yellow

Roo performs client-side validation against your entities. We discuss this in detail in chapter 3. Enter a few choices, perhaps Brie, Sauce, Mushrooms, and Swiss Chard (Swiss Chard?). Each time you save a choice, you’ll see something like figure 1.5, a confirmation of the saved results as a separate page.
Figure 1.5. The save/edit confirmation page

Clicking the edit icon (the page with the pencil) will take you to a page similar to the creation form, except that it’s working with an already persisted entity.
Finally, if you click the List all Toppings menu item, you’ll see a list of the toppings you’ve already entered, as shown in figure 1.6.
Figure 1.6. The listing page, complete with pagination
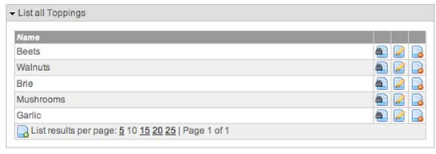
As you see in figure 1.6, Roo provides paging support. It also enables viewing, editing, and removing of entities using icons on each row, as well as creating a new one using the new page icon to the left of the list results paging control at the bottom.
1.3.4. Creating a pizza form—dependencies
Let’s look at a slightly more complicated form—the pizza form. Each pizza is comprised of a base and one or more toppings. You need to be able to create your pizza and choose your toppings and base from the ones entered before.
Click on the Create new Pizza link. You’ll see the form in figure 1.7.
Figure 1.7. Creating a new pizza
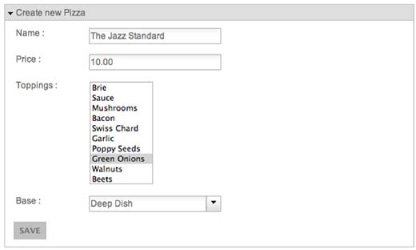
Roo automatically creates the multiselect list for Toppings, and a single-item select list for the Base. The shell has the ability to watch your entities, detect relationships, and automatically update your web forms and controllers with widgets to pick from your related entities.
Try clicking through the application. Start with bases and toppings; create your perfect pizza components. Create some pizzas based on those bases and toppings, and finally, experiment with placing an order. You’ll see the Roo client-side validations for invalid data, drop-down lists of related data, and if you take enough time to enter a lot of data, paging support. And all of this within 49 lines of Roo script code—not a single user-defined line of code.
1.3.5. JSON-based web services with the Pizza Shop
Spring Roo even configures your controllers to support JSON-based web service calls. If you’re on a Unix/Mac machine, and have installed the Unix curl command-line tool, the script even documents several curl commands you can use to test the web service side of this application. For example, to create a Thin Crust base, you’d issue a POST call to the pizzashop/bases URL, passing it JSON data, as shown next:
curl -i -X POST -H "Content-Type: application/json" -H "Accept: application/json" -d '{name: "Thin Crust"}' http://localhost:8080/pizzashop/bases
Book Convention: The Line Arrows for Long Lines
Just as Roo creates long class and package names, Roo and operating system example commands are equally sprawling. Whenever you see the line arrow icon don’t hit Return; just keep typing. This is in contrast to the Unix OS line continuation character, , which can be typed.
Note the data sent in JSON format to create a new pizza base named Thin Crust; it was JSON data. Curl will respond with the result of the web service call, which is an HTTP 201 response code:
HTTP/1.1 201 Created
...
If you open the web application and review the listing of pizza bases, you’ll now see the Thin Crust base appear.
To fetch a list of pizza bases, you’d just issue a GET call to the pizzashop/bases URL:
curl -i -H "Accept: application/json" http://localhost:8080/pizzashop/bases
Roo happily responds with the JSON data:
HTTP/1.1 200 OK
...
[{"id":1,"name":"Deep Dish","version":1},
 {"id":2, "name":"Whole Wheat","version":1},
 {"id":3,"name":"Thin Crust","version":1}]
There! Easy RESTful web service integration.
1.3.6. Wrapping up the walk-through
Practice creating a few toppings, bases, pizzas, and orders. Remove something and see how Roo asks for a confirmation. Get used to the user interface. You get these features for free, all by asking Roo to configure Spring MVC and scaffolding your entities.
Roo and Web Frameworks
Roo installs the web framework Spring MVC if you request it. But there are a number of web frameworks available to Roo directly, including Spring Web Flow (as part of Spring MVC), Google Web Toolkit, JavaServer Faces (in Roo 1.2), and Vaadin. These are all enabled by various Roo add-ons, some of which are installed with Roo itself.
You aren’t required to use Roo’s preconfigured frameworks. You can integrate with any other framework you want to, including Struts, Stripes, Flex, or a pure JavaScript application. But if you wish to install your web framework into a number of Roo-managed applications, you may wish to write your own Roo add-on and share it with your developers or the world.
You can terminate the application at this point. Go to your command window and shut down Jetty by hitting [CTRL]-[C].
I Restarted the Web Application. Where’s My Data?
If you run the application server again, you may find that the data you entered before is missing. This is because Roo’s default behavior is to re-create the database on startup. We discuss how to customize this behavior in chapter 3.
Not bad for just a few lines of Roo script code. Let’s take a few minutes and review the script that created your application.
1.3.7. The Pizza Shop script
The Pizza Shop script file, samples/pizzashop.roo in the Roo installation directory, is approximately 48 lines of scripting text, including comments, but the script does a lot of configuration. Let’s walk through some of the commands in this script and touch on what they do.
Creating the Project
First, the script creates a Roo project, defining the Java package structure that Roo will use to store objects that it generates:
roo> project --topLevelPackage com.springsource.pizzashop
At this point in time, Roo just defines the project as a JAR file—nothing yet tells it that you need a web application configuration. Roo is flexible and won’t configure more than it needs to.
Database Setup
Next, the script configures the database:
roo> jpa setup --provider ECLIPSELINK --database H2_IN_MEMORY
This command does quite a bit of work, setting up your JPA database persistence tier. We describe the work Roo does in depth in chapter 3.
Creating JPA Entities
The script then sets up the four JPA entity classes—Base, Topping, Pizza, and Pizza-Order. The entity jpa and field commands comprise the content of most of this script. Here’s an excerpt that installs three entities—Base, Topping, and Pizza—and begins to add fields to each of them. Notice the options, such as --sizeMin and --notNull. We talk about those in chapter 3, as well as the field reference and field set commands, which establish relationships between entities:
roo> entity jpa --class ~.domain.Base --activeRecord false --testAutomatically
roo> field string --fieldName name --sizeMin 2 --notNull

roo> entity jpa --class ~.domain.Topping --activeRecord false --testAutomatically
roo> field string --fieldName name --sizeMin 2 --notNull

roo> entity jpa --class ~.domain.Pizza --activeRecord false --testAutomatically
roo> field string --fieldName name --notNull --sizeMin 2
roo> field number --fieldName price --type java.math.BigDecimal
roo> field set --fieldName toppings --type ~.domain.Topping
roo> field reference --fieldName base --type ~.domain.Base
Setting Up Repositories
The next script section creates Spring JPA repositories using the Spring Data JPA API. These are the objects that talk to the database in the service-based Spring architecture we discussed earlier:
repository jpa --interface ~.repository.ToppingRepository --entity ~.domain.Topping
repository jpa --interface ~.repository.BaseRepository --entity ~.domain.Base
Configuring Services
Roo can also expose transactional services using Spring Beans. These services are configured to manipulate the entity passed to them, and will delegate calls to the repository methods to find, create, update and delete, data:
service --interface ~.service.ToppingService --entity ~.domain.Topping
service --interface ~.service.BaseService --entity ~.domain.Base
Configuring JSON
The rest of the script concerns the web interface. Roo can optionally expose JSON to the web tier if needed. These commands provide JSON support for the web services we reviewed earlier:
json all --deepSerialize
web mvc json setup
web mvc json all
Spring MVC
And finally, the script generates the web application. This code literally installs Spring MVC, configures the website layout, builds controllers for each entity automatically, and places the controllers in the web subpackage of the root package:
web mvc setup
web mvc all --package ~.web
The Tilde (~) and topLevelPackage
Take special notice of the --topLevel-Package attribute of the project command. This setting allows you to use the previously mentioned ~. (tilde-period) shortcut in future commands as a base package to build your other components from. Roo also configures the project to detect new Spring components from this package downward.
With only a few lines of Roo commands, you’ve already generated a complete Spring MVC web application. This script configures a number of technologies, including
- The Spring Framework
- The EclipseLink ORM implementation
- The Java Persistence API, version 2.0
- Java EE Bean Validations (JSR-303)
- Spring MVC
- JSON data translation with the Flexjson library
- Apache Tiles
- Logging via the slf4j framework and log4j
Roo—Not Just for Web Apps
Although the Pizza Shop is a web-based, data-driven application, you may be building a message-driven system, perhaps using JMS or the Spring Integration API. Spring Roo will help you configure and manage the bulk of your project, regardless of whether it’s a web application or a standalone program, saving valuable time you would otherwise spend wiring together your infrastructure.
Now that you’ve created your application, kicked the tires, and explored the script, let’s dig deeper into the project’s application architecture.
1.4. Roo application architecture models
Every application should be designed with a particular architectural pattern in mind so that developers know where to place their components. The application architecture should consider good design concepts such as loose coupling, separation of concerns, transaction management, reuse, and extension. A typical Spring web application can be broken down into at least three layers:
- User interface—Spring MVC, JSF, Wicket, Struts, or some other web framework.
- Services—Business components that expose services for the user interface layer. Usually where transactions are defined.
- Persistence—Components that access various data sources using APIs such as JDBC, object-relational mapping APIs such as Hibernate or JPA, or even messaging beans that access message queues via JMS.
When defined in layers, developers are able to switch each layer’s implementation. It becomes straightforward to switch persistence strategies or user interface implementations. Spring, being a component-driven development framework, fits well with layered architectures. Developers are encouraged to build beans using interface-driven development techniques, defining business method signatures in the interface, and implementing them in a realizing bean. Spring uses the interface as the contract to the client, so that the implementation can be swapped later.
Defining interfaces also helps developers test their components in isolation, using unit testing tools such as JUnit.
1.4.1. The web layer
Spring Roo provides a Spring MVC–based web application layer. It uses annotation-driven controllers, and can integrate with traditional Spring business services or with Active Record–based entities, as you’ll see later.
Spring MVC is an MVC platform, and as such contains all of the views as well. These views are written in a variant of JavaServer Pages that is fully XML-compliant, and all JSP files are well formed. These files are known as JSPX files, and are written and saved with the.jspx extension.
Roo also deploys several major Spring MVC features, which we discuss in chapter 5:
- Layout support—Roo installs the Apache Tiles framework to lay out your web applications, and separates the web pages into a header, menu, content, and footer.
- Theming—Spring themes provide a way to present the website in several ways. Roo installs theming support automatically.
- Localization—Roo installs Spring MVC’s localization support so that you can support multiple languages, allowing you to translate elements of your website so that various native language speakers can use your application.
Roo uses a set of generated tag libraries to handle operations such as displaying result lists, providing smart form elements such as drop-down pick lists, date and time pickers, and rich text editing. As you’ll see in chapters 6 and 7, you can customize the website entirely, and add support for dynamic Ajax calls or other rich components yourself.
Roo is also smart. It can generate, or scaffold, web application controllers, views, and logic automatically to manage your data objects. As you’re about to see, it can adapt to two major forms of application architecture: services-and-repositories and Active Record.
1.4.2. Service-and-repository layering in Roo
Roo can provide all of the traditional features of a typical web-based layered application. Figure 1.8 shows a fairly typical component architecture for a Spring MVC–based project.
Figure 1.8. Pizza Shop as a layered architecture
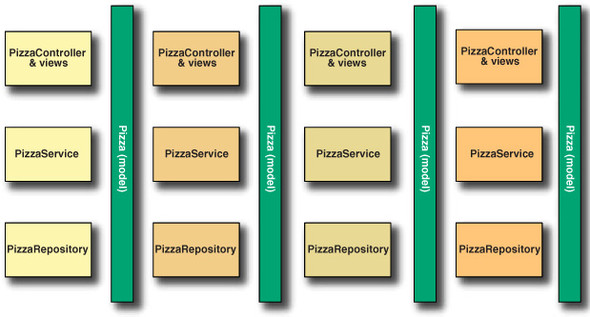
This application diagram is constructed of several well-defined components:
- Views—Components that display information or provide ways to edit data. Commonly Java Server Pages or JSF Facelets.
- Controllers—Accept incoming HTTP web requests and return responses, generally using views to present the data.
- Web service layer—Some applications expose web services, using a convention such as SOAP or REST. These are analogous to web controllers and views and exist in the same layer as those in this diagram.
- Services—Provide an abstraction of business functionality, and are usually coarsegrained, performing a task that may interact with a number of objects in the repository layer. Transactional boundaries are usually defined in the service layer.
- Repositories—At the bottom of the stack is the repository or data access layer (DAO) which communicates to the databases via JDBC, mapping tools such as iBatis/MyBatis or, more commonly object-relational mapping (ORM) tools such as Hibernate or JPA. Messaging integration code using APIs such as JMS may also be defined at this level.
- Models/Entity classes—These components represent data that is transferred from the data access layer or service layer upward to the user interface components. These may either be simple Java Beans—data transfer objects—or “live” objects such as JPA entities, which can be manipulated and then updated directly.
Roo can operate in this traditional layered mode, using Roo entities, controllers, services, and repositories. You can even roll your own Spring Beans to represent each of these component types, and wire them together using Spring’s @Autowired annotation, or even drop down to using XML or even JavaConfig to configure them. Roo is a Spring-based platform.
Roo is an animal with a different stripe. Not only is Roo a Spring-based application platform, but it also enables a more lightweight, rapid application development approach to Spring development that may provide for even more rapid productivity.
1.4.3. Roo’s Active Record architecture
Roo was created to allow developers of Spring applications to become even more productive, and attempt to match the rapidity of development frameworks such as Ruby on Rails or Grails, while not leaving the Java platform. Though developers can still introduce services and repositories, by default Roo takes the approach of slimming down the required components, as shown in figure 1.9.
Figure 1.9. Roo’s Active Record architecture
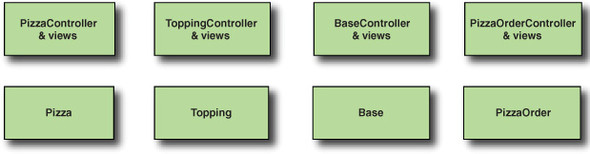
The required components are
- Views—Spring MVC views
- RESTful controllers—Spring MVC controllers
- Entities—Turbocharged Active Record–based entity objects, which know how to load, update, and persist themselves
At first glance, this may seem like a loss of structure. Where are the services? What about database access objects?
One of the reasons applications in enterprise Java take so long to deliver is the sheer number of artifacts required. There’s a constant push-and-pull between “getting the application out the door” and “architecting it so someone else just might understand it later.” Many non-Java frameworks have been able to deliver applications more quickly, with considerable maintainability, because they implement a more domain-centric view of the world. Take a look at figure 1.10.
Figure 1.10. Roo’s “turbocharged” entity
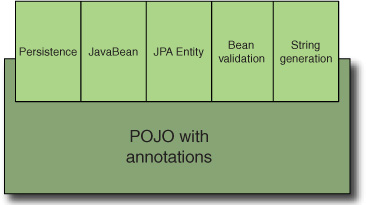
The Active Record pattern turbocharges the persistence model by providing smart “Roo entities”—beans wired using AspectJ ITDs (special class-like files that weave in additional functionality)—to provide service-and-repository features within a single class. This might seem counter-intuitive to a typical service-and-repository Spring developer. But consider that this pattern, the Active Record, has been used by frameworks such as Ruby on Rails and Grails with great success.
In Roo, you can define your persistence objects as Spring Roo entities, and Roo automatically wires up the code to properly validate and persist the entities for you. You’ll see the advantages of this in the next three chapters, but for now, consider that you’re able to use this feature to reduce the amount of code you type. Who needs to write boilerplate methods to load and persist data if a tool can do it for you?
1.4.4. Which pattern is better?
You may be asking why Roo exposes two models. Actually, the original Roo platform envisioned that Active Record would take over, just as it has for those Ruby on Rails and Grails application tools.
But a large subset of Spring developers desire service-and-repository layers in their applications. Also, in most applications, there are cross-domain problems to solve—what if you want to expose a data manipulation command that spans toppings and bases? Do you place the methods in the Base or the Topping entity? In those cases, developers would at least build a service, and call both entity manipulations behind the service.
What you use is up to you. You may find less code overall for the Active Record pattern, and if you have a large number of model objects that you’re manipulating, the extra work of building repositories and services for each one may be a bit tedious, especially when you aren’t doing anything special in those objects. But if you truly have cross-entity transactions and you have significant business logic, you may wish to roll out services, and if you don’t want to see your persistence logic held within your entities, you can ask Roo to create repositories.
Roo is flexible about application architecture, and, in fact, it can dynamically re-fit your project using the shell. Often, you’ll be adding fields to your entities, or adding annotations, and the Roo shell will generate code and keep up with you.
We discuss Active Record and layered service-and-repository patterns in chapters 3 and 4.
Now let’s review what you’ve learned about Spring Roo.
1.5. Summary
In this chapter we discussed the various challenges involved in writing Java applications. There are so many frameworks to choose from! Luckily, we’ve decided to discuss Spring, a powerful and flexible application development platform that can host a wide variety of applications and make configuring and accessing other frameworks better than doing so by hand. Then we discussed how Spring itself can even become a chore to configure as you begin to add configuration elements for your web application, persistence APIs, messaging, email, and other services.
We introduced Spring Roo, and using a built-in sample script, configured the Pizza Shop Spring-based web application in a handful of lines of configuration code. We used the built-in pizzashop.roo demonstration script to build a simple application, complete with validation, persistence, and a Spring MVC web framework, using only a page of Roo commands. By running the application, you saw just how much Spring Roo can help greatly simplify the configuration and setup process.
You saw how Roo even exposes JSON-based RESTful web services against the object you’ve created. That can certainly come in handy when wiring your application to nonweb applications or rich browser clients.
Coming up in chapter 2, we’ll dive into the structure of a Spring Roo project, discuss the key Roo components, and outline a typical project layout and configuration files. We’ll define a sample project, the Task Manager application, and we’ll dig deeper into the Roo shell.
1.6. Resources
Books
- Walls, Craig. Spring in Action, Third Edition (Manning Publications, 2011)
- Wheeler, Willie, et al. Spring in Practice, Early Access Edition (Manning Publications, 2008)
Web
- The “Spring Framework Reference Guide” and other Spring project documentation is available at www.springsource.org/documentation.
- Visit and get familiar with the information on the Spring Roo project home page, available at www.springsource.org/spring-roo. You’ll find a link to forums, documentation, the JIRA bug tracking system, the GitHub repository, and a whole lot more.