
Chapter 6. Advanced web applications
In the last chapter, we discussed how to build Spring MVC web applications, apply scaffolding to automatically generate your controllers and views, and how the Roo custom tag libraries add dynamic behaviors such as client-side validation.
Push-In the Scaffolds for Full Control
When you’re ready to diverge from the standard scaffolding, you can choose to either start with a new controller and views, or use the scaffolding as a baseline. To do the latter, use your IDE (STS or IntelliJ) to push-in every method so that all of the controller code resides in the controller itself. You can then simply remove the @RooWebScaffold annotation and begin to customize your forms directly.
Once the scaffold has been pushed in, you can do anything you want. The z= view tags won’t be used anymore, so you can make changes to the views in any way you see fit. Keep in mind that your views will no longer be maintained against your entity, so any new fields you add must be manually added to your view code.
In this chapter you’ll learn how to customize your view layer. We’ll start by discussing the generated scaffold CRUD views, and how to customize them by hiding, disabling, or modifying the field types attached to various form elements. We’ll discuss how to provide reference data and how to customize date formats, and then dig into how Roo deals with layouts, localization, and themes.
By the end of this chapter, you’ll be able to strike out on your own and customize your Roo web applications.
Let’s begin by discussing Roo’s generated views and how you can customize them.
6.1. Customizing Roo CRUD views
As you saw in the last chapter, the Roo web interface heavily relies on a number of features: Apache Tiles, tag libraries, and Spring’s localization process. Let’s take a closer look at some of these elements and see how you can configure them.
Before we begin, we need to lay out the rules behind some of the common field and component names. Later, we’ll discuss techniques for manipulating and hiding pregenerated form elements.
6.1.1. Element naming conventions
Recall that most elements require an id attribute to identify them. This id is generally created, for data-based operations, using the following scheme:
id_[java-packages].[entity-name][.[field-name]]
For example, your Course entity would generally have the following id:
id_com_rooinaction_coursemanager_course
For the Course field name, you’d have
id_com_rooinaction_coursemanager_course_name
These HTML id field naming conventions are manipulated by the custom tags to pull various other values. For example, to show an entity label:
label_com_rooinaction_coursemanager_course=Course
The label for a collection of those entities:
label_com_rooinaction_coursemanager_course=Course_plural=Courses
The label for a given field within a table:
label_com_rooinaction_coursemanager_course_name=Name
These values are generated by the scaffolding process. This is done within the custom tag files themselves, which are located in the WEB-INF/tags directory.
In the HTML form views, all field id values are reduced to _fieldname_id so that they are easily scripted. For example, _name_id is the HTMLid field representing the name column.
If you want to benefit from Roo’s predefined localization structure, you need to follow these naming guidelines. Roo should automatically add labels for the component and fields for any entity you define, provided it’s a Roo-managed entity (@RooJpaEntity, @RooJpaActiveRecord, etc).
You can also choose to bypass these conventions, and use the custom tag attributes such as label to define your text in-line. But these won’t be localized, so it’s up to you to decide whether you want to buck the conventions for more control, or learn them and benefit from them.
You can customize the contents of these generated views. To do so, you can modify the tag attributes for the various list and form views.
6.1.2. Scaffold’s magic z attribute
If you’re modifying scaffolded forms, rather than building your own, you’ll encounter the z attribute, which is assigned a generated unique ID. This seemingly random value tells Roo that the field is being managed by Roo itself. You don’t want to change this value unless you decide to manage a field yourself. The valid values for z are
- A generated unique value, such as T5MViHc0PXnvBhkOlpd, meaning that this field is controlled by Roo.
- user-managed, which obviously means that the field is being controlled by the user. Less obviously, it tells the Roo shell to ignore this field definition, and specifically not to generate another definition for this generated, but customized, element.
How Do I Reset a Field Back to the Scaffolded Version?
When you save your view, the scaffold fixes it up and replaces the element that was removed, along with any subelements.
Beyond the ID fields and z attribute, Roo has a number of settings in the tag libraries that make it easy to customize your web views. Above all, read through the tag libraries and learn their features.
With the conventions behind us, let’s see how to change the views to suit your needs.
6.1.3. Modifying list views
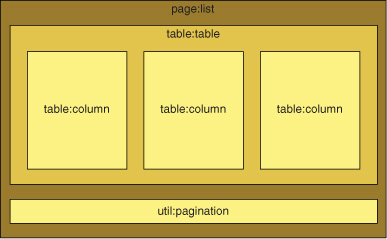
List views are composed of tags nested as shown in figure 6.1.
Figure 6.1. Nested tags in a typical generated list view
Roo automatically iterates through the rows in the collection, first outputting the column headers in a title row, and then listing all data in the collection. If paging is enabled, the content is paginated automatically.
In the list view, the tags you can customize include page:list, table:table, and table:column. Table 6.1 shows some customizations you can make. Keep in mind, you are limited in the scaffolding to showing the data returned by the controller, and may have to set the z parameter to "user-managed" if you make any changes to the attributes so that Roo doesn’t overwrite the field values.
Table 6.1. Some key page:list tag attributes
|
Attribute |
Description |
Examples |
|---|---|---|
| label | The label to show representing the entity if no entries are found. This should be written as a singular value. Defaults to the locale key emitted, which is resolved from the localized application.properties file. |
label="Course" |
| labelPlural | The label to show instead of the name of the entity, to the right of the title prefix List All from messages.properties. Defaults to the pluralized name of the entity. |
labelPlural="Courses" |
| items | The collection to be iterated through in the nested table. It’s listed here so that the outer tag can determine whether to show a table of results, or a message that there are no items available. | items="${courses}" |
But more important customizations occur at the table:table and table:column level. Let’s look at the customizations you can perform on your results table in table 6.2.
Table 6.2. table:table attributes
|
Attribute |
Description |
Examples |
|---|---|---|
|
create update delete |
Whether or not to show the icons for creating, updating, or deleting entries from the table. Defaults to displaying all of these features. |
create="false" update="false" delete="false" |
| data | The data collection to iterate through. | data="${courses}" |
| path | The URL path fragment to prepend to any requests to edit or remove data. | path="/courses" |
| render | Whether to render the table at all. You may wish to replace the table with other form elements instead. | render="false" |
| typeIdFieldName | The field name for the primary key of the row—id is the default. | typeIdFieldName="course_id" |
Finally, each field is emitted using the table:column tag. Table 6.3 shows table column attributes.
Table 6.3. table:column customizations
|
Attribute |
Description |
Examples |
|---|---|---|
| label | The label to display. Unless overridden by this property, the label defaults to the localized label for the field name in application.properties. | label="Times" |
| maxLength | Columns default to showing a maximum of 128 characters,[a] so this is the first setting you’ll want to override if you want to trim the output. | maxLength="30" |
| render | Whether to render a column in the table output. You won’t want to render all 60 fields of your massive employee record, for example. Setting render="false" for the ones you don’t want will omit them from the page. | render="false" |
| date calendar | Tells the tag whether the value is a stored java.util.Date, or a long that can be converted into a java.util.Calendar. For scaffolded date fields, this value will be automatically set. |
date="true" |
| dateTimePattern | The pattern to apply when formatting a field marked as a date or calendar. Scaffolded controllers create these patterns and add them to the request. You may use your own pattern instead (see section 6.2.4). | dateTimePattern="mm/dd/yy" |
a This was changed in Roo 1.2. In earlier versions, users were only shown 10 characters of each field.
You can customize any of the attributes in these fields, as long as you don’t change the generated id field value, or, in the case of the column definitions, modify the name of the properties they’re attached to. This way, Roo marks the customized elements as user-managed and leaves them alone.
What If I Want to Remove a Form Element in a Scaffold?
Just set render="false" on the element and it won’t be rendered. Remember, if it’s a key HTML form field value, you may have to add it as a hidden HTML field manually to carry it in the form.
Now let’s move on to form field views. What can you customize there?
6.1.4. Form view customizations
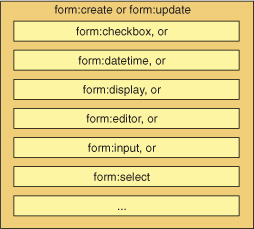
There are two generated forms—the create and update variants. They’re nearly identical to what you saw in the previous chapter. Figure 6.2 shows the tag nesting.
Figure 6.2. Nesting of form and field tags
The form view tags also take a number of attributes. You can choose to replace a generated form field with another type, or customize the way the form is rendered, simply by modifying the attributes or form field tag names.
Unlike the list view, form views are generally relatively flat. That’s because they’re editing a single entity.
Table 6.4 shows some attributes from the form:create and form:update tags.
Table 6.4. form:create and form:update customizations
|
Attribute |
Create? |
Update? |
Description |
Examples |
|---|---|---|---|---|
| label | Y | Y | The label for the entity being created. Will be added to the localized version of the message Create new, as in Create new Course. | label="Training Course" |
| render | Y | Y | Whether to render the generated form. By default only renders if all parent dependencies are satisfied. | render="false" |
| multipart | Y | Y | If a file upload field is present (see field:file), you need to set this attribute to true. Otherwise the file will not be uploaded. | multipart="true" |
There are other parameters, mostly used by the scaffolding system. But the key customizations take place in the form fields.
6.1.5. Common form field attributes
Table 6.5 has a list of fields that are common to many field types, and their relevant uses.
Table 6.5. Common form field attributes
|
Attribute |
Description |
Field Type(s) |
|---|---|---|
| label | The label to use to identify the field on the screen. This version is not localized, and is useful during prototyping or for applications that don’t need localization. | all |
| labelCode | As with label above, identifies the field on the screen. The label is interpolated using the localized properties files. | all |
| required | Whether the field is required to submit the form. If this value is set to true, and the field is skipped, the client-side JavaScript validators won’t allow the form to be submitted. This is a form of client-side validation. | input, editor, textarea, datetime, select |
| disabled | Whether the field can be edited. This may be useful if set based on user permissions using the Spring Security API or other databased permission scheme. | input, editor, textarea, datetime, select |
| validationRegex validationMessage validationMesageCode |
The regular expression defining the validation to apply for this field and the message to return when invalid. The messageCode variant looks up the message in the localized property stream, and the message variant takes a literal error message. Don’t forget to apply this pattern and message to both the create and update forms if you’re going to allow both creation and update editing of the field. Example: validationRegex="[A-Z,a-z ]*$" validationMessage="Invalid Name" |
input, textarea, editor, datetime |
Armed with these tables of information, you should be able to customize your views nicely. You can always drop in additional HTML elements where needed, and update your CSS styles as well. But what else can you do?
6.2. Advanced customization
Here are a few additional helpful techniques you can use while customizing your forms and views.
6.2.1. Changing field types
For example, you can switch the description field to use the field:editor tag, so that users can enter HTML data. Simply replace the original field:textarea tag name with field:editor, leaving the same z value. This is also useful when Roo has chosen a textarea field instead of a single-line input field, or when you want to switch from a checkbox to a Yes/No select list. After you make this change, the Roo shell will update your page for you, switching the field tag value to user-managed.
What about Hidden Fields?
Roo doesn’t have a hidden field tag. But you can just use the standard HTML input form element <input type="hidden"name="fieldName" value="fieldValue" /> tag structure wherever you need a hidden field, and Roo will deliver the field along with the rest of the form. Use the model name and field attribute for the value, such as ${course.title}. The field name should be the name of the member variable in the model.
Remember that if you’d like to reset scaffolded field settings for a given field, you can remove the field from the file, and Roo will replace it with a brand-new Roo-managed field.
6.2.2. Disabling or hiding features
Roo has two attributes attached to most scaffolded field and form elements: render and disabled.
- render—Set this to false when you don’t want to generate this element. This isn’t the same as making it nonvisual; it literally removes it from the view output.
- disabled—Set this to true if you want to render a given field, but not enable editing for that field. For text fields, the value will be emitted as text only, for example.
Let’s say you only want to allow Course comments once the course has been successfully completed. Remove the comment field from the create.jspx form by setting the render property to false. In a more advanced configuration, add an expression on the update.jspx page to evaluate the value of disabled for the field you want to selectively edit, based on the existence of another field value.
If Roo Isn’t Updating Your JSPX Files...
Sometimes Roo can get a bit temperamental, ignoring updates to your view files, especially when you want to regenerate your fields. Just quit and reenter your Roo shell to reset the state and detect the changed views.
Let’s look at another customization—modifying the appearance of date format fields.
6.2.3. Style-based date formatting
In the Offering entity, you’ve defined your offering date using the style-based format as the parameter to the Roo @DateTimeFormat annotation:
@Temporal(TemporalType.TIMESTAMP) @DateTimeFormat(style = "S-")
private Date offeringDate;
Roo uses this annotation to define a format String for the date field in the controller ITD, so that the form field can look it up and use it. The first character determines the format of the date portion of the field, and the second character determines the format of the time portion.
In addition to -, which means suppress the date or time portion of the field, @DateTimeFormat supports three formats—S, M, and L. In the US English locale, these resolve as shown in table 6.6.
Table 6.6. US English date and time style samples
|
Code |
Date sample |
Time sample |
|---|---|---|
| S | 2010-06-15 | 12:15 PM |
| M | Jun 15, 2010 | 12:15:05 PM |
| L | June 15, 2010 | 12:15:05 PM EDT |
During scaffolding, Roo takes this information and uses it to translate the date into a localized String using the Joda-Time library. It does this by generating an addDateTimeFormatPatterns method to the Controller ITD. For example, the Offering-Controller:
void OfferingController.addDateTimeFormatPatterns(Model uiModel) {
  uiModel.addAttribute(
     "offering_offerdate_date_format",
     DateTimeFormat.patternForStyle(
       "S-", LocaleContextHolder.getLocale()));
 }
Roo will add one addAttribute() setting for each field annotated by @DateTimeFormat.
The scaffolded field will use this format automatically in the attribute dateTime-Pattern during the scaffolding process:
<field:datetime
  dateTimePattern="${offering_offerdate_date_format}"
  field="offerDate"
 ...
/>
You can use this technique yourself for your own nonscaffolded date fields.
6.2.4. Pattern-based date formatting
Another way to date formats is to use the format attribute of @DateTimeFormat:
@Temporal(TemporalType.DATE)
@DateTimeFormat(pattern = "MM/dd/yyyy")
private Date offerDate;
Roo simply adds the format as a String in the Controller ITD:
void OfferingController.addDateTimeFormatPatterns(Model uiModel) {
  ...
  uiModel.addAttribute("offering_offerdate_date_format", "MM/dd/yyyy");
   ...
}
You can then use the dateTimePattern attribute to inject the pattern:
<field:datetime
 dateTimePattern="${offering_offerdate_date_format}"
 field="offerDate"
 ...
/>
Sharing and Localizing Date Formats
If you want to localize your date formats for nonscaffolded views, or want to use the same patterns across many date fields in your nonscaffolded or modified scaffold views, you can directly add the formats to a localized version of your application.properties file and use <spring:message> to load it into a variable at runtime.
In your application.properties file:
short.date.format=MM/dd/yyyy
In your view:
<spring:message var="dateFormat" value="${short.date.format}" />
 ...
<field:datetime dateTimePattern="${short.date.format}"
    ...
/>
Roo may also have problems converting these formats into a value supported by the date picker held in the field:datetime form field.
6.2.5. Adjusting date formats in views
The brute-force method is to apply a format pattern to the field directly, using the dateTimeFormat attribute on the view:
<table:table ...>
   <table:column dateTimeFormat="MM/dd/yyyy" ... />
   ...
</table:table>
Of course, this pattern won’t be updated based on changes to the entity’s @DateTime-Format annotation. But if you need to display a very specific date or time format for a given view, at least you have an option.
6.2.6. Providing reference data
Let’s say you need to provide a list of values for a given field as a drop-down list, such as a course complexity level, a query from a database, or a list of values provided by a collection.
On the server side, you’ll need to provide the reference data to the page in the form of request data.
- Use a Java enumerated type and annotate your type with the @Enumerated annotation:
@Enumerated(EnumType.STRING)
private CourseTypeEnum courseType; Roo will provide the options by stringifying the enumeration elements. This is the easiest, but least flexible, way to provide a set of choices to a view because you can’t add a new value unless you change your enumeration. Use this for extremely static choices. - Use a query to a Roo entity and store it in Model. Roo does this with relationship data, so you can do it too. Just annotate a new method in the controller with the @ModelAttribute annotation, and return your collection. For example, to select from a list of offerings, add
@ModelAttribute("offerings")
public Collection<Offering> OfferingController.populateOfferings() {
return Offering.findAllOfferings();
} - Use your own finder, service, or JDBC query to populate the list. This uses the same @ModelAttribute annotation but the method would delegate to the other collaborating components.
On the view itself, you can use the field:select tag to expose the options and allow them to be selected:
<field:select
   field="offering"
   items="${offerings}"
   itemlabel="offerDate" itemValue="id"

.../>
The itemLabel and itemValue clauses refer to properties of the collection provided in the Offering bean, and the provided collection is assigned with the attribute items.
You can even navigate to another controller to do a search, perhaps even making a modal dialog out of the selection process. Anything you can do in standard Spring is available to you here.
6.3. View layouts, theming, and localization
You may not be happy with the way Roo lays out your web application, and you probably have designs on better layouts, localization, and perhaps a set of themes. No matter: you are in complete control of that as well. In this section we’ll tell you how to prepare your application for localization, how to set up different themes, and how to adjust your layouts.
6.3.1. How Roo resolves scaffold labels
Spring Roo automatically builds support for localized user interfaces. In fact, every scaffolded text element is fetched either from the database (via the entities) or via locale-aware properties files such as application.properties and messages.properties.
Here’s how Roo identifies and renders various elements on the page:
- Table names —When Roo renders a scaffolded entry page for a given entity, it uses labels such as “Find by entityName” and “Create new entityName.” This name is held in application.properties under the value label_ appended with the lowercased, fully qualified class name (including package). In the example, it would be label_org_distracted_tracker_model_course. If you’d like to change the way your entity is described, you can modify this file.
- Column names —Column names are also stored within the application.properties file in the same way as the singular and plural entity names (the field is appended to the end of the preceding label).
- Error messages —Error messages are stored in messages.properties and can be customized to suit.
Remember, Roo won’t overwrite the tag libraries or layouts it creates, but it will attempt to keep fields in sync.
Now, armed with the knowledge of how Roo resolves messages, let’s dig into localization.
6.3.2. Configuring additional locales
Roo supports any valid locale in the WEB-INF/i18n directory. The icons placed in the footer.xhtml file of your standard layouts are automatically generated if you issue the web mvc language command. For example, to configure Spanish, issue
roo> web mvc language --code es
Roo responds by adding a new locale file, messages_es.properties, and configuring it with all standard Roo messages relating to the default layout and features. It will be your responsibility to copy your application.properties file to application_es.properties and translate the field labels and messages to the proper locale. Because all files are mounted in this directory, you don’t need any additional configuration.
Roo also copies an icon for the language flag into the webapp/images directory, and updates the footer to allow you to click on that image to switch locales. You can also manually switch locales for your browser session using the lang query string parameter. For example, to translate the site to Spanish, you can issue
http://localhost:8080/coursemanager?lang=es
By default this setting is kept in an in-memory browser cookie. If you’d like to make it more permanent, you can switch from the default CookieLocaleResolver to the SessionLocaleResolver. You can store and reload the session for each user from a data store if you wish. You can also use the AcceptHeaderLocaleResolver to automatically detect the locale based on the browser’s reported language.
See chapter 11 for details on how to create other language locales by writing an add-on.
Now that we’ve talked about the mechanics of rendering the page contents, we’re ready to discuss page layout concepts. Roo uses Apache Tiles to provide a composite view: a view composed of various individual parts. In this section we’ll take a look at just how Roo works with localized property files; the configuration of Apache Tiles in a Roo application; how you can define page layouts via tiles definitions; and then how to customize individual elements of the Roo layout.
6.3.3. Tiles and Roo
Remember that we told you, back in chapter 5 to ignore the views.xml files? Although Spring Roo view files are rather small, Roo ends up rendering complex views, complete with a menu system, header, footer, and content areas. Tiles does this work for you transparently. It’s installed as a special view resolver, a strategy object that resolves names of views returned by controllers to physical files and other resources. Here’s the TilesViewResolver, defined by Roo in WEB-INF/webmvc-config.xml:
<bean
  class="org.springframework.web.servlet.view.tiles2.TilesConfigurer"
         id="tilesConfigurer">
   <property name="definitions">
      <list>
         <value>/WEB-INF/layouts/layouts.xml</value>
         <!-- Scan views directory for Tiles configurations -->
         <value>/WEB-INF/views/**/views.xml</value>
       </list>
   </property>
</bean>
TilesViewResolver processes view names, emitted in the controller, and attempts to find layout definitions within configuration files specified in the definitions property. The main layout definitions file, layouts.xml, is what tells Roo about the two main layouts—default and public, as shown in the following listing.
Listing 6.1. Top-level tiles defined in WEB-INF/layouts.xml
<?xml version="1.0" encoding="UTF-8"?>
<!DOCTYPE tiles-definitions PUBLIC
       "-//Apache Software Foundation//DTD Tiles Configuration 2.1//EN"
       "http://tiles.apache.org/dtds/tiles-config_2_1.dtd">
<tiles-definitions>

   <definition name="default"
      template="/WEB-INF/layouts/default.jspx">
      <put-attribute name="header"
         value="/WEB-INF/views/header.jspx" />
      <put-attribute name="menu"
         value="/WEB-INF/views/menu.jspx" />
      <put-attribute name="footer"
         value="/WEB-INF/views/footer.jspx" />
   </definition>

   <definition name="public"
       template="/WEB-INF/layouts/default.jspx">
      <put-attribute name="header"
          value="/WEB-INF/views/header.jspx" />
       <put-attribute name="footer"
          value="/WEB-INF/views/footer.jspx" />
   </definition>

</tiles-definitions>
In the previous example, each layout is given a physical file that defines the contents of the layout, and values to substitute for various tiles within that file, such as header, footer, and menu.
6.3.4. Roo’s tile layouts
Hang in there, though: Tiles loves levels of indirection! That’s why you can create a number of layouts, assigning them to views, rather quickly by extending or modifying layouts. There are two layouts defined in this file:
- default—The standard layout used by most pages in Roo. This includes a header, footer, and menu.
- public—The layout used by pages that don’t require a menu bar. This layout gives users a larger amount of screen real estate.
Let’s take a look at the default layout, as defined by WEB-INF/layouts/default.jspx, shown next.
Listing 6.2. The default layout—default.jspx
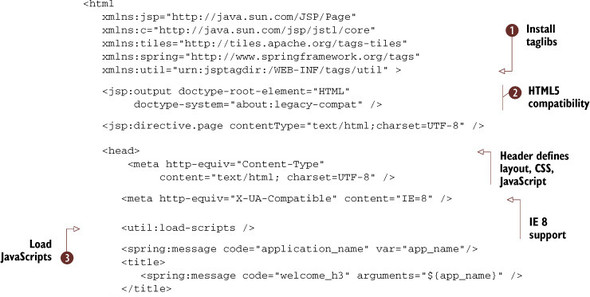
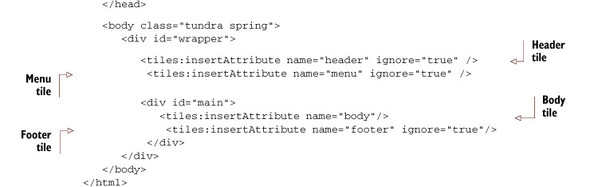
This layout defines a very comprehensive page structure, including features such as HTML5 compatibility ![]() , JavaScript and CSS support, the Dojo widget library,
, JavaScript and CSS support, the Dojo widget library, ![]() CSS, and preinstalled tag libraries
CSS, and preinstalled tag libraries ![]() . The template also includes a set of div elements, each of which defines areas that can be rendered with content at runtime.[1]
. The template also includes a set of div elements, each of which defines areas that can be rendered with content at runtime.[1]
1 To find out more about Internet Explorer’s support for various modes, see http://mng.bz/jQou.
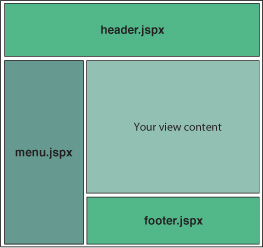
Figure 6.3 shows the layout divs, styled by Roo’s generated stylesheet, in a simple block diagram.
Figure 6.3. JSPX files involved in the Tiles layout process. These files are located in /web-app/WEB-INF/views.
Tiles inserts the content defined in these div elements when it sees the <tiles:insert-Attribute /> tag. For example, in the line
<tiles:insertAttribute name="header
" ignore="true" />
the actual content will be replaced by the file referenced in the attribute header, which is defined in the layouts.xml file:
<put-attribute name="header
" value="/WEB-INF/views/header.jspx" />
6.3.5. Putting it all together
At this point, you’re probably wondering just how the heck this information is relevant to you. Yep, you’re right—Tiles is maddeningly distributed. Careful readers also will notice that the attribute for the page content itself isn’t being passed to the definitions. So how in the world does it know about the page? Ah, that’s because the crux of the whole matter is that views.xml file in your WEB-INF/views/testdrive directory:
<?xml version="1.0" encoding="UTF-8" standalone="no"?>
<!DOCTYPE tiles-definitions PUBLIC " ...
<tiles-definitions>
    <definition extends="default" name="throwaway/index">
        <put-attribute name="body"
            value="/WEB-INF/views/throwaway/index.jspx"/>
    </definition>
</tiles-definitions>
Hopefully this is your Tiles eureka! moment... Finally, you see that the layout named default will be used to render the throwaway/index page. The header, footer, and menu tiles will be loaded from files based on the settings in WEB-INF/layouts, and the body tile will be loaded using the index.jspx file in the views/throwaway directory.
6.3.6. Customizing the tiles layout engine
You can modify the content in any of these tiles just by changing the view files. Here are a few suggestions for quick modifications you can do:
- Add a copyright entry to the footer of every page by editing footer.jspx and adding a fragment such as <em>© 2010 Course Management Incorporated</em> in an appropriate place.
- Add a menu item for nonscaffolded controllers or views: just edit menu.jspx and add a <menu:item>, or if you want to add a menu category (boldfaced headings before groups of related menus) add a <menu:category> element. Read the documentation at the top of the menu.tagx, category.tagx, and item.tagx files for details.
- Change the header to incorporate your logo. Just edit and replace the logo filename in the banner URL within the header.jspx file. The banner dimensions are 800 pixels long by 75 pixels deep if you would like to develop a drop-in replacement.
Then again, why not completely replace the entire layout? Just modify your tiles layout and related CSS files, and go to town. Realize that there are key elements to the various tag libraries generated by Roo, so you’ll have to take care and follow Roo’s variable naming conventions in order for the Roo-generated components to function.
6.3.7. Theming
Roo also supports the concept of theming, which is closely related to layouts. Two themes are installed: standard and alt. If you look closely at the footer of each Roo page in a web browser, you’ll see two clickable links for these themes. When you click on one of these, Roo uses Spring’s theming support to switch a simple client-side HTTP cookie named theme between the values of standard and alt.
A little too complex for this book, theming boils down to special properties files, stored in WEB-INF/classes in the web application, for each theme. Roo uses a special generated tag, theme.tagx, to generate these links, and the theme resolver accepts clicks to these links, which sets the cookie value for the browser. Each time the browser renders a page, it passes the theme name in a cookie to Spring. Spring accepts it, and the CSS file pointed to in the standard.properties or alt.properties files is used to mount a different stylesheet.
The upshot for you is that you can style two different themes. Currently, the only difference between the CSS layouts is the position of the menu: standard layout puts the menu on the left, and the alternative one puts it on the right. Feel free to customize standard.css and alt.css to suit your needs.
6.4. Summary
As you can see, you have a range of options for customizing your web application. Remember to follow these basic rules:
- Change the z attribute to user-managed when changing a scaffolded component entry.
- Hide scaffolded components using the render="false" attribute.
- Follow component naming conventions when adding your own fields, and read up on the generated tags that Roo generates.
- Learn to work within the generated layout, theming, and localization engines, customizing your themes and layouts as you see fit.
- Get comfortable with JSPX files. Since Roo needs XML-parseable files to manage scaffolding and generating your pages, you’ll benefit from digging in.
- The same goes for Spring’s own MVC form tags, which Roo uses inside of the scaffold tags.
If you follow these simple guidelines, you can go far in transforming the generated Roo web application files to suit your needs. If that fails you, just push-in refactor your scaffolded web application controllers and rework the pages and tags to suit your needs.
In chapter 7, we’ll look at Spring’s support for the Dojo component library and JavaScript, delve a bit into Ajax, and look at several other advanced web frameworks supported by Roo: GWT and JSF.
6.5. Resources
Books
- Hogan, Brian P. Web Design for Developers (Pragmatic Press, 2010). Although rather general, if you get into CSS and HTML editing, this is a great reference.
Web
- Official Apache Tiles project page: http://tiles.apache.org.
- Spring MVC and Tiles: http://mng.bz/Wb3O.
- Tiles 2 tutorial on the project site: http://mng.bz/ejF1.