
Chapter 5. Rapid web applications with Roo
- Converting your application into a web application
- Developing controllers and views
- The web scaffolding engine
- Customizing your application
If you’re like us and have written a lot of web application code, you probably expect to spend a significant amount of time to configure a web application. Because you want to get started, you may just want to dive right in, install Spring MVC by hand, and write some code against these entities.
Stop! Don’t touch that keyboard yet! We’ll show you how to save even more time by letting Roo configure and generate your web application for you.
In this chapter we use a simple Roo shell command, web mvc controller, to install Spring’s MVC web framework, and generate a sample controller and view. Then we use web mvc scaffold to generate full web pages complete with create, read, update, delete, and searching capability. We review the scaffolding in depth so that you understand how it functions, and to prepare you for customizing the user interface in chapter 6.
You’ll see that Roo provides a comprehensive Spring MVC solution at a fraction of the time it would take you to configure your own, and that it installs and configures key usability features, such as layout management and internationalization.
Let’s get started by reviewing Spring’s MVC framework.
5.1. The Spring MVC web framework
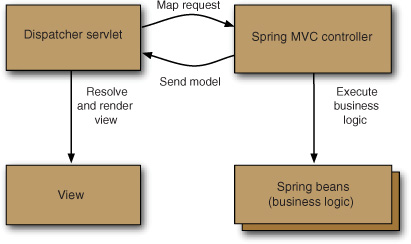
Spring MVC is an annotation-driven model-view-controller web framework that runs within the Spring container. The key components used by Spring MVC are as follows:
- The dispatcher servlet —Spring MVC controls all incoming requests by routing them through a dispatcher servlet that determines the appropriate action to perform based on the URL pattern, parameters, HTTP headers, and a number of other factors. This servlet controls the lifecycle of the HTTP request; it selects and processes the appropriate controller, captures the resulting model, and renders the correct view.
- Controller —Spring relies on user-defined MVC controllers to process the HTTP request. These controllers are POJOs that contain Spring’s MVC annotations, such as @Controller, @RequestMapping, @PathVariable, and a number of others. Spring MVC controllers are just specialized Spring beans; they can use the @Autowired annotation to access other beans.
- Model —Generally, controllers execute calls to other Spring beans, and then gather results that need to be rendered to the end user. These results are loaded into a model object, a simple map-based class that can be injected into a Spring MVC controller method. The dispatcher servlet then passes along this model for rendering by the correct view.
- View —A view is the output of a Spring MVC operation, a representation of the results of a given request. Views can access any object provided in the model, and can be written using a number of rendering technologies, such as JSP, Velocity, FreeMarker, or even using PDF or Excel. Spring Roo is configured to use XML-compliant JSPs, which are commonly referred to as JSPX views. Roo’s JSPX views are configured to use Apache Tiles, which is a layout engine that separates boilerplate code such as headers, footers, and other panels from the code specific to the view being rendered.
Figure 5.1 illustrates the interplay between the dispatcher servlet, controllers, models, and views.
Figure 5.1. Spring MVC key components
What about Other Web Frameworks?
Spring MVC is the predominant web application framework for Spring, since it’s an API within the Spring Framework, supports direct injection of Spring beans, and has full access to the application lifecycle.
In the next chapter we look at other web frameworks supported by Roo, including Google Web Toolkit and JSF.
It takes a significant amount of time and expertise to completely configure a web-based Spring application by hand. But as you’ve seen, Roo helps you by handling your dirty work, and for a web project architect there’s plenty of that to go around. Roo takes care of configuring Spring MVC for you so you can focus on coding your web applications. Let’s dive in and convert your project to a web application.
5.2. Roo Spring MVC quick-start
Remember the pizza shop example from chapter 1? The MVC setup was only two lines of Roo commands. In this section, you’ll see how to direct Roo to generate and configure an entire web application structure, even the Tomcat and Jetty web servers, in just one command. We’ll review components that Roo creates, such as the controller and view, and explain how to pass model information to the view for rendering. Let’s go!
5.2.1. The web application and first controller
When Roo built your Course Manager application, it just configured it as a jar project. JAR projects are useful for things like command-line utilities, but they can’t be deployed directly to a web application container such as Tomcat or Jetty. To get Roo to change the project type to a web application and output a war artifact, you need to execute the Spring MVC setup command:
roo> web mvc setup
Roo responds with a ton of output. Here’s a bit of it:
Created SRC_MAIN_JAVA/.../web
...
Managed ROOT/pom.xml [Added dependency org.springframework:spring-web:${spring.version}]
Managed ROOT/pom.xml [Added dependency org.springframework:spring-webmvc:${spring.version}]
...
Managed ROOT/pom.xml
...
Managed SRC_MAIN_WEBAPP/WEB-INF/i18n/application.properties
Managed SRC_MAIN_WEBAPP/WEB-INF/views/menu.jspx
As usual, Roo just did your dirty work for you. It upgraded your project to a fully functional web application, installed Spring MVC, and configured a user interface that now includes a number of features: a menu system, header, footer, localization, and a bunch of custom JSP tags to make it easy to build pages and forms.
Roo installs Spring MVC artifacts in the src/main/webapp directory. This directory can contain raw HTML, JavaScript, CSS files, and other static resources. Table 5.1 shows key subdirectories of this root directory and their purpose.
Table 5.1. Key directories in src/main/webapp
|
File/Directory |
Description |
|---|---|
| WEB-INF | The web descriptor directory—holds web.xml and other subdirectories. |
| WEB-INF/spring | Contains webmvc-config.xml, which defines the Spring MVC configuration. |
| WEB-INF/i18n | Contains all localized properties files. These files define the values of messages, labels, form elements, and page titles. |
| WEB-INF/layouts | Spring Roo uses Apache Tiles, a layout engine, to render views. The overall Tiles page layouts are defined in this directory. |
| WEB-INF/tags | Spring Roo custom JSPX tag libraries, used by views to render pages, forms, fields, and other elements. |
| WEB-INF/views | Contains the view files, which are comprised of JSPX pages and Apache Tiles view composition files. |
If you had to configure all of the installed features yourself, you’d probably spend the better part of a couple of days researching and experimenting, perhaps with some cut and-paste operations from other projects and examples on blogs and forum posts. Instead, Roo gives you a good starting place: a fully configured MVC project.
5.2.2. Creating your first controller
Ultimately you just want Roo to create a controller for you, so to do this you issue the web mvc controller command:
roo> web mvc controller --class ~.web.TestDriveController
You receive output similar to this:
Created SRC_MAIN_JAVA/org/rooinaction/coursemanager/web/TestDriveController.java
Updated SRC_MAIN_WEBAPP/WEB-INF/i18n/application.properties
Created SRC_MAIN_WEBAPP/WEB-INF/views/menu.jspx
Updated SRC_MAIN_WEBAPP/WEB-INF/i18n/application.properties
Created SRC_MAIN_WEBAPP/WEB-INF/views/testdrive
Created SRC_MAIN_WEBAPP/WEB-INF/views/testdrive/views.xml
Created SRC_MAIN_WEBAPP/WEB-INF/views/testdrive/index.jspx
Created SRC_MAIN_WEBAPP/WEB-INF/tags/menu/menu.tagx
Created SRC_MAIN_WEBAPP/WEB-INF/tags/menu/item.tagx
Created SRC_MAIN_WEBAPP/WEB-INF/tags/menu/category.tagx
Updated SRC_MAIN_WEBAPP/WEB-INF/views/menu.jspx
Roo builds the TestDriveController class and view artifacts, and even configures an entry on the menu system as well. Let’s take a look at the generated TestDrive-Controller, shown in the following listing.
Listing 5.1. TestDriveController.java
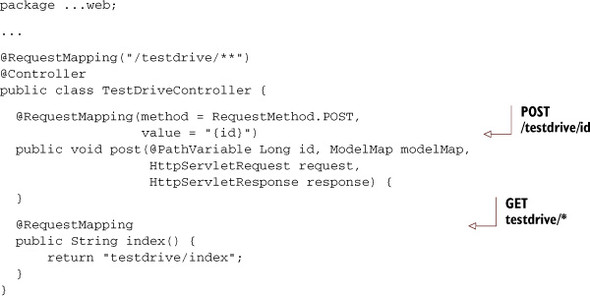
This controller uses the @RequestMapping annotation, which tells Spring MVC to map any requests with the given pattern to methods within this controller. The classlevel mapping, /testdrive/**, makes sure anything with a URL that begins with /testdrive is handled by this controller. Each method then provides its own request mapping, defining a unique URL subpattern, based on portions of the path, request attributes, request types (POST, GET), and other options.
Two methods are mapped:
- POST on/testdrive/{id} via thepost method—The post method defines a further @RequestMapping with two further refinements: that the method responds to an HTTP POST call, and that the path includes a value after /testdrive/ which is mapped to the variable id. Note the curly-brace matcher syntax. A POST call to / testdrive/234 would be received by this method, and the id variable automatically converted to a Long variable.
- GET on/testdrive/* via theindex() method—Because the index() method doesn’t further refine the path, and the default method of @RequestMapping is GET, a simple GET to any path starting with /testdrive will call this method. This method actually functions, returning a view with the path of demo/index, which Spring’s dispatcher servlet then resolves to a file named WEB-INF/views/ testdrive/index.jspx, and renders the JSP file.
Controllers wouldn’t be useful without a way to display the data that they place in their models. Let’s take a look at the next component of your web application, the view.
To better understand what’s going on here, you need to know the underlying conventions. Spring MVC is a convention-driven API, which means that it processes methods based on the presence or absence of annotations, parameters, and return types in controller method definitions. Here are a few key concepts to keep in mind as you begin to look at some of these methods.
- If you define an HttpServletRequest, HttpServletResponse, HttpSession, ModelMap (map of values to render in the view), an Errors object, or a number of other components, they’ll be injected automatically.
- If the method returns a String (as in the index() method above) it will be treated as a view name, and Spring MVC will attempt to resolve it based on the Roo-configured path for all views, /WEB-INF/views.
- As you saw earlier, index and post are all annotated with @RequestMapping, and although the post method currently does nothing, it can respond to POST requests to /testdrive. The index method responds to /testdrive/id, where id is a number. You’ll see why this is important when we discuss Roo scaffolding in section 5.3.
5.2.3. Views, tags, and templates
One of the more complex parts of Spring Roo is the way it configures and manages MVC views. Roo uses an XML-compliant version of Java Server Pages, known as JSPX. These files must be XML-parseable, so that the Roo shell can manipulate them. As you’ll see later, Roo can generate and maintain forms and form fields in your views automatically.
Roo uses the Apache Tiles templating framework to provide layout and a consistent look and feel from view to view, and to provide support for a menuing system, headers, and footers for each page. In addition, Roo makes heavy use of its own JSPX custom tags to simplify the view code.
When you installed TestDriveController, Spring Roo generated the testdrive directory in WEB-INF/views. In this directory are two files, index.jspx and views.xml. Ignore the views.xml file for now. The view for your controller’s index() method is index.jspx, shown next.
Listing 5.2. The testdrive/index.jspx view
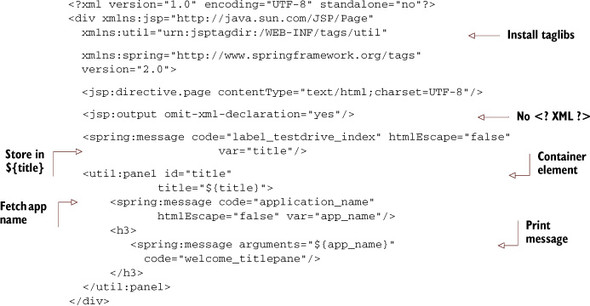
This is a pretty compact view file, for several reasons. First Roo installs several tag libraries—the Spring MVC spring: tag library, JSTL tags, and the Roo-specific util: tag library. Next, because Roo uses Apache Tiles, the bulk of the page structure is hidden within a template. You’re viewing only a fragment of the page, known as the tile, that represents the display area for your controller. The other tiles are combined with it to render the title, header, footer, and menu structure that you saw back in chapters 1 and 2.
The page:page tag wraps the page content in a bordered box, complete with a title bar.[1] The content is a simple message. However, how it’s computed requires a bit of explanation.
1 This is actually a Dojo rich JavaScript component, as are the fields that provide client-side validation and drop-down date fields. You can use Dojo to build your own view with your own hand-selected components. For now, keep in mind that Roo uses rich web interface components like this to give your web application a dynamic look and feel.
Labels and the Message Tag
This view makes heavy use of the <spring:message /> tag, which fetches properties from two files, application.properties and messages.properties, located in the webapp directory WEB-INF/i18n. This tag can be used in two ways—first to fetch messages from localized properties files and store them in page variables, such as in this fragment, which stores the value of the property application_name in the local page variable app_name:
<spring:message code="application_name" var="app_name"/>
It can also be used to render output, such as in this fragment, which renders the message welcome_titlepane, using the fetched variable above as an argument:
<spring:message arguments="${app_name}" code="welcome_titlepane"/>
The application_name message referred to by the first example is located in the web application’s WEB-INF/i18n directory, in a file named application.properties:
application_name=coursemanager-chapter-05
You may change your application’s friendly name by editing that file. The welcome_titlepane message is located in another file in that directory—messages.properties:
#welcome page
welcome_titlepane=Welcome to {0}
The two files serve slightly different purposes:
- messages.properties —This provides the Roo web framework scaffolding page element labels, such as button_save, which defines the label for all Save buttons, and field_invalid_integer, which defines the error message to display when a field doesn’t contain a valid integer value. Generally you don’t need to add anything to this file that’s application-specific.
- application.properties —This provides your application-specific and navigational framework label values, such as the label to use for each field, or for each element in the menu structure. The application_name in this file shows the name of your application in the title bar, and elements such as label_testdrive_index describe the labels to use for menu items that trigger controller invocations—in this case the TestDriveController.index() method. This file is heavily used by the scaffolding engine that we discuss later in this chapter.
Customizing Text in Properties Files
You may customize the text of generated labels in application.properties. Roo will not overwrite your entries, and will not touch the ones created even by itself—once an entry is created in this file, it’s available for customization by you from that point forward.
When you’re defining your own labels for nonscaffolded controllers, generally you’ll want to place them in the application.properties file in src/main/resources/METAINF/spring. You’ll also have to register the filename (without extension) in the p:basenames property of the ReloadableResourceBundleMessageSource in src/ main/webapp/WEB-INF/webmvc-config.xml.
After that, you can use the <spring:message code="your code" /> tag to display your message. You could place messages in application.properties, as well, but since Roo adjusts that file each time it scaffolds, you could have a harder time organizing your properties.
5.2.4. Launching the web application
Now that you’ve created your controller and view, what do they do? Let’s find out by firing up the server. Issue the following Maven command in your Roo project directory:
mvn package tomcat:run
The package keyword builds your Roo application, as you’ve seen in earlier chapters. The tomcat:run command launches Apache Tomcat on port 8080, and automatically loads your application to a web URI based on the name of your project, in this case /coursemanager.
Pick Your Favorite Web Container
Roo installs both the Apache Tomcat and Jetty web container plug-ins. Choose between Tomcat and Jetty by issuing tomcat:run or jetty:run. See below for details on Jetty.
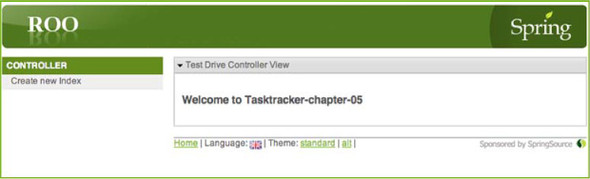
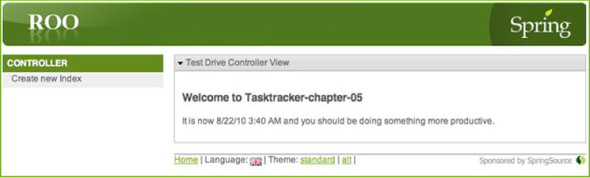
Browse to http://localhost:8080/coursemanager to view your web application’s default page. Figure 5.2 shows the terribly exciting view.
Figure 5.2. The default view page—terribly exciting!
Tomcat runs by default on port 8080. You can customize what port the Tomcat web server runs on by modifying the plug-in settings within the pom.xml file. For example, replace the existing plug-in definition with something like this:
<plugin>
  <groupId>org.codehaus.mojo</groupId>
  <artifactId>tomcat-maven-plugin</artifactId>
  ...
  <configuration>
    <port>9090</port>
  </configuration>
</plugin>
Review other options for the Tomcat plug-in by visiting the plug-in’s website at http://mng.bz/IgJ5.
If you’re a SpringSource Tool Suite user, you can drag the project to a configured server in the Servers pane and install it in Tomcat or SpringSource tc Server automatically. If you leave your web server running, STS will automatically redeploy the application when it recompiles the project.
You can also run Jetty as your web server. In fact, some developers really dig Jetty because it’s so easily customizable, and it’s quite polite: it even tells you your web application name if you hit the root of the server by mistake! To kick off your application with Jetty, just use
mvn jetty:run
Here’s a nice customization for you—Jetty has a setting, scanIntervalSeconds, that will scan for changes to the Maven project, and reload the web application automatically. You can edit the Maven pom.xml file in the root of your project, and change the jetty-maven-plugin to take advantage of this feature:
<groupId>org.mortbay.jetty</groupId>
<artifactId>jetty-maven-plugin</artifactId>
<version>7.4.2.v20110526</version>
  <configuration>
    <scanIntervalSeconds>5</scanIntervalSeconds>
  </configuration>
</plugin>
Now every time you perform an mvn package command, Jetty will automatically reload. There are a ton of other configuration features in jetty-maven-plugin; it’s worth spending an hour reviewing the documentation, at http://mng.bz/1MM6.
5.2.5. Customizing your view
Of course, Roo isn’t psychic. It can’t automatically figure out what you want the TestDriveController to do. It expects you to actually code something in that index() method before it returns the view name. So, let’s start small. What if you wanted to render the current time? You’d have to place the current date and time in the Model, so that you can render it in the view.
To do this, you just add a parameter to the index method, Model map, and then use the addAttribute method of the model to inject the currentDate attribute to the view. Let’s change the index() method in the TestController class to something like this:
@RequestMapping
public String index(Model map) {
  map.addAttribute("currentDate", new java.util.Date());
  return "testdrive/index";
}
When Spring MVC sees the ModelMap class, it injects it into the method automatically.
In the testdrive/index.jspx view file, you can now reference ${currentDate} and omit the String value of the current date. The lines between <util:panel> and </util:panel> can be changed to
<h3>
  <spring:message arguments="${app_name}" code="welcome_titlepane"/>
</h3>
<p>
  It is now ${currentDate} - you should be doing something productive.
</p>
You’ve changed Java code, so restart the server. Figure 5.3 shows the newly customized example, complete with dynamic evaluation from the controller.
Figure 5.3. index.jspx rendering the time
When the method returns testdrive/index, Spring MVC delegates to the Tiles view resolving mechanism, passing it a template named testdrive/index. Look in the WEB-INF/views directory for the testdrive subdirectory, and review views.xml:
<definition extends="default" name="testdrive/index">
   <put-attribute name="body"
      value="/WEB-INF/views/testdrive/index.jspx"/>
</definition>
Roo configures a definition for a tile named testdrive/index. It uses the default layout, and the body tile resolves to testdrive/index.jspx.
5.2.6. Customize that message!
Simply done, eh? But to be a better web developer (cue the music) you should proba bly follow the Spring Roo conventions and externalize this message. Add your message to the end of the #welcome page section of WEB-INF/i18n/messages.properties, keeping the original welcome_titlepane message:
#welcome page
welcome_titlepane=Welcome to {0}
testdrive_date_message=It is now {0} and you should be doing something productive.
To use this message in the view, replace the ${currentDate} paragraph fragment with this snippet:
<p>
  <spring:message arguments="${currentDate}"
     code="testdrive_date_message" />
</p>
Spring replaces the value of {0} in the message with the model attribute, currentDate, and uses some built-in formatting rules to render it properly. More complex objects, including things like a list of query results, can be placed in the model map, which is generally how Spring MVC deals with data that needs to be rendered in a view.
You’ll learn more about messages and locales in chapter 6.
5.3. Web scaffolding for entities
Ken remembers someone once lamenting about the trials and tribulations of web application development. They wanted to do all of this really cool stuff, integrating with other systems, doing complex graphical work, and meaty programming. But they said, “It’s ridiculous. What do we always do, day in and day out? Suck data out of a database, show it to the user, and let them change it. Period.” Yep, that’s right. You spend 90% of your time fetching, displaying, modifying, creating, and deleting that pesky data!
Why is manipulating database data so much work? Most of your Spring coding traditionally involves wiring up data access objects, services, controllers, and views to present and modify data. Shouldn’t it be easier to do this? And less manual? That’s where Spring Roo can really help.
In this section we’ll delve into the world of scaffolded Roo controllers. You’ll see how to generate a scaffolded course controller, and we’ll review each of the generated controller methods and views for the list, create, update, and delete operations. We’ll also look at how Roo integrates finders into these controllers.
5.3.1. Creating the course scaffold
Fully functional Spring Roo controllers that can handle create, read, update, and delete operations can be generated automatically by using the web mvc scaffold command. To generate a Roo scaffolded controller and views for a Course entity, just enter the following command in the Roo shell:
roo> web mvc scaffold --class ~.web.CourseController --backingType ~.model.Course
The options, --class and --entity, specify the name of the new controller and the entity to use, respectively. Again, Roo responds by performing a number of actions. Assuming you’ve already set up the MVC framework with the first web mvc controller command, the output will look like this:
Created SRC_MAIN_JAVA/org/rooinaction/coursemanager/web/CourseController.java
Created SRC_MAIN_JAVA/org/rooinaction/coursemanager/web/CourseController_Roo_Controller.aj
Created SRC_MAIN_WEBAPP/WEB-INF/views/courses
Created SRC_MAIN_WEBAPP/WEB-INF/views/courses/list.jspx
Created SRC_MAIN_WEBAPP/WEB-INF/views/courses/views.xml
Created SRC_MAIN_WEBAPP/WEB-INF/views/courses/show.jspx
Managed SRC_MAIN_WEBAPP/WEB-INF/views/courses/views.xml
Created SRC_MAIN_WEBAPP/WEB-INF/views/courses/create.jspx
Managed SRC_MAIN_WEBAPP/WEB-INF/i18n/application.properties
Managed SRC_MAIN_WEBAPP/WEB-INF/views/menu.jspx
Managed SRC_MAIN_WEBAPP/WEB-INF/views/courses/views.xml
Created SRC_MAIN_WEBAPP/WEB-INF/views/courses/update.jspx
Managed SRC_MAIN_WEBAPP/WEB-INF/views/courses/views.xml
Managed SRC_MAIN_WEBAPP/WEB-INF/i18n/application.properties
Managed SRC_MAIN_WEBAPP/WEB-INF/views/menu.jspx
Again, that’s a lot of processing. Of course, this time Spring Roo generates a few key files, including
- The controller, CourseController.java
- The AspectJ ITD, CourseController_Roo_Controller.aj
- Menu items to list and create courses in the shared file, menu.jspx
- Views to manage listing, creating, reading, updating, and deleting courses contained in WEB-INF/views/courses
We’ll focus on a number of these components, but first let’s start by identifying the views contained within WEB-INF/views/courses in table 5.2.
Table 5.2. Key scaffolded views
|
File/Directory |
Use |
|---|---|
| list.jspx | A view that displays a list of entities in a tabular format. |
| show.jspx | A view that displays a single entity row in a form-based view. |
| create.jspx | A view that generates an editable form that can create a new entity. |
| update.jspx | A view that generates an editable form that can edit an existing entity. |
| views.xml | The Apache Tiles configuration for all views in this directory. This file defines the Tiles layout to use, which is defined in /WEB-INF/layouts/layouts.xml. |
These view files are generated and configured using the Roo JSPX tag libraries, which are installed in WEB-INF/tags. You’ve already seen the util:panel tag in listing 5.2; but various page wrapper tags, such as page:create, page:update, and page:list, will wrap the various view pages to provide the proper forms and container elements. All fields available in the entity are generated as fields in these various view files.
Just as it did with entities, Roo creates the CourseController.java class, but also generates an AspectJ ITD, CourseController_Roo_Controller.aj. This aspect contains all scaffolded logic to manage creating, reading, updating, and deleting Course entities.
Roo also edits WEB-INF/i18n/application.properties with labels for all fields and the entity name itself for form rendering purposes, and adds menu items to menu.jspx, which was created when Roo generated the web application.
Just as the Course.java Roo entity itself seems a bit simple and empty, so does the actual Java controller. But that’s because the magic is in the generated ITD file. Let’s review the generated Controller class, CourseController.java, in the following listing.
Listing 5.3. The CourseController.java Roo scaffold controller
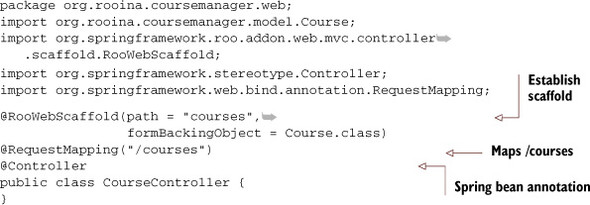
This controller class manages all operations against the Course entity. The code to implement the controller actions is stored within the AspectJ ITD. Roo generates and maintains the JSPX pages based on the @RooWebScaffold annotation.
Code Generation? Ick, I’ve Seen this Before!
Yeah, we’ve seen this before as well. It’s very difficult to write a good system and then keep it up to date by forward- and reverse-engineering changes to the software. We think that Roo is a different animal because it makes a distinction between user-editable artifacts and generated ITDs. If Roo generates a normal file, such as a class like CourseController, or a localization file like application.properties, it won’t overwrite it later. But if Roo creates a Roo-managed intermediate file, such as the Course_Roo_Controller.aj AspectJ ITD, it’ll manage it entirely via the Roo shell.
The gray area in all of this is the view technology. Since Roo generated the views as user-editable elements, any changes made by a developer must generally be honored. In fact, if you change your templates around, modify the HTML code, or otherwise modify the boilerplate code, Roo will allow this to happen. But if you change fields within forms, special considerations must be made, which we’ll review in chapter 6, section 1, “Customizing Roo CRUD views.”
Now, let’s take a look at the various views and controllers generated by your web mvc scaffold operation. We’ll review the files based on the operations they provide. First, let’s take a look at the GET operation.
5.3.2. Fetching courses
The GET operations your scaffolded controller supports are both a list of all of the Course objects and the display of a single Course. Both operations are supported by different generated controller methods and views. We’ll look at both in turn, starting with the listing operation.
Listing Courses
The list operation is called by performing HTTP GET operations on http://localhost:8080/coursemanager/courses. First, review the next listing to see the list method Roo generates in the CourseController_Roo_Controller.aj file.
Listing 5.4. The list method in CourseController_Roo_Controller.aj

This method is mapped to /courses. When you ask to GET tasks based on this URL, the controller fetches all of the tasks and places them in ${courses} to render in the view. The controller supports paging results if the page and size parameters are passed as parameters to the URL; otherwise it fetches all rows. The controller also tells the view how many pages of rows were available, if paging was enabled.
Roo Builds Restful Controllers
Roo URLs are all based on the REST web URL philosophy, which treats URLs as nouns (resources) and HTTP verbs such as GET, POST, PUT, and DELETE as actions. Getting the /courses resource returns all courses, whereas getting the /courses/1 resource returns the course with the primary key of 1. You’ll see the syntax {id} in many mapped URLs; this refers to the primary key in the path.
These verbs are also used by other actions, such as creating (POST of / courses), updating (PUT of /courses/1 with updated field values), and deleting (DELETE of /courses/1).[2]
2 For more information about REST, start with the excellent Wikipedia article at http://mng.bz/1PMN
The list method returns the value courses/list, which resolves to the JSPX view file list.jspx in the WEB-INF/views/courses directory. Let’s review the contents of list.jspx. If you’re familiar with Spring MVC and the form taglib, you’ll be pleasantly surprised by the use of tag libraries, which shorten the amount of code in the next listing.
Listing 5.5. Displaying courses with list.jspx
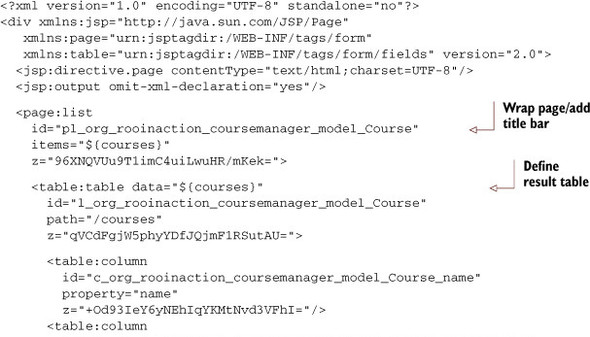

The first thing you might notice is that you’re not defining a full JSP page. In fact, the file looks a lot more like an XML document than an HTML page. That’s because the combination of using Apache Tiles to render page fragments and the heavy use of JSP tag libraries reduces the view to a tighter, more compact version of the usual view. That is, except things like those strangely long id and z fields. More about those later.
Roo composes this tile fragment using the JSP tag page:list. This tag sets up the container for the next tag, table:table, which renders an HTML table of results. The results, coming from ${courses} in the controller, are rendered using table:column elements. All of these tags are available for review and editing in webapp/web-inf/tags.
The resulting output of the course listing view should be similar in appearance to figure 5.4.
Figure 5.4. The course list view
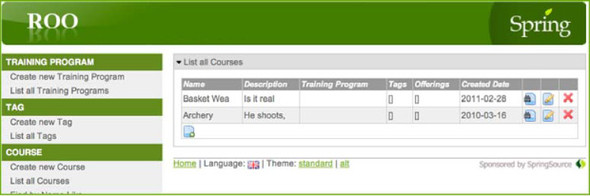
As you can see, the results are paginated, with alternating grey and white bars for the rows. The list is wrapped with a box that’s entitled List all Courses, and if you click on the List all Courses drop-down arrow, it collapses the entire view. Icons are shown for various actions, which all result in further calls to methods in the course controller’s ITD. These icons are
 —Adds a new course. Displays a form that you can use to enter the data for the new course.
 —Deletes a course. Prompts the user before deletion.
 —Displays the course in a single-object view page. Useful for showing larger fields such as comments.
 —Updates/edits a course. Displays a form, populated with data values, that persists updates to the given course.
Clicking on any of these icons navigates to the other actions.
You should spend some time getting familiar with the custom tag libraries, such as list.tagx, table.tagx, and column.tagx. We’ll continue to customize the user interface as we go through the CourseController example.
Now let’s see how you can review an individual course.
Showing a Single Course
If a user clicks on the ![]() icon for a given course in the web application, the browser navigates to another URL, passing the primary key as part of
the path. If the key value selected is 42, the URL generated is /courses/42. The method mapped to this URL pattern is called
show. Let’s take a look at it:
icon for a given course in the web application, the browser navigates to another URL, passing the primary key as part of
the path. If the key value selected is 42, the URL generated is /courses/42. The method mapped to this URL pattern is called
show. Let’s take a look at it:

There’s a bit of interplay going on between this view and the list view in listing 5.5. The list view’s table:table tag generates a table of results, each of which contains a link to edit an individual Course.
The show method, mapped to the /tasks/{id} URL pattern, takes the course primary key from the incoming URL path directly after courses/ and places it in the show method as the parameter id. Then it retrieves a course using the Course.findCourse(id) entity method, storing the result in the Model as course, which will be referenced by the JSP view below.
The show method returns the value courses/show, which resolves to the view file in the WEB-INF/views/tasks directory named show.jspx. The following listing reviews this file.
Listing 5.6. Showing a single course with show.jspx
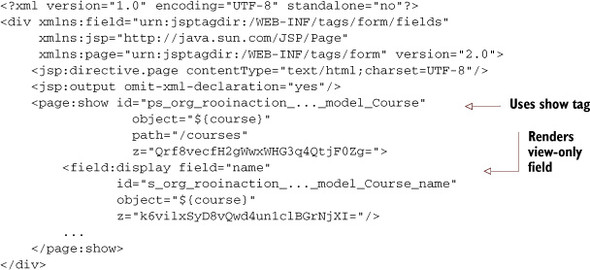
The page looks similar to the list view above, but you’ll notice that the page is now surrounded by a page:show tag, and that each field is no longer rendered by table:column, but by a field:display tag. This form is rendered as a read-only view of a single Course. Roo automatically shows this view if you click on the ![]() icon for a given row in the list view, or once you create or update a row using the Create New Course menu item or click
the
icon for a given row in the list view, or once you create or update a row using the Create New Course menu item or click
the ![]() icon.
icon.
Of course, it would be rather difficult to list or show tasks without actually creating one. Let’s see how to create a Course, using the HTTP POST operation.
5.3.3. Creating a new course
Spring MVC follows a very specific pattern for form-based processing, illustrated in figure 5.5.
Figure 5.5. Creating a resource with form processing
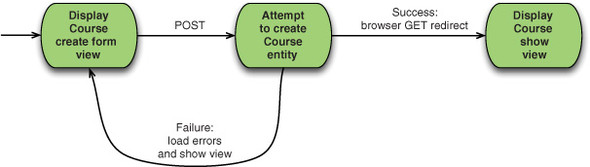
As you see above, creating new entities requires first the display of a form that can edit the data. To create a new empty Course and edit it with the form, users would select the Create New Course menu item, which requests /courses?form. This URL maps to the createForm controller method in the Course_Roo_Controller.aj ITD:
@RequestMapping(params = "form", method = RequestMethod.GET)
public String CourseController.createForm(Model uiModel) {
    uiModel.addAttribute("course", new Course());
    return "courses/create";
}
The params = "form" code in the @RequestMapping annotation is what makes Roo map this form using /courses?form. In this method, Roo calls the new Course() constructor to create a single Course entity instance. This instance is then added to the model map as course and the JSPX Tiles view rendered is courses/create, which renders the view fragment located in WEB-INF/views/course/create.jspx, as shown next.
Listing 5.7. Creating a new course with create.jspx
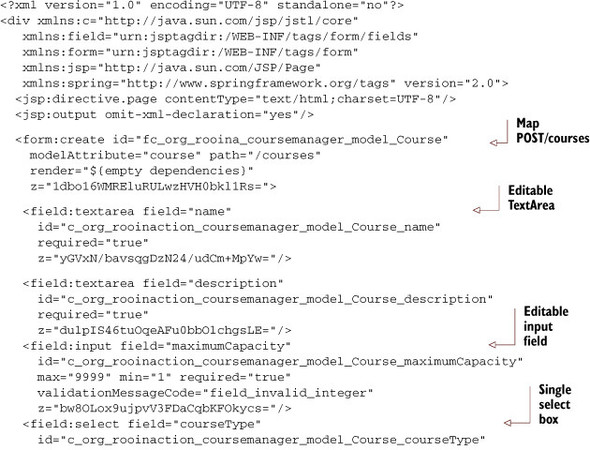
This is a fully functional HTML form page. The HTML form tag is generated by the <form:create> tag, which establishes that the form will be submitted using the POST method to the URI /courses.
Users with JavaScript-capable browsers will see the automatic rich field generation, including date pop-ups for date fields, and automatic rule validation. Try clicking in a field, and entering invalid data. Experiment with skipping required fields. You should get feedback from the web page immediately upon leaving the field.
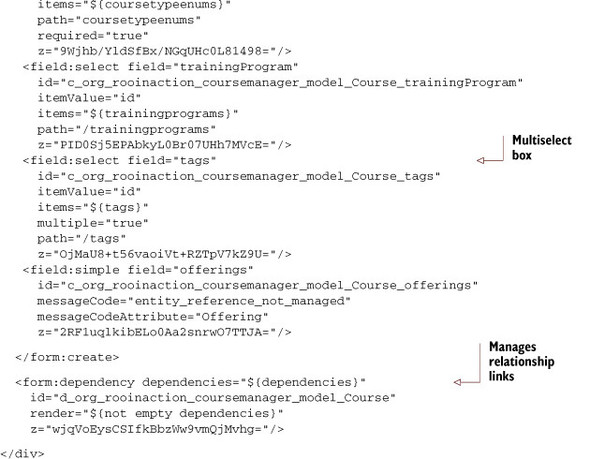
There are several field types used in the form above. Table 5.3 lists the field types available in the Roo tag library.
Table 5.3. Roo form field types
|
Tag name |
Supported datatypes |
Notes |
|---|---|---|
| checkbox | boolean | Used to set a Boolean field value. |
| datetime |
java.util.Date, java.util.Calendar |
Several validation options available, including regular expressions, future, past, and required. |
| editor | String | A rich text editor, used for fields that need to incorporate HTML elements. Includes tool bar. Not used by default in scaffolding. |
| input | String | Standard HTML input text box. The default for any field not selected by another strategy, and for String fields less than 30 characters in length. |
| reference | Not used directly | The dependency and select tags call this tag to render an HTML fragment which can create a new entity reference; for example, if a course depends on a curriculum, the select tag may defer to a reference tag to render the create link when the curriculum is unassigned. |
| select | Set, Enums | Supports relationship and enumerated type assignments. Using multiple=true allows for multiple select values; false allows for single-ended relationship element selections. Falls back to rendering reference fields if no collection rows found. This shows a create link to build a new instance of the referenced type. |
| simple | Reference to entity | Since one-to-many collections are managed from the many end, on the one end you simply display the fact that this side does not manage the relationship. |
| textarea | String, javax.persistence.Lob | Used for String or large object fields if they exceed 30 characters. |
The <form:dependency> tag will render any dependent collections (defined in the entity using the JPA @ManyToOne annotation, for example) when there’s no corresponding @OneToMany annotation in the parent relationship. An example exists in the Roo sample petclinic.roo: in the VisitController_Roo_Controller.aj ITD:
List dependencies = new ArrayList();
if (Pet.countPets() == 0) {
    dependencies.add(new String[]{"pet", "pets"});
}
uiModel.addAttribute("dependencies",  dependencies);
This fragment sets up a <field:reference> tag for the Pet entity within the Visit form.
Next, let’s review the CourseController.create method, which processes submitted data from this form. This is the heart of the forms processing in figure 5.5:
@RequestMapping(method = RequestMethod.POST)
public String CourseController.create(@Valid Course course,
                           BindingResult result, Model uiModel,
                           HttpServletRequest request) {
    if (result.hasErrors()) {
        uiModel.addAttribute("course", course);
        return "courses/create";
    }
    uiModel.asMap().clear();
    course.persist();
    return "redirect:/courses/" +
            encodeUrlPathSegment(course.getId().toString(), request);
}
The request accepts all POST requests to /courses, and then validates the data using the @Valid annotation. The result of the validation is placed in the BindingResult attribute, result, and is interrogated. If no errors are returned in the result object, you’re redirected to the single-task view, show. However, if errors do exist, you’re redirected back to the create page (and the errors are automatically displayed).
After performing the POST operation, the MVC framework is asked to redirect after posting to the list view by issuing a browser HTTP response code 302 MOVED. This forces the browser to browse to a new location. Redirecting after POST makes it impossible for the user to bookmark the actual POST operation, since the URL rewritten is now a GET of the /courses URL instead of the /courses/{id} URL using a POST.
How can I Customize My Form Field Value Defaults?
That’s actually pretty easy. Push-in the CourseController.createForm method to your CourseController.java and modify the code.
You can then create the course any way you wish and set values that make sense to you. If you’re manually moving the createForm method, be sure to run the Roo shell to have it remove the ITD-generated one.
The combination of the createForm action, the create.jspx form, and the create action comprise the complete Course creation page and controller logic. Course modification is just as easy, and follows a parallel set of files and behaviors. Let’s see how we can perform updates to existing courses in an almost identical way.
5.3.4. Updating courses with PUT
Just as the create course process is performed using a combination of the createForm method, create.jspx, and create method, the update course process is performed using an updateForm method, an update.jspx page, and an update action, as you see in figure 5.6.
Figure 5.6. Updating a resource with form processing
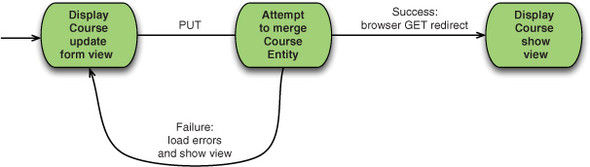
First, let’s take a look at the updateForm method, which responds to a GET request for the URL /courses/{id}?form (where {id} is the actual course primary key field):
@RequestMapping(value = "/{id}", params="form"

                method = RequestMethod.GET)
public String CourseController.updateForm(
               @PathVariable("id") Long id, Model uiModel) {
    uiModel.addAttribute("course", Course.findCourse(id));
    return "courses/update";
}
This method is remarkably similar to the create method in section 5.3.3. However, the major difference is that it maps to a GET method that passes a Course ID via the URL path just after /courses. The updateForm method uses this id field to call the Course.findCourses(id) method, which fetches the entity row. The method then adds the course to the model map, and redirects to the edit form.
Let’s take a look at this form view, courses/update.jspx, in the following listing.
Listing 5.8. Updating a course with update.jspx
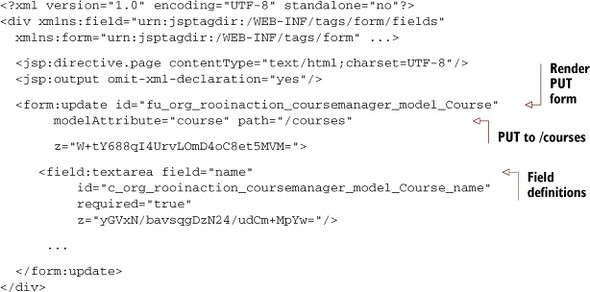
So far, this should look very familiar. This is a mirror image of the create form pattern above. The major differences are that you’re submitting your form data to the same URL using the HTTP PUT method and that you’ve embedded hidden form data including the existing primary key field value (known as id), and a version field, which can be used to detect modifications by others after you’ve fetched your data.
Wait, Browsers Only Issue Get and Post Operations!
You’ve seen for things like the update and remove operations that the tags look like they’re issuing PUT and DELETE operations. However, in general, web browsers can only operate on several operations: GET, OPTIONS, POST, and HEAD being the main ones. PUT and DELETE are operations defined by the HTTP RFC. However, you’ll notice you’re mapping all of your operations to the other operations, such as RequestMethod.DELETE. How does Roo identify these?
The reason this works is because Roo uses a HiddenHttpMethodFilter. This method looks for an HTTP request parameter named _method, which is set to the desired HTTP method such as GET, POST, PUT, and DELETE. Spring MVC then converts these GET and POST requests internally to PUT and DELETE requests based on that field.
Spring Roo builds RESTful URLs using this technique, and if you install the proper Spring configuration elements, you can also support RESTful calls to manipulate your entities using Spring’s REST support and JSON or XML automatically. You’ll see an example of this in the next chapter.
Below you see the update method in the ITD, which will save your changes to the course object, or redirect you back to editing the form in the case of an error:
@RequestMapping(method = RequestMethod.PUT)
public String CourseController.update(
       @Valid Course course, BindingResult bindingResult,
       Model uiModel, HttpServletRequest httpServletRequest) {
    if (bindingResult.hasErrors()) {
      uiModel.addAttribute("course", course);
      return "courses/update";
    }
    uiModel.asMap().clear();
    course.merge();
    return "redirect:/courses/"
            + encodeUrlPathSegment(course.getId().toString(),
                    httpServletRequest);
}
Just like the create() method in section 5.3.3, you’re accepting Course data, validating it, and then either persisting with merge() and showing the single course view, or redirecting to the entry page to display errors. This is the kind of boilerplate code Roo excels at generating, saving you the time to build, wire up, and debug the methods and views.
We are almost finished looking at the basic data manipulation operations. Finally, we should review the delete course action, so you can remove Courses you’re no longer interested in.
5.3.5. Removing a course with DELETE
Let’s say you’re ready to remove a course. Roo has this operation covered too. You can click on the ![]() icon to trigger the delete operation. The HTTP DELETE operation is mapped to a method on the CourseController ITD named delete:
icon to trigger the delete operation. The HTTP DELETE operation is mapped to a method on the CourseController ITD named delete:
@RequestMapping(value = "/{id}", method = RequestMethod.DELETE)
public String CourseController.delete(
       @PathVariable("id") Long id,
       @RequestParam(value = "page", required = false) Integer page,
       @RequestParam(value = "size", required = false) Integer size,
       Model uiModel) {
  Course.findCourse(id).remove();
  uiModel.asMap().clear();
  uiModel.addAttribute("page",
            (page == null) ? "1" : page.toString());
  uiModel.addAttribute("size",
            (size == null) ? "10" : size.toString());
  return "redirect:/courses";

}
The Course.findCourse(id).remove() statement from the Course ITD performs the delete operation. First, the course id passed to the delete method is used to look up the course using findCourse, and then the remove method removes the found course.
The rest of the code within the delete method handles any paging settings, such as the number of rows per page and the number of the current page passed to the original list view, which is where the DELETE operation is generally being called from.
The DELETE operation then redirects the browser to the list operation again, by navigating to /courses.
5.3.6. Scaffolding and finders
You can expose the finders we discussed in chapter 3 to your web pages. Let’s assume a finder is defined on the Course entity to search using the SQL LIKE keyword, which we defined in chapter 3. The syntax for that command would have been
~.model.Course roo> finder add --finderName findCoursesByNameLike
To expose the finders to your scaffolded controller, you have two choices:
- Use the web mvc finder add command:
roo> web mvc finder add --formBackingType ~.model.Course --class ~.web.CourseController - Just annotate the CourseController with the @RooWebFinder annotation (which has the same effect as using the web mvc finder add command).
Once you do one of the above, Roo wakes up and generates the web-tier methods and artifacts:
Updated SRC_MAIN_JAVA/org/rooinaction/.../web/CourseController.java
Updated SRC_MAIN_WEBAPP/WEB-INF/views/courses/views.xml
Updated SRC_MAIN_WEBAPP/WEB-INF/i18n/application.properties
Created SRC_MAIN_JAVA/org/rooinaction/coursemanager/web/CourseController_Roo_Controller_Finder.aj
Created SRC_MAIN_WEBAPP/WEB-INF/views/courses/findCoursesByNameLike.jspx
Updated SRC_MAIN_WEBAPP/WEB-INF/views/menu.jspx
The shell adds a new ITD, CourseController_Roo_Controller_Finder.aj, with two new controller ITD methods. It also generates input and result views to handle the search and adds the search page to the menu. First the new ITD method that renders the search form, findCoursesByNameLikeForm in CourseController_Roo_Controller_Finder.aj:
@RequestMapping(params = {"find=ByNameLike", "form"},method = RequestMethod.GET)
public String CourseController.findCoursesByNameLikeForm(Model uiModel) {
  return "tasks/findCoursesByNameLike";
}
This method is requested when the URI /courses?find=ByNameLike&form method is requested with a GET, which is the link provided in the menu file, menu.jspx. This method renders the input form, which gives you a text input field and a submit button. Here’s the key portion of the search page:
<form:find finderName="ByNameLike"
    id="ff_org_rooinaction_coursemanager_model_Course"
    path="/courses"
    z="bwOQxLqK/eMbWXGmvLpgh8c4Oq8=">

    <field:input disableFormBinding="true" field="name"
      id="f_org_rooinaction_coursemanager_model_Course_name"
      max="60" min="1" required="true"
      z="yXP0sm876zw9NEZ3jEiqqxawWqw=" />

</form:find>
As you can see, a special Roo form tag, <form:find>, is used to submit a search form. Though it appears that the form submits to the /courses path, the <form:find> tag actually sends along a hidden field, find, whose value is set to ByNameLike, which is the name of the finder method and is sent via the attribute above named finderName. Roo can add additional finders by changing the value of this tag.
Once you submit the search form, the finder is executed via the other method in the new ITD, findCoursesByNameLike:
@RequestMapping(params = "find=ByNameLike", method = RequestMethod.GET)
public String CourseController.findCoursesByNameLike(@RequestParam("name") String name, Model uiModel) {
    uiModel.addAttribute("courses", Course.findCoursesByNameLike(name).getResultList());
    return "courses/list";
}
The method calls Course.findCoursesByNameLike(String) and renders the list view again, which now contains search results.
5.3.7. Scaffolding wrap-up
Spring Roo does a lot of work for you with the scaffolding process—creating the views and controller ITD, wiring up JSPs with custom tags, and providing RESTful URLs for every operation. In addition, Roo will keep the scaffold up to date based on changes you make during development. Although Roo does make some decisions up front, such as the use of Apache Tiles, XML-compliant views, the use of tag libraries, localization and personalization, and a number of other features, it does so to make you more productive. And Roo heavily leverages your Roo-managed JPA entities, relationships, and finders.
If you don’t like the way Roo configures web applications, you can choose to roll your own web interface, but for getting basic work done, the scaffolding process can really do the trick.
Now it’s time to step back a bit and think about how the web framework fits within the overall picture. Remember back in chapter 4 when we discussed building Spring beans as business logic services, annotating them with @Service? What about accessing those service beans rather than embedding business logic in the controllers? Let’s see how Spring itself makes this quite easy.
5.4. Accessing other Spring beans
Roo controllers can write logic directly against Roo entities or in layered applications. Your controllers can access the Roo entities directly as you’ve seen in your scaffold above, but also may call Spring services and repositories, including those you created in chapters 3 and 4.
Although Spring Roo doesn’t expect developers to write software with the level of separation that you saw in section 5.3, you may need to add Roo and Spring MVC to an existing, larger effort. Perhaps the application logic has already been written as a series of Spring beans, or you may need to expose the business logic to a number of different consumers, from web clients to integration engines and desktop applications.
5.4.1. Automatic detection in scaffolds
In scaffolded interfaces, Roo repositories and services are automatically detected and used. The rule is to use the repository automatically, unless a Roo service exposes the repository. In this way, you can easily refactor your data tier to various persistence models without modifying a single line of your scaffolded code. If you’ve defined a repository for your Course entity, Roo will respond by adjusting the scaffolding calls. Here’s a fragment of the CourseController_Roo_Controller.ajdelete method with a repository defined against the Course entity:
Course course = courseRepository.findOne(id);
courseRepository.delete(course);
Here’s the same method fragment with a Roo service defined against the same Course:
Course course = courseService.findCourse(id);
courseService.deleteCourse(course);
Feel free to experiment with various persistence configurations while keeping your scaffolding in place.
5.4.2. Nonscaffolded controllers and Spring beans
You can inject Roo-generated services and repositories into your own controllers by using the @Autowired annotation. You can then directly access the service as with any injected Spring bean. Here’s a simple example:
@RequestMapping("/coursenonscaffolded/**")
@Controller
public class CourseNonScaffoldedController {

  @Autowired
  private CourseService courseService;

  @RequestMapping
  public String index(Model uiModel) {
    long numCourses = courseService.countAllCourses();
    uiModel.addAttribute("numCourses", numCourses);
    return "coursenonscaffolded/index";
  }
}
In the preceding example, simply inject the CourseService instance and use it in your index method to fetch the number of courses.
5.4.3. Multimodule scaffolds
If you’re using multimodule projects using the module command, you’ll need to be aware of the additional syntax for referencing models from scaffolds in other projects. Roo can scaffold controllers and views against other modules in the same project. But you’ll need to make sure you prefix the entity name with module| (that’s the module name, plus a vertical pipe |).
Roo will still detect ActiveRecord models, or services and repositories, and will do exactly the same scaffolding you’ve seen previously.
For example, if you’ve created an entity in a module known as business, which is a JAR-based Roo module, you’d need to change module focus to your web module (here shown as web) and issue the scaffolding command as in the example below:
roo> module focus --moduleName ~.web
roo> web mvc scaffold --class ~.controller.CourseController --entity business|~.service.CourseService
You can use the project top-level package prefix (~.) in each case to refer to the top-level package of the module in question.
To execute a web-based project in the Jetty or Tomcat runtimes, you’ll need to do some gymnastics:
$ cd [top-level directory of entire project]
$ mvn install
$ cd web
$ mvn jetty:run
This will install the various projects into your local Maven repository and then run the web application, looking for collaborating libraries in the repository itself.
Now let’s take a few moments to review what you’ve learned about Spring MVC and Roo.
5.5. Summary
You can see just how much power Roo packs into its Spring MVC web framework support. At the simplest level, Roo generates a template-driven website, complete with JSP tags and a predefined MVC configuration. This alone is worth considering.
But the real power lies within the scaffolding engine. For applications that require a ton of data manipulation, scaffolding can save you weeks of effort. Roo automatically scaffolds all CRUD behavior for you, even providing finder forms and views, if those are defined on your entities.
Finally, you saw that you can easily inject your Spring beans into a Roo controller using @Autowired, so your Roo web applications can support those business logic beans your development team has been building, and so you can keep that logic out of the controller.
In chapter 6, we’ll start customizing your web applications, modifying views, controls, layout, and more. In chapter 7, we’ll discuss other web frameworks that can be installed in Roo, such as GWT, JSF, and Vaadin.
5.6. Resources
You can find out more information on Spring MVC in a variety of resources. Here are a few:
Books
- Walls, Craig. Spring in Action, Third Edition (Manning Publications, 2011) covers Spring MVC in depth.
Web
- The Spring MVC Showcase sample library, located at http://mng.bz/B91V, contains a number of useful samples.
- The Spring MVC reference guide contains a wealth of information: http://mng.bz/nZQX.