
Chapter 14. Workflow applications using Spring Integration
- Workflow applications
- Enterprise application integration
- Spring Integration
- Spring Integration add-on for Roo
- Course registration implementation using Spring Integration
In the previous chapter, you learned how to deploy Java applications to the cloud. Using the Roo framework made it easier and faster to package and migrate your application from a local environment to the cloud server instance.
In this chapter, we discuss the support for the Spring Integration framework that Roo provides for workflow-based applications. The Spring Integration framework is a SpringSource project that’s been grabbing the spotlight recently. The framework implements the popular enterprise integration patterns, a set of common components in applications involving some type of workflow, where multiple steps in the business process are executed either sequentially or in parallel.
Because Spring Integration is an add-on like the JMS and email add-ons, this chapter is similar from a content flow standpoint to previous chapters where we covered those two add-ons, and our discussion focuses mainly on Roo commands and how each command works.
By the end of this chapter, you’ll know how to use enterprise integration patterns to implement the advanced types of use cases in enterprise Java applications. You’ll also be comfortable using the Spring Integration framework as well as its add-on for Roo, which will let you implement Spring Integration components using Roo commands in less time than it would take if you were to manually configure the Spring Integration workflow components.
Let’s get started with a discussion of workflow applications and the enterprise integration patterns (EIPs).
14.1. Workflow applications
Workflow-based applications include business processes that consist of multiple steps, with each step requiring a different type of trigger mechanism (time-based versus event-based), a different interaction model (synchronous versus asynchronous), or a different type of order for execution (sequential versus parallel). This type of architecture provides a great deal of flexibility and extensibility to application design and offers several advantages over traditional asynchronous messaging.
An ideal architecture solution to implement workflow requirements should manage the messaging and integration concerns and let the application architects and developers focus on the business components, without having to worry about the complex infrastructure and integration plumbing code. Enterprise integration patterns help in this space by providing a set of messaging architecture and design patterns to successfully implement your workflow requirements.
14.1.1. Enterprise application integration
Enterprise application integration (see http://mng.bz/u7is) helps software architects and developers design and implement integration requirements in their applications. These patterns are based on asynchronous messaging architectures that make the application design more modular and loosely coupled from other components within the application.
These EAI patterns are driven by design principles such as loose coupling, event-driven architectures, and synchronous and asynchronous interaction models.
Two types of dependencies (or couplings) are involved—a component-level dependency and a system-level dependency. A component- or type-level dependency deals with associating between various components in the application. For example, a controller class may depend on a service class, which may in turn depend on a data access object (DAO) class. These component-level dependencies can be reduced using the dependency injection (DI) principle.
Conversely, a system-level dependency refers to the coupling between two systems, whether they’re two internal systems within the same organization, or systems that are hosted in an external organization. By limiting one system level of coupling to another you can evolve and implement any changes in one system without adversely impacting the other system. Minimizing the system-level coupling also ensures that one system can function when the other system it relies on isn’t available. The communication and interaction between these systems can happen based on business events that trigger the subsequent processing in the main system.
Event-driven architecture (EDA) is another important component of enterprise application integration. We’ll look at this component next.
14.1.2. Event-driven architecture
The architectural pattern known as event-driven architecture explains how complex applications are broken down into a set of components or services that interact via events. One of the primary advantages of this is a loosely coupled application architecture, which helps to simplify the implementation of the component by eliminating concern about how to communicate with other components. Staged event-driven architecture (SEDA) is an architectural pattern where the events are communicated via channels that act as buffers during high throughput in the system. SEDA-based architectures are more scalable than are standard multithreaded applications. They’re also tunable at runtime, allowing optimization for the current load being experienced.
Event-driven, message-based architecture centers on two main components: events and messages. The message-based interaction operates through a structure of channels and endpoints, through which the messages are sent to carry out the functionality of the application.
With this big-picture view of event-driven, message-based architecture understood, you’re ready to see how the Spring Integration framework implements this architecture style.
14.2. Using the Spring Integration framework
Spring Integration is a framework for implementing event-based messaging applications. It provides a simple model for building enterprise integration solutions while maintaining the separation of concerns between business logic and integration logic.
Spring Integration is an extension of the Spring programming model to support enterprise integration patterns, taking advantage of the inversion of control (dependency injection) capability provided in the Spring core framework. Its architecture is based on lightweight messaging and integration with external systems using declarative adapters that provide a higher-level abstraction for functionality like remoting and messaging.
For more information on this topic, refer to Spring Integration in Action (http://www.manning.com/fisher/) from Manning. The book was coauthored by Spring Integration project lead Mark Fisher and offers a wealth of resources. The Spring Integration website (http://mng.bz/br9v) is another helpful resource, providing documentation on how to use the framework in Spring applications.
Another framework that works nicely with Spring Integration is Spring Batch, which can be used to design and implement batch (offline) applications.
14.2.1. Spring Batch
Spring Batch enables the development of batch-based use cases that are common in the operations of enterprise systems. A POJO-based framework, it provides reusable functions that are essential in processing large volumes of records, such as transaction management, job processing statistics, job restart, and resource management.
The Spring Batch and Spring Integration frameworks complement each other well and produce sophisticated event-driven, high-volume, high-performance batch applications. One scenario where using a Spring Integration and Spring Batch combination adds value to the solution architecture is when a batch job needs to be launched based on a business event. An example of this is when a data file is uploaded to an FTP server from an internal application or an external system. It’s also a good solution if any of the steps in the workflow need to be run as a batch with job restart or skip capabilities, which are available out of the box in Spring Batch.
Currently, Roo has no add-on available for Spring Batch, making it a good add-on candidate because there are several commands in the batch framework and it would be easier to set up the jobs and other batch components using Roo commands.
If you’re interested in learning more about Spring Batch framework’s features and API, refer to these additional resources: Spring Batch in Action (http://manning.com/templier/), and the Spring Batch project website (http://mng.bz/F66T).
14.3. Adding Spring Integration to your Roo application
In this section, we’ll discuss the design details of the course registration use case with EIP patterns and Spring Integration in the mix.
You implemented the course registration use case in chapter 10. In that solution design, the messaging infrastructure you set up didn’t allow the flexibility to add other steps in the process flow. If you need the flexibility to add (or modify or remove) any components without having to write a lot of code to change the order of tasks, you can take advantage of the Spring Integration framework. This alternative implementation of the course registration use case is the main focus of this chapter.
14.3.1. Course registration: a workflow-based approach
Let’s revisit the course registration use case, which includes multiple steps to process the course registration request before the last step of sending a confirmation email notification. This is a good use case for a workflow-based solution. The beauty of this solution is that you can implement a successful registration and a wait-list scenario within the same workflow. This is one of the advantages to using a workflow approach and the Spring Integration framework in enterprise Java applications. It allows you to design a solution with different branches (forks) and subprocesses in the process flow.
You’ll re-architect the solution you created for the wait-list notification use case covered earlier in this book. This time you’ll take advantage of the workflow capabilities the Spring Integration framework provides.
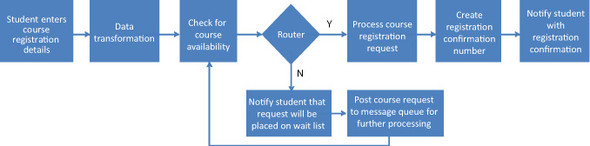
The course registration process, using the Spring Integration solution, includes the following steps:
1. When a student submits the course registration request, you post a message with the course registration details in a message queue.
2. A channel adapter component receives the message and performs a data transformation to filter out the data in the message that’s not required for your course registration process. Because the request data can come from different systems including external business partners, you need the transformation step to ensure that the input data to the next step is Course Manager domain friendly and doesn’t contain any unknown or invalid data.
3. The next step in the process is to check course availability. If the course is available, the program will route the course registration request to the branch to continue processing the request. This processing can be done offline without consuming any resources in the main business process. If the course isn’t available, the request will be routed to another branch in the program flow where the wait-list processing occurs. This also can happen outside the main process.
4. The Course Manager program performs all of the required updates and processing.
5. The final step is to notify the student with either the course registration confirmation or that the registration request has been placed on the wait list.
The diagram in figure 14.1 shows the various steps of the course registration process flow with two different scenarios—one for successfully registering for a course the user finds available, and the other for the wait-list scenario.
Figure 14.1. Course registration process flow
You’ll use some of the integration patterns in the implementation of the course registration use case. Let’s take a look at these patterns in more detail.
14.3.2. Integration patterns used in the solution
As you can see, you’re using a few different integration patterns, listed on the EAI patterns catalog site (http://mng.bz/U87T), to implement the components in the workflow process. Here’s the list of design patterns used in the solution and what they’re responsible for:
- Inbound Channel Adapter —This component in the workflow receives the course registration details from a message queue.
- Content Filter —This component removes the data elements from the course registration message that aren’t necessary for processing the course registration.
- Content-Based Router —This component routes the registration request to the course registration confirmation or the wait-list step in the process, based on course availability.
- Outbound Channel Adapter —This component sends an email notification to the customer after processing the course registration request.
The EAI patterns site uses special modeling (UML) notations for each of these patterns. Figure 14.2 shows the integration patterns using the UML notations.
Figure 14.2. Course registration workflow with integration components

By now, you must be itching to start testing, so let’s get to it. In the next section, we’ll dive into the installation, configuration, and use of the new Roo add-on component in the sample application.
14.4. Spring Integration add-on for Roo
Fortunately, an add-on component exists to create and manage Spring Integration components using Roo commands without having to write the code from scratch. The Spring Integration add-on for Roo provides quick and simple configuration of Spring Integration flows.
In this chapter, we’ll look at the course registration use case that includes a workflow with a message queue, a data transformation step, a routing step, and a notification step to send an email to the customer of the sample Course Manager application.
The discussion includes the new Spring Integration add-on (http://mng.bz/VX0h), which is not yet in general release. We’ll look at how to install the add-on and then how to run Roo commands for setting up Spring Integration components like SERVICE_ACTIVATOR, ROUTER, and so on. The design philosophy of the Spring Integration add-on aligns with the enterprise application integration patterns and their implementation in enterprise applications.
Another helpful tool when you need to add the various Spring Integration components into the application is the SpringSource Tool Suite (http://mng.bz/k0jd), or STS. This Eclipse-based IDE tool makes the job of adding different components easier, without having to configure them manually from scratch. STS also provides a good context-sensitive help feature.
Spring Integration Scala DSL[1] is another new project from the Spring Integration team that makes it easy to configure Spring Integration components using a domain-specific language (DSL) approach. This project is also in the early stages of development.
1 See http://blog.springsource.org/2012/03/05/introducing-spring-integration-scala-dsl/.
The Spring Integration add-on’s current status is that of a work in progress, and at the time of this writing, it’s not in GA release. The current version’s support is not comprehensive in that the add-on doesn’t persist the Spring configuration files after issuing the Roo commands. But it does have good support for setting up the various Spring Integration components in the workflow.
We’ll start this discussion by running different add-on commands to show you how to set up the Spring Integration workflow and associate the components to one another. Then you’ll create the required Spring configuration files to test the workflow setup. You’ll also write the Java classes needed to capture the business logic of the use case. Finally, you’ll write a JUnit test in order to test the different course registration scenarios.
The add-on also provides a focus command, similar to the Roo focus command, but it works on integration patterns rather than on Java classes.
14.4.1. How to install the Roo add-on for Spring Integration
You’ll perform the following steps to install the Spring Integration add-on:
1. Download the source from its Git repository location.
2. Compile the Java classes and package the JAR files.
3. Deploy the JAR files to the Roo runtime environment (which is based on OSGi technology).
4. After completing the installation process, you’re ready to use the Spring Integration add-on.
Let’s look at each of these steps in more detail.
Getting the Spring Integration Add-On Source Code
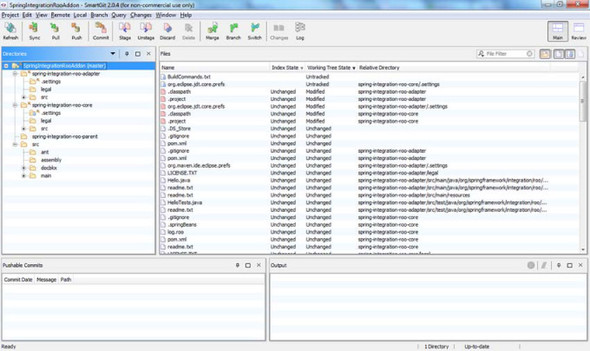
Let’s first check out the add-on source code from its Git repository location to a local directory on your machine. You can use a Git client tool like SmartGit (http://mng.bz/n5pg) to work with the Git repository, using a graphical user interface tool. Figure 14.3 shows the SmartGit client tool window, with the SpringIntegrationRoo-Addon Git project folders (in the left pane) and files (in the right pane).
Figure 14.3. Spring Integration add-on SmartGit screenshot
Now you need to clone the project using the add-on component’s Git repository URL.[2]
2 See git://git.springsource.org/spring-integration/roo-addon.git.
It includes three subprojects (or Maven modules):
- spring-integration-roo-parent
- spring-integration-roo-core
- spring-integration-roo-adapter
The spring-integration-roo-parent module includes the common dependency JAR files for the other modules in the project. And the spring-integration-roo-core module contains all the Roo commands for setting up a new project, creating various Spring Integration pipeline components, and configuring each component in the workflow.
Build the Add-On
To compile and package the add-on JAR files, run Maven clean and install commands, as shown in this example:
REM First, set JAVA_HOME and MAVEN_HOME variables to point to JDK
REM and Maven home directories respectively. Add these two variables
REM to the PATH system environment variable.

set PROJECT_HOME=C:/dev/projects/SpringRooProjects/SpringIntegrationRooAddon
cd %PROJECT_HOME%

mvn clean install
This will create two JAR files for the core and adapter modules, which you can deploy to the Roo environment, as discussed in the next section.
Deploy the Add-On
The Spring Integration add-on depends on the following four libraries:
- Apache Commons Logging
- Spring Core
- Spring Beans
- Spring ASM
If you try to deploy the Roo add-on without having these libraries installed first, the framework will throw the error shown in the following listing.
Listing 14.1. Error when deploying without the dependent Java libraries
ERROR: Error starting file:/C:/dev/frameworks/Roo/v1.2.0/spring-roo-1.2.0.M1/bundlespring-integration-roo-core-1.0.0.BUILD-SNAPSHOT.jar
(org.osgi.framework.BundleException: Unresolved constraint in bundle
spring-integration-roo-core [71]: Unable to resolve 71.0: missing requirement [71.0] package;
(&(package=org.springframework.util)(version>=3.0.0)) [caused by: Unable to resolve 69.0:
missing requirement [69.0] package; (&(package=org.apache. commons.logging)(version>=1.1.1)
(!(version>=2.0.0)))])org.osgi.framework.BundleException: Unresolved constraint in bundle
spring-integration-roo-core [71]: Unable to resolve 71.0: missing requirement [71.0] package;
(&(package=org.springframework.util)(version>=3.0.0)) [caused by: Unable to resolve 69.0:
missing requirement [69.0] package; (&(package=org.apache. commons.logging)(version>=1.1.1)
(!(version>=2.0.0)))]
You have two options to resolve this error. You can copy the required JAR files to the target folder in the PROJECT_HOME directory, or you can install these libraries using the OSGi commands. To do this, first you create a new directory under target called RooAddOnLibraries and copy the zip file contents into this new folder.
There are five JAR files under the bundles subdirectory:
- spring-asm-3.0.4.RELEASE.jar
- spring-beans-3.0.4.RELEASE.jar
- spring-core-3.0.4.RELEASE.jar
- spring-integration-roo-adapter-1.0.0.BUILD-SNAPSHOT.jar
- spring-integration-roo-core-1.0.0.BUILD-SNAPSHOT.jar
Install these JAR files to the bundle folder under Roo’s installation directory using the osgi start command for each JAR file, as shown in this example:
osgi start --url file:///C:/dev/projects/SpringRooProjects/SpringIntegrationRooAddon/spring-integration-roo-core/target/spring-integration-roo-core-1.0.0.BUILD-SNAPSHOT.jar
osgi start --url file:///C:/dev/projects/SpringRooProjects/SpringIntegrationRooAddon/spring-integration-roo-adapter/target/spring-integration-roo-adapter-1.0.0.BUILD-SNAPSHOT.jar
If you need to uninstall a library, you can use the following command:
osgi uninstall --bundleSymbolicName spring-integration-roo-core
Let’s install the Apache Commons Logging library now. The OSGi version of the Commons Logging JAR file can be downloaded from the SpringSource Enterprise Bundle Repository (http://mng.bz/PpyY), which hosts OSGi-ready versions of hundreds of open source enterprise libraries commonly used to develop Spring applications.
You can download the Apache Commons Logging (version 1.1.1) library (com.springsource.org.apache.commons.logging-1.1.1.jar) from the bundle repository (http://mng.bz/ad5d).
After installing the required libraries, type the following command to view all of the installed libraries and their current status (for example, whether they’re active or not):
osgi ps
The output of this command is shown in the next listing.
Listing 14.2. osgi ps command output showing all active OSGi bundles
[ 67] [Active ] [ 1] Spring ASM (3.0.4.RELEASE)
[ 68] [Active ] [ 1] Spring Beans (3.0.4.RELEASE)
[ 69] [Active ] [ 1] Spring Core (3.0.4.RELEASE)
[ 70] [Active ] [ 1] Spring Integration ROO add-on ADAPTER module (1.0.0.BUILD-SNAPSHOT)
[ 71] [Active ] [ 1] Spring Integration ROO add-on CORE module (1.0.0.BUILD-SNAPSHOT)
[ 74] [Active ] [ 1] Apache Commons Logging (1.1.1)
Another way to verify that the Spring Integration add-on components are installed correctly is to use the osgi log command.
The following listing shows the output of this command.
Listing 14.3. osgi log output showing current status of OSGi bundles
2011.04.19 20:24:34 INFO - Bundle: spring-integration-roo-core - BundleEvent STARTED
2011.04.19 20:24:34 INFO - Bundle: spring-integration-roo-core - [org.springframework.roo.shell.Converter] - ServiceEvent REGISTERED
2011.04.19 20:24:34 INFO - Bundle: spring-integration-roo-core - [org.springframework.roo.shell.Converter] - ServiceEvent REGISTERED
2011.04.19 20:24:34 INFO - Bundle: spring-integration-roo-core - [org.springframework.roo.shell.Converter] - ServiceEvent REGISTERED
2011.04.19 20:24:34 INFO - Bundle: spring-integration-roo-core - [org.springframework.roo.shell.Converter] - ServiceEvent REGISTERED
2011.04.19 20:24:34 INFO - Bundle: spring-integration-roo-core - 2011.04.19 20:24:34 INFO - Bundle: spring-integration-roo-core - [org.springframework.integration.roo.addon.IntegrationOperations] - ServiceEvent REGISTERED
2011.04.19 20:24:34 INFO - Bundle: spring-integration-roo-core - [org.springframework.roo.shell.CommandMarker] - Service
Event REGISTERED
2011.04.19 20:24:34 INFO - Bundle: spring-integration-roo-core - [org.springframework.roo.shell.CommandMarker] - Service
Event REGISTERED
2011.04.19 20:24:34 INFO - Bundle: spring-integration-roo-core - [org.springframework.integration.roo.addon.IntegrationContext] - ServiceEvent REGISTERED
2011.04.19 20:24:34 INFO - Bundle: spring-integration-roo-adapter - BundleEvent STARTED
2011.04.19 20:24:34 INFO - Bundle: spring-integration-roo-adapter - BundleEvent RESOLVED
2011.04.19 20:24:34 INFO - Bundle: org.springframework.core - BundleEvent STARTED
2011.04.19 20:24:34 INFO - Bundle: org.springframework.beans - BundleEvent STARTED
2011.04.19 20:24:34 INFO - Bundle: org.springframework.beans - BundleEvent RESOLVED
2011.04.19 20:24:34 INFO - Bundle: org.springframework.asm - BundleEvent STARTED
So far, you’ve downloaded, compiled, packaged, and deployed the Spring Integration add-on component source code along with the libraries on which the add-on depends. Now you can start using the add-on to implement the course registration use case. Before you do that, you need to quickly verify that you successfully installed the add-on and that there were no errors during deployment.
14.4.2. Verifying the add-on installation
To verify success of the add-on installation, run the help command in the Roo command shell window. This will display all of the Spring Integration commands. The following listing is the partial output of this command that shows Roo’s Spring Integration commands.
Listing 14.4. Spring Integration Roo commands to verify the add-on installation
* integration flow delete - Allows you to delete an existing Integration flow
* integration flow edit - Allows you to edit an existing Integration flow
* integration flow fold - Allows you to fold an existing Integration flow to be exposed via convenient namespace support
* integration flow list - Lists available flows
* integration flow read - Allows you to read an existing Integration flow
* integration flow start - Starts the new Integration flow
* integration project - Focuses the Command Line context on the component specified
If you want context-sensitive help, you can type integration and press TAB:
roo> integration flow
integration flow read     integration flow start
Note that the exact syntax of these commands may change in more recent releases of the Spring Integration add-on, because the version of the add-on component is not in GA release at the time of this writing.
Now you’re ready to use the new add-on for your use case implementation. In the next section, we’ll discuss the implementation of the course registration confirmation use case step by step using Roo commands to define and configure the Spring Integration components you need in the use case.
14.5. Course registration workflow components
Before you can start creating the workflow components required for implementing the use case, you first need to set up the Spring Integration flow.
14.5.1. Spring Integration flow setup
Let’s create a new project to see how the add-on sets up a Spring Integration project. Change your directory to a new folder called coursemanager-spring-int and run the following command to set up the project:
integration project --name coursemanager-spring-int --rootDomain org.rooinaction.coursemanager
This creates a new project called coursemanager-spring-int that’s similar to how Roo creates a new Java project when you run the project command.
You can now type integration flow and press TAB twice to see what command options are available. It will show the following output on the command shell window:
integration flow read integration flow start
Because you didn’t create an existing Spring Integration flow yet, you need to use the start option with the integration flow command:
roo> integration flow start --name course-mgmt-int
The output should say
Started new flow: course-mgmt-int
If you want to edit an existing Spring Integration workflow, use the command integration flow edit, specifying the name of the flow, as this example shows:
roo> integration flow edit --name course-mgmt-int
The output will say that the flow is ready for edits:
Flow 'course-mgmt-int' is ready for modification
To see all of the available Spring Integration commands at this time, you can press TAB twice and it will display the following list of commands:
coursemanager-spring-int[course-mgmt-int] roo>

aggregate    enrich       filter      produce       route       send    service
stop         transform    validate
As you can see in the previous output example, there are several commands to create the different Spring Integration components that you need in your use case.
Note that the available commands are context sensitive, meaning that you see only the commands that are relevant to the Spring Integration component that’s currently in focus.
Another interesting feature to note is that the new add-on has support for maintaining the state of the project between Roo restarts.
14.5.2. Configuring Spring Integration components
Now that the base Spring Integration flow is set up, you’re ready to start adding the integration components you need to implement the course registration use case requirements. These components include the following:
- Input channel adapter (message queue)
- Transformer
- Router
- Output channel adapter
Let’s look at how to implement each of these components using Roo commands. First, start with the input channel adapter, which is based on a JMS queue. Post the course registration details to the message queue and the channel adapter helps with receiving the message from the queue for further processing in the subsequent steps of the workflow.
Input Channel Adapter
The input channel adapter in this case is acting as a producer, so you need to run the produce command to set up the adapter component. Type produce and press TAB twice to see the available options for the produce command. If you do this a couple of times, you’ll see the command for setting up the channel adapter. Here’s the example of this command:
coursemanager-spring-int[course-mgmt-int] roo> produce via channel-adapter
As you can see from the output in the following listing, a number of different adapter options are available, from ftp, jdbc, and jms to some new adapters that were added in recent releases of Roo, such as twitter and xmpp.
Listing 14.5. Variations of produce command for creating channel adapter component
produce via channel-adapter bean    produce via channel-adapter event
produce via channel-adapter feed    produce via channel-adapter file
produce via channel-adapter ftp     produce via channel-adapter http
produce via channel-adapter jdbc    produce via channel-adapter jms
produce via channel-adapter mail    produce via channel-adapter sftp
produce via channel-adapter tcp     produce via channel-adapter twitter
produce via channel-adapter udp     produce via channel-adapter xmpp
You’ll use the jms option for your requirements. Here’s the full command to configure the JMS channel adapter:
coursemanager-spring-int[course-mgmt-int] roo> produce via channel-adapter jms
You can now use the previously mentioned focus command to switch to a specific component in the workflow. Let’s run the focus command with the --name parameter to see the list of different components available. Here’s the output of this command:
channel_fffa channel_valueA channel_valueB inbound-adapter_e57b
The channel adapter’s ID is inbound-adapter_e57b. You can now use the focus command with the component ID to switch the focus to the inbound channel adapter. After running the focus command, if you press TAB twice, it will display the list of available commands:
coursemanager-spring-int[course-mgmt-int] ...inbound-adapter_e57b roo>

aggregate   config      diagram    enrich       filter     focus     produce       route        send
service     stop          transform    validate
Transformer
One of the commands listed is transform, which can be used to define a transformer component in the workflow. It’s useful for data transformation requirements. Let’s run the transform command, which creates a data transformer and sets the focus to this new component. Here’s output of the command after a transformer component has been added to the workflow:
coursemanager-spring-int[course-mgmt-int] ...trnsfmr_6054 roo>

aggregate    config     diagram     enrich      filter    focus    produce
route        send       service     stop         transform         validate
Another command that’s available is the diagram command, which you can use for viewing Spring Integration workflow details, such as what Spring Integration components are defined and assembled so far in your use case. Type the diagram command and press Enter. The output of the diagram command showing the FLOW details with the channel adapter, message channel, and transformer components is shown here:
========================================
 FLOW: -> inbound-adapter_e496(JMS) -> channel_6054 -> trnsfmr_6054
========================================
You only have two components defined so far in the process, so the diagram doesn’t have a lot of components. You’ll run this command again later in this section after creating all of the components to show how the FLOW diagram will look after all of the workflow components are in place.
Router
The next workflow component you need to define is a router that can be used to send the incoming messages to different steps in the process based on the predefined business rules. The command to define a router component is route. After you create the router component, you can run another command, validate, to perform a validation of the Spring Integration flow you’ve created so far. Here’s the output of the validate command:
Validating Flow: course-mgmt-int
The last component you’ll create for your use case is the output channel adapter. It’ll send the email notifications to customers after performing all of the steps in the course registration workflow.
Output Channel Adapter
Similar to the produce command you used earlier in this section to create an inbound adapter, now you’ll run the send command to define the outbound channel adapter. You’ll also specify that you need an email-based adapter by including the mail parameter in the send command. Here’s the command for defining the output channel adapter component:
coursemanager-spring-int[course-mgmt-int] ...router_9a29 roo> send via adapter mail --name course-reg-email
When the final workflow component has been defined, you can run the diagram command one more time to see the final version of the Spring Integration flow details. Here’s the command output:
========================================
 FLOW: -> inbound-adapter_302d(JMS) -> channel_302d ->   trnsfmr_33b4 -> channel_9a29 -> router_9a29(HVR)[channel_valueB,
channel_valueA] -> channel_course-reg-email -> course-reg-email(MAIL)
 FLOW: -> channel_valueA
 FLOW: -> channel_valueB
========================================
coursemanager-spring-int[course-mgmt-int] ...course-reg-email roo>
Also, when you’re finished creating and configuring all of the Spring Integration components you need for your use case, you can run the stop command to exit the course-mgmt-int workflow.
14.5.3. Spring Integration configuration details
Let’s add the Spring configuration file and Maven dependencies to test the Spring Integration components.
First you start with the Spring configuration file. The following listing shows the contents of the applicationContext-integration.xml file.
Listing 14.6. Configuration details for JMS components in course registration use case
<?xml version="1.0" encoding="UTF-8"?>
<beans xmlns="http://www.springframework.org/schema/beans"
  xmlns:xsi="http://www.w3.org/2001/XMLSchema-instance"
  xmlns:integration="http://www.springframework.org/schema/integration"
  xsi:schemaLocation="http://www.springframework.org/schema/beans
      http://www.springframework.org/schema/beans/spring-beans.xsd
      http://www.springframework.org/schema/integration
      http://www.springframework.org/schema/integration/spring-integration.xsd">

    <bean id="connectionFactory" class="org.springframework.jms.  connection.CachingConnectionFactory">
        <property name="targetConnectionFactory">
            <bean class="org.apache.activemq. ActiveMQConnectionFactory">
                <property name="brokerURL" value="vm://localhost"/>
            </bean>
        </property>
        <property name="sessionCacheSize" value="10"/>
        <property name="cacheProducers" value="false"/>
    </bean>

    <bean id="courseRegistrationRequestQueue" class="org.apache. activemq.command.ActiveMQQueue">
        <constructor-arg value="jms.queue. CourseRegistrationRequestQueue"/>
    </bean>

    <integration:poller id="poller" default="true" fixed-delay="1000"/>

</beans>
This configuration file defines the JMS queue-related Spring beans using the ActiveMQ server as the messaging container. A second configuration file, coursemanager-spring-int-config.xml, contains the Spring bean configuration for the integration components. This is shown in the following listing.
Listing 14.7. Spring configuration for course registration workflow components
<?xml version="1.0" encoding="UTF-8"?>
<beans:beans xmlns="http://www.springframework.org/schema/integration"
    xmlns:xsi="http://www.w3.org/2001/XMLSchema-instance"
    xmlns:beans="http://www.springframework.org/schema/beans"
    xmlns:context="http://www.springframework.org/schema/context"
    xmlns:jms="http://www.springframework.org/schema/integration/jms"
    xmlns:jmx="http://www.springframework.org/schema/integration/jmx"
    xmlns:stream="http://www.springframework.org/schema/integration/stream"
    xsi:schemaLocation="http://www.springframework.org/schema/beans
        http://www.springframework.org/schema/beans/spring-beans.xsd
        http://www.springframework.org/schema/context
        http://www.springframework.org/schema/context/spring-context.xsd
        http://www.springframework.org/schema/integration
        http://www.springframework.org/schema/integration/spring-integration.xsd
        http://www.springframework.org/schema/integration/jms
        http://www.springframework.org/schema/integration/jms/ spring-integration-jms.xsd
        http://www.springframework.org/schema/integration/jmx
        http://www.springframework.org/schema/integration/jmx/ spring-integration-jmx.xsd
        http://www.springframework.org/schema/integration/stream
        http://www.springframework.org/schema/integration/stream/spring-integration-stream.xsd">

     <!--  Test Outbound Adapter for Unit Testing -->
     <channel id="stdinToJmsoutChannel"/>
     <stream:stdin-channel-adapter id="stdin"   channel="stdinToJmsoutChannel"/>

    <jms:outbound-channel-adapter
         id="jmsout"
         channel="stdinToJmsoutChannel"
         destination="courseRegistrationRequestQueue"/>

     <!--  Inbound Adapter -->
     <jms:message-driven-channel-adapter
         id="coursemanager-jms-input-adapter"
         destination="courseRegistrationRequestQueue"
         channel="jmsInToTransformerChannel"/>

     <channel id="jmsInToTransformerChannel"/>
     <!--  Transformer -->
     <transformer input-channel="jmsInToTransformerChannel"
         output-channel="transformerToRouterChannel"

         expression="payload.toUpperCase() + '- [' + T(java.lang.System).currentTimeMillis() + ']'"/>

     <channel id="transformerToRouterChannel"/>

     <recipient-list-router id="coursemanager-router" input-channel="transformerToRouterChannel">
         <recipient channel="jmsinToStdoutChannel"
             selector-expression="payload.contains('12345')"/>
         <recipient channel="jmsinToWaitListChannel" selector-expression="payload.contains('99999')"/>
     </recipient-list-router>
     <channel id="jmsinToStdoutChannel"/>
     <channel id="jmsinToWaitListChannel"/>

     <stream:stdout-channel-adapter id="courseRegSuccess" channel="jmsinToStdoutChannel" append-newline="true"/>
     <stream:stdout-channel-adapter id="courseRegWaitList"  channel="jmsinToWaitListChannel" append-newline="true"/>
         <!--  Mail Output Channel Adapter  -->
     <!-- replace 'userid and 'password' wit the real values -->
     <mail:inbound-channel-adapter id="pop3ShouldDeleteTrue"
         store-uri="pop3://[userid]:[password]@pop.gmail.com/INBOX"
         channel="routerToOutputAdapterChannel"
         should-delete-messages="true"
         auto-startup="true"

         java-mail-properties="javaMailProperties">

         <poller fixed-rate="20000"/>
    </mail:inbound-channel-adapter>

    <util:properties id="javaMailProperties">
        <beans:prop key="mail.pop3.socketFactory.fallback">
             false</beans:prop>
        <beans:prop key="mail.debug">true</beans:prop>
        <beans:prop key="mail.pop3.port">995</beans:prop>
        <beans:prop key="mail.pop3.socketFactory.class">
             javax.net.ssl.SSLSocketFactory</beans:prop>
        <beans:prop key="mail.pop3.socketFactory.port">
             995</beans:prop>
    </util:properties>
</beans:beans>
There are some additional Maven build dependencies for the Spring Integration classes. These dependencies are shown in the next listing. We’re using Spring Integration framework version 2.0.5 in this code example. The version is specified as <spring.integration.version>2.0.5.RELEASE</spring.integration.version> in the Maven pom.xml file.
Listing 14.8. Maven build dependencies for Spring Integration
<!--  Spring Integration Dependencies  -->
        <dependency>
            <groupId>org.apache.activemq</groupId>
            <artifactId>activemq-core</artifactId>
            <version>${activemq.version}</version>
         </dependency>
         <dependency>
            <groupId>org.springframework.integration</groupId>
            <artifactId>spring-integration-jms</artifactId>
            <version>${spring.integration.version}</version>
         </dependency>
         <dependency>
            <groupId>org.springframework.integration</groupId>
            <artifactId>spring-integration-jmx</artifactId>
            <version>${spring.integration.version}</version>
         </dependency>

         <dependency>
            <groupId>org.springframework</groupId>
            <artifactId>spring-jms</artifactId>
            <version>${spring.version}</version>
            <scope>compile</scope>
         </dependency>

         <dependency>
            <groupId>org.springframework.integration</groupId>
            <artifactId>spring-integration-core</artifactId>
            <version>${spring.integration.version}</version>
         </dependency>
         <dependency>
            <groupId>org.springframework.integration</groupId>
            <artifactId>spring-integration-stream</artifactId>
            <version>${spring.integration.version}</version>
         </dependency>

         <dependency>
            <groupId>org.springframework.integration</groupId>
     <artifactId>spring-integration-mail</artifactId>
     <version>${spring.integration.version}</version>
 </dependency>
14.5.4. Testing Spring Integration flow
To test the course registration use case with Spring Integration, you’ll write a test client class called CourseRegistrationSpringIntegrationTestClient. Because most of the workflow details are captured in the configuration file, all you need to do in the test client is to post a course registration request message to the JMS queue course-RegistrationRequestQueue. To make it easier to test, use the stream support provided by the Spring Integration framework. Instead of writing the code to create and post a message to the JMS queue, use a stdout-channel-adapter component, which allows you to type in the course registration test message at the console to trigger the course registration workflow. The following listing shows the test client class.
Listing 14.9. Test client for testing course registration with Spring Integration
package org.rooinaction.coursemanager.integration;

import java.io.File;

import org.apache.commons.logging.Log;
import org.apache.commons.logging.LogFactory;
import org.springframework.context.support.  ClassPathXmlApplicationContext;

/**
 * @author
 *
 * Test Data:
 * Successful Registration Text Message:
 * Test Course Registration # 12345
 *
 * Waitlist Registration Text Message:
 * Test Course Registration # - 99999
 *
 */
public class CourseRegistrationSpringIntegrationTestClient {

    private static final Log log = LogFactory.getLog(CourseRegistrationSpringIntegrationTestClient.class);
    private final static String[] configFiles = {
        "/META-INF/spring/integration/applicationContext-integration.xml",
        "/META-INF/spring/integration/coursemanager-spring-int-config.xml"
    };
     public static void main(String[] args) {
         CourseRegistrationSpringIntegrationTestClient client = new CourseRegistrationSpringIntegrationTestClient();
         client.verifyThatCourseRegistrationIsSuccessful();
    }
    public void verifyThatCourseRegistrationIsSuccessful() {
        log.debug("verifyThatCourseRegistrationIsSuccessful()   method is called.");
        log.debug("Cleaning up the ActiveMQ Test Data.");
        File tmpDirAMQ = new File("activemq-data");
        cleanupActiveMQDatabase(tmpDirAMQ);
        log.debug("Loading Spring Application Context.");
        new ClassPathXmlApplicationContext(configFiles, CourseRegistrationSpringIntegrationTest.class);
        log.debug("[For testing purposes, Successful Registration  message should contain " +
                "the number 12345 and the Waitlist should  contain 99999].");
        System.out.println("Type the Course Registration Test   Message and press the Enter key.");
    }
    private void cleanupActiveMQDatabase(File dirAMQ) {
        if (dirAMQ.exists()) {
            String[] children = dirAMQ.list();
            if (children != null) {
                for (int i = 0; i < children.length; i++) {
                     cleanupActiveMQDatabase(new File(dirAMQ,   children[i]));
                }
            }
        }
        dirAMQ.delete();
    }
}
14.6. Summary
In this chapter, you learned how to implement a workflow solution using the Spring Integration framework and the Roo add-on. Using the Roo add-on makes the implementation process easier, without having to write a lot of code. Following Roo’s philosophy, the Spring Integration add-on allows you to easily create and manage integration components.
As you’ve seen, the Spring Roo framework has a good ecosystem in areas of application development, with common use cases such as data access (CRUD) and user interface development, as well as advanced use cases such as asynchronous messaging, Spring Integration, and support for emerging technologies like cloud computing.
14.7. Resources
Enterprise integration patterns (http://www.eaipatterns.com)
Spring Integration add-on source repository (http://mng.bz/VX0h)
Spring Integration framework website (http://mng.bz/7377)
SpringSource Tool Suite (http://www.springsource.com/developer/sts)