
The next class diagram shows the JPA entity classes generated by seam-gen:
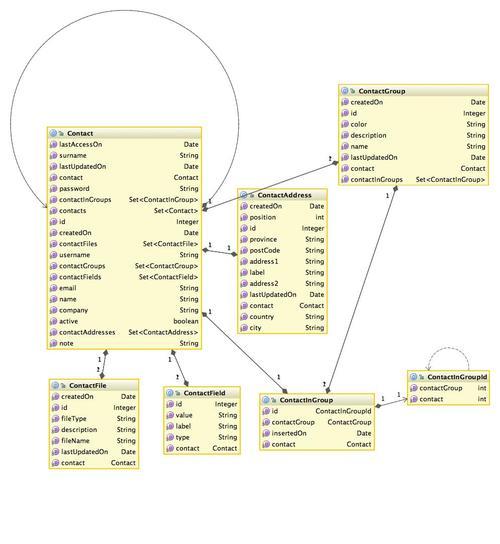
As you can see, it doesn't differ a lot from the E-R diagram in fact, every class matches with the corresponding table in the database.
This is an example of the generated entity class (the ContactGroup entity). We've written some parts of the class, just to show some relevant JPA annotation:
@Entity
@Table(name = "contact_group",
catalog = "adv_contact_manager")
public class ContactGroup implements java.io.Serializable {
private Integer id;
private Contact contact;
private String name;
private Set<ContactInGroup> contactInGroups =
new HashSet<ContactInGroup>(0);
// ... other fields, constructors, getters and setters ...
@Id
@GeneratedValue(strategy = IDENTITY)
@Column(name = "id", unique = true, nullable = false)
public Integer getId() {
return this.id;
}
public void setId(Integer id) {
this.id = id;
}
@ManyToOne(fetch = FetchType.LAZY)
@JoinColumn(name = "ContactOwner", nullable = false)
@NotNull
public Contact getContact() {
return this.contact;
}
public void setContact(Contact contact) {
this.contact = contact;
class diagramclass diagramJPA entity classes}
@Column(name = "name", nullable = false)
@NotNull
public String getName() {
return this.name;
}
public void setName(String name) {
this.name = name;
}
@OneToMany(cascade = CascadeType.ALL,
fetch = FetchType.LAZY, mappedBy = "contactGroup")
public Set<ContactInGroup> getContactInGroups() {
return this.contactInGroups;
}
public void setContactInGroups(Set<ContactInGroup> contactInGroups) {
this.contactInGroups = contactInGroups;
}
}
It is just a normal class (with fields, getters, and setters) annotated by JPA annotations (we highlighted them) that connect the class and its fields with the corresponding table in the database. You can annotate fields or the getter (as in this case). In both cases, the annotation has the same effects.
@NotNull and @Length are Hibernate Validator annotations, which we have seen in Chapter 2. Seam-gen puts some basic Hibernate Validator annotations, but we need to complete them by editing the entity classes (we'll see an example in the next paragraph).
Another annotation you might know is the JPA @OneToMany it manages the relationship with another entity class.
To make an example, the contactInGroups property returns all of the ContactInGroup instances that are connected to ContactGroup. In a simple way, if I have an instance of ContactGroup, I can get all the contacts in that group just by reading that property.
Using JPA is convenient also because you have more features available such as Hibernate Validators (we have seen how they work in the first example) and other useful annotations that help us to write clean code.
Seam-gen does a lot of work for us, but like every automatic tool, it is not perfect and we would add features to the generated classes after the project generation.
In this case, we are adding more Hibernate Validators to our entity classes. Here are some useful built-in ones:
@Length(min=, max=):Checks if the string length matches min and max values@Max(value=):Checks if the value is less than or equal to the max value@Min(value=):Checks if the value is more than or equal to the min value@NotNull:Checks if the value of the field is not null@Email:Checks whether the string conforms to the email address specification@Range(min=, max=):Checks if the value is between the min and max values (included)@Future:Checks if the date is in the future@Past:Checks if the date is in the past@Pattern(regex="regexp", flag=):Checks if the property matches the regular expression, given a match flag (seejava.util.regex.Patternfor more information)@Patterns( {@Pattern(...)} ):Like@Pattern, but for multiple regular expressions
You can create your own validators in a simple way. Refer to the Hibernate Validator documentation for all the features of this framework.
Another useful feature we would like to add to our entities is represented by the @PrePersist and @PreUpdate annotations. If a method is annotated with one of these annotations, it will be called before persisting the instance into the database and before updating it.
Here is the added code for the entity class of the previous section (the ContactGroup entity):
/**
* This method initializes the values before
* the class is persisted
*/
@PrePersist
public void prePersist() {
setCreatedOn(new Date());
setLastUpdatedOn(new Date());
}
/**
* This method initializes the values before
* the class is updated
*/
@PreUpdate
public void preUpdate() {
setLastUpdatedOn(new Date());
}
Here we used the @PrePersist and @PreUpdate annotations that enable us to automatically set the createdOn and lastUpdatedOn properties (using the setCreatedOn and setUpdatedOn methods) without having to do that every time we persist or update an entity. We will also use them to do something before the entity is persisted or updated.
For now, we will limit the editing of this page to transforming the h:messages component into the RichFaces one (rich:messages), which as we've seen, supports Ajax out of the box (rich:messages also has the same attribute as that of the JSF one, so we don't have to modify anything else).
In order to use it, we also have to add the RichFaces namespace we have seen. Therefore, this is how the template.xhtml page looks (some parts have been omitted because they are the same as before):
<f:view contentType="text/html"
xmlns="http://www.w3.org/1999/xhtml"
xmlns:ui="http://java.sun.com/jsf/facelets"
xmlns:h="http://java.sun.com/jsf/html"
xmlns:f="http://java.sun.com/jsf/core"
xmlns:a="http://richfaces.org/a4j"
xmlns:rich="http://richfaces.org/rich"

xmlns:s="http://jboss.com/products/seam/taglib">
<html>
<head>
...
</head>
<body>
<div class="body">
<rich:messages id="messages"
globalOnly="true"
styleClass="message"
errorClass="errormsg"
infoClass="infomsg"
warnClass="warnmsg"
rendered="#{showGlobalMessages!='false'}"/>
<ui:insert name="body"/>
</div>
...
</body>
</html>
</f:view>
In the next chapter, we will add those functionalities to the template page, which we want to share across different pages.
Tip
As you can see, the rendered attribute of the rich:messages component is controlled by the EL expression #{showGlobalMessages!='false'}. showGlobalMessage is a Facelets parameter that you can pass to the template (remember the projectName parameter passed to the menu?) in order to force it to not render the rich:messages component.