
In order to generate our project, first let's create a directory to contain our component (it can contain more than one) and let's call it, for example, sandbox.
Inside the new directory, let's create a file called pom.xml and insert this code:
<?xml version="1.0" encoding="UTF-8"?>
<project xmlns="http://maven.apache.org/POM/4.0.0" xmlns:xsi="http://www.w3.org/2001/XMLSchema-instance" xsi:schemaLocation="http://maven.apache.org/POM/4.0.0 http://maven.apache.org/ xsd/maven-4.0.0.xsd">
<modelVersion>4.0.0</modelVersion>
<groupId>org.mycompany</groupId>
<artifactId>sandbox</artifactId>
<url>http://mycompany.org</url>
<version>1.0-SNAPSHOT</version>
<packaging>pom</packaging>
<dependencies>
<dependency>
<groupId>javax.servlet</groupId>
<artifactId>servlet-api</artifactId>
<version>2.4</version>
<scope>provided</scope>
</dependency>
<dependency>
<groupId>javax.servlet</groupId>
<artifactId>jsp-api</artifactId>
<version>2.0</version>
<scope>provided</scope>
</dependency>
<dependency>
<groupId>javax.servlet.jsp</groupId>
<artifactId>jsp-api</artifactId>
<version>2.1</version>
<scope>provided</scope>
</dependency>
<dependency>
<groupId>javax.faces</groupId>
<artifactId>jsf-api</artifactId>
<version>1.2_12</version>
</dependency>
<dependency>
<groupId>javax.faces</groupId>
<artifactId>jsf-impl</artifactId>
<version>1.2_12</version>
</dependency>
<dependency>
<groupId>javax.el</groupId>
<artifactId>el-api</artifactId>
<version>1.0</version>
<scope>provided</scope>
</dependency>
<dependency>
<groupId>el-impl</groupId>
<artifactId>el-impl</artifactId>
<version>1.0</version>
<scope>provided</scope>
</dependency>
<dependency>
<groupId>javax.annotation</groupId>
<artifactId>jsr250-api</artifactId>
<version>1.0</version>
</dependency>
<dependency>
<groupId>org.richfaces.ui</groupId>
<artifactId>richfaces-ui</artifactId>
<version>3.3.1.GA</version>
</dependency>
</dependencies>
</project>
With the exception of the modelVersion, packaging, and dependencies sections, you can change the other parameters (such as groupId, artifactId, and so on) with your custom values.
Note
What is a POM?
If you don't know Maven, maybe you are wondering about what POM means. POM stands for Project Object Model and it is used as a description of the project to be built inside it, you can specify not only dependencies but also the tasks to do during the process and a lot of advanced features. It can be customized with three-part plugins for specific tasks.
Having created the POM, we can move (in our terminal) inside the sandbox directory that we have just created (containing the pom.xml file) and launch the following command (it is all in one whole line):
mvn archetype:generate -DarchetypeGroupId=org.richfaces.cdk -DarchetypeArtifactId=maven-archetype-jsf-component -DarchetypeVersion=3.3.1.GA -DartifactId=starRating
By using this command, we are asking Maven to generate a project template for a component called starRating.
It will start the project generation phase stopping at a certain point to ask you some information:
Define value for groupId: : book.richfaces.cdk.example
Here, we've defined the prefix for the package structure of our library to be book.richfaces.cdk.example.
Pressing the Enter key, we can go over the next question:
Define value for version: 1.0-SNAPSHOT: :
Here, we can decide the component version. The system suggests the 1.0-SNAPSHOT value and we just confirm it by pressing Enter.
Also for the next question, we choose the predefined values by just pressing the Enter key:
Define value for package: book.richfaces.cdk.example: :
After that, the script asks us to confirm the values, so we just press Y and go on by pressing the Enter key:
Confirm properties configuration:
groupId: book.richfaces.cdk.example
artifactId: starRating
version: 1.0-SNAPSHOT
package: book.richfaces.cdk.example
Y: : Y
It generates the new component project structure that should appear as shown in the following screenshot:
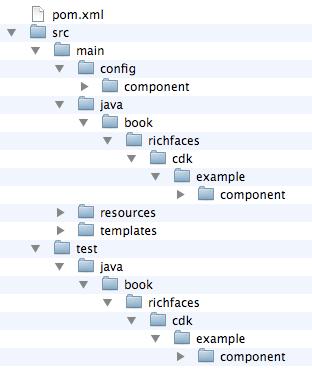
A short explanation for the generated directory structure is as follows:
|
Directory |
Description |
|---|---|
|
|
Contains the metadata files related to the component configuration. |
|
|
Contains the Java code. |
|
|
Contains every resource we are going to use in our component (images, JavaScript files, CSS files, and so on.). |
|
|
Contains the JSP-like template that describes the layout of the component. |
As you can see, inside the new generated component directory (called starRating), you can find another pom.xml file. The next step is to edit this file by adding a new plugin inside the plugins section:
<plugin>
<artifactId>maven-compiler-plugin</artifactId>
<inherited>true</inherited>
<configuration>
<source>1.5</source>
<target>1.5</target>
</configuration>
</plugin>
Setting the source and target versions inside the configuration element of the plugin tells the Maven compiler plugin to pass those parameters to the javac compiler. Therefore, we obtain classes compatible with the version of Java we specified in the target element (1.5) for compiling 1.5-compatible source code.
We need to set those parameters, as the default source setting is 1.3, and the default target setting is 1.1 this is independent of the JDK you run Maven with.
We are now ready to create the skeleton for our new component: let's go inside the starRating directory and launch the following command:
mvn cdk:create -Dname=starRating
We have just executed the Maven goal called cdk:create passing the name as parameter (using the D option to define a system property).
After the creation of the template skeleton, we can test it by just launching the following code:
mvn install
If, at the end of the process, it says BUILD SUCCESSFUL, then everything worked and you have generated a new (empty) component jar package. You can find the package inside the target directory that the process created.