We would like to attach one or more files to each contact. For example, we can attach some image, or the CV, or other useful information about the contact.
By implementing this feature, we are going to introduce three new components and explain how to use them in a productive way.
Let's start creating the upload file wizard this is a simple two-page wizard that enables the user to upload and then review files, eventually adding a note to each one.
Let's create the /view/main/uploadFiles/ directory and, inside it, an empty file called wizardFirstStepUploadFiles.xhtml (that will be the first step page of our wizard) with the following content:
<!DOCTYPE composition PUBLIC "-//W3C//DTD XHTML 1.0 Transitional//EN"
"http://www.w3.org/TR/xhtml1/DTD/xhtml1-transitional.dtd">
<ui:composition xmlns="http://www.w3.org/1999/xhtml"
xmlns:s="http://jboss.com/products/seam/taglib"
xmlns:ui="http://java.sun.com/jsf/facelets"
xmlns:f="http://java.sun.com/jsf/core"
xmlns:h="http://java.sun.com/jsf/html"
xmlns:rich="http://richfaces.org/rich"
xmlns:a="http://richfaces.org/a4j">
<!-- my code -->
</ui:composition>
Now we have to insert (replacing the<!-- my code --> comment) the form with the RichFaces file upload:
<h:form>
<h:outputText value="#{messages['selectFilesToUpload']}" />
<rich:fileUpload acceptedTypes="gif,jpg,png,pdf,doc,xls" allowFlash="auto" autoclear="false" maxFilesQuantity="10" immediateUpload="true" fileUploadListener="#{filesUploadHelper.listener}">
<a:support event="onuploadcomplete" reRender="nextBtn" />
</rich:fileUpload>
</h:form>
The working way is very intuitive for every file we upload, a listener method is called, so the application can manage the uploaded file.
The other attributes we have set are easy to understand, but a special mention goes to the allowFlash attribute, which permits the enabling of a Flash uploading panel component. If the Flash plugin is enabled, it allows the user to select more than one file to upload at a time.
Where the uploaded files are stored depends on createTempFile, an init-param set in web.xml file. By default, its value is true, and the files are stored in a temporary folder. If the parameter is set to false, then the uploaded files will be kept in the RAM (it is a better mode if you have uploaded small files).
In order to change the parameter value, you have to open the web.xml file and add this code:
<init-param> <param-name>createTempFiles</param-name> <param-value>false</param-value> </init-param>
Before creating the bean, we have to define the path where the uploaded files will be saved, and we can use the uiOptions component for that. Just open the UIOption class and add the following property:
private String fileSavePath;
public String getFileSavePath() {
return fileSavePath;
}
public void setFileSavePath(String fileSavePath) {
this.fileSavePath = fileSavePath;
}
Now we have to configure it in the components.xml file. Let's open it and add a property to the uiOption component initialization:
<property name="fileSavePath">/my/file/path/</property>
For security reasons, it's highly recommended to put the file path outside the application we will see how to enable the access through the application later on.
Now, we need the Seam component that manages the file upload process (filesUploadHelper). Let's create a new class called FilesUploadHelper inside the book.richfaces.advcm.modules.main.files package:
@Name("filesUploadHelper")
@Scope(ScopeType.CONVERSATION)
public class FilesUploadHelper       {     @In(create = true)
EntityManager entityManager;

@In(required = true)
HomeSelectedContactHelper homeSelectedContactHelper;

@In
UIOptions uiOptions;
}
Besides the entityManager, we need the uiOptions component because of the fileSavePath property. We also need homeSelectedContactHelper to get the selected contact to associate files with.
Now let's insert the listener() method:
public void listener(UploadEvent event) throws Exception {
UploadItem item = event.getUploadItem();
// Creating the instance
ContactFile newFile = new ContactFile(homeSelectedContactHelper. getSelectedContact(), item.getFileName(), item.getContentType());
// Persisting it into the database
entityManager.persist(newFile);
// Copying the files into the disk using the new id
copyFile(new FileInputStream(item.getFile()),
new FileOutputStream(uiOptions.getFileSavePath()
+ newFile.getId()));
}
As you can see, this method gets the UploadItem instance of the uploaded file, creates the association with the selected contact, and persists it into the database. After that it copies the temporary file to our preferred position, the following copyFile method is used to this:
private void copyFile(FileInputStream sourceStream, FileOutputStream destinationStream) throws IOException {
FileChannel inChannel = sourceStream.getChannel();
FileChannel outChannel = destinationStream.getChannel();
try {
inChannel.transferTo(0, inChannel.size(),
outChannel);
}
catch (IOException e) {
throw e;
}
finally {
if (inChannel != null) {
try {
inChannel.close();
} catch (IOException ioe) { }
}
if (outChannel != null) outChannel.close();
}
}
This is an almost general bean that you can use in your application by just changing the database code.
The wizard has two steps we've seen the first one that permits the user to select and upload files. The second one is used to review the files and to eventually add a note to each one.
Before creating the second page, let's add the navigation code to the first one, after the</rich:fileUpload> closing tag:
<a:commandLink id="nextBtn" action="next" style="float:left;" styleClass="image-command-link">
<h:graphicImage value="/img/next.png" />
<h:outputText value="#{messages['next']}" />
</a:commandLink>
This button permits the user to navigate to the next page using the JSF navigation rules from the next outcome. Let's open the faces-config.xml file and add the following code after the</application> closing tag:
<navigation-rule>
<from-view-id>/main/uploadFiles/wizardFirstStepUploadFiles.xhtml
</from-view-id>
<navigation-case>
<from-outcome>next</from-outcome>
<to-view-id>/main/uploadFiles/wizardSecondStepUploadFiles.xhtml
</to-view-id>
</navigation-case>
</navigation-rule>
<navigation-rule>
<from-view-id> /main/uploadFiles/wizardSecondStepUploadFiles.xhtml
</from-view-id>
<navigation-case>
<from-outcome>previous</from-outcome>
<to-view-id> /main/uploadFiles/wizardFirstStepUploadFiles.xhtml </to-view-id>
</navigation-case>
</navigation-rule>
This is standard JSF that permits navigation to the second step page in case of the next outcome, and going back to the first one in case of the previous outcome.
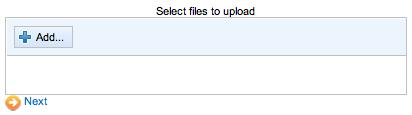
The screenshot of the first step of the wizard is as follows:
Now let's create an empty file (using the previously shown template) again called wizardSecondStepUploadFiles.xhtml and add the following code:
<h:form>
<ui:include src="showCurrentContactFiles.xhtml">
<ui:param name="edit" value="true"/>
<ui:param name="columns" value="2"/>
</ui:include>
<a:commandLink ajaxSingle="true" action="previous" reRender="uploadImagesWizard" style="float:left;" styleClass="image-command-link">
<h:graphicImage value="/img/previous.png"/>
<h:outputText value="#{messages['previous']}"/>
</a:commandLink>
</h:form>
You can notice that there is an included file (using the ui:include Facelets tag) with two passed parameters that's because we will reuse the code to show the files' list for another feature (you will see it later).
The other component to go back to the first step is commandLink.
Now, let's create the showCurrentContactFiles.xhtml file using the empty template and add the following code:
<a:outputPanel style="width: 500px; height: 400px; overflow: auto;" layout="block">
<rich:dataGrid value="#{filesListHelper.files}" var="file" columns="#{columns}">
<a:outputPanel layout="block" rendered="#{edit==true}" style="text-align: center;">
<h:outputText value="#{file.fileName}"/>
<br/><br/>
<h:inputTextarea value="#{file.description}" style="width: 150px; height: 50px;"/>
</a:outputPanel>
</rich:dataGrid>
<h:outputText value="#{messages['noFilesFound']}" rendered="#{empty filesListHelper.files}"/>
</a:outputPanel>
Here, we have rich:dataGrid with the number of columns passed as a Facelets parameter (columns) that renders an edit box for every uploaded file with h:inputTextarea to let the user add the file description.
As you can see (the highlighted code), this panel is shown only when the Facelets parameter edit is set to true. We will later add another panel to manage the case when edit is set to false.
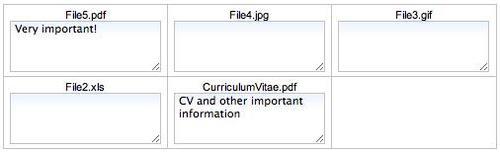
This is the result with some associated files:
We want to show the upload wizard inside a modal panel. Therefore, let's start creating the code to show it.
Let's create a new file (with the empty template we've seen) inside the /view/main/uploadFiles/ folder, called uploadFilesModalPanel.xhtml, and put the following code inside the ui:component tag:
<rich:modalPanel id="uploadFilesMP"
minHeight="300"
minWidth="350"
autosized="true"
moveable="true"
resizeable="false"> <f:facet name="header">
<h:outputText value="#{messages['uploadNewFiles']}"/> </f:facet>
<!-- my code -->
</rich:modalPanel>
Here, I defined the rich:modalPanel component setting the id and some attributes like minWidth, minHeight, autosized, movable, and resizable. Also, I have added the f:facet tag to customize the panel header.
This is a sample of what we have done:

The code to open the modal panel is very simple.
Let's open the contactEdit.xhtml file and add the new rich:toolBar group to the latest rich:toolBar component:
<rich:toolBarGroup location="right">
<a:commandLink
onclick="#{rich:component('uploadFilesMP')}.show();"
styleClass="image-command-link">
<h:graphicImage value="/img/upload.png"/>
<h:outputText value="#{messages['uploadFiles']}"/>
</a:commandLink>
</rich:toolBarGroup>
The highlighted line is the one that does the trick to close the panel (for example, by using a button inside it). We can use the same code, but call the JavaScript hide() method instead of show(), very simple!
Remember that to make it work, we have to include the file into our page, so let's open the home.xhtml file and add the following code at the end, after the</h:panelGrid> closing tag:
Another way of controlling the rich:modalPanel component (and the other components that have JavaScript API, which permits controlling them) is to use the rich:componentControl component. It allows, in fact, to call JavaScript functions of a component after a specific event.
Let's make an example of use by calling the show() function of our modal panel using rich:componentControl:
<a:commandLink styleClass="image-command-link">
<h:graphicImage value="/img/upload.png"/>
<h:outputText value="#{messages['uploadFiles']}"/>
<rich:componentControl for="uploadFilesMP" event="onclick" operation="show"/>
</a:commandLink>
By inserting the component inside the a:commandLink, we automatically attached to it however, it is also possible to specify the component to attach to using the attachTo attribute:
<a:commandLink id="showPanelBtn" styleClass="image-command-link">
<h:graphicImage value="/img/upload.png"/>
<h:outputText value="#{messages['uploadFiles']}"/>
</a:commandLink>
<rich:componentControl for="uploadFilesMP" attachTo="showPanelBtn" event="onclick" operation="show"/>
We are now ready to insert the wizard inside the modal panel and enable Ajax navigation using standard navigation rules. We are going to use the a:include component to make this possible!
Let's open the /view/main/uploadFiles/uploadFilesModalPanel.xhtml again and replace the<!-- my code --> comment with the code to include (the Ajax way!) the first step of the wizard:
<a:outputPanel id="uploadFilesWizard">
<a:include ajaxRendered="true" viewId="/main/uploadFiles/wizardFirstStepUploadFiles.xhtml"/>
</a:outputPanel>
Now, let's add the close button into the first wizard step (to the /view/main/uploadFiles/wizardFirstStepUploadFiles.xhtml file):
<a:commandLink onclick="#{rich:component('uploadFilesMP')}.hide();"
style="float:right;" styleClass="image-command-link">
<h:graphicImage value="/img/close.png" />
<h:outputText value="#{messages['close']}" />
</a:commandLink>
This is just the standard code we've seen for closing a modal panel (notice the call to the hide() method).
In the second step, we also want to save the modification before closing the panel, so the code to add (to the /view/main/uploadFiles/wizardSecondStepUploadFiles.xhtml file) is slightly different:
<a:commandLink
action="#{filesListHelper.updateList}"
oncomplete="#{rich:component('uploadFilesMP')}.hide();"
style="float:right;" styleClass="image-command-link">
<h:graphicImage value="/img/close.png"/>
<h:outputText value="#{messages['finish']}"/>
</a:commandLink>
Here, the framework first calls the filesListHelper.updateList action method and then (oncomplete) closes the panel.
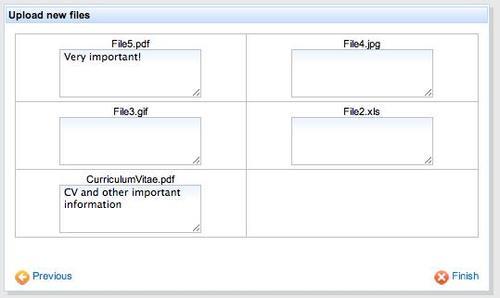
Here are the two screenshots of the steps inside the modal panel:

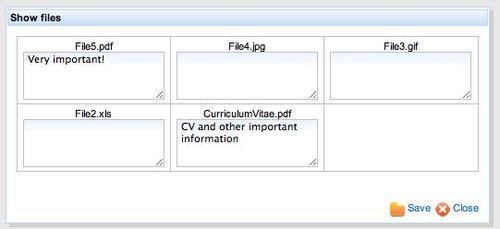
The last feature we are going to add is the Files panel to show (or edit if in edit mode) the files associated to a contact.
In order to do that, we are going to use what we've seen uptil now, so let's start creating a new XHTML file with a modal panel called showFilesModalPanel.xhtml containing the following code:
<ui:component
xmlns="http://www.w3.org/1999/xhtml"
xmlns:ui="http://java.sun.com/jsf/facelets"
xmlns:h="http://java.sun.com/jsf/html"
xmlns:f="http://java.sun.com/jsf/core"
xmlns:s="http://jboss.com/products/seam/taglib"
xmlns:a="http://richfaces.org/a4j"
xmlns:rich="http://richfaces.org/rich">
<rich:modalPanel id="showFilesMP" minHeight="400" minWidth="500" autosized="true"
moveable="true" resizeable="false">
<f:facet name="header">
<h:outputText value="#{messages['showFiles']}"/>
</f:facet>
<h:form>
file attachmentfinishing with<a:outputPanel id="showFilesWizard">
<ui:include src="showCurrentContactFiles.xhtml">
<ui:param name="edit" value="#{homeSelectedContactHelper. selectedContactEditing}"/>
<ui:param name="columns" value="3"/>
</ui:include>
<br/>
<h:panelGroup style="float:right;">
<a:commandLink action="#{filesListHelper.updateList}" oncomplete="#{rich:component('showFilesMP')}.hide();" rendered="#{homeSelectedContactHelper. selectedContactEditing}"
styleClass="image-command-link">
<h:graphicImage value="/img/files.png"/>
<h:outputText value="#{messages['save']}"/>
</a:commandLink>
<rich:spacer width="5"/>
<a:commandLink action="previous" onclick="#{rich:component('showFilesMP')}.hide();"
styleClass="image-command-link">
<h:graphicImage value="/img/close.png"/>
<h:outputText value="#{messages['close']}"/>
</a:commandLink>
</h:panelGroup>
</a:outputPanel>
</h:form>
</rich:modalPanel>
</ui:component>
Here, we've created a modal panel that includes the showCurrentContactFiles.xhtml (the one we created) file to show the files data grid. This time the edit Facelets parameter depends on homeSelectedContactHelper.selectedContactEditing property (you can see it highlighted in the code) so, it will be set to true in edit mode, but false otherwise.
After the ui:include, we have two buttons one is the Save button (shown only in edit mode) and the other is the Close button.
It's time to implement the panel rendered when not in the edit mode inside the showCurrentContactFiles.xhtml file let's open it again and add the following code right after the<rich:dataGrid ..> tag:
<a:outputPanel layout="block" rendered="#{edit==false}" style="text-align: center;">
<h:outputText value="#{file.fileName}" style="font-weight: bold;"/>
<h:outputText value="#{file.fileName}" style="font-weight: bold;"/>
<br/><br/>
<h:outputText value="#{file.description}" escape="false"/>
<br/><br/>
<s:link action="#{fileDownloadHelper.download}" styleClass="image-command-link">
<f:param name="cid" value="#{file.id}"/>
<h:graphicImage value="/img/download.png"/>
<h:outputText value="#{messages['download']}"/>
</s:link>
</a:outputPanel>
This panel is rendered when the edit Facelets parameter is set to false.
The download method of the FileDownloadHelper bean we implemented is the following:
public void download() {
ContactFile contactFile = entityManager.find(ContactFile.class, contactFileId);
try {
// Get the file
File file = new File(appOptions.getFileSavePath() + contactFile.getId());
long fileLength = file.length();
// Create the stream
FileInputStream fileIS = new FileInputStream(file);
// Get the data
byte fileContent[] = new byte[(int) fileLength];
fileIS.read(fileContent);
// Stream the content
FacesContext facesContext = FacesContext.getCurrentInstance();
if (!facesContext.getResponseComplete()) {
HttpServletResponse response = (HttpServletResponse) facesContext.getExternalContext().getResponse();
response.setContentType(contactFile.getFileType());
response.setContentLength((int) fileLength);
response.setHeader("Content-disposition", "attachment; filename=" + contactFile.getFileName());
ServletOutputStream out;
out = response.getOutputStream();
out.write(fileContent);
out.flush();
facesContext.responseComplete();
}
} catch (IOException e) {
e.printStackTrace();
file attachmentfinishing with}
}
It is useful for the download of small files (less than Integer.MAX_VALUE); for big ones it's better you use a servlet or a custom Seam resource.
The last step is adding the code to open the modal panel, both in view and in edit mode.
Let's open the contactView.xhtml file and add another rich:toolBarGroup tag inside rich:toolBar:
<rich:toolBarGroup location="right">
<a:commandLink oncomplete="#{rich:component('showFilesMP')}.show();" ajaxSingle="true" reRender="showFilesPanel" styleClass="image-command-link">
<f:setPropertyActionListener value="#{null}" target="#{filesListHelper.files}"/>
<h:graphicImage value="/img/files.png"/>
<h:outputText value="#{messages['files']}"/>
</a:commandLink>
</rich:toolBarGroup>
The commandLink will force the re-read of the files list (by setting it to null) and will re-render showFilesPanel to synchronize the changes after that the modal panel will be opened by the oncomplete JavaScript code.
Here is a screenshot of the final rich:toolBar in view mode:
The same commandLink must be added inside the contactEdit.xhtml file, near the Upload button, as it appears in the next screenshot:
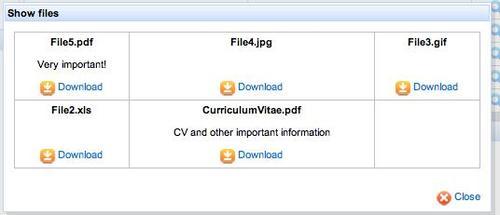
Our new panel is ready; let's see how it looks in view mode:
And in edit mode it appears as follows: