We have to let the user register into the platform using a registration page. This page might ask for user information and might have a captcha to avoid automatic registrations.
The fields we are going to ask the user to complete are:
- Username
- Password
- Name
- Surname
- Company
Let's start creating the registration page create a folder called /user inside the /view/ directory. Create a blank page (use home.xhtml as a model page) called register.xhtml inside it and open it for editing.
Let's put a form and a panel inside the body definition using this code:
<ui:define name="body">
<h:form id="login">
<rich:panel>
<f:facet name="header">
<h:outputText value="#{messages['registration']}" />
</f:facet>
<!-- code -->
</rich:panel>
</h:form>
</ui:define>
As you can see, we defined a form and we put inside it a panel with an internationalized title.
Let's define the registration label in our messages bundle:
Let's open /resources/messages_en.properties and add the following line:
registration=Registration
Now let's do the same thing for the Italian messages bundle file at /resources/messages_it.properties:
registration=Registrazione
In order to support the registration feature, we have to create a bean that can hold the entity to be inserted as a property and persist it into the database.
Let's create a new class called RegistrationHelper in the book.richfaces.advcm.modules.login package, by using the following code:
package book.richfaces.advcm.modules.login;
@Name("registrationHelper")
public class RegistrationHelper {
@In (create=true)
EntityManager entityManager;
@In
FacesMessages facesMessages;
private Contact newUser;
public void signUp() {
// Save the user and send the emails
try { entityManager.persist(getNewUser());
facesMessages.add(Severity.INFO, "#{messages['userRegisteredThanks']}");
} catch (NoResultException e) { facesMessages.add(Severity.ERROR, "#{messages['emailNotFound']}");
}
}
public void setNewUser(Contact newUser) { this.newUser = newUser;
}
public Contact getNewUser() { if (newUser==null) { newUser=new Contact(); // The user is active without confirming // the email address (for now) newUser.setActive(true);
}
return newUser;
}
}
You can use the newUser property (highlighted in the above code), which we are using in the form (we'll see how in a minute), the signUp() action method that persists the user to the database, and the facesMessages component to alert the user about the action adding a JSF global messages component (notice the use of the messages object for i18n).
Another highlight is the newUser property getter called getNewUser() it lazily initializes the newUser property the first time it is accessed, by creating a new instance (while it is still null) and setting the default values for its properties (in this case just the active one).
Now we are ready to create all the form fields and the action buttons inside the panel. Let's come back to the register.xhtml file and insert the following code by replacing the<!-- code --> comment. Let's start explaining the first field, the others have the same mechanism:
<h:panelGrid columns="3" rowClasses="prop" columnClasses="name,value,validatormsg">
<h:outputLabel for="usernameRegistration">
#{messages['username']}:
</h:outputLabel>
<h:inputText id="usernameRegistration" value="#{registrationHelper.newUser.username}">
</h:inputText>
<rich:message for="usernameRegistration" styleClass="messagesingle" errorClass="errormsg" infoClass="infomsg" warnClass="warnmsg">
<rich:message for="usernameRegistration" styleClass="messagesingle" errorClass="errormsg" infoClass="infomsg" warnClass="warnmsg">
</rich:message>
...
</h:panelGrid>
The code is standard JSF code, so it is very simple to understand. We use a three-column h:panelGrid to put the label, the input field, and the rich:message component respectively for validation text; the input field value is the property of the Contact instance called newUser, which we've created inside the registrationHelper bean.
We added a new CSS class (validatormsg) besides the ones defined by seam-gen (name and value) and new ones for the validators style; just open the theme.css file and add the following code:
.validatormsg {
padding: 5px;
}
.messagesingle {
}
.errormsg {
color: red;
background: url(../img/msgerror.png) no-repeat left center;
padding-top: 1px;
padding-left: 20px;
margin-left: 3px;
}
.warningmsg {
color: blue;
background: url(../img/msgwarn.png) no-repeat left center;
padding-top: 1px;
padding-left: 20px;
margin-left: 3px;
}
.infomsg {
color: yellow;
background: url(../img/msginfo.png) no-repeat left center;
padding-top: 1px;
padding-left: 20px;
margin-left: 3px;
}
We just added a bit of internal space to better show the validation text and customized it with an icon for the different kind of validation messages (info, warning, and error).
Now let's add the other fields inside h:panelGrid:
<h:outputLabel for="passwordRegistration"> #{messages['password']}:
</h:outputLabel>
<h:inputSecret id="passwordRegistration" value="#{registrationHelper.newUser.password}"/>
<rich:message for="passwordRegistration" styleClass="messagesingle" errorClass="errormsg" infoClass="infomsg" warnClass="warnmsg">
</rich:message>
<h:outputLabel for="nameRegistration"> #{messages['name']}:
</h:outputLabel>
<h:inputText id="nameRegistration" value="#{registrationHelper.newUser.name}"/>
<rich:message for="nameRegistration" styleClass="messagesingle" errorClass="errormsg" infoClass="infomsg" warnClass="warnmsg">
</rich:message>
<h:outputLabel for="surnameRegistration"> #{messages['surname']}:
</h:outputLabel>
<h:inputText id="surnameRegistration" value="#{registrationHelper.newUser.surname}"/>
<rich:message for="surnameRegistration" styleClass="messagesingle" errorClass="errormsg" infoClass="infomsg" warnClass="warnmsg">
</rich:message>
<h:outputLabel for="emailRegistration"> #{messages['email']}:
</h:outputLabel>
<h:inputText id="emailRegistration" value="#{registrationHelper.newUser.email}"/>
<rich:message for="emailRegistration" styleClass="messagesingle" errorClass="errormsg" infoClass="infomsg" warnClass="warnmsg">
</rich:message>
<h:outputLabel for="companyRegistration"> #{messages['company']}:
</h:outputLabel>
<h:inputText id="companyRegistration" value="#{registrationHelper.newUser.company}" />
<rich:message for="companyRegistration" styleClass="messagesingle" errorClass="errormsg" infoClass="infomsg" warnClass="warnmsg">
</rich:message>
We now have to add the action button to confirm the sign up, by adding the following code right after the panel:
<div class="actionButtons">
<a:commandButton id="registerBtn" value="#{messages['signUp']}" action="#{registrationHelper.signUp}">
<s:defaultAction />
</a:commandButton>
</div>
The button calls the signUp method inside the registrationHelper bean that persists the entity instance into the database.
We also used the s:defaultAction Seam component that calls the action when the Enter key is pressed (it is very useful when there is more then one action button) in a field of the form.
We still have to add the support for bean validation in fact, we want to annotate the Contact entity with the Hibernate Validator validation annotation and tell JSF to use it instead of rewriting all the rules using the standard f:validateXYZ component (we have seen it in the first example).
So, let's open the Contact.java file and add a bit of the Hibernate Validator annotations we have covered in Chapter 3, First Steps. Therefore, now we will just see what we've added in this case by highlighting the important parts:
@Column(name = "name", length = 45)
@Length(min=3, max = 45)
public String getName() { ... }
@Column(name = "surname", length = 45)
@Length(min=3, max = 45)
public String getSurname() { ... }
@Column(name = "username", nullable = false, length = 20)
@NotNull
@Length(min=5, max = 20)
public String getUsername() { ... }
@Column(name = "password", nullable = false, length = 20)
@NotNull
@Length(min=5, max = 20)
public String getPassword() { ... }
@Column(name = "email", nullable = false)
@NotNull
@Email
public String getEmail() { ... }
We can put the rich:beanValidator component inside every input component in order to use Hibernate validators such as the JSF ones. In this case, we would have many inputs in the form, so we prefer to use another RichFaces component rich:graphValidator.
Using rich:graphValidator we can add validation support to more than one field at a time, just by including them inside the tag. In our case, surround h:panelGrid with the rich:graphValidator tag and we're done!
So, let's open the register.xhtml page and do that:
<rich:graphValidator>
<h:panelGrid columns="3" rowClasses="prop" columnClasses="name,value,validatormsg">
<!-- fields --> </h:panelGrid>
</rich:graphValidator>
Simple, isn't it? Instead of adding a single rich:beanValidator for every input field, we surround all of the fields with rich:graphValidator, thereby obtaining the same result.
In order to make the registration accessible, we have to add a link to the menu bar. Let's open the /view/layout/menu.xhtml file and add the following code before the logout link:
<s:link view="/user/register.xhtml" value="#{messages.signup}" rendered="#{not identity.loggedIn}" propagation="none" />
This is just an internationalized link that is visible when the user is not logged in and redirects to the register.xhtml page without propagating the conversation.
Another common use case we see in web sites is the "Rewrite password" field that checks if the rewritten password is same as the one in the password field (to avoid user mistakes while writing it).
In order to do that, we are going to add another field under the password field and use a Seam validator called s:validateEquality, as shown in the following code:
<h:outputLabel for="rewritePasswordRegistration"> #{messages['rewritePassword']}:
</h:outputLabel>
<h:inputSecret id="rewritePasswordRegistration">
<s:validateEquality for="passwordRegistration" messageId="validateNotSamePassword" operator="equal" />
</h:inputSecret>
<rich:message for="rewritePasswordRegistration" styleClass="messagesingle" errorClass="errormsg" infoClass="infomsg" warnClass="warnmsg">
</rich:message>
We don't even need to set the value for h:inputSecret, because we are using it only for validation.
It's true that we can use Hibernate, JSF, and Seam validators. However, a lot of the time, we can have the need of creating our own ones, which work for particular use cases. In that case, we would want to check whether the inserted username exists or not, and that the user is not using reserved names in place of the username. Let's start from the latter one.
First of all, we have to configure a list of reserved names; we can use appOptions components to do that and pass the list via component.xml (as we've seen for the available skins list). Let's open the AppOptions class and add the following code:
private List<String> reservedWords;
public void setReservedWords(List<String> reservedWords) {
this.reservedWords = reservedWords;
}
public List<String> getReservedWords() {
return reservedWords;
}
It is just a property (reservedWords) with getter and setter.
Now let's open components.xml and edit the appOptions component section, by adding the reserved names to the list as shown in the following code:
<component name="appOptions">
<property name="defaultSkin">wine</property>
<property name="availableSkins">
<value>laguna</value>
<value>darkX</value>
<value>glassX</value>
<value>blueSky</value>
<value>classic</value>
<value>ruby</value>
<value>wine</value>
<value>deepMarine</value>
<value>emeraldTown</value>
<value>japanCherry</value>
</property>
<property name="reservedWords">
<value>guest</value>
<value>admin</value>
<value>editor</value>
<value>root</value>
<value>anonymous</value>
</property>

</component>
The highlighted code fills the reservedWord property with the list of words, which the users can't use as usernames.
Now the list is configured and ready, so let's create our validator let's create a new class called ValidateReservedWords inside the book.richfaces.advcm.validators package.
Let's start making it a JSF validator by adding the right annotations (for Seam) and making it implement javax.faces.validator.Validator:
@Name("reservedWordValidator")
@BypassInterceptors
@Validator
public class ValidateReservedWords
implements javax.faces.validator.Validator {
...
}
You don't have to register it in the faces-config.xml file as Seam is doing it for us (because of the @Validator annotation). Now let's implement the required methods:
public void validate(FacesContext facesContext, UIComponent uiComponent, Object o)
throws ValidatorException {
AppOptions appOptions = (AppOptions) Component. getInstance("appOptions");
boolean valid = isReservedWords(appOptions.getReservedWords(), (String) o);
if (!valid)
{
throws new ValidatorException(FacesMessages. createFacesMessage(FacesMessage.SEVERITY_ERROR, "snet. validator.reservedWord", "#{messages['javax.faces.component. UIInput.REQUIRED']}", o));
}
}
protected boolean isReservedWords(List<String> reservedWords, String word) {
for (String resWord : reservedWords) {
if (word.compareToIgnoreCase(resWord) == 0) {
return false;
}
}
return true;
}
This code needs some explanation the validate method must throw a ValidatorException if the value is not validated, because we need the list of reserved words we want in order to access the appOptions component. We can't do this by injecting it because of the @BypassInterceptors annotation in the class. In this way, Seam can't inject the value before accessing it, so we have to get it using the static method ((AppOptions)Component.getInstance("appOptions")). As you can see, it is not very complex, but it's important to know why we are doing this.
Now that the validator is ready, we can use it inside the registration form let's open the /view/user/register.xhtml file and add the code inside the username h:inputText component:
<h:inputText id="usernameRegistration" value="#{registrationHelper.newUser.username}"> <f:validator validatorId="reservedWordValidator" />
</h:inputText>
We are using the standard f:validator tag for passing the name of our validator; now it is integrated with the other validators attached to the input components by rich:graphValidator.
The other validator we would like to use is to check the username existence in order to allow only non-existent usernames to be registered. In order to do that, let's create our validator called ValidateUsernameExistence in the same package and with the same structure of the one we've seen:
@Name("usernameExistenceValidator")
@BypassInterceptors
@Validator
public class ValidateUsernameExistence implements javax.faces.validator.Validator {
public void validate(FacesContext facesContext, UIComponent uiComponent, Object ) throws ValidatorException {
boolean usernameExists = usernameExists((String) ); if (usernameExists) { throw new ValidatorException(FacesMessages. createFacesMessage(FacesMessage.SEVERITY_ERROR, "snet.validator.usernameExists", "#{messages['snet.validator.usernameExists']}",));
} }
protected boolean usernameExists(String username) { EntityManager em = (EntityManager) Component. getInstance("entityManager");
if (username != null) { try { String query = "select c from Contact c where c.username = :username"; List<Contact> actorsFound = (List<Contact>) em.createQuery(query).setParameter("username", username) .getResultList();
if (actorsFound.size() > 0) { return true;
} else { return false; } } catch (NoResultException e) { // not found return false; } } return false; }
}
Also, in this case we are getting the entityManager component using the Component.getInstance("entityManager") static method, after which we will use it as usual to make a JPA query and see if the username is used by another user.
Let's add the validator to the username h:inputText in register.xhtml:
<h:inputText id="usernameRegistration" value="#{registrationHelper.newUser.username}">
<f:validator validatorId="usernameExistenceValidator" />

<f:validator validatorId="reservedWordValidator" />
</h:inputText>
As you can see, implementing you r own JSF validators is very simple and powerful!
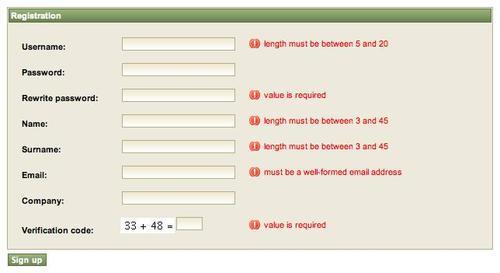
Captchas are very useful and can avoid, in most cases, automatic registrations by asking to rewrite text or, as in our case, to resolve a simple math calculation.
JBoss Seam supports it out of the box, so we can just add a bit of code to integrate it. Let's add the following code after the "Company" field:
<h:outputLabel for="verifyCaptcha">
#{messages['captcha']}:
</h:outputLabel>
<h:panelGroup id="verifyCaptchaPnl">
<h:graphicImage id="verifyCaptchaImg" value="/seam/resource/captcha?f=#{currentDate.time}"
height="20" width="70" styleClass="captchaImage" />
<h:inputText id="verifyCaptcha" value="#{captcha.response}" required="true" size="4">
</h:inputText>
</h:panelGroup>
<rich:message for="verifyCaptcha" styleClass="messagesingle"
errorClass="errormsg" infoClass="infomsg" warnClass="warnmsg">
</rich:message>
We use the standard captcha resource and the captcha Seam component in order to show and verify the response.
After every try of submitting the form, you have to re-render the captcha in order to show the new value if the user inserted a wrong one. For doing that, just use the reRender attribute of the form command button, like this:
<div class="actionButtons">
<a:commandButton id="registerBtn" value="#{messages['signUp']}"
                                         action="#{registrationHelper.signUp}"
reRender="verifyCaptchaImg">
<s:defaultAction />
</a:commandButton>
</div>
Here is a screenshot displaying how our captcha looks:
Tip
The date trick
You might have noticed that we used the f parameter with the captcha image resource; the value of the parameter is the actual date. We use that to avoid browser caching of the captcha image. By using this trick, the image will be always updated.
The captcha response is reset only in case of wrong answers, so it is very important to manually reset the captcha after a successful registration (if not, the same response will be used again). In order to do that, let's edit the signUp() method of RegistrationHelper class, adding the following code after the entityManager.persist(getNewUser()); call:
// Empty the captcha
Captcha.instance().setResponse(null);
Captcha.instance().init();
In our registration use case, the user is immediately active after the registration. Therefore, it would be good if he/she would be logged in automatically after the registration task.
In order to do that, we just have to inject the identity and the credentials Seam components (the ones that we've used in the login form), log in from inside the registration bean, and add this code to the RegistrationHelper class:
@Name("registrationHelper")
public class RegistrationHelper {
...
@In
Credentials credentials;
@In
Identity identity;
...
public void signUp() {
// Save the user and send the emails
try {
...
// Execute the login
credentials.setUsername(...credentials. setPassword(getNewUser().getPassword()); identity.login();
} catch (NoResultException e) { facesMessages.add(Severity.ERROR,"#{messages['emailNotFound']}");
}
}
...
}
As you can see, we set the user and password in the credentials component and then call indentity.login() exactly as the login form does!
We also want that after the login, the user should be redirected to the home page; there are different ways to do so. We would like to show the navigation features of JBoss Seam: let's create a new file in the /view/user/ directory (where the register.xhtml file is located) and call it register.page.xml this file defines the page option for register.xhtml.
Open the file and add the following code:
<?xml version="1.0" encoding="UTF-8"?>
<page xmlns="http://jboss.com/products/seam/pages"
xmlns:xsi="http://www.w3.org/2001/XMLSchema-instance"
xsi:schemaLocation="http://jboss.com/products/seam/pages http://jboss.com/products/seam/pages-2.1.xsd">
<navigation from-action="#{registrationHelper.signUp}">
<rule if="#{identity.loggedIn}">
<redirect view-id="/home.xhtml" />
</rule>
</navigation>
</page>
We've highlighted the navigation rule, which says that when a user clicks on the signup command button of the registration form, if the login after the registration is successful, he/she must be redirected to the home.xhtml page very simple and powerful!
Another feature we would like our application to support (as every real application does) is that of email sending after registration, in order to inform the user that the registration was successful, and the administrator that a new user registered.
This task has nothing to do with the RichFaces framework, but we are briefly touching on it to show how to do it in our application. Refer to the Seam documentation in order to get information about all of its functionalities.
Let's start adding the email support to our project open components.xml and add the following code:
<components
... xmlns:mail=http://jboss.com/products/seam/mail ... xsi:schemaLocation="...http://jboss.com/products/seam/mail http://jboss.com/products/seam/mail-2.1.xsd... ">
<mail:mail-session host="localhost" port="25" username="test" password="test" />
</components>
The mail-session tag attributes contain the data of the SMTP mail server, which we want to use for sending email (this depends on your server). There are other options you can set in order to support different types of SMTP server and authentication; refer to the JBoss Seam documentation to find out more.
Our project is now ready to send emails we have to create the email template for the two kinds of emails we want to send after registration.
Let's start with the model for the email directed to the user create a new directory called /view/mailTemplates/ inside the view/ directory. Inside this directory, let's create an xhtml file called newRegistrationForUser.xhtml and insert the following code:
<m:message xmlns="http://www.w3.org/1999/xhtml"
xmlns:m="http://jboss.com/products/seam/mail"
xmlns:h="http://java.sun.com/jsf/html">
<m:from name="Advanced Contact Manager administration">
[email protected]
</m:from>
<m:to name="#{registrationHelper.newUser.name} #{registrationHelper.newUser.surname}"> #{registrationHelper.newUser.email}
</m:to>
<m:subject> #{messages['thankYouForRegistrationMailSubject']}
</m:subject>
<m:body>
<p>
<h:outputText value="#{messages['thankYouForRegistrationMailDear']}: #{registrationHelper.newUser.name} #{registrationHelper. newUser.surname}," />
<br/>
<h:outputText value="#{messages['thankYouForRegistrationMailText']}" />
<br/>
<h:outputText value="#{messages['mailStaffSignature']}" />
<br/>
</p>
</m:body>
</m:message>
As you can see, this is a normal XHTML page with special tags for emails: you can use m:from, m:to , m:subject, and m:body in order to compose the email. You can access the Seam components (in this case, we get the registering user's information from the registrationHelper bean) and also use the message bundles for i18n!
Let's create the email template to inform the administrator about the new registered user, and call the file newRegistrationForAdmin.xhtml:
<m:message xmlns="http://www.w3.org/1999/xhtml"
xmlns:m="http://jboss.com/products/seam/mail"
xmlns:h="http://java.sun.com/jsf/html">
<m:from name="Advanced Contact Manager administration">
[email protected]
</m:from>
<m:to name="Advanced Contact Manager administration "> [email protected]
</m:to>
<m:subject>New user registration!</m:subject>
<m:body>
<p>A new user has registered!<br/>
<h:outputText value="#{messages['name']}: #{registrationHelper.newUser.name}" /><br/>
<h:outputText value="#{messages['surname']}: #{registrationHelper.newUser.surname}" /><br/>
<h:outputText value="#{messages['email']}: #{registrationHelper.newUser.email}" /><br/>
</p>
</m:body>
</m:message>
In this case, we don't need to use i18n for strings, because the email is only for administrators.
It's also very simple to send them: let's open the RegistrationHelper class again, and add the following code:
@Name("registrationHelper")
public class RegistrationHelper {
...
@In (create=true)
Renderer renderer;
...
public void signUp() { // Save the user and send the emails
try {
...
renderer.render("/mailTemplates/newRegistrationForAdmin.xhtml");
renderer.render("/mailTemplates/newRegistrationForUser.xhtml"); ...
} catch (NoResultException e) { facesMessages.add(Severity.ERROR, "#{messages['emailNotFound']}");
}
}
...
}
We just have to make one call to render the email page and then send it.