
In this chapter, we are going to develop the structure and the login/logout/registration pages of our application. We will see step by step how to implement every feature in an effective way using the latest technology in Java Enterprise.
As we've said in Chapter 1, What is RichFaces?, skinnability is a feature of the RichFaces framework that gives us control over the look of our application and its components.
In fact, it is very important to have a consistent user interface in a real application. This is not a simple task when you have to integrate a different set of components or give the user the ability to choose his/her preferred skin without the need of copying and pasting values between CSS files for every skin.
RichFaces helps us to manage all those things by extending the capabilities of the CSS technology in order to make our lives easier.
A very important feature is the skin parameters with them you can define a value and reuse it in CSS selectors. Those values are associated to a particular skin, so to change them you have just to define and select another skin.
A skin is simply a properties file containing skin parameters and values, so to add a skin, just create a file of the format<skin_name>.skin.properties (or copy and change the existing ones that you can find in the richfaces-impl-xxx.jar file, inside the /META-INF/skins/ folder) and put it in /META-INF/skins/ or another folder in the classpath.
We'll see it in depth in Chapter 10, Advanced techniques; we are going to use the built-in ones for now.
In order to choose a default skin for your project, you have to specify its name in the org.richfaces.SKIN context parameter of web.xml:
<context-param>
<param-name>org.richfaces.SKIN</param-name>
<param-value>skin_name</param-value>
</context-param>
You can select another skin at runtime too, we'll see how later.
RichFaces built-in skins (simple skins that use just skin parameters personalization described previously) are:
- DEFAULT
- plain
- emeraldTown
- blueSky
- wine
- japanCherry
- ruby
- classic
- deepMarine
Those skins contain parameters used by the RichFaces framework in order to customize the look and feel of the component.
A special mention for the plain skin it has no parameters and is used in projects that have their own CSS styles.
RichFaces skinnability also allows you to associate custom renders to a new skin in order to render standard and custom JSF components with the same style.
Until now we have talked about setting just one application-wide skin to use, without the possibility for the user to change it.
Doing that is very simple and needs a couple of managed beans and some configuration. We want to add support for user-selected skins in our application so first of all, let's choose the default skin and the supported ones as application parameters.
In every application, there are some configuration parameters that might not be put and compiled with the code, as they are related to the server to which they are deployed (a directory in which to save files, mail connection parameters, and so on) and you can just edit a text file to modify them without the need of recompiling the Java code.
In a standard JSF application, you would use context-param of web.xml in order to pass parameters to the application and add the parameter to the web.xml file in this way:
<web-app>
..
<context-param>
<param-name>firstParameter</param-name>
<param-value>27</param-value>
</context-param>
<context-param>
<param-name>secondParameter</param-name>
<param-value>myOtherValue</param-value>
</context-param>
...
</web-app>
Then, from the bean, you would have to access the external context to get it; you can do that using this code:
String strParam=FacesContext.getCurrentInstance()
.getExternalContext()
.getInitParameter("firstParameter");
As you can see, this is not integrated with JSF and not so convenient.
You can also use faces-config.xml and the managedBeans declaration to pass parameters, but there is a simpler way.
As we are using JBoss Seam, in fact, we can take advantage of the XML capabilities of the framework about instantiating managedBean (or, better, Seam components) and setting their properties, all by using the components.xml configuration file.
In our case, we would like to configure the default skin name and the list of the other skins that the user can select. In order to do that, let's start creating the bean that will manage those parameters: AppOptions.
First create a package called book.richfaces.advcm.options. Inside it, create a class called AppOptions that looks like this:
package book.richfaces.advcm.options;
import org.jboss.seam.ScopeType;
import org.jboss.seam.annotations.Name;
import org.jboss.seam.annotations.Scope;
import org.jboss.seam.annotations.Startup;
import org.jboss.seam.annotations.Synchronized;
import java.util.List;
@Name("AppOptions")
@Scope(ScopeType.APPLICATION)
@Startup
@Synchronized
public class AppOptions {
private String defaultSkin;
private List<String> availableSkins;
public String getDefaultSkin() {
return defaultSkin;
}
public void setDefaultSkin(String defaultSkin) {
this.defaultSkin = defaultSkin;
}
user-selected application skinuser-selected application skinparameters passage, components.xml usedpublic List<String> getAvailableSkins() {
return availableSkins;
}
public void setAvailableSkins(List<String> availableSkins)
{
this.availableSkins = availableSkins;
}
}
As you can see, we declared a managed bean/Seam component called appOptions that is created at the application startup (we do that using the @Startup annotation) and has APPLICATION scope (and because of this, it is synchronized using the corresponding annotation). It has two properties with their getter and setter defaultSkin contains the name of the skin that will be used by default (if the user didn't select a personal one, we'll see it later) and availableSkins is the list of all the supported skins.
Now, how to pass our own values?
Just edit the components.xml file and add the following section:
<component name="appOptions">
<property name="defaultSkin">wine</property>
<property name="availableSkins">
<value>blueSky</value>
<value>classic</value>
<value>ruby</value>
<value>wine</value>
<value>deepMarine</value>
<value>emeraldTown</value>
<value>japanCherry</value>
</property>
</component>
We are telling the JBoss Seam framework that it has to set the defaultSkin property of the appOptions component to wine and availableSkins with the listed values (notice that it is a list (java.util.List) of values).
Even if we use Integer properties, Seam will automatically convert them while setting them into the bean.
We want it so that every user can decide what application skin to work with, so this parameter differs from user to user. In few words, we have to use session-scoped parameters.
In order to do so, we have to create a session-scoped bean that contains the user options; let's put it into the same package of AppOptions (book.richfaces.advcm.options).and create a class called UserOptions that looks like this:
package book.richfaces.advcm.options;
import book.richfaces.advcm.Contact;
import org.jboss.seam.ScopeType;
import org.jboss.seam.annotations.In;
import org.jboss.seam.annotations.Logger;
import org.jboss.seam.annotations.Name;
import org.jboss.seam.annotations.Scope;
import org.jboss.seam.log.Log;
@Name("userOptions")
@Scope(ScopeType.SESSION)
public class UserOptions {
@In
AppOptions appOptions;
private String skin;
public String getSkin() {
if (skin==null) {
skin=appOptions.getDefaultSkin();
}
return skin;
}
public void setSkin(String skin) {
this.skin = skin;
}
}
This is a session-bean scoped Seam component called userOptions. As you can see, we inject (using the @In annotation) the appOptions component in order to get the default skin, if the user hasn't selected his/her own favorite one (so the skin property is null).
After that, we just need to set the org.richfaces.SKIN parameter with the skin property of the bean we have just created (userOptions). In this way, the application skin for the user will depend on the skin property of the userOptions component.
In order to do that, let's edit web.xml and change the value of the org.richfaces.SKIN parameter to make it look like this:
<context-param>
<param-name>org.richfaces.SKIN</param-name>
<param-value>#{userOptions.skin}</param-value>
</context-param>
The last step is to make it possible for the user to select the preferred skin. In order to do that, we will use the simple h:selectOneMenu component, which is bound to the userOptions.skin property.
In order to add it, let's open the /view/layout/template.xhtml file and add the following code before the footer div:
<div class="rightFooter">
<h:form>
<h:outputText value="Choose skin:"/>
<h:selectOneMenu value="#{userOptions.skin}">
<s:selectItems
value="#{appOptions.availableSkins}"
var="skin"
label="#{skin}"
itemValue="#{skin}"/>
</h:selectOneMenu>
<h:commandButton value="Change skin"/>
</h:form>
</div>
In order to fill h:selectOneMenu, we use s:selectItems.
The seam component enhances the standard f:selectItems by adding the possibility to use other types (string in this case) for the list instead of only the SelectItem type. It is also very useful to list entity beans lists without the need of converting them into SelectItem lists (we will use this feature in the following chapters).
Note
You might have noticed that we are using the non-Ajax h:commandButton in this case, because we want to refresh the whole page after skin changing.
The last thing we have to do is to add the rightFooter class to our CSS file in order to make the menu on the righthand side of the bottom. Just open /view/stylesheet/theme.css and enter the following code:
rightFooter {
text-align: right;
font-size: 11px;
float: right;
}
Done, now we can make the application look how we like it!
RichFaces unifies the application appearance by skinning the standard HTML elements the same way that it does with the other components of the library.
There are two levels of skinning:
We'll see how to manage it in Chapter 10.
With RichFaces, you can use XML-formatted CSS (XCSS) in order to use all the power of the skinnability feature: you can dynamically create a CSS file by mixing skin parameters, CSS, and external resources such as class-defined gradients (we'll see an example later).
In XCSS, you can use u:selector and u:style for composing the styles to be converted in CSS:
<u:selector name=".rich-name, .mystyle, .otherstyle">
<u:style name="color" skin="generalTextColor" />
<u:style name="border-color" skin="panelBorderColor" />
<u:style name="border-width" value="1px" />
</u:selector>
The above code is transformed to the following in CSS:
.rich-name, .mystyle, .otherstyle {
color: #000000;
border-color: #BED6F8;
border-width: 1px;
}
XCSS is used a lot in the Plug-n-Skin skinnability feature.
With Plug-n-Skin, you can develop a new customized skin using all the possibilities we have seen so far, create a jar file, and "plug" it into the application/WEB-INF/lib/ directory.
In order to select the new skin, just change the value of the org.richfaces.SKIN context parameter with the name of the new skin.
For creating the new skin, you have to import the template using Maven, and then edit it to customize the skin. Inside the template, there are also ready-to-use gradient classes that you can use in XCSS:
<u:selector name=".rich-calendar-week">
     <u:style name="background-position" value="0% 50%" />
     <u:style name="background-image">
     <f:resource
         f:key="org.richfaces.renderkit.html.CustomizeableGradient">
        <f:attribute name="valign" value="middle" />
        <f:attribute name="gradientHeight" value="20px" />
        <f:attribute
                         name="baseColor"
                         skin="calendarWeekBackgroundColor" />
    </f:resource>
   </u:style>
   <u:style name="border-color" skin="newBorder" />
</u:selector>
As you can see from the example, we can use the CSS values (as for background-position), dynamic resources (as for background-image), and skin parameters (as for border-color).
Note
What is Maven?
Maven is a very useful tool that helps developers to maintain their project and library dependences. It is more powerful than Apache Ant and can be used for building automation.
In order to install Maven, just go to the download section of its web site (http://maven.apache.org/download.html) and grab the latest version of the bin package, unzip it, and follow the simple instructions you find inside the README.txt file.
We will use it to configure a new Ajax JSF component using the CDK (see Chapter 11, Component Development Kit).
We are going to see this in depth in Chapter 10. In the meantime, we just want to put a gradient to our footer in order to do that, let's open the theme.xcss page that you find in the /view/stylesheet/ directory and add the following code:
<u:selector name=".footer">
     <u:style name="background-image">
              <f:resource
f:key="org.richfaces.renderkit.html.images.SliderFieldGradient"/>
    </u:style>
</u:selector>
We are just using a Java class for rendering a gradient according to the colors of the skin; we can use built-in resources (as in this case) or build our own ones.
There are three plug 'n' skin examples available, which have been developed by the RichFaces team. We can download them from the Download section of the RichFaces web site at http://www.jboss.org/jbossrichfaces/downloads/.
These examples are:
darkX-X.Y.Z.GA.jarglassX-X.Y.Z.GA.jarlagunaX-X.Y.Z.GA.jar
If you want to use them as skins, just download them and copy them into the classpath, so that they are available to be selected by name as the other skins.
If you want to use one of these skins, just download the jar file, copy it into the classpath (for example the /lib folder) and then set the org.richfaces.SKIN context parameter with the name of the skin.
darkX*.jar
glassX*.jar
laguna*.jar
Now, the jar files will be included into the /WEB-INF/lib/ directory and be available for use.
In order to let the user also choose these skins, just add the skin name into the availableSkins list. Let's edit components.xml and add the three values. In the end, it will look like this:
<component name="appOptions">
<property name="defaultSkin">wine</property>
<property name="availableSkins">
<value>laguna</value>
<value>darkX</value>
<value>glassX</value>
<value>blueSky</value>
<value>classic</value>
<value>ruby</value>
<value>wine</value>
<value>deepMarine</value>
<value>emeraldTown</value>
<value>japanCherry</value>
</property>
</component>
Now the user will see them in the skin selection menu.
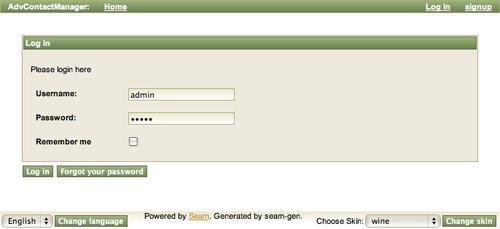
Here are some examples of skin changing for the login page. The first screenshot is using the wine skin, which turns the look and feel of RichFaces components to green:
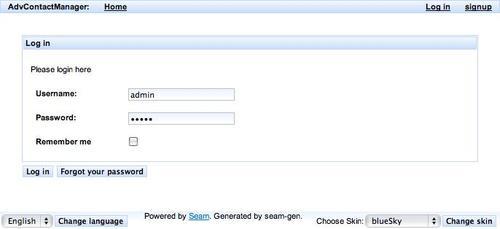
The second screenshot is using a light-blue skin called blueSky:
The third screenshot shows a pink version using the japanCherry built-in skin:
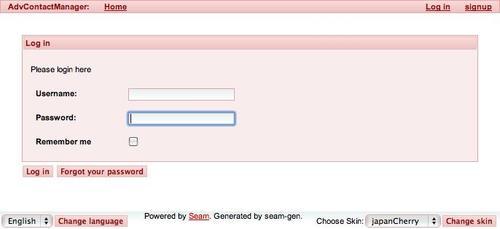
Notice that the gradient for the footer changes according to the skin.