Chapter 10. Testing Your Code with JUnit
JUnit 3.8 and JUnit 4
JUnit was a groundbreaking piece of software in its day, and there are many, many useful JUnit extensions that help with unit testing in specialized areas and that still rely on the JUnit 3.x approach. We will look at a few of them later on in the book. This section is a brief refresher on JUnit 3.8, for future reference and to better understand the changes brought by newer frameworks such as JUnit 4 and TestNG (Chapter 20).
In JUnit 3, you write unit tests in special Java classes, called test cases.
All JUnit 3 test cases must extend the TestCase class. You write unit tests as
methods of these classes, following a special naming convention: test methods
must return void, take no parameters, and start with the
word “test.” Your test classes usually also follow a particular naming
convention, such as ending with the word Test.
Here is a simple Unit 3.8 test class that tests a class that calculates GST (“Goods and Services Tax,” also known as a “Value Added Tax” in some countries). Suppose that the standard GST rate is 12.5 percent. Our unit test class might look like this:
public class PriceCalculatorTest extends TestCase {

    public void testCalculateGST() {
       calculator = new PriceCalculator();
       double amountWithGst = calculator.calculatePriceWithGST(100.00);
       assertEquals("Standard GST is 12.5%", 112.50, amountWithGst, 0.0);
    }
}
The
TestCase base class comes with a large number of assert methods: assertEquals(), assertTrue(),
assertNotNull(), and many more. These
make up the core of your unit tests, since they are what you use to actually
perform your tests. You use the assert methods to check your obtained results
against the expected results. You can optionally provide a message as the first
parameter of your asserts, which can help to make it easier to identify the
error when you have a lot of unit tests to run.
You can override the setUp()tearDown()
setUp()
method:
public class PriceCalculatorTest extends TestCase {

   PriceCalculator calculator;

   protected void setUp() throws Exception {
       calculator = new PriceCalculator();
   }

   public void testCalculateGST() {
       double amountWithGst = calculator.calculatePriceWithGST(100.00);
       assertEquals("Standard GST is 12.5%", 112.50, amountWithGst, 0.0);
   }
   // More tests with the calculator object
}
There is actually more to JUnit 3 than this, but you should now be familiar enough with the JUnit 3 architecture, to understand the innovations brought by the newer frameworks, and to use the JUnit 3 extensions that we discuss in other chapters. JUnit 4 is usually preferable, but 3.8 is still widely used, and many plug-ins still haven’t been updated for JUnit 4. In the remainer of this chapter, we will refer exclusively to JUnit 4.
Unit Testing with JUnit 4
When it comes to unit testing frameworks, JUnit is the de facto standard. It is widely used and known, and has many useful extensions for more specialized testing. JUnit, originally written by Kent Beck and Erich Gamma, is widely recognized as a monumental piece of software that greatly contributed to the popularity (at least in theory) of decent unit testing practices in Java. However, over the last few years, the basic API has not evolved a great deal, and some other different and innovative testing frameworks such as TestNG (see Chapter 20) have emerged.
JUnit 3 imposes many constraints which are no longer justified in the world of Java 5, annotations and IOC programming. In JUnit 3, test classes need to extend a JUnit base class, and tests need to respect a special naming convention: you cannot use any old Java class as a test class. JUnit 3 test classes are initialised each time a test is executed, which makes it harder to refactorise and optimize test code. There is no support for data-driven testing (running your tests against externally provided data). It also lacks features such as dependencies between tests, and test groups.
JUnit 4 is a major rewrite of the JUnit API, which aims at taking advantage of the progress in Java technology over the pass few years. It is simpler, easier, and more flexible to use than its predecessor, with a few new features to boot! It introduces a lot of new features that can make writing your unit tests easier, such as the use of annotations and more flexible test class initialization. In JUnit 4, a test can be any old POJO class, and test methods don’t need to respect any particular naming convention.
Let’s see how our tax calculator tests (see JUnit 3.8 and JUnit 4) would look in JUnit 4:
import org.junit.Before;
import org.junit.Test;
import static org.junit.Assert.*;

public class PriceCalculatorTest {

   @Test
   public void calculateStandardGST() {
     PriceCalculator calculator = new PriceCalculator();
     double gst = calculator.calculatePriceWithGST(100.00);
     assertEquals(gst, 112.50 , 0.0);
   }

   @Test
   public void calculateReducedGST() {
     PriceCalculator calculator = new PriceCalculator();
     double gst = calculator.calculatePriceWithReducedGST(100.00);
     assertEquals(gst, 105.00 , 0.0);
   }

}
The
first thing to notice is that, unlike test classes in JUnit 3, a JUnit 4 test
case does not need to extend any particular class. JUnit 4, like TestNG, uses
annotations to indicate which methods should be treated as unit tests. Any
method marked by the @Test annotation is
considered to be a unit test. There is no particular naming convention (tests no
longer need to be called testThis or testThat), although the methods still do
need to return void and take no parameters. In theory,
you could even place your unit tests in the same class as the code you are
testing, although in practice it is probably a good idea to keep them
separate.
The org.junit.Assert class contains the old JUnit 3.x
asserts we’ve all come to know and love. In JUnit 3, the assert methods were
defined in the TestCase class, the base class of all
JUnit test classes, and so could be used in any JUnit test. Not so in JUnit 4,
where test classes no longer need to be derived from
TestCase. To avoid much heartache and gnashing of
teeth, you can do a static import on this class (as shown here) so that you can
use these asserts (assertEquals,
assertNotNull, and so on) in exactly the same way as
in your old JUnit 3.x unit tests.
Alternatively, you can also use Java 5 assert statements:
assert (gst == 100*PriceCalculator.DEFAULT_GST_RATE);
This may look nicer, but there is a hitch: Java will blissfully ignore your asserts unless you use the -ea (enable assertions) command-line option.
Setting Up and Optimizing Your Unit Test Cases
As with as any other code, unit tests need to be coded efficiently
and refactored where necessary. JUnit 4 provides a couple of annotations that
can help you out here. The @Before annotation indicates a
method that needs to be called before each test, effectively replacing the
setup() method of JUnit 3.x. You can also use the @After
annotation to indicate any cleanup methods that need to be run
after each test. Here, the initialize() method will be called before, and tidyup() after, each unit
test:
import org.junit.Before;
import org.junit.Test;
import static org.junit.Assert.*;

public class PriceCalculatorTest {

   private PriceCalculator calculator;

   @Before
   public void initialize() {
     calculator = new PriceCalculator();
   }

   @Test
   public void calculateStandardGST() {
     PriceCalculator calculator = new PriceCalculator();
     double gst = calculator.calculatePriceWithGST(100.00);
     assertEquals(gst, 112.50 , 0.0);
   }

   @Test
   public void calculateReducedGST() {
     PriceCalculator calculator = new PriceCalculator();
     double gst = calculator.calculatePriceWithReducedGST(100.00);
     assertEquals(gst, 105 , 0.0);
   }

   @After
   public void tidyup() {
     calculator.close();
     calculator = null;
   }

}
However,
this may still not be optimal. JUnit also provides a few other annotations which
you can use to improve things further. Sometimes, for the sake of efficiency,
you would like to be able to be able to set up some resources before you run
any of the unit tests in a given class, and then clean
up afterward. You can do just that with the @BeforeClass and @AfterClass annotations. Methods
annotated with @BeforeClass will be invoked
just once, before any of the unit tests are executed. And, as you would expect,
methods annotated with @AfterClass are
executed only when all of the tests have been completed. In the above example,
the calculator object should be created only once, at the start of the unit
tests, and closed only after all of the tests have been completed. We might add
a reset() method, called before each unit
test, to reinitialize the calculator each time. Here is what our optimized unit
test class might look
like:
import org.junit.Before;
import org.junit.Test;
import static org.junit.Assert.*;

public class PriceCalculatorTest {

   private PriceCalculator calculator;

   @BeforeClass
   public void initialize() {
     calculator = new PriceCalculator();
   }

   @Before
   public void resetCalculator() {
     calculator.reset();
   }

   @Test
   public void calculateStandardGST() {
     PriceCalculator calculator = new PriceCalculator();
     double gst = calculator.calculatePriceWithGST(100.00);
     assertEquals(gst, 112.50 , 0.0);
   }

   @Test
   public void calculateReducedGST() {
     PriceCalculator calculator = new PriceCalculator();
     double gst = calculator.calculatePriceWithReducedGST(100.00);
     assertEquals(gst, 105 , 0.0);
   }

   @AfterClass
   public void tidyup() {
     calculator.close();
   }

}
Simple Performance Testing Using Timeouts
A very simple type of performance testing involves making sure that a particular test always executes within a certain timeframe. This can also be useful for database queries using O/R mapping tools such as Hibernate. Basic errors in Hibernate mapping files, for example, can result in very poor response times, even for relatively simple queries. Although a normal unit test wouldn’t pick this up, a test with a timeout would.
This sort of check also works nicely for detecting infinite loops, although it is of course harder to know which parts of your code are likely to contain infinite loops....
This technique is directly integrated into the @Test annotation, which allows you to set an upper limit on the amount of time a test may run without failing. To do this, you specify the timeout parameter of the @Test annotation (in milliseconds), as shown here:
  @Test(timeout=100)
  public void lookupGST() {
     double gst = calculator.lookupRateForYear(2006);
     assertEquals(gst, GST_RATE_IN_2006 , 0.0);
  }
Now, if the query takes more than 100 milliseconds, the test will fail:
Testsuite: com.wakaleo.jpt.alexandria.services.PriceCalculatorTest
Tests run: 3, Failures: 0, Errors: 1, Time elapsed: 0.136 sec

Testcase: calculateStandardGST took 0.009 sec
Testcase: lookupGST took 0.128 sec
        Caused an ERROR
test timed out after 100 milliseconds
java.lang.Exception: test timed out after 100 milliseconds
For some critial, high-performance methods, you might want to check that the
classes perform with acceptable throughput. Of course, the lower the timeout
value, the higher the chances are that some outside factor might slow down your
tests and that your tests might timeout incorrectly. For example, in the
following test case, we check that on average the calculateInterest() method never takes more than a millisecond to
run:
  @Test(timeout=50)
  public void perfTestCalculateInterest() {
      InterestCalculator calc = new InterestCalculatorImpl();
      for(int i = 0 ; i < 50; i++) {
          calc.calculateInterest(principal, interestRate, startDate, periodInDays);
      }
  }
This type of test is just a reality check to make sure your methods are not excessively slow, so don’t be too demanding.
Checking for Exceptions the Easy Way
Sometimes you want to check that an exception is correctly thrown
under certain circumstances. In JUnit 3.x, this is a fairly laborious task
involving catching the exception and asserting success in this case and failure
otherwise. In JUnit 4, you can use the expected parameter in the @Test annotation to the exception that should be thrown if all
goes according to plan. In the following (somewhat contrived) example, we
require the application to go through an
IllegalArgumentException if the year is less than
some arbitrary year. In JUnit 4, we can check this fairly easily as shown
here:
  @Test(expected = IllegalArgumentException.class)
  public void lookupIllegalGSTYear() {
     double gst = calculator.lookupRateForYear(1066);
  }
Now, if this method doesn’t throw an
IllegalArgumentException, the test will fail:
Testsuite: com.wakaleo.jpt.alexandria.services.PriceCalculatorTest
Tests run: 3, Failures: 1, Errors: 0, Time elapsed: 0.114 sec

Testcase: calculateStandardGST took 0.009 sec
Testcase: lookupGST took 0.01 sec
Testcase: lookupIllegalGSTYear took 0.003 sec
        FAILED
Expected exception: java.lang.IllegalArgumentException
junit.framework.AssertionFailedError: Expected exception:
java.lang.IllegalArgumentException
Using Parameterized Tests
Unit tests are dull things to write, and developers are prone to take shortcuts. However, there is no escaping that good unit tests need to test business functions with a wide range of different data, be it boundary cases, data classes, or whatever. The same test may well succeed with one set of data, but fail with another. But if a developer needs to write a separate test case for each value (which testing best practices would suggest), he will typically not test very many values. Wouldn’t it be nice to be able to run the same unit test several times, using different data?
In fact, JUnit 4 does provide a neat feature that makes it easy to test using arbitrary sets of data. Basically, you can set up a collection of test data and feed it automatically into your unit test methods. Let’s look at an example. Suppose that you need to write a class that calculates income tax for a given income in a certain year. The business class interface might look like this:
public interface TaxCalculator {
    public double calculateIncomeTax(int year, double taxableIncome);
}
Now working out income tax typically involves some pretty nontrivial calculations. Most countries use a progressive tax system of some sort, in which the tax rate increases with the taxable income, using a system of “tax brackets.” In addition, the exact tax brackets sometimes vary from year to year. For this sort of application, it is important to test values within each tax bracket, as well as various boundary cases. So, we will set up a collection of test data containing the income, the year, and the expected income tax, over a wide range of values. Let’s see how we could do this.
JUnit 4 lets us define sets of test data, which we can pass to our unit tests. In this case, we need to test various taxable incomes in the different tax brackets. In this example, we will only test against one year (2006), but, in a real-world application, we may want to test against several years. So, our test data sets will contain three values: taxable income, year, and the amount of payable income tax.
To use this test data, we need to set up a parameterized test class. This is basically a test class with a constructor that takes several parameters: precisely one parameter for each value in the test data sets. So, in our case, the constructor will take three parameters: taxable income, year and payable income tax. The parameterized test class will typically also have member variables corresponding to each of these fields. The constructor initialises these fields, and the unit test methods in the class use them to execute their tests.
JUnit will instantiate a new instance of your test class for each row in the test data and then execute the class’s unit tests against this data. So, if you have 20 rows of test data, JUnit will instantiate your test class 20 times, each time running the unit tests against a different set of data.
Let’s see how you would code this. The full test class is listed here:
@RunWith(Parameterized.class)
public class TaxCalculatorTest {

    @Parameters
    public static Collection data() {
        return Arrays.asList(new Object[][]{
                /* Income   Year     Tax  */
                {     0.00, 2006,     0.00},
                { 10000.00, 2006,  1950.00},
                { 20000.00, 2006,  3900.00},
                { 38000.00, 2006,  7410.00},
                { 38001.00, 2006,  7410.33},
                { 40000.00, 2006,  8070.00},
                { 60000.00, 2006, 14670.00},
                {100000.00, 2006, 30270.00},
        });
    }

    private double revenue;
    private int    year;
    private double expectedTax;

    public TaxCalculatorTest(double input, int year, double expectedTax) {
        this.revenue = revenue;
        this.year = year;
        this.expectedTax = expectedTax;
    }

    @Test public void calculateTax() {
        TaxCalculator calculator = getTaxCalculator();
        double calculatedTax = calculator.calculateIncomeTax(year, revenue);
        assertEquals(expectedTax, calculatedTax);
    }

    private TaxCalculator getTaxCalculator() {
        TaxCalculator calculator = new TaxCalculatorImpl();
        return calculator;
    }
}
Let’s
look at each part of this class in detail. First of all, you need to use the
@RunWith annotation,
specifying the Parameterized class, to let JUnit know
that your test class contains parameterized test
cases.
@RunWith(Parameterized.class)
public class TaxCalculatorTest {...
Next, you need to set up a collection of test data. You do this by defining a function, tagged with the @Parameters annotation, which returns the test data in the form of a collection. Behind the scenes, the test data is usually a list of arrays. In our case, we set up a list of arrays of values, with each array containing three values: the income, the year, and the expected tax for that income in that year:
    @Parameters
    public static Collection data() {
        return Arrays.asList(new Object[][]{
                /* Revenue  Year     Tax  */
                {     0.00, 2006,     0.00},
                { 10000.00, 2006,  1950.00},
                { 20000.00, 2006,  3900.00},
                { 38000.00, 2006,  7410.00},
                { 38001.00, 2006,  7410.33},
                { 40000.00, 2006,  8070.00},
                { 60000.00, 2006, 14670.00},
                {100000.00, 2006, 30270.00},
        });
    }
As we mentioned earlier, when JUnit 4 runs this class, it actually creates an instance of the class for each line in the test data collection. You need to provide member variables to store each of these values, and a public constructor to initialize them so that JUnit can set up each instance with the correct test data:
    private double revenue;
    private int    year;
    private double expectedTax;

    public TaxCalculatorTest(double revenue, int year, double expectedTax) {
        this.revenue = revenue;
        this.year = year;
        this.expectedTax = expectedTax;
    }
Now we just test against these values:
   @Test
   public void calculateTax() {
       TaxCalculator calculator = getTaxCalculator();
       double calculatedTax = calculator.calculateIncomeTax(year, revenue);
       assertEquals(expectedTax, calculatedTax);
   }
When you run these unit tests, the test will be run many times, once for each line in the data array:
Testsuite: com.wakaleo.jpt.alexandria.services.TaxCalculatorTest
Tests run: 8, Failures: 0, Errors: 0, Time elapsed: 0.119 sec

Testcase: calculateTax[0] took 0.012 sec
Testcase: calculateTax[1] took 0.001 sec
Testcase: calculateTax[2] took 0.002 sec
Testcase: calculateTax[3] took 0.001 sec
Testcase: calculateTax[4] took 0.001 sec
Testcase: calculateTax[5] took 0.001 sec
Testcase: calculateTax[6] took 0.002 sec
Testcase: calculateTax[7] took 0.003 sec
Note that you can put many unit tests in a parameterized unit test class, just as you would in a normal unit test class. Each individual unit test method will be run against each row of test data.
Using assertThat and the Hamcrest Library
JUnit 4.4 introduced a new notation for assert statements designed to make the intentions of the developer clearer and easier to read. This notation, originally developed by Joe Walnes,[9] uses the assertThat method, along with set of matcher statements (or constraints, or predicates, depending on your background), which can quite nicely improve the readability of your tests. For example, the following class tests that, in this situation, the calculated tax is zero:
import static org.junit.Assert.*;
import static org.hamcrest.CoreMatchers.*;

public class TaxCalculatorTest {

   @Test
   public void calculateTax() {
       TaxCalculator calculator = getTaxCalculator();
       double calculatedTax = calculator.calculateIncomeTax(2007, 0);
       assertThat(calculatedTax, is(0.0));
    }
}
Now assertThat(calculatedTax, is(0.0)) is arguably more readable than assertEquals(calculatedTax, 0.0, 0.0), although this may be a matter of personal preference. For me, it certainly reads more naturally. It’s probably the fraction of a second that your brain takes to convert “assertsEquals” into a sentence structure along the lines of “yeah right, so calculated tax has to equal zero.” With the first form, your brain goes “OK, we’re asserting that calculated tax is zero.” This requires less work.
More readable tests also mean more reliable and maintainable tests. If your tests are easy to read, it’s easy to see that they are correct.
You can use the equalTo matcher (or is, in a shorthand form) as a more readable version of the assertEquals method:
String result = "red";
...
assertThat(result, equalTo("red"));
These statements can also be combined for more complex tests. For example, using the anyOf matcher statement, the following test checks that the color variable is red, green, or yellow:
assertThat(color, anyOf(is("red"),is("green"),is("yellow")));If necessary, you can add a description of your test to make things even clearer:
String color = "noir";
assertThat("black is black", color, is("black"));
This will generate an error message with a bit more depth:
<<< FAILURE!
java.lang.AssertionError: black is black
Expected: "black"
     got: "noir"
...
You can also use the not matcher to negate any other matcher in a fairly intuitive way:
String color = "black";
assertThat(color, is(not(("white"))));
These new methods actually come from a third-party library called
Hamcrest. The range of matchers that comes with JUnit 4.4 is actually relatively
limited. For a more complete set, you should include the hamcrest-all.jar library in your project. You can
download this API from the Hamcrest web site.[*] If you are using Maven, you can simply include a reference in your
POM file, as shown
here:
<dependency>
    <groupId>org.hamcrest</groupId>
    <artifactId>hamcrest-all</artifactId>
    <version>1.1</version>
    <scope>test</scope>
</dependency>
Then
replace the static import of org.hamcrest.CoreMatchers to org.hamcrest.Matchers. This will give you
access to a much richer set of matchers. Some of these additional features are
discussed in the remainder of this section.
Many of the more interesting matchers make it easy to work with collections. For example, the hasItem matcher can be used to search the contents of a list (hasItemInArray does the same thing for array structures):
List<String> colors = new ArrayList<String>();
colors.add("red");
colors.add("green");
colors.add("yellow");
...
assertThat(colors, hasItem("red"));
You can use the hasItem and hasItemInArray to build nontrivial tests about list values. Here, for example, we check that a list has no entry:
List<Integer> ages = new ArrayList<Integer>();
ages.add(20);
ages.add(30);
ages.add(40);
...
assertThat(ages, not(hasItem(lessThan(18))));
Conversely, the isIn matcher lets you check whether a particular object is contained in a list:
assertThat(20, isIn(ages));
Collection support is not limited to lists. The hasKey and hasValue matchers can be used to check whether a Map contains a certain key or value:
Map map = new HashMap();
map.put("color", "red");
...
assertThat(map, hasValue("red"));
You can even use the hasProperty matcher to perform tests on the properties of an object:
Client client = new Client();
client.setClientName("Jane");
...
assertThat(client, hasProperty("clientName", is("Jane")));
This is just a sample of what you can do with this type of expression. Check out the latest API documentation to see what else is available. The bottom line is that they can give your test cases more clarity and more expressiveness, which in turn allows you to code better, more reliable tests, more quickly and more easily.
JUnit 4 Theories
Another major new feature introduced in JUnit4.4, albeit with an experimental status, is the notion of theories. A theory expresses a general assertion that holds true across a, possibly infinite, number of data sets. Any constraints to the data sets to which the theory applies are specified as assumptions.
The developer first specifies a set of data points for testing the theory. A data point is a (generally constant) piece of test data, identified by the @DataPoint annotation. Alternatively, automated tools may analyze the code and automatically create data sets to reinforce or disprove the theory. For example, here we define the years 2007 and 2008 as valid test data:
    @DataPoint public static int YEAR_2007 = 2007;
    @DataPoint public static int YEAR_2008 = 2008;
Another set of data can be used to define test data used for possible revenue test data:
    @DataPoint public static double INCOME_1 = 0.0;
    @DataPoint public static double INCOME_2 = 0.01;
    @DataPoint public static double INCOME_3 = 100.0;
    @DataPoint public static double INCOME_4 = 13999.99;
    @DataPoint public static double INCOME_5 = 14000.0;
To define a theory-enabled test, you use the @Theory annotation instead of the usual @Test annotation. A theory is an ordinary method that takes a certain number of parameters. JUnit will work out which data points to use for the various parameters in your test methods based on their respective types. Each data point will be passed to each parameter of the same type. This can be a little confusing if there are several parameters of the same type. As we will see, you use assumptions to limit the allowed values for each individual parameter.
The next step is to define your assumptions using the @assumeThat annotation. Indeed, by placing assumptions within a theory-enabled test case, you limit the test data that will be used to execute that test case. In the following example, we limit a test case to the year of 2007, for incomes greater than $0 and less than $14,000:
assumeThat(year, is(2007));
assumeThat(income, both(greaterThan(0.00)).and(lessThan(14000.00)));
The JUnitRunner runs the test with all possible combinations of the set of data points that pass the assumptions, in this case YEAR_2007 with INCOME_2, INCOME_3, and INCOME_4:
import static org.hamcrest.MatcherAssert.assertThat;
import static org.hamcrest.Matchers.*;
import static org.junit.Assume.assumeThat;

import java.math.BigDecimal;

import org.junit.experimental.theories.DataPoint;
import org.junit.experimental.theories.Theories;
import org.junit.experimental.theories.Theory;
import org.junit.runner.RunWith;

@RunWith(Theories.class)
public class TaxCalculatorTheoryTest {

    @DataPoint public static int YEAR_2007 = 2007;
    @DataPoint public static int YEAR_2008 = 2008;
    @DataPoint public static BigDecimal INCOME_1 = new BigDecimal(0.0);
    @DataPoint public static double INCOME_2 = 0.01;
    @DataPoint public static double INCOME_3 = 100.0;
    @DataPoint public static double INCOME_4 = 13999.99;
    @DataPoint public static double INCOME_5 = 14000.0;

    @SuppressWarnings("unchecked")
    @Theory
    public void lowTaxRateIsNineteenPercent(int year, double income) {
        assumeThat(year, is(2007));
        assumeThat(income, allOf(greaterThan(0.00),lessThan(14000.00)));

        TaxCalculator calculator = getTaxCalculator();
        double calculatedTax = calculator.calculateIncomeTax(year, income);
        double expectedIncome = calculatedTax * 1000/195;
        assertThat(expectedIncome, closeTo(income,0.001));
        System.out.println("Year: " + year + ", Income: " + income + ", Tax: "
        + calculatedTax);
    }

    private TaxCalculator getTaxCalculator() {
        return new TaxCalculatorImpl();
    }
}Year: 2007, Income: 0.01, Tax: 0.0019500000000000001 Year: 2007, Income: 100.0, Tax: 19.5 Year: 2007, Income: 13999.99, Tax: 2729.99805
For
simplicity, we are just using double values here. For a real business
application, you would typically use a more precise type for the monetary
values, such as BigDecimal or a dedicated Money class.
On failure of a test, a descriptive message includes details of the data points that caused the failure:
org.junit.experimental.theories.internal.ParameterizedAssertionError:
lowTaxRateIsNineteenPercent(2007, 0.01)
Caused by: java.lang.AssertionError:
    Expected: is <0.01>
    Got: is <0.0>
You can then add other theories to test other subsets of your test data. The applicable set of DataPoints, as constrained by the assumptions, will be applied to each Theory.
Using JUnit 4 with Maven 2
Maven 2 uses the Surefire plug-in to execute unit tests (see Testing Your Code). The Surefire plug-in handles both JUnit 3 and JUnit 4 unit tests seamlessly: the test classes just need to be in the test directory and Maven will automatically detect and run them. You can even combine JUnit 3 and JUnit 4 tests in the same application. You run your unit tests in exactly the same way as you would any other tests in Maven, that is, by using the mvn test command:
$ mvn test
[INFO] Scanning for projects...
...
-------------------------------------------------------
 T E S T S
-------------------------------------------------------
...
Results :

Tests run: 68, Failures: 0, Errors: 0, Skipped: 0

[INFO] ------------------------------------------------------------------------
[INFO] BUILD SUCCESSFUL
[INFO] ------------------------------------------------------------------------
[INFO] Total time: 4 seconds
[INFO] Finished at: Tue Aug 14 22:28:51 GMT+12:00 2007
[INFO] Final Memory: 7M/67M
[INFO] ------------------------------------------------------------------------
This will run both your JUnit 3 and JUnit 4 tests, and generate the usual set of Surefire reports with the combined results of all your tests. This is very useful if you wish to use JUnit 4 features for your normal unit tests, but still benefit from the many excellent JUnit-3 based test libraries such as StrutsTestCase (see Chapter 19), the Spring MVC testing framework, or DBUnit.
Using JUnit 4 with Ant
JUnit 4 is poorly supported in any versions of Ant earlier than 1.7.0. From Ant 1.7.0 onward, however, JUnit 4 tests are fully supported and easy to configure. In this section, we will go through the steps of setting up, compiling, and running your JUnit 4 tests using Ant.
For completeness, we will go through the whole build file. Most of it will be straightforward to developers familiar with Ant (see Chapter 1). In the first part of the build file, we just define project directories and housekeeping tasks:
<project name="JUnit-Tests-Sample" default="runtests" basedir=".">
    <property name="junit.home"   value="/home/john/tools/junit4.1" />
    <property name="java.src"     value="src/main/java" />
    <property name="test.src"     value="src/test/java" />
    <property name="build.dir"    value="target" />
    <property name="java.classes" value="${build.dir}/classes" />
    <property name="test.classes" value="${build.dir}/test-classes" />
    <property name="test.reports" value="${build.dir}/test-reports" />

    <target name="init">
        <mkdir dir="${java.classes}"/>
        <mkdir dir="${test.classes}"/>
        <mkdir dir="${test.reports}"/>
    </target>

    <target name="clean">
        <delete dir="${build.dir}"/>
    </target>
Then, we define a task to compile our Java code:
    <target name="compile" depends="init" >
        <javac srcdir="${java.src}" destdir="${java.classes}" >
            <include name="**/*.java"/>
        </javac>
    </target>
Again, there is nothing special here: we are just compiling Java code using the standard Ant <javac> task. The next section, however, starts getting a little more interesting. Here, we set up a classpath that refers to the JUnit 4.1 JAR file and the application’s compiled Java classes, and use it to compile the JUnit 4 unit tests. JUnit 4 is backward-compatible with JUnit 3, so unit tests written using the two APIs can comfortably live together in the same project without picking fights:
    <path id="test.classpath">
        <pathelement location="${junit.home}/junit-4.1.jar" />
        <pathelement location="${java.classes}" />
    </path>

    <target name="compiletests" depends="compile">
        <javac srcdir="${test.src}" destdir="${test.classes}">
            <classpath refid="test.classpath" />
            <include name="**/*.java"/>
        </javac>
    </target>
Now we are ready to actually run our unit tests. Ant 1.7.0 comes with a new and improved JUnit task that supports both JUnit 3 and JUnit 4 tests. A typical JUnit test task in Ant 1.7.0 looks like this:
    <target name="runtests" depends="compiletests">
        <junit printsummary="yes" haltonfailure="yes">
          <classpath>
              <path refid="test.classpath" />
              <pathelement location="${test.classes}"/>
          </classpath>

          <formatter type="plain"/>
          <formatter type="xml"/>

          <batchtest fork="yes" todir="${test.reports}">
            <fileset dir="${test.src}">
                 <include name="**/*Test*.java"/>
            </fileset>
          </batchtest>
        </junit>
    </target>
The first interesting item (for users of JUnit with previous versions of Ant) is the classpath entry. This is where you tell Ant where to find the JUnit 4 jar file. This is worth mentioning because, until Ant 1.6.5, you needed to place a copy of the junit.jar file in the Ant lib directory if you wanted the JUnit task to work. Although this quirk was documented in the Ant manual and officially declared “not a bug,” it was messy at the best of times. However, as of Ant 1.7.0, you can simply declare your JUnit 4 JAR file in the nested classpath as shown here.
Next comes a list of formatter objects. Test results can be generated in several formats: plain generates simple text files, whereas xml results in more detailed test reports suitable for HTML report generation.
The actual tests are executed by the <batchtest> element, which runs all JUnit tests found in the specified fileset. No distinction is made between JUnit 3 and JUnit 4 unit tests.
When you invoke this target, you should get something like the following:
$ ant runtests
Buildfile: build.xml

init:

compile:
    [javac] Compiling 11 source files to
    /home/john/Documents/book/java-power-tools/src/sample-code/alexandria/target/classes

compiletests:
    [javac] Compiling 4 source files to
    /home/john/Documents/book/java-power-tools/src/sample-code/alexandria/target/
    test-classes

runtests:
    [junit] Running com.wakaleo.jpt.alexandria.domain.CatalogTest
    [junit] Tests run: 4, Failures: 0, Errors: 0, Time elapsed: 4.493 sec
    [junit] Running com.wakaleo.jpt.alexandria.domain.LegacyJUnit3CatalogTest
    [junit] Tests run: 4, Failures: 0, Errors: 0, Time elapsed: 0.041 sec
    [junit] Running com.wakaleo.jpt.alexandria.services.PriceCalculatorTest
    [junit] Tests run: 3, Failures: 0, Errors: 0, Time elapsed: 0.048 sec
    [junit] Running com.wakaleo.jpt.alexandria.services.TaxCalculatorTest
    [junit] Tests run: 8, Failures: 0, Errors: 0, Time elapsed: 0.054 sec

BUILD SUCCESSFUL
Selectively Running JUnit 4 Tests in Ant
The Ant JUnit task is a flexible tool, and you can use it to pick and choose which unit tests you want to run at a particular time. This section discusses various techniques you can use to do this.
Running Individual Tests
The usual way to run your unit tests is en masse, using the <batchtest> element. However, you can run individual tests, using the <test> element:
    <target name="runtest" depends="compiletests">
        <junit printsummary="yes" haltonfailure="yes">
            ...
            <test name="com.wakaleo.jpt.alexandria.domain.CatalogTest"/>
        </junit>
    </target>
Invoking this target runs only the unit tests found in this class:
$ ant runtest
Buildfile: build.xml

init:

compile:

compiletests:

runtest:
    [junit] Running com.wakaleo.jpt.alexandria.domain.CatalogTest
    [junit] Tests run: 4, Failures: 0, Errors: 0, Time elapsed: 9.02 sec

BUILD SUCCESSFUL
In this situation, you may well want to exclude this test from your main unit tests, using an <exclude> element as shown here:
    <target name="runtests" depends="compiletests">
        <junit printsummary="yes" haltonfailure="yes">
          ...
          <batchtest fork="yes" todir="${test.reports}">
            <fileset dir="${test.src}">
                <include name="**/*Test*.java"/>
                <exclude name="**/CatalogTest.java"/>
            </fileset>
          </batchtest>
        </junit>
    </target>
Running Tests Conditionally
In some cases, you may prefer not to run all of your test classes each time you run your normal unit tests. Some types of tests—such as load tests, integration tests and performance tests—can be time-consuming, and need not be run each time you recompile your application. Developer unit tests should be kept short and snappy, and the slower, more processor-intensive tests should only be run when needed. The latter tests are typically run only on request on the developer’s machines but systematically on the integration server.
One way to do this is to use the if attribute of the <batchtest> element. This attribute specifies a property that must be set for the unit tests to run; otherwise, they are simply skipped.
The following target will be run only if the perftests property is set:
    <target name="runperftests" depends="compiletests">
        <junit printsummary="yes" haltonfailure="yes">
           ...
          <batchtest fork="yes" todir="${test.reports}" if="perftests">
            <fileset dir="${test.src}">
                <include name="**/*PerfTest*.java"/>
            </fileset>
          </batchtest>
        </junit>
    </target>
The performance tests will never be run unless this property is set, even if the target is called by name:
$ ant runperftests
Buildfile: build.xml

init:

compile:

compiletests:

runperftests:

BUILD SUCCESSFUL
Total time: 1 second
However, if you set the perftests property (to any value: it doesn’t matter), the performance tests will be correctly executed. You can set properties in a number of ways: explicitly in the build file, in a properties file that is loaded into the build script using the <property> task, or simply from the command line:
$ ant runperftests -Dperftests=true
Buildfile: build.xml

init:

compile:

compiletests:

runperftests:
    [junit] Running com.wakaleo.jpt.alexandria.domain.CatalogPerfTest
    [junit] Tests run: 4, Failures: 0, Errors: 0, Time elapsed: 7.227 sec
    [junit] Running com.wakaleo.jpt.alexandria.services.PriceCalculatorPerfTest
    [junit] Tests run: 3, Failures: 0, Errors: 0, Time elapsed: 0.192 sec

BUILD SUCCESSFUL
One typically uses this command-line property uniquely on the integration server: performance and integration tests will only be run here, and not repeatedly on every developer’s machine.
If you use this technique, don’t forget to exclude these tests from the main unit test run using the <exclude> element discussed above.
Integration Tests
Unit tests should be short and snappy, and give a quick turnaround time. Unit tests shouldn’t use external resources such as databases or web application frameworks. To do this, you often use interfaces, mock objects, and a variety of other techniques to ensure that you are testing each component in isolation.
However, you will need to see how the components fit together at some point. This point is called the “integration tests” phase. Here, you might test your Hibernate-based DAOs against a real database (as opposed to an embedded one), run queries that go all the way from the service layer to the database and back, or simulate a user’s web browser using a tool like Selenium. You might also want to see how the application holds up under load, or with many simultaneous requests. These tests are vitally important, but they would slow things down far too much if they had to be run every time a developer runs through the ordinary unit tests. Slow unit tests discourage developers from testing, so you need a way to distinguish fast unit tests from the slower integration tests.
In Maven, you can configure the Surefire plug-in to determine what tests are run during the unit tests phase (when you run mvn test), and which ones are run during the integration tests (when you run mvn integration-test). In the following example, integration tests have names that end in “IntegrationTest.” This is a simple, arbitrary convention: you can, of course, define your own. The following configuration excludes the integration tests from the ordinary unit tests (associated with the “test” phase), and attaches them to the “integration-test” phase instead:
<project>
  ...
  <build>
    <plugins>
      <plugin>
        <artifactId>maven-surefire-plugin</artifactId>
        <executions>
          <execution>
            <id>unit-tests</id>
            <phase>test</phase>
            <goals>
              <goal>test</goal>
            </goals>
            <configuration>
              <excludes>
                  <exclude>**/*IntegrationTest.java</exclude>
              </excludes>
            </configuration>
          </execution>
          <execution>
            <id>integration-tests</id>
            <phase>integration-test</phase>
            <goals>
              <goal>test</goal>
            </goals>
            <configuration>
              <includes>
                  <include>**/*IntegrationTest.java</include>
              </includes>
            </configuration>
          </execution>
        </executions>
      </plugin>
    </plugins>
  </build>
  ...
</project>
Then, to run your performance tests, just invoke the integration test phase:
$ mvn integration-test
Using JUnit 4 in Eclipse
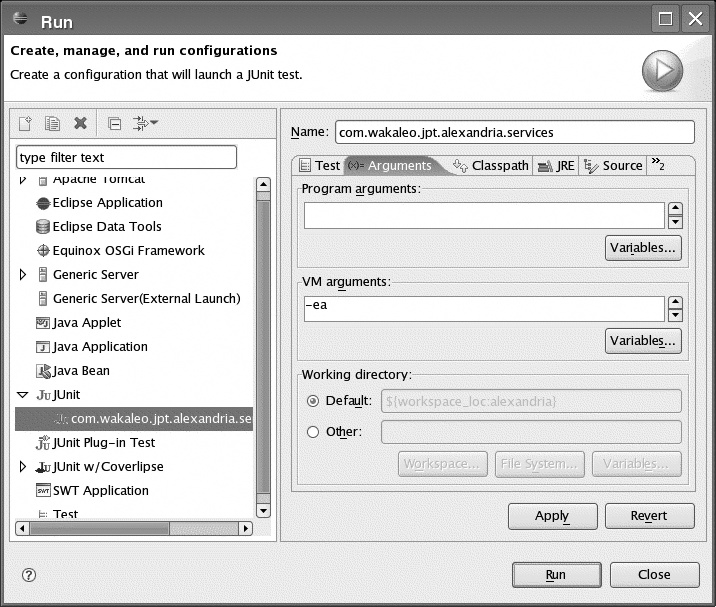
Working from within your IDE is probably the easiest and most productive way to run your unit tests. JUnit 4 integrates extremely smoothly with Eclipse: you run JUnit 4 tests in exactly the same way as for JUnit 3 tests, by using “Run As...JUnit Test.” If you are using Java 5-style asserts, you will also need to place the -ea (“enable assertions”) option in the Run configuration screen (see Figure 10-1). Otherwise, your asserts will simply be ignored.
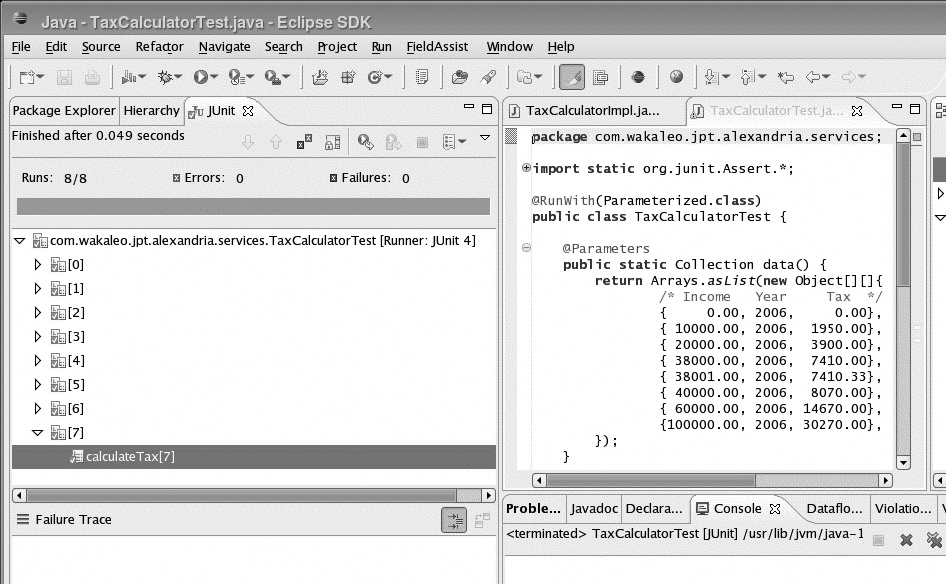
Eclipse even handles JUnit 4-specific features such parameterized tests correctly (see Figure 10-2).
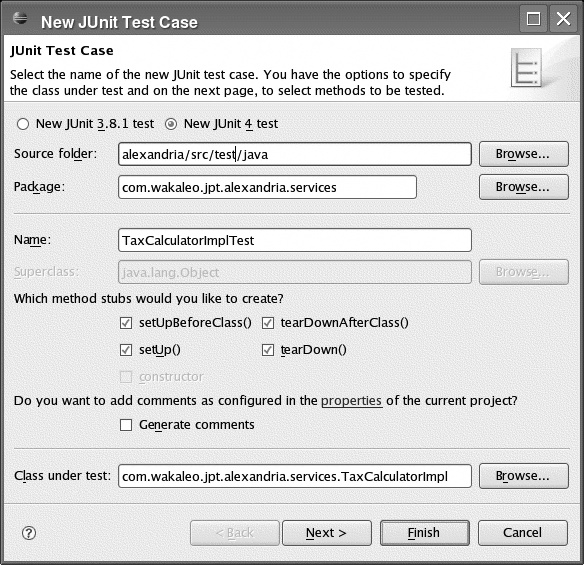
You can also create new JUnit4 test cases easily in Eclipse by selecting “New...JUnit Unit Test” (see Figure 10-3). This dialog box lets you create either JUnit 3.8 or JUnit 4 test classes (you can uses both types of unit tests simultaneously in the same project).