Chapter 13
There’s More to You than Your Jobs
IN THIS CHAPTER
![]() Detailing your professional career
Detailing your professional career
![]() Listing education, licenses, and certifications
Listing education, licenses, and certifications
![]() Discovering accomplishments and adding them to your profile
Discovering accomplishments and adding them to your profile
![]() Branding yourself through activities and interests
Branding yourself through activities and interests
Most people think of LinkedIn as a place to state the positions they’ve held throughout their careers. LinkedIn is so much more than just a compendium of where you worked. Your LinkedIn profile is a 360-degree view of you as a professional. Throughout your career you won awards, joined industry organizations, ran projects, received patents, wrote publications, and more.
In this chapter, I show you how to compile and record all of these professional accomplishments to create a complete profile of you. And it’s not just accomplishments; certain professions demand certain skill sets, certifications, and abilities. LinkedIn spotlights your education, licenses and certifications, and volunteer experiences directly under the Experience section of your LinkedIn profile.
Scrolling further down, LinkedIn provides the Accomplishments section for you to record the honors and awards you received, publications you appeared in, organization you are a part of, patents you hold, languages you speak, courses you’ve taken, and test scores that make you even more marketable. Reading that list you may think, “But I don’t have any of that!” Stick with me because there’s a good chance you have much more than you think. Keep reading to find out how to capture all your accomplishments, even when you don’t necessarily think of them that way.
Adding Your Education, or Lack Thereof
At one time, LinkedIn hinged your profile’s All-Star ranking (which I discuss in deeper fashion in Chapter 4) on having a school listed in the Education section of your LinkedIn profile. I think that those LinkedIn employees working in Silicon Valley with their Ivy League educations just assumed everyone went to a good school and had a great education. It was only until recently that LinkedIn changed its profile completion meter’s requirements and stopped including Education as a must for a complete profile.
When I first began working as a LinkedIn profile writer over a decade ago, I was shocked by the number of executives, entrepreneurs, small-business owners, and plain ol’ professionals who didn’t have college degrees. I quickly realized that many movers and shakers of this world aren’t content sitting in a college classroom. These “do-ers” have better things to do, such as build businesses, get jobs to support their families, and generate revenue. And for those executives and entrepreneurs who were doing just fine without a college degree, instead of getting a college education, they just hired someone with one. You no longer have to cloak not having a degree on your LinkedIn profile, but there are more options for you to showcase what you do have.
Keep reading to find out how to make the Education section work for you regardless of whether you graduated from college or university, or graduated after a longer than typical spell, or didn’t graduate at all.
Divulging the year you graduated
People tend to omit the years they attended college. As I see it, the reason is either that they prefer to disguise their real age, or they do not want people to realize it took them more than the usual amount of time to graduate.
If you are not listing your graduation date because you are trying to hide your age, I say, “Don’t worry about it!” Embrace your age. By putting the years you attended university, LinkedIn is able to link you to other people who graduated with you. This means more people to add to your network, which means the potential for more opportunity. And that is a good thing.
 In addition, a profile that is missing years is a huge red flag to potential employers, recruiters, and human resources professionals. Omitting dates is a sign that something isn’t quite right. It’s better to be viewed as old than someone who is hiding something.
On the other hand, if you are omitting dates because it took you longer to graduate than the norm, at the very least, enter the year you graduated. This way you are still able to connect with your fellow graduates without divulging the length of time it took you to complete your schooling.
Preparing activities and societies
Before we get started adding your Education, let’s take a moment to prepare the Activities and Societies and Description sections. It is tempting to leave these fields blank, but profiles that are completely filled out rank better than profiles missing information. This means you should enter something in these fields.
In what clubs, activities, fraternities, or sororities did you participate? Determine the activities that portray you as a well-rounded individual and list them. Here are a few examples: Foreign Language Club, Debate Team, Football, Theater, Delta Delta Delta Sorority, Chess Club.
The Description field is where you provide information about your educational background and experience. Did you graduate with honors? Were you the recipient of a scholarship? Take the most interesting notes and add them into your profile. Here are a few examples: Fulbright Scholarship. Graduated cum laude. Study Abroad Program, Junior Year, London, England. Matriculated while working full time. Wrote thesis entitled, Liberation of Literature during Fin de siècle France. Minored in English, with a concentration in American Literature.
Don’t get too carried away with this section. Just add a couple items and move on.
Adding your education
If you graduated university or college, this part is easy: Add the institutions you received degrees from. If you have a ton of degrees, crack your knuckles and get going! If on the other hand, you attended a school for a few years but didn’t graduate, you may choose to add the school but omit the degree since you didn’t receive one. If you attended a bunch of schools but never graduated, you might consider adding the school where you spent the most time (but if you don’t feel an affiliation to the school, I suggest you just skip this section all together). If you didn’t graduate, but you decided to add a school because you spent time there and forged relationships, make sure to read the section “Reordering education” later in this chapter because it shows how to stop the school from showing up at the top of your profile.
Here’s how to add a school:
- Open your LinkedIn profile.
- If you have the Education area already added to your profile, simply scroll to it and expand it by clicking the down arrow on the right side.
- Click the pencil (edit) icon to enter into edit mode, as shown in Figure 13-1, then go to Step 7.
If you don’t have the Education area added to your profile yet, add it by clicking “Add new profile section” located in your intro card.
A drop-down list appears with additional profile sections you can add to your profile.
- Expand the Background section by clicking the down arrow.
- Click the plus ( + ) sign next to Education to add it to your profile.
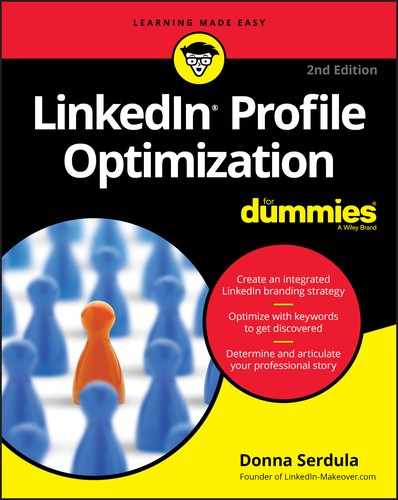
In the School field, start to type the name of your school.
A drop-down list with schools matching the characters you type appears.
Select the school name from the list.
By selecting your school from the drop-down list, the school’s logo appears alongside your education section, the LinkedIn university page for your school is dynamically linked to your profile, and you are included in the alumni data. LinkedIn also may show you other alumni who graduated with you in the People You May Know page, helping you create an even more robust LinkedIn network.
In the degree field, start to type the degree you earned and select the degree from the drop-down list that appears.
If you don’t see a degree that matches your degree, continue to type your degree and do not choose from the drop-down list.
Under Field of Study, start to type your major and choose your major from the drop-down list LinkedIn provides.
If your major doesn’t match what LinkedIn suggests, add your own major by simply not selecting LinkedIn’s suggestions.
In the Grade field, enter your GPA or whether you graduated Cum Laude, Summa Cum Laude, or Magna Cum Laude.
If you don’t have a respectable GPA or can’t remember back that far, don’t worry. Leave this field blank. Having written thousands of profiles, I have added information to the Grade field only a few times.
- In the Activities and Societies field, enter the clubs and activities you participated in during your time at that school.
Under Time period, choose the year you started to attend the school and the year you left the school in the drop-down lists.
For the end date, choose the date you graduated or the year you expect to graduate.
- In the Description field, enter your educational background and experiences that will impress your reader (see Figure 13-1).
- Click Save.
Adding multimedia
Add documents, photos, links, videos, and presentations to your entries in the Education section. Are you proud of your thesis? Upload it to your profile! Is there a picture you’d like to include? Upload it to your profile!
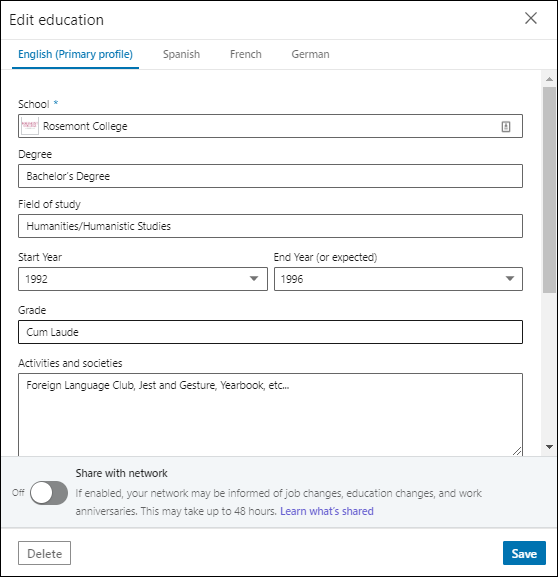
FIGURE 13-1: Adding educational background and experience information to the Education section.
Follow these steps to add multimedia to your education entries:
Within the Education section of your profile, select the appropriate button below Media: Upload or Link.
You can upload or link to documents in the following formats: .pdf, .doc, .docx, or .rtf.
You can upload or link to photos in the following formats: .png, .gif, .jpg, or .jpeg.
You can upload or link to presentations in the following formats: .pdf, .ppt, .pps, .pptx, .ppsx, .pot, or .potx.
Click Upload to display the media on your profile or click Link to type in a website URL to link to content that exists on another site, and then click Continue (see Figure 13-2).
If you chose to upload a file, select the file from your desktop. A picture of your content displays. LinkedIn sometimes automatically populates the Title and Description fields if it can surmise it from the information available.
- If the prepopulated Title and Descriptions fields aren’t correct, click and edit them to your liking.
- Click Apply.
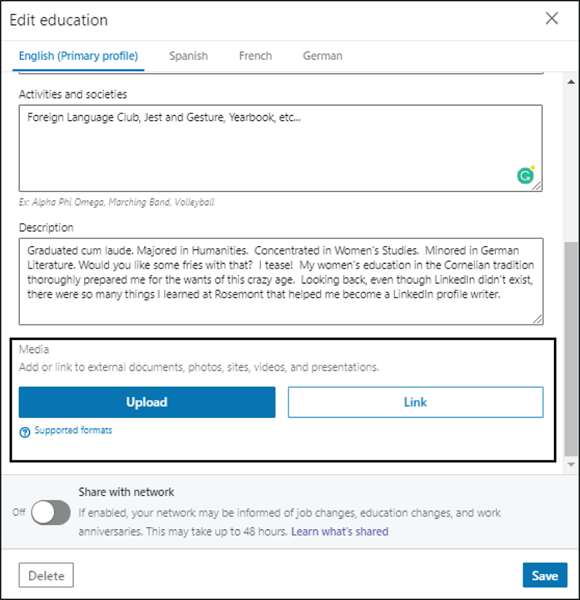
FIGURE 13-2: Adding multimedia work samples to your education.
Reordering education
If you went to multiple schools and want to list them in a specific order, it’s easy to reorder them. You are not constrained in any way when reordering your schools. You can have the most current at the top or the first school you attended at the top. The schools in between also do not need to be in any order. You have full control over how you want your education displayed. It’s important to note that the first school you list in the Education section is the school that shows at the top of your profile. As soon as you reorder, the top school magically appears at the top of your profile’s intro card.
Here’s how to reorder schools:
- Hover your mouse pointer over the education entry you’d like to rearrange.
- Click and hold the Reorder icon (four horizontal lines) that appears to the right of your school name, as shown in Figure 13-3.
- Drag the school into the desired position.

FIGURE 13-3: Reordering the schools in your Education section.
Changing the school displayed in your intro card
At the top of your LinkedIn profile is your intro card. I talk all about the intro card in Chapter 5. In the upper-right corner of your intro card, the only school or the school you listed first in the Education section of your profile displays for all to see. If you added a school that you didn’t receive a degree from, you may choose to omit it from your intro card.
A client of mine took a leadership program at Columbia University. He didn’t receive a degree, but he received a certificate of completion. He could have added it as a certification in the Licenses and Certifications section, but he wanted to add more information to the entry than what the that section allows, so we decided to add it to the Education section. Suddenly at the top of his profile it stated “Columbia University” and it looked like he was a graduate of this Ivy League school. As much as his mother loved how it looked, we both felt it wasn’t ethical. The fix I suggested was simply removing it from the top of his profile.
Here’s how to change the way schools are displayed on your intro card:
- Open your LinkedIn profile.
- Within the intro card section of your profile, click the pencil (edit) icon to get into edit mode.
- To remove education from showing on your intro card, remove the checkmark from “Show education in my intro,” as shown in Figure 13-4.

FIGURE 13-4: Changing how education is displayed on your profile’s intro card.
- To change the school that displays, click the Education drop-down menu to choose a different school you have added to your profile’s Education section.
- Click Save.
Listing Licenses and Certifications
Certain professions demand certain skill sets and certifications. Increase your marketability by spotlighting your professional development. Add the certifications, licensures, and clearances you’ve earned throughout your career to your profile.
A common issue I see, however, is that many people enter certifications in the Education section of their profiles. At one time, the LinkedIn profile didn’t contain these extra sections, and the only way to record a certification was to add it as part of the Education section. Remember, the Education section is where you enter degrees received. If you received a certificate, enter it in the Certifications section. There are always exceptions to the rule, though. In the preceding section, I mention how a client of mine earned a Certificate of Completion for an executive leadership program and wanted to add more context around this program, so we added it under Education. This also allowed him to add the courses he took and associate them with the program because it was added as Education.
Here’s how to enter a certification to your profile:
- Open your LinkedIn profile.
- If you have the Certifications area already added to your profile, simply scroll to it and expand it by clicking the down arrow on the right side.
- Click the pencil (edit) icon to enter into edit mode, then go to Step 7.
If you don’t have the Certifications area added to your profile yet, add it by clicking “Add new profile section” located in your intro card.
A drop-down list appears with additional profile sections you can add to your profile.
- Expand the Background section by clicking the down arrow.
- Scroll through the list until you get to Licenses & Certifications and click the plus ( + ) sign to add it to your profile.
- Type the name of the Certification in the Name field.
Enter the Issuing Organization in the next field.
The Issuing Organization is the trusted organization or company that is guaranteeing your knowledge or ability.
Under Issue Date, choose the month and year from the drop-down lists.
If the certification has no end date, place a check mark next to “This credential does not expire.”
- Enter the certification number/ID in the Credential ID field.
- In the Credential URL field, add the website address where more information on this certification can be found.
Click the Save button.
See Figure 13-5 for an example of adding a certificate.
FIGURE 13-5: Adding a certificate to the Licenses & Certifications section.
Adding Volunteer Experiences
You are more than just a corporate creature. There are causes that you care about and support after work hours. Showing your philanthropic and humanitarian interests proves you are a well-rounded individual, which readers of your profile may find interesting and relatable.
Do you belong to a service organization such as Rotary, Kiwanis, Knights of Columbus, Shriners, or Lions Club?
Do you donate to the Salvation Army, Toys for Tots, Doctors Without Borders, UNICEF, or St Jude Children’s Hospital?
Do you take part in the Susan B. Komen Race for a Cure or have you donated time to a charitable organization?
The Volunteer section is where you add these items to your LinkedIn profile. These Volunteer experiences allow you to showcase the breadth of your work. You can add the name of the organization, your role, the cause it supports, dates of your tenure, and a description.
Here’s how to add a volunteer experience to your profile:
- Open your LinkedIn profile.
- If you have the Volunteer Experience area already added to your profile, simply scroll to it and expand it by clicking the down arrow on the right side.
- Click the pencil (edit) icon to enter into edit mode, then go to Step 7.
If you don’t have the Volunteer Experience area added to your profile yet, add it by clicking “Add new profile section” located in your intro card.
A drop-down list appears with additional profile sections you can add to your profile.
- Expand the Background section by clicking the down arrow.
- Scroll through the list until you get to Volunteer Experience and click the plus ( + ) sign to add it to your profile.
- Type the name of the Organization in the Organization field.
Click Role and add your role or the type of volunteer work you do.
This field shows at the top of the individual volunteer experience; it should spotlight either your role or what you are doing specifically. Here are some roles that might work for you: Angel, Backer, Contributor, Supporter, Patron, Donor, Grantor, Giver, Sponsor, Subscriber.
Click the Cause drop-down list and choose the applicable cause from the list.
If nothing from the list correctly identifies this volunteer experience, choose the top option that looks like a minus sign to leave this field blank.
In the Date fields, choose the month and year from the drop-down lists.
LinkedIn defaults to present with no end date. If this Volunteer Experience is no longer current, enter an end date by deselecting I Currently Volunteer Here.
In the Description field, enter information about the volunteer experience.
 It’s better to add context around your experiences and the easiest way to do it is to visit the organization’s About Us page on its website.
Click the Save button.
See Figure 13-6 for an example of a completed Volunteer section.

FIGURE 13-6: A completed Volunteer section.
Citing Your Accomplishments
LinkedIn has an entire section devoted to your accomplishments. LinkedIn is rather liberal in what it considers an accomplishment. Were you raised bilingual? Accomplishment! Do you pay dues to belong to an association? Accomplishment! Rather than get into the nitty-gritty of what is truly an accomplishment, this profile section is important and shouldn’t be ignored. When a person reads your profile, the further they scroll, the more qualified you become as a prospect. If they get down to your Accomplishments section, that means they are really interested in learning about you. Make sure you give them some good things to read about.
The Accomplishments section includes the following categories:
- Publications
- Patents
- Courses
- Projects
- Honors & Awards
- Test Scores
- Languages
- Organizations
The order the accomplishments appear is by how many items you have within each bucket, most to least. Unfortunately, there’s no way to reorder or rearrange accomplishments.
Looking at the different buckets, there are some that are quite pie in the sky for most people: Patents, Publications, and Languages. But don’t let those deter you! The other buckets are far more achievable, and most likely you already have things that fit. Keep reading to find out how to beef up this section with things you already have accomplished!
Showcasing organizations
The Organizations area of the Accomplishments section of your LinkedIn profile is the place to record the real-world associations and clubs to which you belong. Listing professional membership organizations on your profile proves you are an integral force within your community and an involved member within your industry.
I often see LinkedIn members add LinkedIn Groups or their volunteer experience to the Organizations area. This is a mistake. LinkedIn Groups are forums within LinkedIn focused on a specific topic. Within a LinkedIn Group, members post and comment on discussions. It’s a great way to come together with like-minded individuals for discussions around shared interests. I discuss Groups in Chapter 14. However, you do not want to list your LinkedIn Groups within the Organizations area, as LinkedIn Groups automatically appear at the bottom of your profile.
Another issue is listing Volunteer Experiences in the Organizations section. The Volunteer Experience section of LinkedIn is where you list those humanitarian organizations to which you donate money or time. Not sure where to add a particular organization? To determine which organization goes into which section, ask yourself the question, “Is this organization’s goal philanthropy, and am I donating my time or money?” If so, enter it into the Volunteering Experience section, which I covered earlier in this chapter in “Adding Volunteer Experiences.”
To determine the organizations to list in your profile, answer the following questions:
- Do you belong to any industry organizations?
- Do you belong to any user groups?
- Are you a member of a networking group?
- Do you pay dues to any association?
- Are you a part of a local government organization?
- Do you sit on a board of directors?
Make sure you include organizations that forward you professionally and are interesting to your target audience. It’s okay to leave out organizations that are of a personal nature or may alienate your target audience.
 Everyone has causes that move them but you must be smart about what you list on your profile. You may love animals but showing your support of People for the Ethical Treatment of Animals (PETA) may alienate some people. Likewise, listing your National Rifle Association (NRA) membership may upset others. It’s certainly fine to stand behind your convictions whatever end of the spectrum they might be on — just realize that not everyone will agree and opportunity might be redacted because of what you list on your profile. You can’t please everyone, so be strategic and think through the pros and cons; consider the avatar of your target audience and what will resonate or deter them prior to adding organizations to your profile.
To add professional membership organizations to the Organizations area of your LinkedIn profile, follow these steps:
- Open your LinkedIn profile.
- If you have the Organizations area already added to your profile, simply scroll to it and expand it by clicking the down arrow on the right side.
- Click the pencil (edit) icon to enter into edit mode, then go to Step 7.
If you don’t have the Organizations section added to your profile yet, add it by clicking “Add new profile section” located in your intro card.
A drop-down list appears with additional profile sections you can add to your profile (see Figure 13-7).

FIGURE 13-7: Add additional sections to your profile.
- Expand the Accomplishments section by clicking the down arrow.
- Scroll through the list until you get to Organizations and click the plus ( + ) sign to add it to your profile.
- In the Name field, type the name of the organization, association, club, or entity.
In the Position Held field, type the position you held.
If you didn’t have an official title, such as President or Treasurer, you can use Member, Key Contributor, Team Member, Patron, Supporter, Sponsor, Subscriber, Angel, or Backer.
In the Associated with field, select the current or prior experience to connect this organization to a particular role.
The drop-down list is populated by your current and previous experiences. If you are part of this organization not because of a current or past role, feel free to skip this field. At one time, by linking the organization to a position, the organization would show up in the Organizations section and directly under the position it is paired with. Currently, although you can link an Organization with an Experience, nothing visibly happens that a reader would see that they are linked. Perhaps in the future this field will get removed or they will start creating a visible link.
In the Start Date fields, choose the month and year you started your membership from the drop-down lists.
LinkedIn defaults to no end date. If this organization is no longer current, enter an end date by deselecting Membership Ongoing.
- In the Description field, enter information about the organization.
Click the Save button.
See Figure 13-8 for an example of an organization added to the Organizations section.

FIGURE 13-8: Adding an organization membership.
Uncovering your honors and awards
The Honors & Awards section of your LinkedIn profile is the area to enter any honors and awards you earned throughout your career. Working with clients, I find that the Honors & Awards section is one of the hardest areas to fill out. Many people don’t keep a list of the honors and awards they have received, and when it finally comes time to list them, they simply can’t remember.
Here’s something to remember: If you don’t record these honors, no one else will. You never know when it might come down to you and another highly lauded individual for a job, promotion, or project. You don’t want to miss out simply because they recorded and touted their accomplishments and you didn’t.
To determine your honors and awards, think in terms of certificates, plaques, and trophies you received. Open up your closet and check the top shelf — are any of these items collecting dust in a box? Jot down on a piece of paper these awards. Once you have identified any certificates, plaques, or trophies, let’s dig deeper. Honors and awards don’t have to be tangible items.
Here are some questions to help you remember other types of honors and awards you may have received:
- Were you ever quoted in a newspaper article?
- Were you ever profiled in a magazine?
- Did you ever give a speech or deliver a keynote address?
- Did you ever sit on a panel or act as a moderator?
- Were you ever asked to work on a special project?
- Were you chosen to provide training or mentoring to colleagues?
- Were you ever appointed to a committee?
Choosing the right honors and awards
Are your brain juices pumping now? Before you start adding all these amazing honors and awards to your profile, you need to take a step back and decide what to add and what not to include.
Look over the list of honors and awards you compiled. Did you list things that occurred over 20 years ago? In the professional world, it’s all about what you did lately. With that said, once an Oscar winner, always an Oscar winner. The older awards that are for amazing accomplishments, you may decide to keep. However, if the accomplishments were great at the time but don’t point you in the direction of your desired career future or impress your greatness upon your target audience, ditch ’em!
I can’t tell you how many top-level executives have asked me whether to include their Eagle Scout award. Although this award is from childhood, it does showcase perseverance, and I tell them to include it on their profiles. Besides, there are a lot of former Boy Scouts in high places, and the Eagle Scout award impresses them.
Did you earn your black belt in Karate? You might decide to list it under Honors & Awards, especially if it is a recent achievement. It’s up to you, but always keep your target audience in mind and consider what they might deem as an impressive professional accomplishment.
Ultimately, it comes down to being smart. If you only have awards that are over five years old, include them. As you receive new awards, start deleting the older ones. Also, if you earned President’s Club or another top sales award five years in a row, you don’t need to list it five times. Condense it into one entry and state it is for multiple years.
Don’t go overboard. It’s better to have three to five high-level honors listed instead of 15 to 20 so-so awards.
Creating a strong description
Once you have your final, master list of honors and awards, you now want to do some research to create an optimized description that provides context around the award and showcases your contribution as award worthy.
Start with a boilerplate explanation of the organization that presented the honor or award. Who are they and what do they do? Then describe the honor or award and what you did specifically to get the award. You want to aim for a couple of sentences, not a full-blown novel.
The best way to get this information is to consult the Internet. Run searches on the organization and check its website’s About Us page. Then search for the honor or award. Even if it’s not the exact award you received, you may find wording that is close to what you need. Rather than plagiarizing, use this content as a springboard and tweak it to make it work for you.
Now that you have descriptions, it’s time to enter these honors and awards into your LinkedIn profile. Here’s how:
- Open your LinkedIn profile.
- If you have the Honors & Awards area already added to your profile, simply scroll to it and expand it by clicking the down arrow on the right side.
- Click the pencil (edit) icon to enter into edit mode, then go to Step 7.
If you don’t have the Honors & Awards area added to your profile yet, add it by clicking “Add new profile section” located in your intro card.
A drop-down list appears with additional profile sections you can add to your profile.
- Expand the Accomplishments section by clicking the down arrow.
- Scroll through the list until you get to Honors & Awards and click the plus ( + ) sign to add it to your profile.
- In the Title field, enter the name of your honor or award.
In the Associated with field, select the current or prior experience to connect the honor or award to a particular role.
The drop-down list is populated by your current and previous experiences.
- In the Issuer field, enter the organization or person or group that bestowed you with the honor or award.
In the Start Date field, choose the month and year you received the honor or award from the drop-down lists.
If this is an honor and award that spans multiple years, or a date simply doesn’t pertain, feel free to leave the date field blank.
In the Description field, enter information about the honor or award.
Remember, it’s better to add context around your honors and awards, and the easiest way to do that is to search the web for already created content that you can tweak.
- Click the Save button.
Keeping your honors and awards updated
If you take anything away from this chapter, I want it to be this: Honors and awards aren’t bestowed on just anyone. Honors and awards are typically given to people who have asked for recognition.
It’s time for you to start strategically identifying honors and awards and doing what it takes to obtain them. Make sure it’s known that you are interested and worthy. Keep an eye out for initiatives where you can volunteer to be seen. Honors and awards prove to your audience that you have what it takes to be a success and deserve recognition.
And as you begin to accumulate more honors and awards in your career, revisit this section on your LinkedIn profile. Remove older awards and add new ones. Always include a description. Don’t be shy and don’t dismiss this section. You are worthy of recognition.
By adding these awards, you aren’t bragging; you are merely reporting on what was presented to you. By adding your honors, regardless of how silly they may seem to you, potential employers or customers take notice. No one else will toot your horn, so it’s important that you do it!
The three P’s: Projects, publications, and patents
There are times when you go above and beyond within your professional life. In these instances, you don’t want to group these extraordinary accomplishments with less ordinary accomplishments. Projects, publications, and patents deserve their own spotlighted area on your LinkedIn profile. Keep reading to see what is considered worthy of the spotlight and how to add these “three P’s” to your profile.
Adding projects
The Projects area of the Accomplishments section is the perfect place to spotlight your involvement in company-driven initiatives. Long-range, high-yield projects that deserve a bigger spotlight than a simple bullet in your Experience section belong in the Projects area. Choose projects that make you proud and show that you helped move the corporate needle, but most of all, choose projects that will impress your target reader.
This area of the Accomplishments section also allows you to add a URL that links to an external website to add even more context to the project. Another great part of this section is that you can pull in other team members and link them to the project to show the full range of contribution.
To add projects to the Projects area of your LinkedIn profile, follow these steps:
- Open your LinkedIn profile.
- If you have the Projects area already added to your profile, simply scroll to it and expand it by clicking the down arrow on the right side.
- Click the pencil (edit) icon to enter into edit mode, then go to Step 7.
If you don’t have the Projects area added to your profile yet, add it by clicking “Add new profile section” located in your intro card.
A drop-down list appears with additional profile sections you can add to your profile.
- Expand the Accomplishments section by clicking the down arrow.
- Scroll through the list until you get to Projects and click the plus ( + ) sign to add it to your profile.
- In the Project name field, enter the name of the project.
In the Date field, choose the month and year you worked on the project from the drop-down lists.
If this project spanned a period of time, click Switch to Date Range to add an end date.
Add another contributor by clicking the “Add creator” link and start typing a name.
If the team member is one of your first-degree connections on LinkedIn, his or her name appears in a drop-down list.
Select the creator(s) you wish to add to the project from the drop-down list.
You can add contributors even if they aren’t on LinkedIn, but they will not have profiles dynamically linked within the project.
Under Creator, select the current or prior experience to connect the project to a particular role.
The drop-down list is populated by your current and previous experiences. By linking the project to a position, the project shows up in the Projects section and directly under the position it is paired with.
In the Project URL field, add the website where more information on this project can be found.
If this project doesn’t have a web presence, skip this section.
- In the Description field, add context around your project so that your reader has an idea of the extent of your success and why this project was singled out.
Click the Save button.
See Figure 13-9 for an example of adding a project to the Projects area.
Just as you can add a person to a project you created, others can add you to a project they created. If you aren’t happy with your inclusion on a project on someone else’s profile, you can’t remove it yourself. You must reach out to the person and ask him or her to remove you from the project.
Adding publications
The Publications section of LinkedIn is the place for writers to add published work. This section is a great place to spotlight your writing ability and showcase your knowledge.
Do not think that this section is only for the books you wrote. If you wrote an article that was published or broadcast in some manner, add it to this section and share it with the readers of your LinkedIn profile. Cite magazine articles, newsletter pieces, guest blog articles, and more. Here’s how to add your publication history to your profile:
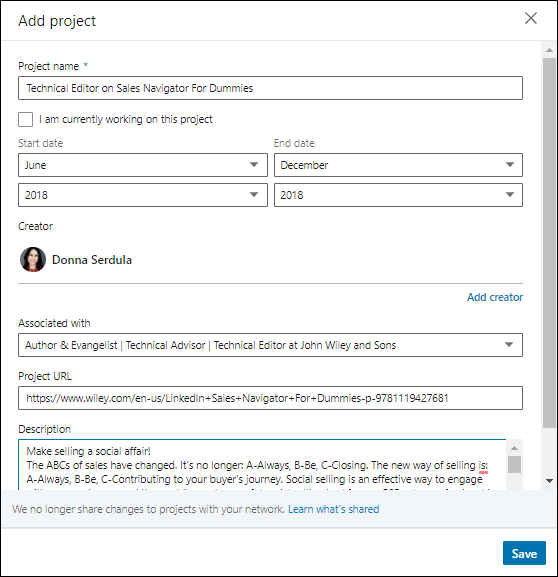
FIGURE 13-9: Adding a project to the Projects area.
- Open your LinkedIn profile.
- If you have the Publications area already added to your profile, simply scroll to it and expand it by clicking the down arrow on the right side.
- Click the pencil (edit) icon to enter into edit mode, then go to Step 7.
If you don’t have the Publications area added to your profile yet, add it by clicking “Add new profile section” located in your intro card.
A drop-down list appears with additional profile sections you can add to your profile.
- Expand the Accomplishments section by clicking the down arrow.
- Scroll through the list until you get to Publications and click the plus ( + ) sign to add it to your profile.
- In the Title field, enter the name of the publication.
- In the Publication/Publisher field, enter the name of the publication if it’s a magazine or periodical, or the name of the publisher if it is a book.
- In the Publication Date field, choose the month, day, and year the text was published from the drop-down lists.
In the Publication URL field, add the website address where more information on this publication can be found.
If your publication is a book, you might consider adding a link to the book on Amazon. If it is an article you wrote, add a link to the article. If this publication doesn’t have a web presence, skip this section.
In the Author(s) field, add the name of a first-degree LinkedIn connection to tie them to the publication, if applicable.
If you are the sole author, skip this step.
When adding additional authors, they have the opportunity to add the publication to their profiles (or not). The authors’ names will not be linked to the publication, and the publication will not show up on the authors’ profiles, until they approve.Your name is always listed first when you add a publication to your profile. To rearrange the additional author’s name, simply click a name and drag it into the desired order within edit mode.
If you remove the publication after the additional author added it to his or her profile, the publication will remain on that author’s profile.
In the Description field, provide some detail around the publication.
This is a great place to add a boilerplate description of the books and/or articles you’ve published, and you can even provide a brief excerpt. LinkedIn allows a maximum length of 2,000 characters, which is approximately 300 words — just enough room to provide context, but not enough room to write a novel.
Click the Save button.
See Figure 13-10 for an example of adding a book to the Publications section.
Adding patents
A patent is a professional accomplishment and should be shared on your LinkedIn profile. If you are an inventor with patents to your name, the Patents area is the place to showcase your work.
Here’s how to add a patent to the Accomplishments section:
- Open your LinkedIn profile.
- If you have the Patents area already added to your profile, simply scroll to it and expand it by clicking the down arrow on the right side.
- Click the pencil (edit) icon to enter into edit mode, then go to Step 7.

FIGURE 13-10: Adding a book to the Publications section.
If you don’t have the Patents area added to your profile yet, add it by clicking “Add new profile section” located in your intro card.
A drop-down list appears with additional profile sections you can add to your profile.
- Expand the Accomplishments section by clicking the down arrow.
- Scroll through the list until you get to Patents and click the plus ( + ) sign to add it to your profile.
- In the Patent Title field, enter the name of the patent.
- In the Patent Office drop-down list, select the appropriate Patent Office.
- Type in the Patent/Application Number.
Add any additional inventors by clicking the “Add inventor” link and typing a name.
To choose a name from a drop-down list, additional inventors must be first-degree connections on LinkedIn. If they aren’t first-degree connections, you can still add their names, but they won’t have a profile dynamically linked.
Your name is always listed first when you add a patent to your profile. To rearrange the additional inventor names simply, click a name and drag it into the desired order within edit mode. If you remove the patent after additional inventors added it to their profiles, the patent will remain on their profiles.
- Under Status, select Patent Issued or Patent Pending.
- In the Issue Date field, choose the month, day, and year from the drop-down lists.
- In the Patent URL field, add the patent’s URL where more information on this patent can be found.
In the Description field, provide some detail around the patent.
This is a great place to add more description about your patent, and you can even provide a brief sample from the patent itself.
Click the Save button.
See Figure 13-11 for an example of adding a patent.

FIGURE 13-11: Adding a patent to the Patents section.
Adding courses
If you take a one-off course that doesn’t deliver a certificate nor is part of a much larger degree program, the Courses section of LinkedIn is for you. In addition, more and more students are joining LinkedIn, realizing the huge opportunities for networking and job search. The Courses section is where you spotlight recent courses that deserve to be highlighted outside of the degree you are working toward.
Here’s how to add a course to your LinkedIn profile:
- Open your LinkedIn profile.
- If you have the Courses area already added to your profile, simply scroll to it and expand it by clicking the down arrow on the right side.
- Click the pencil (edit) icon to enter into edit mode, then go to Step 7.
If you don’t have the Courses area added to your profile yet, add it by clicking “Add new profile section” located in your intro card.
A drop-down list appears with additional profile sections you can add to your profile.
- Expand the Accomplishments section by clicking the down arrow.
- Scroll through the list until you get to Courses and click the plus ( + ) sign to add it to your profile.
- In the Course Name field, type the name of the course.
- Enter the course number in the Number field.
If this course was taken for a position you held, select that position from the drop-down list under the Associated With section.
By linking to a past or present work experience, readers can see the courses you took for that position, thus providing even more robustness to your profile and work history.
Click the Save button.
See Figure 13-12 for an example of adding a course to the Courses section.

FIGURE 13-12: Adding a course to the Courses section.
Adding the languages you speak
Sprechen sie Deutsch? Ja, me neither. But if you do speak other languages, add them to your LinkedIn profile. Simply choose the language(s) from the drop-down list and then indicate your level of proficiency.
Choose from:
- Elementary proficiency
- Limited working proficiency
- Professional working proficiency
- Full professional proficiency
- Native or bilingual proficiency
If you add a foreign language to this section, be sure to also add your native language to the list of languages you speak. You don’t want potential alliances to dismiss you because they assume you hired a translator to create your LinkedIn profile and don’t speak their language.
Creating a Profile in Another Language
For those global business people who work throughout the world, you can make multiple versions of your profile in different languages. This way, the person viewing your profile sees your profile in the language that matches his or her primary language. If this person is using LinkedIn in a language that doesn’t match any of your languages, he or she sees your profile in your primary language.
When you initially created your profile, the language you chose becomes your primary language. Once your primary language is chosen, it can’t be changed. However, you can add as many secondary language profiles as you like, provided there are languages available. (Sorry, Klingon is not supported.)
LinkedIn doesn’t automatically translate your profile; you are responsible for editing your profile and adding the translated text yourself.
To create a profile in another language, follow these steps:
- Open your LinkedIn profile.
Click “Add profile in another language” located in the right sidebar.
A text box appears, as shown in Figure 13-13. If you have already added a profile in another language, you will see that this area states your primary language.
- Choose a language from the drop-down list.
- If your first name and last name are different in the new language, update your name in the First Name and Last Name fields.
- In the Headline field, update your headline in the new language.
Click the Create Profile button to go to the Edit Profile page of your new language profile.
You are now at the new secondary language profile. Your original profile sections have been transferred to the new secondary language profile with the titles, company names, and recommendations intact. When you click into sections, the descriptions remain; you must delete the content and replace it with your translation. Once the original primary language is deleted, LinkedIn provides your primary language text below the fields to aid you in translating.
- Refer back to the chapters of this book to optimize your profile in your new language.

FIGURE 13-13: Creating a profile in another language.
In the next chapter, I show you how to truly trick out your profile by following group, companies, and Influencers. I also take a giant dive into Groups, looking at how they work and how to better leverage them.