
Appendix B. Setting up a development environment
There are many reasons to start with a fresh slate when working on a new project. The following list shows a few of the more relevant ones with respect to ML project work:
- Dependency management is easier with a clean environment.
- Isolation of temporary files, logs, and artifacts is simpler.
- Scripted environment creation makes porting to production easier.
- Installation of libraries is less complex with fewer dependency collisions.
While many options exist for creating isolable environments for development of new projects, this appendix provides guidance on using Docker along with Conda’s package management suite of tools, just as the companion repository to this book does.
B.1 The case for a clean experimentation environment
A major struggle that data scientists have once they’ve been building prototypes on their local computers for long enough is that older projects simply can’t run anymore in the updated environments that subsequent projects have necessitated. As libraries evolve, the DSs upgrade library versions and add new packages with updated dependencies on other packages; dependencies change within this truly massive ecosystem comprising the large web of interconnected APIs
This incredibly complex and frustrating concept of maintaining compatibility among libraries is known as dependency hell, a moniker that is well-earned. Figure B.1 shows a typical scenario that happens with dependency struggles.
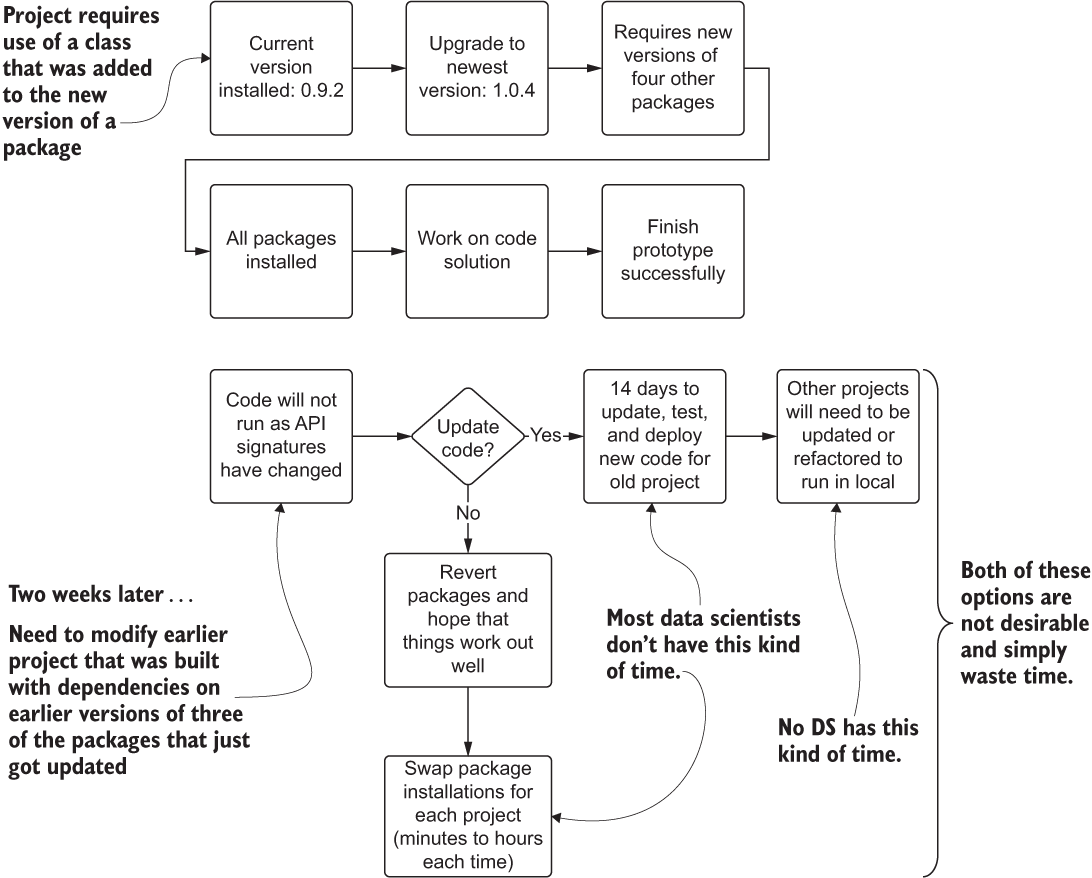
Figure B.1 Dependency hell in a common Python development environment. Package management struggles can waste a great deal of time.
As you can see, the options for resolving library conflicts on a single local environment are quite dire. On one hand, you could be forced to refactor code bases and train runtime environments, both actions being untenable as the number of projects grows at a company. Alternatively, the DS team members would have to waste countless hours modifying their installed packages (reverting or upgrading) each time that they wanted to work on a new project. It’s simply not a scalable solution.
Regardless of the operating system that you’re running, if you have Python already installed on your machine, you’re going to have some deep dependencies among the packages that are also installed. Some of the experimentation and testing will require library installations that could break either previously developed projects or utility applications that are available to you on the command line. Not to mention that each team member’s computer likely has slight different versions of each of these critical packages, resulting in reproducibility issues if those team members run one another’s code.
B.2 Containers to deal with dependency hell
This frustrating and time-wasting endeavor of making everything work together at all times has multiple solutions. One of the most popular is the prepackaged builds that are graciously provided as open source distributions (under a New BSD License) to the ML community by the company Anaconda. These tested and validated collections of packages are guaranteed to work well with one another, saving you from the arduous task of ensuring that behavior for yourself. There are three primary ways of creating a new, pristine environment with an Anaconda build of Python:
- Conda environment manager—Command-line tool that can create isolated Python environments locally from images that will not interfere with system Python installations
- Anaconda Navigator—GUI that allows for one-click setup of many popular development tools using isolated Conda environments on a local machine
- Docker Container deployment of a Conda environment for use in a virtual machine (VM)—Portable container definition that will create an isolated Python environment with the Conda package build that can run either on a local VM or in a cloud-based VM
Figure B.2 shows the first two approaches, which are applicable to ML experimentation in Python and use purely open source (free) solutions to isolate the runtime environments. The top portion can be done via the command-line interface (CLI) or through the Anaconda Navigator GUI.

Figure B.2 Conda environment management vs. container service environment management. Both are good choices for streamlining experimentation, development, and production.
These approaches solve the problem of having version conflicts within different project requirements, allowing for a massive savings in time and effort for the frustrating work that would otherwise be required to manage all of the packages for ML. For further explanation of what Docker is and why it is important, see the following sidebar.
B.3 Creating a container-based pristine environment for experimentation
In this section, we’re going to define and initiate a basic isolated runtime environment by using Docker. I’m rather partial to Anaconda for experimentation that doesn’t require a paid service, so we’re going to be using one of its preconfigured Docker containers that has a bootstrapped environment for Python 3 and the vast majority of core ML libraries already installed (well, at least the ones we’ll need for this book, at any rate).
To ensure that we have the image on our system, we’re going to run via the command line dockerpullcontinuumio/anaconda3. This command will fetch the prebuilt Docker container from Docker Hub, a repository of Docker images with both free and restricted images. The container includes a Linux operating system, the latest version of the Anaconda Python stack, and all of the configurations already completed for having a fully operable development environment for most DS work tasks with nearly no additional action required by the user.
NOTE It’s always advisable, particularly through the experimentation phase, to have an isolated environment where we can, as the kids say, “go absolutely nuts” with various packages, versions of those packages, and configurations that we might not want to have contaminating our computer’s general environment. There is no more exquisite pain than realizing that your other project that you’ve been working on is now throwing dozens of exceptions because you updated to a newer version of NumPy.
To get a basic ML-enabled environment (a runnable VM image) built for us to perform the first phases of testing and research for a project, we can run the following (after ensuring that we install Docker, of course).
Listing B.1 Docker run command to create a basic ML environment
docker run -i --name=airlineForecastExperiments           ❶
-v Users/benwilson/Book/notebooks:/opt/notebooks          ❷
-t -p 8888:8888                                           ❸
continuumio/anaconda3                                     ❹
/bin/bash  -c "/opt/conda/bin/conda install jupyter
-y --quiet && mkdir -p  /opt/notebooks &&
/opt/conda/bin/jupyter notebook --notebook-dir=/opt/notebooks
--ip='*' --port=8888 --no-browser --allow-root"
❶ Feel free to name the container anything you’d like. If you omit this configuration, Docker will choose a fun name for you that makes it impossible to remember what is in the container.
❷ Absolute path to local filesystem (you hopefully don’t have a root users directory of benwilson)—change this.
❸ This is the image that we pulled from Docker Hub with the “docker pull continuumio/anaconda3” command.
❹ Bash commands to allow us to install Jupyter and set it up to function with port forwarding so we can open up a local browser window and interface with the container’s environment
Some slight modifications to this script—in particular, overriding the mount location (the first portion after the -v option that precedes the colon)—and a paste into the command line will have the container up and running. After the packages are collected and the image is built, the command line will give you a hint (a local host reference of http://127.0.0.7:8888/?token=...) that you can paste into your web browser to bring up Jupyter so you can start writing code in a notebook.
NOTE If you have a development environment hosted in the cloud somewhere that makes it remarkably easy for someone else to create this pristine environment for you, for a nominal fee, feel free to ignore this. This is for all my sisters and brothers of the maths who are on the laptop struggle bus with ML.