When a user logs in to Dynamics 365 Business Central, they are presented with a page that shows information and actions tailored to their role inside the company. This page is called a Role Center, and it's an integral part of the role-tailored experience of the application.
Dynamics 365 Business Central offers about 20 Role Centers out of the box (as standard) that you can extend and customize, and you can create new Role Centers.
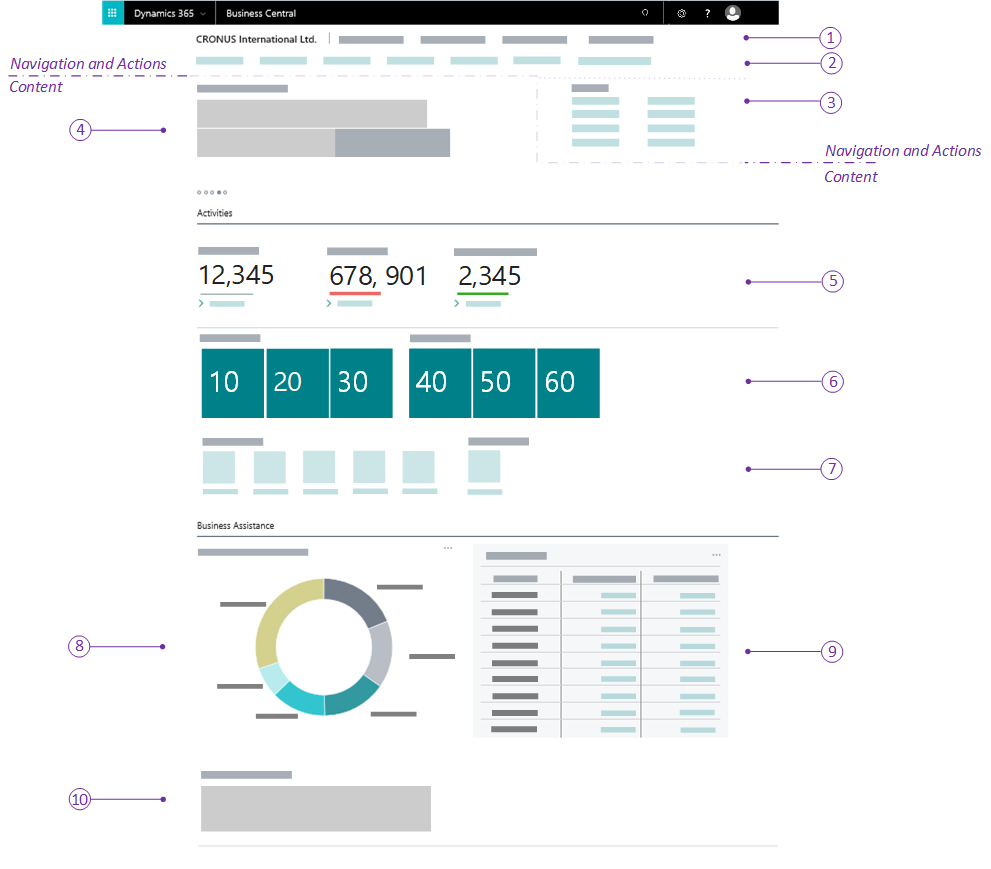
A Role Center is a page that has the PageType property set to RoleCenter. The page structure is as follows:

In the structure diagram, the sections are as follows:
- Section 1 is the Navigation Menu area (one or more items that, when clicked, show other sub-menus). This is used to provide access to the relevant entities for the role to which this Role Center page is assigned.
- Section 2 is the Navigation Bar area, which displays a list of links to other pages that will be opened in the Content area. This is normally used to add links to the user's most useful entities for their business role.
- Section 3 is the Action area, used to add links for running the most important tasks for this role (links to pages, reports, or codeunits).
- Section 4 is the Headline area, used to display dynamically generated information about the business. We'll see more details about this area in the Customizing the Headline section of this chapter.
- Section 5 is the Wide Cue area, a set of cues that display numerical values about the business. This area is created with a cuegroup control on a page with PageType = CardPart and with the Layout property set to wide.
- Section 6 is the Data Cue area, used to provide a visual representation of aggregated business data (such as KPIs). This part is created with a cuegroup control on a page with PageType = CardPart.
- Section 7 is the Action Cue area, which shows tiles that link to some business tasks. This area is created with a cuegroup control on a page with PageType = CardPart.
- Section 8 is the Chart area, used to show information as charts (custom business chart control add-ins or embedded Power BI reports).
- Section 9 is the CardPart or ListPart page area, used to display data from the application with a card or a list layout.
- Section 10 is the Control add-in area, used for displaying custom content using HTML-based control add-ins (written in JavaScript).
A Role Center page can be created in AL using the following code:
page 50101 "My Role Center"
{
    PageType = RoleCenter;

    layout
    {
        area(rolecenter)
        {
            part(SalesPerformance; "Sales Performance")
            {
                ApplicationArea = All;
                Visible = true;
            }

            part(MyCustomers; "My Customers")
            {
                ApplicationArea = All;
                Visible = true;
            }

            part(News;"Headline RC Business Manager")
            {
                ApplicationArea = All;
                Visible = true;
            }
        }
    }
}
Here, we have created a Role Center page with three parts (sub-pages).
You can customize an existing Role Center page by creating a pageextension object:
pageextension 50100 SalesManagerRoleCenterExt_SD extends "Sales Manager Role Center"
{
    layout
    {
        addlast(Content)
        {
            part(MyNews; MyRoleCenterHeadline)
            {
                ApplicationArea = All;
                Visible = true;
            }
        }
    }

    actions
    {
         addlast(Sections)
         {
            group("My Customers")
            {
                 action("Customer Ledger Entries")
                {
                    RunObject = page "Customer Ledger Entries";
                    ApplicationArea = All;
                }
            }
         }
    }
}
Here, we have extended the Sales Manager Role Center page by adding a new custom headline part to the content and a new action to open the Customer Ledger Entries page.
Customizing or creating Role Centers is important because it gives your users a better user experience.
In the next section, we'll see how we can customize the Headline part of a Role Center.
