
In this example, we will be creating a new entity in Dynamics 365 Business Central to handle the details of Cars, and this entity will also be exposed as an API for external applications:
- To do this, we first create a new Car table, as follows:
table 50111 Car
{
    DataClassification = CustomerContent;
    Caption = 'Car';
    LookupPageId = "Car List";
    DrillDownPageId = "Car List";
    fields
    {
        field(1; ModelNo; Code[20])
        {
            Caption = 'Model No.';
            DataClassification = CustomerContent;
        }
        field(2; Description; Text[100])
        {
            Caption = 'Description';
            DataClassification = CustomerContent;
        }
        field(3; Brand; Code[20])
        {
            Caption = 'Brand';
            DataClassification = CustomerContent;
        }
        field(4; Power; Integer)
        {
            Caption = 'Power (CV)';
            DataClassification = CustomerContent;
        }
        field(5; "Engine Type"; Enum EngineType)
        {
            Caption = 'Engine Type';
            DataClassification = CustomerContent;
        }
        field(10; ID; Guid)
        {
            Caption = 'ID';
            DataClassification = CustomerContent;
        }
    }

    keys
    {
        key(PK; ModelNo)
        {
            Clustered = true;
        }
    }

    trigger OnInsert()
    begin
        ID := CreateGuid();
    end;
}
The Car table has the required fields, and it has an ID field defined as Guid that is automatically assigned in the OnInsert trigger.
- The Engine Type field is of the Enum EngineType type, and the enum is defined as follows:
enum 50111 EngineType
{
    Extensible = true;
    value(0; Petrol)
    {
        Caption = 'Petrol';
    }
    value(1; Diesel)
    {
        Caption = 'Diesel';
    }
    value(2; Electric)
    {
        Caption = 'Electric';
    }
    value(3; Hybrid)
    {
        Caption = 'Hybrid';
    }
}
- We also create a Car List page (a standard list page) for managing Car data in Dynamics 365 Business Central. The Car List page is defined as follows:
page 50112 "Car List"
{
    PageType = List;
    SourceTable = Car;
    Caption = 'Car List';
    ApplicationArea = All;
    UsageCategory = Lists;

    layout
    {
        area(content)
        {
            repeater(General)
            {
                field(ModelNo;ModelNo)
                {
                    ApplicationArea = All;
                }
                field(Description;Description)
                {
                    ApplicationArea = All;
                }
                field(Brand;Brand)
                {
                    ApplicationArea = All;
                }
                field("Engine Type";"Engine Type")
                {
                    ApplicationArea = All;
                }
                field(Power;Power)
                {
                    ApplicationArea = All;
                }
            }
        }
    }
}
- Now, we need to create the API page (by using the tpage snippet and then selecting the Page of type API). The CarAPI page is defined as follows:
page 50111 CarAPI
{
    PageType = API;
    Caption = 'CarAPI';
    APIPublisher = 'sd';
    APIGroup = 'custom';
    APIVersion = 'v1.0';
    EntityName = 'car';
    EntitySetName = 'cars';
    SourceTable = Car;
    DelayedInsert = true;
    ODataKeyFields = ID;

    layout
    {
        area(Content)
        {
            repeater(GroupName)
            {
                field(id; ID)
                {
                    Caption = 'id', Locked = true;
                }
                field(modelno; ModelNo)
                {
                    Caption = 'modelNo', Locked = true;
                }
                field(description; Description)
                {
                    Caption = 'description', Locked = true;
                }
                field(brand; Brand)
                {
                    Caption = 'brand', Locked = true;
                }
                field(engineType; "Engine Type")
                {
                    Caption = 'engineType', Locked = true;
                }
                field(power; Power)
                {
                    Caption = 'power', Locked = true;
                }
            }
        }
    }

    trigger OnInsertRecord(BelowxRec: Boolean): Boolean
    begin
        Insert(true);
        Modify(true);
        exit(false);
    end;

    trigger OnModifyRecord(): Boolean
    var
        Car: Record Car;
    begin
        Car.SetRange(ID, ID);
        Car.FindFirst();
        if ModelNo <> Car.ModelNo then begin
            Car.TransferFields(Rec, false);
            Car.Rename(ModelNo);
            TransferFields(Car);
        end;
    end;

    trigger OnDeleteRecord(): Boolean
    begin
        Delete(true);
    end;
}
This page exposes the fields that we want to have in our API by applying the naming rules according to the OData specifications.
We then handle the OnInsertRecord, OnModifyRecord, and OnDeleteRecord page triggers to call the table's triggers and to handle renaming a record.
- Now, press F5 in Visual Studio Code and publish your extension. When it's published, search for Car List and then insert some example Car records, such as the following:

- Now, we can test our custom API. When published in a SaaS tenant, a custom API endpoint has the following format:
{BaseURL}/v2.0/<your tenant id>/<environment name>/api/<api publisher>/<api group>/<api version>If you're testing it on a Docker-based sandbox (for example, on an Azure VM as I'm doing here), the API endpoint is like this:
{BaseServerUrl:ODATA_Port}/{ServerInstance}/api//<api publisher>/<api group>/<api version>You can check the metadata for the published API with the following URL (here, d365bcita0918vm is the name of my Azure VM that's hosting the container):
https://d365bcita0918vm.westeurope.cloudapp.azure.com:7048/BC/api/sd/custom/v1.0/$metadata
The APIs are invoked per company. To have the list of companies on your database, you have to send a GET request to the following URL:
{baseUrl}/{D365BCInstance}/api/sd/custom/v1.0/companies
To have the list of cars for the selected company, you need to send a GET request to the following URL (by passing the company ID that was retrieved with the preceding call):
{baseUrl}/{D365BCInstance}/api/sd/custom/v1.0/companies({id})/cars
In our environment, the URL is as follows:
GET https://d365bcita0918vm.westeurope.cloudapp.azure.com:7048/BC/api/sd/custom/v1.0/companies(ecdc7cd0-ab75-4d40-8d0e-80d2471c4378)/cars
This is the response that we get:

As you can see, we have the JSON representation of the inserted records, and every field (JSON token) has the name that we assigned in our API definition.
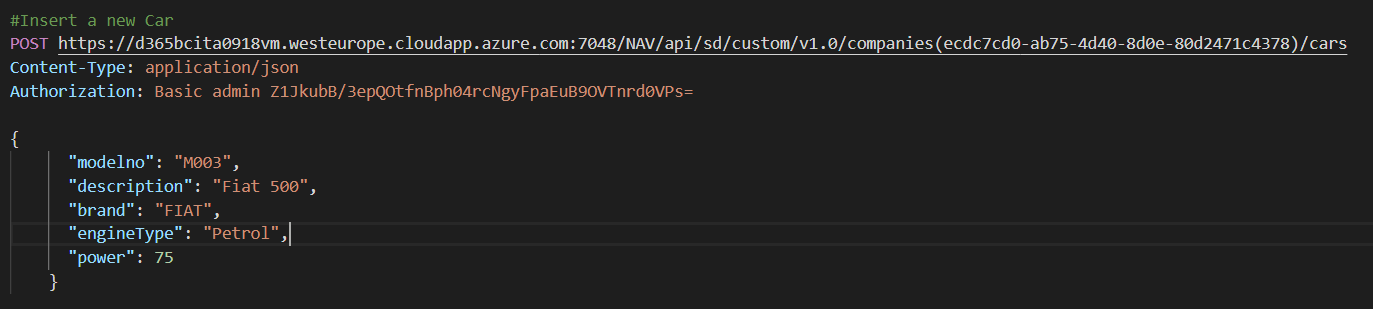
To insert a new Car record via our previously published custom cars API, you need to send a POST request to the following URL by passing the JSON record to create in the body:
{baseUrl}/{D365BCInstance}/api/sd/custom/v1.0/companies({id})/cars
This is the HTTP request we send:
The response received is as follows:

We receive HTTP/1.1 201 Created and the JSON details of the Car record are added to Dynamics 365 Business Central.
If you look at Car List in Dynamics 365 Business Central, you can see that the new record has been created:

To retrieve the details of a specific car record, just send a GET request to the following URL:
{baseUrl}/{D365BCInstance}/api/sd/custom/v1.0/companies({id})/cars({id})
This is done by passing the GUID of the car record to retrieve.
In our example, if we want to retrieve the details of the Mercedes record, we have to send an HTTP GET request to the following URL:
https://d365bcita0918vm.westeurope.cloudapp.azure.com:7048/BC/api/sd/custom/v1.0/companies(ecdc7cd0-ab75-4d40-8d0e-80d2471c4378)/cars(0237f4af-3422-41b3-94aa-81196346460e)
This is the response we receive:

As you can see, we have retrieved the JSON representation of the Car record.