Chapter 2. Creating a Task List
In this chapter, you will learn how to: | |
✓ | Enter task information. |
✓ | Estimate and enter how long each task should last. |
✓ | Create a milestone to track an important event. |
✓ | Organize tasks into phases. |
✓ | Create task relationships by linking tasks. |
✓ | Record task details in notes and insert a hyperlink to content on the Internet. |
✓ | Check a project plan’s overall duration. |
Tip
Do you need only a quick refresher on the topics in this chapter? See the Quick Reference entries in Creating a Task List.
Important
Before you can use the practice files provided for this chapter, you need to install them from the book’s companion CD to their default locations. See "Using the Book’s CD" for more information.
Entering Tasks
Tasks are the most basic building blocks of any project—tasks represent the work to be done to accomplish the goals of the project. Tasks describe project work in terms of sequence, duration, and resource requirements. Later in this chapter, you will work with two special types of tasks: summary tasks (which summarize or “roll up” the durations, costs, and so on of subtasks) and milestones (which indicate significant events in the life of a project).
In this exercise, you enter the first tasks required in the video project.
Important
If you are running Project Professional, you may need to make a one-time adjustment to use the Computer account and to work offline. This ensures that the practice files you work with in this chapter do not affect your Project Server data. For more information, see "Starting Project Professional“.
Note
OPEN Wingtip Toys Commercial 2a from the DocumentsMicrosoft PressProject 2007 SBSChapter 2 Simple Tasks folder. You can also access the practice files for this book by clicking Start, All Programs, Microsoft Press, Project 2007 Step by Step, and then selecting the chapter folder of the file you want to open.
On the File menu, click Save As.
The Save As dialog box appears.
In the File name box, type Wingtip Toys Commercial 2, and then click Save.
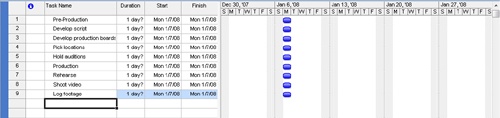
In the first cell directly below the Task Name column heading, type Pre-Production, and then press
 .
.The task you entered is given an ID number. Each task has a unique ID number, but it does not necessarily represent the order in which tasks occur.
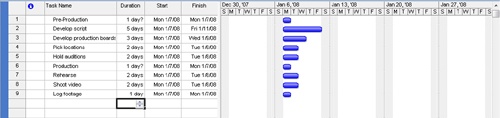
Project assigns a duration of one day to the new task, and the question mark indicates that this is an estimated duration. A corresponding task bar of one day’s length appears in the Gantt chart. By default, the task start date is the same as the project start date.
Enter the following task names below the Pre-Production task name, pressing
after each task name.Develop script
Develop production boards
Pick locations
Hold auditions
Production
Rehearse
Shoot video
Log footage
When you complete this step, you should have nine tasks entered.
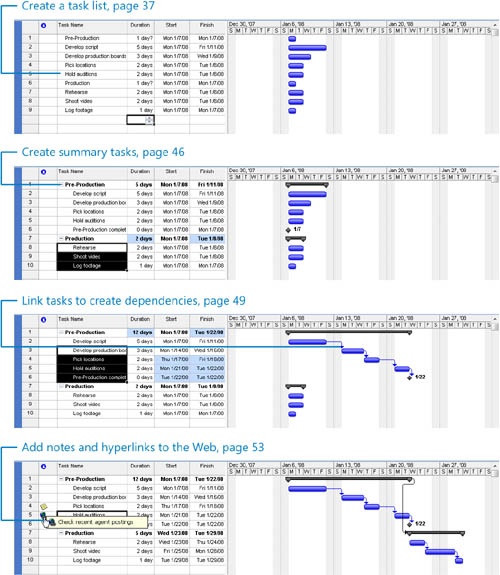
Tip
In addition to typing task information directly into Project, you can develop task lists in other applications and then import them into Project. For example, Project installs an Excel template named Microsoft Project Task List Import Template, which you or others can complete and then import into Project with the proper structure. In Excel, this template appears on the Spreadsheet Solutions tab of the Templates dialog box. You can also import your Outlook task list into a project plan. In Project, on the Tools menu, click Import Outlook Tasks.

Estimating Durations
A task’s duration is the amount of time you expect it will take to complete the task. Project can work with task durations that range from minutes to months. Depending on the scope of your project, you’ll probably want to work with task durations on the scale of hours, days, and weeks.
For example, a project might have a project calendar with working time defined as 8 A.M. through 5 P.M. with a one-hour lunch break Monday through Friday, leaving nonworking time defined as evenings and weekends. If you estimate that a task will take 16 hours of working time, you could enter its duration as 2d to schedule work over two eight-hour workdays. By starting the task at 8 A.M. on a Friday, you should then expect that it wouldn’t be completed until 5 P.M. on the following Monday. No work would be scheduled over the weekend because Saturday and Sunday have been defined as nonworking time.
Tip
You determine the overall duration of a project by calculating the difference between the earliest start date and the latest finish date of the tasks that compose it. The project duration is also affected by other factors, such as task relationships, which are discussed in the "Linking Tasks" section of this chapter. Because Project distinguishes between working and nonworking time, a task’s duration doesn’t necessarily correlate to elapsed time.
When working in Project, you can use abbreviations for durations.
If you enter this abbreviation | It appears like this | And it means |
m | min | minute |
h | hr | hour |
d | day | day |
w | wk | week |
mo | mon | month |
Tip
You can schedule tasks to occur during working and nonworking time. To do this, assign an elapsed duration to a task. You enter elapsed duration by preceding the duration abbreviation with an e. For example, type 3ed to indicate three elapsed days. You might use an elapsed duration for a task that you don’t directly control but that nonetheless is critical to your project. For instance, you might have the tasks Pour foundation concrete and Remove foundation forms in a construction project. If so, you might also want a task called Wait for concrete to cure because you don’t want to remove the forms until the concrete has cured. The task Wait for concrete to cure should have an elapsed duration because the concrete will cure over a contiguous range of days, whether they are working or nonworking days. If the concrete takes 48 hours to cure, you can enter the duration for that task as 2ed, schedule the task to start on Friday at 9 A.M., and expect it to be complete by Sunday at 9 A.M. In most cases, however, you’ll work with nonelapsed durations in Project.
Project uses standard values for minutes and hours for durations: one minute equals 60 seconds, and one hour equals 60 minutes. However, you can define nonstandard durations for days, weeks, and months for your project. To do this, on the Tools menu, click the Options command, and in the Options dialog box, click the Calendar tab, illustrated here.
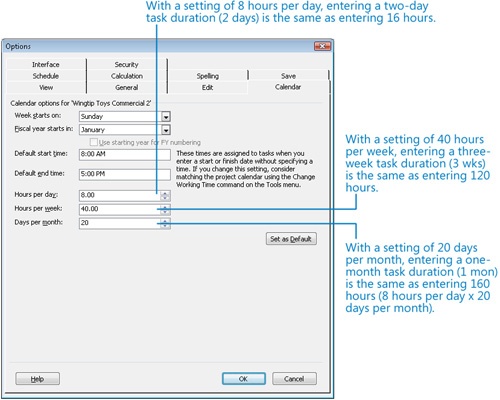
The exercises in this chapter use default values: eight hours per day, 40 hours per week, and 20 days per month.
Tip
Although it’s beyond the scope of this book, Program Evaluation and Review Technique (PERT) analysis can be a useful tool for estimating task durations. For more information, type Use PERT analysis to estimate task durations into the Type a question for help search box in the upper right corner of the Project window.
In this exercise, you enter durations for the tasks you’ve created. When you created those tasks, Project entered an estimated duration of one day for each task. (The question mark in the Duration field indicates that the duration is an explicit estimate, although realistically you should consider all task durations to be estimates until the task is completed.) To enter durations:
Click the cell below the Duration column heading for task 2, Develop script.
The Duration field for task 2 is selected.
The value 5 days appears in the Duration field.
Enter the following durations for the remaining tasks.
Task ID
Task Name
Duration
3
Develop production boards
3d
4
Pick locations
2d
5
Hold auditions
2d
6
Production
7
Rehearse
2d
8
Shoot video
2d
9
Log footage
1d
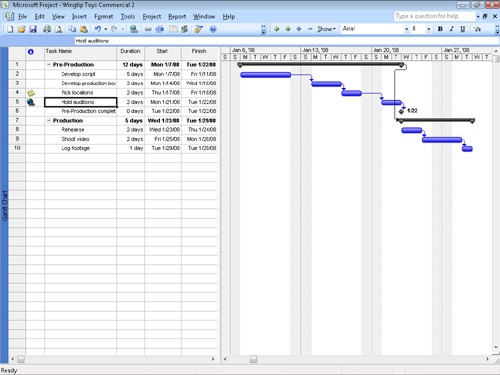
As you complete this step, you see the length of the Gantt bars change.
Entering a Milestone
In addition to tracking tasks to be completed, you might want to track an important event for your project, such as when the pre-production phase of the project will end. To do this, you will create a milestone.
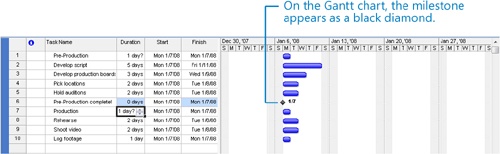
Milestones are significant events that are either reached within the project (such as completion of a phase of work) or imposed upon the project (such as a deadline by which to apply for funding). Because the milestone itself doesn’t normally include any work, milestones are represented as tasks with zero duration.
In this exercise, you create a milestone.
Click the name of task 6, Production.
On the Insert menu, click New Task.
Project inserts a row for a new task and renumbers the subsequent tasks.
Type Pre-Production complete! and then press the
 key to move to the Duration field.
In the Duration field, type 0d and then press the
key.The milestone is added to your plan.
Organizing Tasks into Phases
It is helpful to organize groups of closely related tasks that represent a major portion of the project’s work into phases. When reviewing a project plan, observing phases of tasks helps you and others to think in terms of major work items and detailed work items. For example, it is common to divide a film or video project into major phases of work such as pre-production, production, and post-production. You create phases by indenting and outdenting tasks. You can also collapse a task list into phases, much as you can work with an outline in Word. In Project, phases are represented by summary tasks.
A summary task behaves differently from other tasks. You can’t edit its duration, start date, or other calculated values directly because this information is derived or “rolled up” from the detail tasks, called subtasks (these appear indented under the summary tasks). Project calculates the duration of a summary task as the span of time from the earliest start date to the latest finish date of its subtasks.
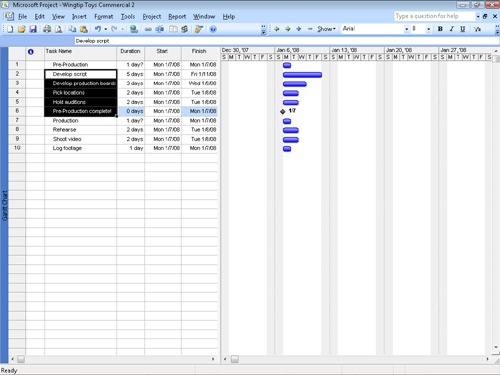
In this exercise, you create two summary tasks by indenting tasks.
Select the names of tasks 2 through 6.
On the Project menu, point to Outline, and then click Indent.
Task 1 becomes a summary task. A summary task bar for it appears in the Gantt chart, and the summary task name is formatted in bold type.
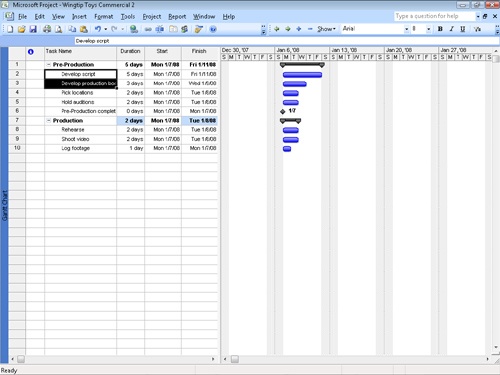
Next, select the names of tasks 8 through 10.
On the Project menu, point to Outline, and then click Indent.
Task 7 becomes a summary task, and a summary task bar for it appears in the Gantt chart.


Linking Tasks
Projects require tasks to be performed in a specific order. For example, the task of filming a scene must be completed before the task of editing the filmed scene can occur. These two tasks have a finish-to-start relationship (also called a link or dependency) that has two aspects:
The second task must occur later than the first task; this is a sequence.
The second task can occur only if the first task is completed; this is a dependency.
In Project, the first task (“film the scene”) is called the predecessor because it precedes tasks that depend on it. The second task (“edit the filmed scene”) is called the successor because it succeeds tasks on which it is dependent. Any task can be a predecessor for one or more successor tasks. Likewise, any task can be a successor to one or more predecessor tasks.
Although this might sound complicated, tasks can have one of only four types of task relationships.
This task relationship | Means | Looks like this in the Gantt chart | Example |
Finish-to-start (FS) | The finish date of the predecessor task determines the start date of the successor task. | A film scene must be shot before it can be edited. | |
Start-to-start (SS) | The start date of the predecessor task determines the start date of the successor task. | Reviewing a script and developing the script breakdown and schedule are closely related, and they should occur simultaneously. | |
Finish-to-finish (FF) | The finish date of the predecessor task determines the finish date of the successor task. | Tasks that require specific equipment must end when the equipment rental ends. | |
Start-to-finish (SF) | The start date of the predecessor task determines the finish date of the successor task. | The time when the editing lab becomes available determines when a pre-editing task must end. (This type of relationship is rarely used.) |
Representing task relationships and handling changes to scheduled start and finish dates is one area in which the use of a scheduling engine, such as Project, really pays off. For example, you can change task durations or add or remove tasks from a chain of linked tasks, and Project will reschedule tasks accordingly.
Task relationships appear in several ways in Project:
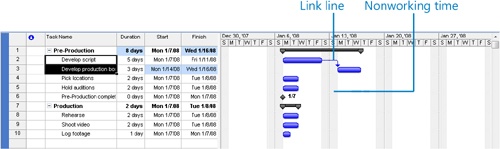
In the Gantt Chart and Network Diagram views, task relationships appear as the lines connecting tasks.
In tables, such as the Entry table, task ID numbers of predecessor tasks appear in the Predecessor fields of successor tasks.
You create task relationships by creating links between tasks. Currently, all of the tasks in the project plan are scheduled to start on the same day—the project start date. In this exercise, you use different methods to create links between several tasks, thereby creating finish-to-start relationships.
First you’ll create a finish-to-start dependency between two tasks.
Select the names of tasks 2 and 3.
On the Edit menu, click Link Tasks.
Tip
To create a finish-to-start dependency, you can also click the Link Tasks button on the Standard toolbar.
Tasks 2 and 3 are linked with a finish-to-start relationship. Note that Project changed the start date of task 3 to the next working day following the completion of task 2 (skipping over the weekend), and the duration of the Pre-Production summary task grew correspondingly.
Tip
To unlink tasks, select the tasks you want to unlink, and then click the Unlink Tasks button on the Standard toolbar. You can also click Unlink Tasks on the Edit menu. If you unlink a single task that is within a chain of linked tasks with finish-to-start relationships, Project reestablishes links between the remaining tasks.
Next, you will link several tasks at once.
Select the names of tasks 3 through 6.
On the Edit menu, click Link Tasks.
Tasks 3 through 6 are linked with a finish-to-start relationship.
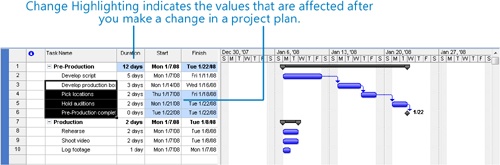
Have you noticed the blue highlighting of some of the Duration, Start, and Finish fields as you linked tasks? Project highlights the values that are affected after each change you make in a project plan. This feature is called Change Highlighting, and you can turn it off or on via the View menu.
Next, you will link two tasks in a different way by making task 8 the predecessor of task 9.
Select the name of task 9.
On the Project menu, click Task Information.
The Task Information dialog box appears.
Click the Predecessors tab.
Click the empty cell below the Task Name column heading, and then click the down arrow that appears.
Click OK to close the Task Information dialog box.
Tasks 8 and 9 are linked with a finish-to-start relationship.
To finalize this exercise, you’ll link the remaining production tasks and then link the two summary tasks.
Select the names of tasks 9 and 10.
On the Edit menu, click Link Tasks.
Select the name of task 1 and, while holding down the
 key, select the name of task 7. This is how
you make a nonadjacent selection in a table in Project.
key, select the name of task 7. This is how
you make a nonadjacent selection in a table in Project.On the Edit menu, click Link Tasks to link the two summary tasks.
Tip
When working with summary tasks, you can either link summary tasks directly (as you did above) or link the latest task in the first phase with the earliest task in the second phase. The scheduling end result is the same in either situation, but it’s preferable to link the summary tasks to better reflect the sequential nature of the two phases. Under no circumstances, however, can you link a summary task to one of its own subtasks. Doing so would create a circular scheduling problem, and therefore Project doesn’t allow it.
If needed, scroll the chart portion of the Gantt Chart view to the right until the second phase of the project plan is visible.
Tip
You can also create a finish-to-start relationship between tasks right in the Gantt chart. Point to the task bar of the predecessor task until the pointer changes to a four-pointed star. Then, drag the mouse pointer up or down to the task bar of the successor task. While you’re dragging the mouse pointer to create a task relationship, the pointer image changes to a chain link.

Documenting Tasks
You can record additional information about a task in a note. For example, you might have detailed descriptions of a task and still want to keep the task’s name succinct. You can add such details to a task note. In that way, the information resides in the Project file and can be easily viewed or printed.
There are three types of notes: task notes, resource notes, and assignment notes. You enter and review task notes on the Notes tab in the Task Information dialog box. (You can open the Notes tab by clicking the Task Notes command on the Project menu.) Notes in Project support a wide range of text formatting options; you can even link to or store graphic images and other types of files in notes.
Hyperlinks allow you to connect a specific task to additional information that resides outside of the project plan such as another file, a specific location in a file, a page on the Internet, or a page on an intranet.
In this exercise, you enter task notes and hyperlinks to document important information about some tasks.
Select the name of task 4, Pick locations.
On the Project menu, click Task Notes.
Tip
You can also click the Task Notes button on the Standard toolbar, or right-click the task name and click Task Notes in the shortcut menu that appears.
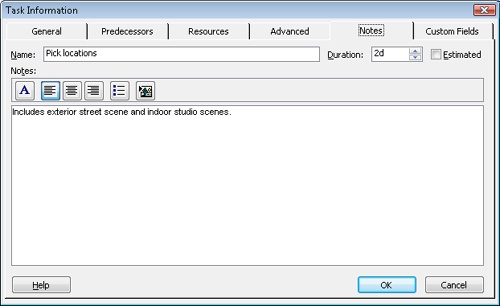
Project displays the Task Information dialog box with the Notes tab visible.
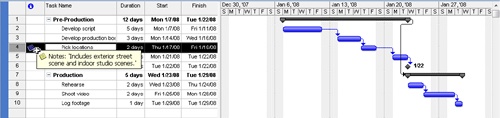
In the Notes box, type Includes exterior street scene and indoor studio scenes.
Click OK.
A note icon appears in the Indicators column.
Point to the note icon.
The note appears in a ScreenTip. For notes that are too long to appear in a ScreenTip, you can double-click the note icon to display the full text of the note.
To conclude this exercise, you create a hyperlink.
Select the name of task 5, Hold auditions.
On the Insert menu, click Hyperlink.
Tip
You can also click the Insert hyperlink button on the Standard toolbar, or right-click the task name and then click Hyperlink on the shortcut menu.
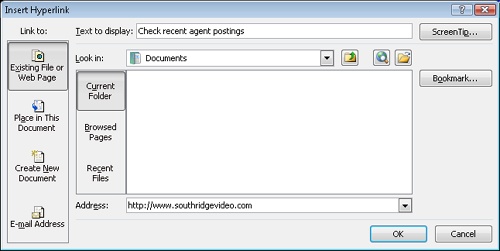
The Insert Hyperlink dialog box appears.
In the Text to display box, type Check recent agent postings
In the Address box, type http://www.southridgevideo.com
Click OK.
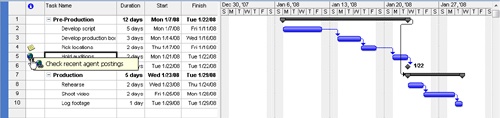
A hyperlink icon appears in the Indicators column. Pointing to the icon displays the descriptive text you typed earlier.
Clicking the icon opens the Web page in your browser.
Checking the Plan’s Duration
At this point, you might want to know how long the project is expected to take. You haven’t directly entered a total project duration or finish date, but Project has calculated these values based on individual task durations and task relationships. An easy way to view the project’s scheduled finish date is via the Project Information dialog box.
In this exercise, you see the current total duration and scheduled finish date of the project based on the task durations and relationships you’ve entered.
On the Project menu, click Project Information.
The Project Information dialog box appears.
Note the finish date: 1/29/08.
Tip
This tip describes enterprise project management (EPM) functionality. If you are running Project Professional, you will see a slightly different dialog box. The Project Information dialog box in Project Professional includes an Enterprise Custom Fields section. Enterprise custom fields are used only with Project Server. For more information about Project Server, see Part 4.
You can’t edit the finish date directly because this project is set to be scheduled from the start date. Project calculates the project’s finish date based on the total number of working days required to complete the tasks, starting at the project’s start date. As this project plan is now built, any change to the start date will cause Project to recalculate the finish date.
Next, let’s look at the duration information in more detail.
Click the Statistics button.
The Project Statistics dialog box appears.
You don’t need to pay attention to all of these numbers yet, but the current finish date and current duration are worth noting. The duration is the number of working days in the project calendar between the project’s start date and finish date.
Click the Close button to close the Project Statistics dialog box.
Next, you will display the complete project by changing the timescale in the Gantt Chart view.
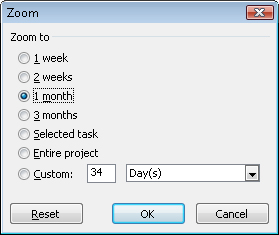
On the View menu, click Zoom.
The Zoom dialog box appears.
Click Entire project, and then click OK.
The entire project appears on the screen.
Tip
You can also click the Zoom In and Zoom Out buttons to change the timescale of the Gantt Chart view.
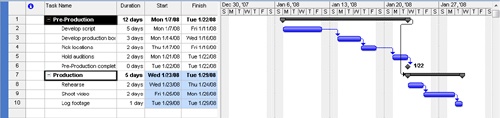
You can see the project’s overall duration in the Gantt Chart view.


Key Points
Essential aspects of tasks in a project plan include their duration and order of occurrence.
Task links, or relationships, cause the start or end of one task to affect the start or end of another task. A common task relationship is a finish-to-start relationship in which the completion of one task controls the start of another task.
In Project, phases of a schedule are represented as summary tasks.
You can document additional details using task notes and create hyperlinks to the Internet.
The Project Information dialog box (Project menu) is an excellent way to observe the key values of a project plan, such as its scheduled finish date and duration.