Chapter 1. Getting Started with Project

In this chapter, you will learn how to: | |
✓ | Understand the family of Microsoft Office Project 2007 products. |
✓ | Understand what a good project management tool can help you accomplish. |
✓ | Start Project Standard or Project Professional, and identify the major parts of the Project window. |
✓ | Use views to work with project plan details in different ways. |
✓ | Use reports to print project plan details. |
✓ | Create a project plan and enter a project start date. |
✓ | Set the working and nonworking time for a project. |
✓ | Enter a project plan’s properties. |
Tip
Do you need only a quick refresher on the topics in this chapter? See the Quick Reference entries in Getting Started with Project.
Project management is a broadly practiced art and science. If you’re reading this book, there’s a good chance that either you’re seriously involved in project management or you want to be.
At its heart, project management is a toolbox of skills and tools that help you predict and control the outcomes of endeavors undertaken by your organization. Your organization might be involved in other work apart from projects. Projects (such as a film project) are distinct from ongoing operations (such as payroll services) in that projects are temporary endeavors undertaken to create some unique deliverable or end result. With a good project management system in place, you should be able to answer such questions as
What tasks must be performed, and in what order, to produce the deliverable of the project?
When should each task be performed?
Who will complete these tasks?
How much will it cost?
What if some tasks are not completed as scheduled?
What’s the best way to communicate project details to those who have an interest in the project?
Good project management does not guarantee the success of every project, but poor project management usually contributes to failure.
Microsoft Office Project 2007 should be one of the most frequently used tools in your project management toolbox. This book explains how to use Project to build project plans complete with tasks and resources, use the extensive formatting features in Project to organize and format the project plan details, track actual work against the plan, and take corrective action when things get off track.
If you are new to project management, stop right here and read Appendix A, before proceeding with this chapter. It won’t take long, and it will help you to properly assess and organize your specific project-scheduling needs and build solid plans in Project.
Most of the exercises in this book revolve around a fictitious film production company, Southridge Video and Film Productions. Chances are you don’t work for a film production company, but you probably have seen a TV commercial or film recently. Each commercial or film constitutes its own project; in fact, some are fairly complex projects involving hundreds of resources and aggressive deadlines. We think you’ll be able to recognize many of the scheduling problems that Southridge Video encounters and apply the solutions to your own scheduling needs.
This chapter walks you through the Project interface and presents the steps necessary to create a new plan in Project.
Note
There are no practice files in this chapter.
Managing Your Projects with Project
The best project management tool in the world can never replace your own good judgment. However, the tool can and should help you accomplish the following:
Track all of the information you gather about the work, duration, costs, and resource requirements of your project.
Visualize and present your project plan in standard, well-defined formats.
Schedule tasks and resources consistently and effectively.
Exchange project information with other Microsoft Office System applications.
Communicate with resources and other stakeholders while you, the project manager, retain ultimate control of the project.
Manage projects using a program that looks and feels like other desktop productivity applications.
The Microsoft Office Project 2007 family encompasses a broad range of products, including the following:
Microsoft Office Project Standard 2007. Windows-based desktop application for project management. The Standard edition is designed for the single project manager and does not interact with Project Server.
Microsoft Office Project Professional 2007. Windows-based desktop application that includes the complete feature set of the Standard edition, plus—when used with Project Server—additional project team planning and communications features. Project Professional plus Project Server represents Microsoft’s enterprise project management (EPM) product offering.
Microsoft Office Project Server 2007. Intranet-based solution that enables enterprise-level project collaboration, timesheet reporting, and status reporting when used in conjunction with Project Professional.
Microsoft Office Project Web Access 2007. Internet Explorer–based interface for working with Project Server.
Microsoft Office Project Portfolio Server 2007. Portfolio management solution.
Tip
To learn more about the new features in Project 2007 as well as the differences between the Standard and Professional editions, check out the Project area of the Office Online Web site at microsoft.com Find it on the Web at www.office.microsoft.com, and then navigate to the Project page. For a list of the products that make up the Project Server–based enterprise project management, see "Understanding the Key Pieces of Enterprise Project Management" in Chapter 20.
Most of the chapters in this book focus on the feature set of Project Standard, the entry-level desktop project management tool. The chapters in Part 4 introduce you to the EPM features available with Project Professional and Project Server. All content in this book that applies to Project Standard also applies to Project Professional, so you can use either edition of Project to complete Part 1 through Part 3 of this book. If you have Project Professional and access to Project Server, you can also explore the features introduced in Part 4. Otherwise, you can browse through Part 4 to help you decide whether you or your organization should be using Project Professional and Project Server.
Starting Project Standard
Important
Follow the steps in this section if you have Microsoft Office Project Standard. If you have Microsoft Office Project Professional, skip this section and refer to the next section, "Starting Project Professional.” If you are uncertain, here is an easy way to tell which edition of Project you have: After starting Project, look for a Collaborate menu between the Report and Window menus. If you see it, you have Project Professional; if not, you have Project Standard. You can also click About Microsoft Office Project on the Help menu any time after Project has been started. The dialog box that appears indicates which edition you have.
In this exercise, you’ll start Project Standard, create a file based on a template (containing some initial data that you can use as a starting point for a new project plan), and view the major areas of the default Project interface.
On the Windows taskbar, click the Start button.
The Start menu appears.
On the Start menu, point to All Programs, click Microsoft Office, and then click Microsoft Office Project 2007.
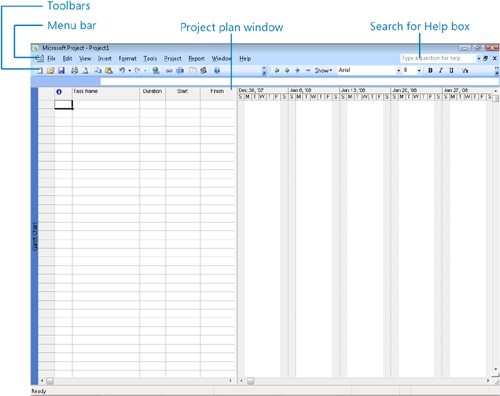
Project Standard appears. Your screen should look similar to the following illustration.
Tip
Depending on the screen resolution that is set on your computer and the toolbar buttons you use most often, it’s possible that not every button on every toolbar will appear on your Project toolbars. If a button mentioned in this book doesn’t appear on a toolbar, click the Toolbar Options down arrow on that toolbar to display the rest of the available buttons.
If you’ve used other Office applications or if you’re upgrading from a previous version of Project, you’ll be familiar with many of the major interface elements in the Project window. Let’s walk through them:
The main menu bar and shortcut menus allow you to give instructions to Project.
Toolbars provide quick access to the most common tasks; most toolbar buttons correspond to a menu bar command. Pop-up screen tips describe the toolbar buttons you point to. Project customizes its toolbars for you based on how frequently you use specific toolbar buttons. The most frequently used buttons will remain visible on the toolbars; those less frequently used will be temporarily hidden.
The project plan window contains a view of the active project plan. (We’ll refer to the types of documents that Project works with as project plans, not documents or schedules.) The name of the active view appears on the left edge of the view—in this case, the Gantt Chart view is displayed.
The box labeled Type a question for help allows you to quickly search for instructions on performing common activities in Project. Simply type in a question and press Enter. Throughout this book, we’ll suggest questions that you can enter into this box to learn more about specific features. If your computer is connected to the Internet, your search query will go to assistance content on Office Online (part of the Microsoft Web site), and the results displayed will reflect the most up-to-date content available from Microsoft. If your computer is not connected to the Internet, the search results will be limited to the Help installed with Project.
Next, you will view the templates included with Project and create a project plan based on one of them.
On the File menu, click New.
The New Project task pane appears.
In the New Project task pane, under Templates, click On computer.
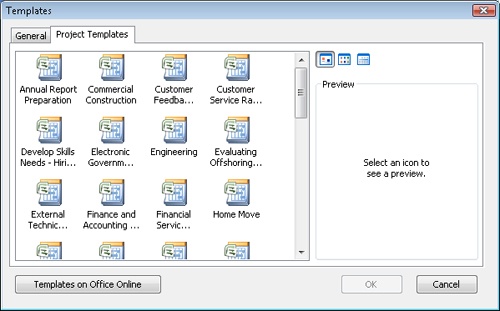
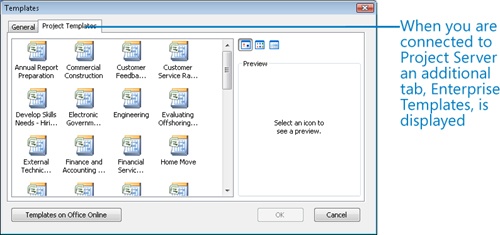
The Templates dialog box appears.
Click the Project Templates tab.
Your screen should look similar to the following illustration.
Click New Business (you may need to scroll down through the list of Project Templates to see it), and then click OK.
Tip
Depending on how Project was installed on your computer, the templates included with Project might not be installed at this point. This “install on first use” setting is one of the setup choices for optional components included with Project. If you have never seen the templates included with Project before, spend some time browsing through them. You might find one that matches an upcoming project for which you’d like to develop a full plan. Starting with a predefined template can save you a great deal of effort.
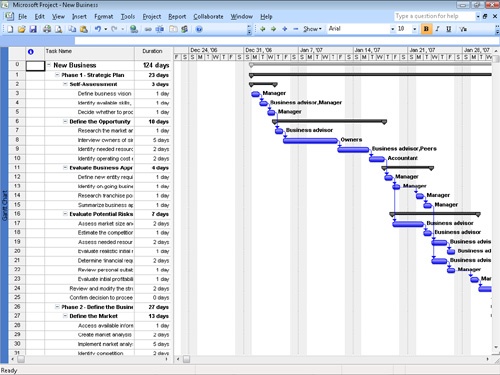
Project creates a project plan based on the New Business template and closes the New Project task pane. Your screen should look similar to the following illustration.
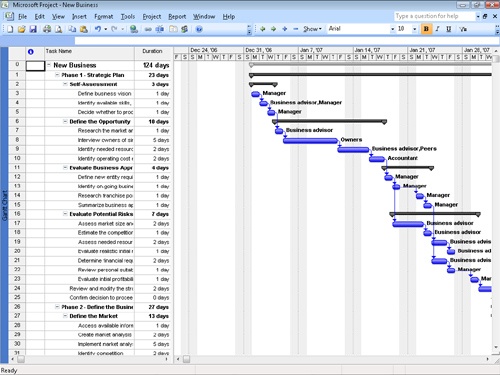
For the next few exercises in this chapter, you will use the sample data provided by the template to identify the major parts of the Project interface.
Project includes a wizard-like interface that you can use when creating or fine-tuning a project plan. This helper is called the Project Guide. You can use the Project Guide to perform many common activities relating to tasks, resources, and assignments.
In Project 2007, the Project Guide is turned off by default, but you can display the Project Guide by clicking Turn On Project Guide on the View menu or checking the Display Project Guide box on the Interface tab of the Options dialog box (Tools menu). Once you do this, the Project Guide appears in the left pane of the Project window.
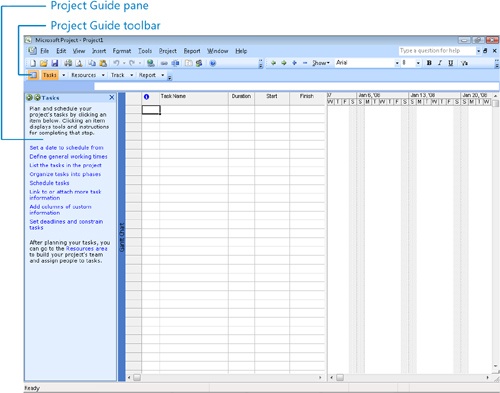
The Project Guide contains instructions, definitions, and commands that not only walk you through common activities, but can change views and other settings in Project to help you complete your chosen activity. You can view all activities in the Project Guide through the Project Guide toolbar. This toolbar is divided into the most common subject areas within Project (Tasks, Resources, Track, and Report).
Starting Project Professional
Important
Follow the steps in this section if you have Microsoft Office Project Professional. If you have Microsoft Office Project Standard, skip this section and refer to the previous section, "Starting Project Standard.” If you are uncertain, here is an easy way to tell which edition of Project you have: After starting Project, look for a Collaborate menu between the Report and Window menus. If you see it, you have Project Professional; if not, you have Project Standard. You can also click About Microsoft Office Project on the Help menu any time after Project has been started. The dialog box that appears indicates which edition you have.
In this exercise, you’ll start Project Professional, create a file based on a template (containing some initial data that you can use as a starting point for a new project plan), and view the major areas of the default Project interface. If you use Project Professional connected to Project Server, you will also make a one-time adjustment to how Project Professional starts so that you can use this book’s practice files without affecting Project Server.
On the Windows taskbar, click the Start button.
The Start menu appears.
On the Start menu, point to All Programs, click Microsoft Office, and then click Microsoft Office Project 2007.
Depending on how your enterprise options have been set in Project Professional, you might be prompted to log into or choose a Project Server account. If so, complete step 3. Otherwise, go to step 4.
If the Login dialog box appears, in the Profile box select Computer, and then click OK.
Choosing this option sets Project Professional to work independently of your Project Server and helps ensure that none of the practice file data used for this chapter can accidentally be published to your Project Server.
Project appears. Next, you’ll review or adjust some enterprise options.
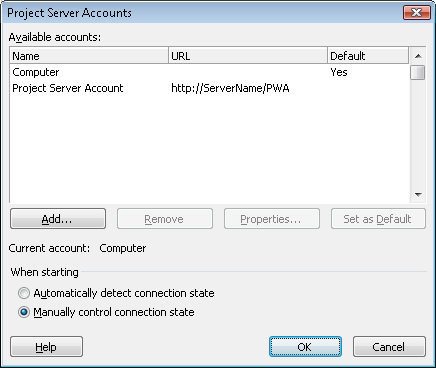
On the Tools menu, point to Enterprise Options, and then click Microsoft Office Project Server Accounts.
The Project Server Accounts dialog box appears.
Note the Current account value:
If the Current account value is something other than Computer, click Manually control connection state, click OK, and then complete step 6.
Or
If the Current account value is Computer, click Cancel, and then skip step 6.
Choosing Manually Control Connection State will cause Project Professional to prompt you to choose an account to work with when you start Project Professional. This helps ensure that none of the practice file data used for this chapter can accidentally be published to your Project Server.
Close and restart Project Professional. If prompted to choose a profile, click Computer, and then click OK.
Project Professional appears.
Tip
Depending on the screen resolution that is set on your computer and the toolbar buttons you use most often, it’s possible that not every button on every toolbar will appear on your Project toolbars. If a button mentioned in this book doesn’t appear on a toolbar, click the Toolbar Options down arrow on that toolbar to display the rest of the available buttons.
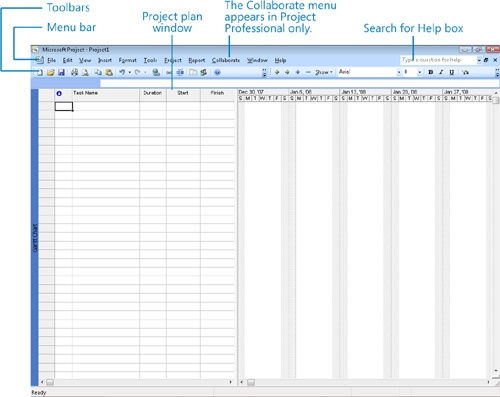
If you’ve used other Office applications or if you’re upgrading from a previous version of Project, you’ll be familiar with many of the major interface elements in the Project window. Let’s walk through them:
The main menu bar and shortcut menus allow you to give instructions to Project.
Toolbars provide quick access to the most common tasks; most toolbar buttons correspond to a menu bar command. Project customizes its menus and toolbars for you based on how frequently you use specific commands or toolbar buttons. The most frequently used buttons will remain visible on the toolbars; those less frequently used will be temporarily hidden.
The project plan window contains a view of the active project plan. (We’ll refer to the types of documents that Project works with as project plans, not documents or schedules.) The name of the active view appears on the left edge of the view—in this case, the Gantt Chart view is displayed.
The box labeled Type a question for help allows you to quickly search for instructions on performing common activities in Project. Simply type in a question and press Enter. Throughout this book, we’ll suggest questions that you can enter into this box to learn more about specific features. If your computer is connected to the Internet, your search query will go to assistance content on Office Online (part of the Microsoft Web site), and the results displayed will reflect the most up-to-date content available from Microsoft. If your computer is not connected to the Internet, the search results will be limited to the Help installed with Project.
Next, you will view the templates included with Project and create a project plan based on one of them.
On the File menu, click New.
The New Project task pane appears.
In the New Project task pane, under Templates, click On computer.
The Templates dialog box appears.
Click the Project Templates tab.
Click New Business (you may need to scroll down through the list of Project Templates to see it), and then click OK.
Tip
Depending on how Project was installed on your computer, the templates included with Project might not be installed at this point. This “install on first use” setting is one of the setup choices for optional components included with Project. If you have never seen the templates included with Project before, spend some time browsing through them. You might find one that matches an upcoming project for which you’d like to develop a full plan. Starting with a predefined template can save you a great deal of effort.
Project creates a project plan based on the New Business template and closes the New Project task pane. Your screen should look similar to the following illustration.
For the next few exercises in this chapter, you will use the sample data provided by the template to identify the major parts of the Project interface.

Project includes a wizard-like interface that you can use when creating or fine-tuning a project plan. This helper is called the Project Guide. You can use the Project Guide to perform many common activities relating to tasks, resources, and assignments.
In Project 2007, the Project Guide is turned off by default, but you can display the Project Guide by clicking Turn On Project Guide on the View menu or checking the Display Project Guide box on the Interface tab of the Options dialog box in the Tools menu. Once you do this, The Project Guide appears in the left pane of the Project window.

The Project Guide contains instructions, definitions, and commands that not only walk you through common activities, but can change views and other settings in Project to help you complete your chosen activity. You can view all activities in the Project Guide through the Project Guide toolbar. This toolbar is divided into the most common subject areas within Project (Tasks, Resources, Track, and Report).
Exploring Views
The working space in Project is called a view. Project contains dozens of views, but you normally work with just one view (sometimes two) at a time. You use views to enter, edit, analyze, and display your project information. The default view—the one you see when Project starts—is the Gantt Chart view shown here.

In general, views focus on either task or resource details. The Gantt Chart view, for example, lists task details in a table on the left side of the view and graphically represents each task as a bar in the chart on the right side of the view. The Gantt Chart view is a common way to represent a project plan, especially when presenting it to others. It is also useful for entering and fine-tuning task details and for analyzing your project.
In this exercise, you’ll start at the Gantt Chart view and then switch to other views that highlight different aspects of a project plan. Finally, you’ll explore combination views that let you focus on specific project details more easily.
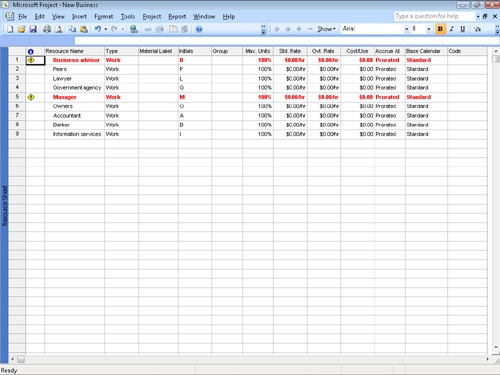
On the View menu, click Resource Sheet.
The Resource Sheet view replaces the Gantt Chart view.
The Resource Sheet view displays details about resources in a row-and-column format (called a table), with one resource per row. This view is called a sheet view. Another sheet view, called the Task Sheet view, lists the task details. Note that the Resource Sheet view doesn’t tell you anything about the tasks to which resources might be assigned. To see that type of information, you’ll switch to a different view.
On the View menu, click Resource Usage.
The Resource Usage view replaces the Resource Sheet view.
This usage view groups the tasks to which each resource is assigned. Another usage view, the Task Usage view, flips this around to display all of the resources assigned to each task. Usage views also show you the work assignments per resource on a timescale, such as daily or weekly.
Next, you’ll switch to the Task Usage view.
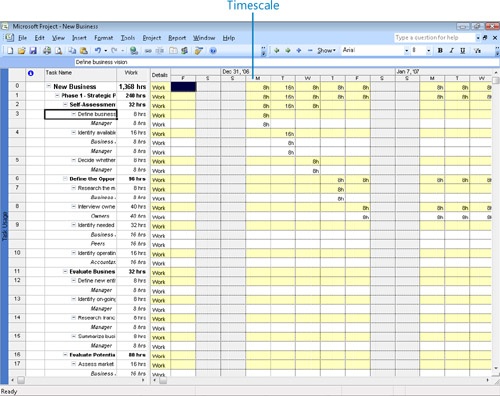
On the View menu, click Task Usage.
The Task Usage view replaces the Resource Usage view.
In the table portion of the view on the left, click Define business vision, which is the name of task 3.
On the Standard toolbar, click the Scroll To Task button.
The timescale side of the view scrolls to show you the scheduled work values for this task.
A usage view is a fairly sophisticated way of viewing project details. Next, you’ll switch to a simpler view.
On the View menu, click Calendar.
The Calendar view appears.
This simple month- or week-at-a-glance view lacks the table structure, timescale, or chart elements you’ve seen in previous views. Task bars appear on the days they’re scheduled to start; if a task’s duration is longer than one day, its bar will span multiple days.
Another common view used in project management is the Network Diagram.
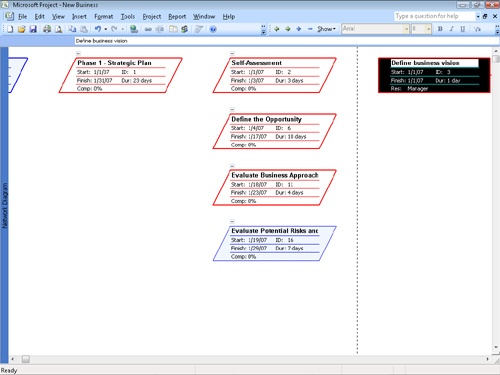
On the View menu, click Network Diagram.
The Network Diagram view appears. Use the scroll bars to view different parts of the Network Diagram view.
This view focuses on task relationships. Each box or node in the Network Diagram view displays details about a task, and lines between boxes indicate task relationships. Like the Calendar view, the Network Diagram view lacks a table structure; the entire view is a chart.
To conclude this exercise, you’ll look at combination views. These split the project plan window into two panes, with each pane containing a different view. The views are synchronized; therefore, selecting a specific task or resource in one view causes the other view to display details about that task or resource.
On the View menu, click More Views.
The More Views dialog box appears. This dialog box lists all of the predefined views available in Project.
In the Views box, click Task Entry, and then click the Apply button.
The Task Entry view appears.
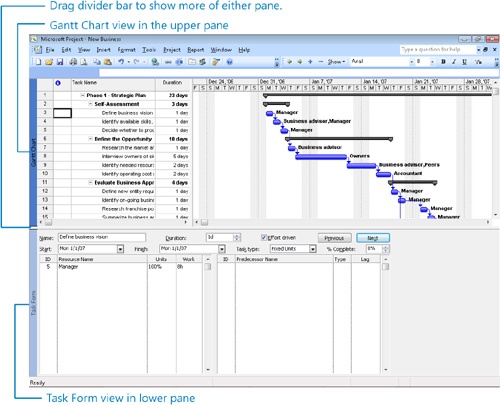
This view is a predefined split-screen or combination view, with the Gantt Chart in the upper pane and the Task Form in the lower pane. A form is the final element of a view that you will see in this chapter. A form displays details about the selected task or resource, much like a dialog box. You can enter, change, or review these details in the form.
If the selection in the Gantt Chart portion of the view is not on task 3, Define business vision, click that task’s name.
The details about task 3 appear in the Task Form portion of the view.
In the Gantt Chart portion of the view, click the name of task 4, Identify available skills, information, and support.
The details about task 4 appear in the Task Form.
Tip
Besides using the predefined combination views, you can display two views of your choice by clicking Split on the Window menu. After the Project window is split into two panes, click in the upper or lower pane and then choose the view you want to appear there. To return to a single view, on the Window menu, click Remove Split.

It is important to understand that, in all of these views as well as all of the other views in Project, you are looking at different aspects of the same set of details about a single project plan. Even a simple project plan can contain too much data to display at one time. You can use views to help you focus on the specific details you want.
In later exercises, you’ll do more work with views to further focus on the most relevant project details.
Exploring Reports
Project contains two types of reports: tabular reports that are intended for printing, and visual reports that allow you to export Project data to Excel and Visio. Visual reports use Excel and Visio templates included with Project to produce nicely designed charts and diagrams.
You don’t enter data directly into a report. Project includes several predefined task and resource reports that you can manipulate to obtain the information you want.
In this exercise, you view a report in the Print Preview window and then generate a visual report.
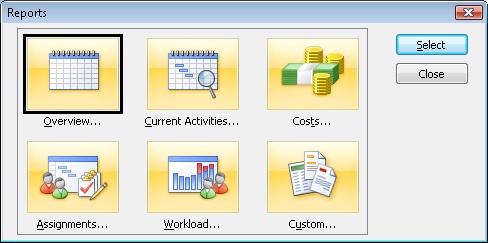
On the Report menu, click Reports.
The Reports dialog box appears, displaying the six broad report categories available in Project.
Click Custom, and then click the Select button.
The Custom Reports dialog box appears, listing all predefined reports in Project and any custom reports that have been added.
On the Reports list, click Resource (work), and then click the Preview button.
Project displays the Resource (work) report in the Print Preview window.
This report is a complete list of the resources available in this project plan, similar to what you’d see in the Resource Sheet view. If you want to zoom in closer, move the mouse pointer (shaped like a magnifying glass) to a specific portion of the report and click. Click again to toggle back to the full-page preview.
On the Print Preview toolbar, click the Close button.
The Print Preview window closes, and the Custom Reports dialog box reappears.
In the Custom Reports dialog box, click Close, and then click Close again to close the Reports dialog box.
Next, you will create a visual report to get a close look at overall resource workload and availability through the life of the project. This exercise requires that you have Microsoft Office Excel 2003 or later installed on your computer. If you do not, skip ahead to step 11.
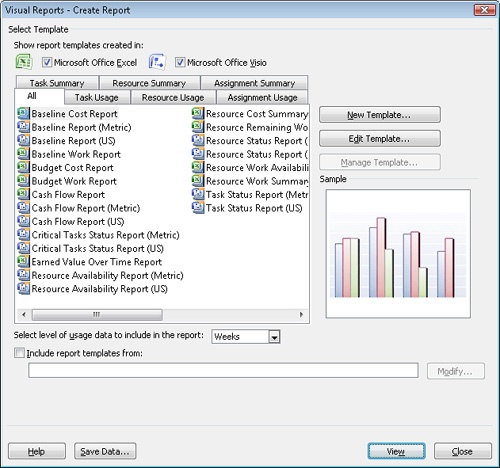
On the Report menu, click Visual Reports.
The Visual Reports dialog box appears, listing all predefined visual reports in Project.
For each available report, Project exports data to Excel or Visio and then generates charts, tables, or diagrams in one or the other of those applications.
For Show Report Template Created In, make sure that Microsoft Office Excel is selected and that the All tab is visible.
Click Resource Remaining Work Report, and then click View.
Excel starts and Project exports resource data to Excel (this may take a few moments).
The Chart sheet contains a stacked bar chart of actual and remaining work per resource. You can also observe the data on which the chart is based on the Resource Summary sheet. Because the chart is based on an Excel PivotTable (visible on the Resource Summary sheet), you can substantially refine the data and corresponding chart.
Close Excel without saving the visual report.
Tip
Project users frequently go to a lot of trouble to customize views to include specific information in the format they want. Before you do that, check the predefined views (for online work or printing), reports (for printing), or visual reports (for charts and diagrams). There’s a good chance that the Project designers have anticipated your needs and provided a predefined solution for you.
Click Close to close the Visual Reports dialog box.
To conclude this exercise, you’ll close the file you’ve been using to explore views and reports.
On the File menu, click Close to close the New Business plan. When prompted to save changes, click the No button.


Creating a New Project Plan
A project plan is essentially a model you construct of some aspects of the real project you anticipate—what you think will happen or what you want to happen (it’s usually best if these are not too different). This model focuses on some, but not all, aspects of the real project—tasks, resources, time frames, and possibly their associated costs.
As you might expect, Project focuses primarily on time. You might know the planned start date of a project, the planned finish date, or both. However, when working with Project, you specify only one date: the project start date or the project finish date. Why? Because after you enter the project start or finish date and the durations of the tasks, Project calculates the other date for you. Remember that Project is not merely a static repository of your schedule information; it is an active scheduling tool.
Most projects should be scheduled by using a start date, even if you know that the project must finish by a certain deadline date. Scheduling from a start date causes all tasks to start as soon as possible and gives you the greatest scheduling flexibility. In later chapters, you will witness this flexibility in action as we work with a project that is scheduled from a start date.
Now that you’ve had a brief look at the major parts of the Project interface, you are ready to create the project plan you will use in Part 1 of this book.
In this exercise, you create a new project plan.
On the File menu, click the New command. Then, in the New Project task pane, click Blank Project.
Project creates a new, blank project plan. Next, you’ll set the project’s start date.
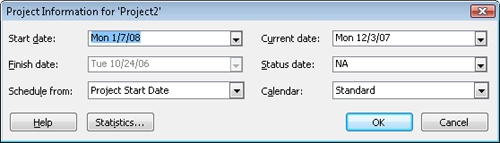
On the Project menu, click Project Information.
The Project Information dialog box appears.
In the Start date box, type or select 1/7/08.
Tip
In most cases when you need to enter a date in Project, you can click the down arrow next to the Date field to show a small monthly calendar. There you can navigate to any month and then click the date you want, or click Today to quickly choose the current date.
Important
If you are using Project Professional, the Project Information and some other dialog boxes you see will contain additional options. Throughout most of this book we show Project Standard screen illustrations, but point out some Project Server-related functionality that is supported in Project Professional and Project Server. In Part 4, we show Project Professional illustrations.
Click OK to close the Project Information dialog box.
On the Standard toolbar, click the Save button.
Because this project plan has not previously been saved, the Save As dialog box appears.
Locate the Chapter 1 Getting Started folder in the Project 2007 Step by Step folder on your hard disk. The default location for the Project 2007 Step by Step folder is DocumentsMicrosoft Press.
In the File name box, type Wingtip Toys Commercial 1.
Click Save to close the Save As dialog box.
Project saves the project plan as Wingtip Toys Commercial 1.
Setting Nonworking Days
This exercise introduces calendars—the primary means by which you control when each task and resource can be scheduled for work in Project. In later chapters, you will work with other types of calendars; in this chapter, you will work only with the project calendar.
The project calendar defines the general working and nonworking time for tasks. Think of the project calendar as your organization’s normal working hours. For example, this might be Monday through Friday, 8 A.M. through 5 P.M., with a one-hour lunch break. Your organization or specific resources might have exceptions to this normal working time, such as holidays or vacation days. You’ll address resource vacations in a later chapter, but here you’ll address a holiday in the project calendar.
On the Tools menu, click Change Working Time.
The Change Working Time dialog box appears.
In the For calendar box, click the down arrow.
The list that appears contains the three base calendars included with Project. These calendars are as follows:
24 Hours: Has no nonworking time.
Night Shift: Covers a “graveyard” shift schedule of Monday night through Saturday morning, 11 P.M. to 8 A.M., with a one-hour break.
Standard: The traditional working day, Monday through Friday from 8 A.M. to 5 P.M., with a one-hour lunch break.
Only one of the base calendars serves as the project calendar. For this project, you’ll use the Standard base calendar as the project calendar, so leave it selected.
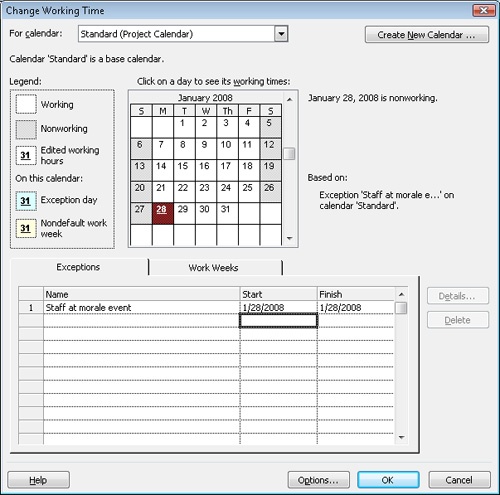
You know that the entire staff will be at a morale event on January 28; therefore, no work should be scheduled that day. You will record this as a calendar exception.
In the Name field on the Exceptions tab, type Staff at morale event, and then click in the Start field.
In the Start field, type 1/28/08, and then press
 .
.You could have also selected the date you want in the calendar above the Exceptions tab or from the drop-down calendar in the Start field.
This date is now scheduled as nonworking time for the project. In the dialog box, the date appears underlined and is formatted teal to indicate an exception day.
Click OK to close the Change Working Time dialog box.
To verify the change to the project calendar, scroll the chart portion of the Gantt Chart view (the portion on the right) to the right until Monday, January 28, is visible. Like the weekends, January 28 is formatted gray to indicate nonworking time.


Entering Project Properties
Like other Microsoft Office programs, Project keeps track of several file properties. Some of these properties are statistics, such as how many times the file has been revised. Other properties include information you might want to record about a project plan, such as the project manager’s name or keywords to support a file search. Project also uses properties in page headers and footers when printing.
In this exercise, you enter some properties that you will use later when printing project information and for other purposes.
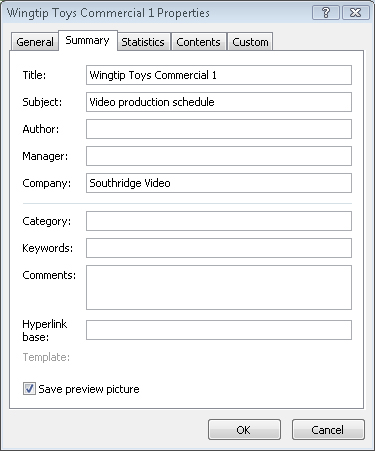
On the File menu, click Properties.
The Properties dialog box appears.
Click the Summary tab if it is not already visible.
In the Subject box, type Video production schedule.
In the Author box, type your name.
In the Manager box, type your name, type your manager’s name, or leave the box blank.
In the Company box, type Southridge Video.
Select the Save preview picture check box.
The next time this file appears in the Open dialog box with the Preview view option selected, a small image showing the first few tasks of the project will be displayed.
Click OK to close the dialog box.
Key Points
The Project product family includes Project Standard, Project Professional, Project Server, and Project Web Access. Normally, you would use Project Standard on the desktop or the latter three in combination to form an EPM solution.
One of the key distinguishing factors that separates Project from other list-keeping tools, such as Excel, is that Project has a scheduling engine that can work with time.
Project includes several sophisticated templates that can provide you with a good start to a new project plan.
The main working space in Project is a view. One or sometimes two views are typically displayed at a time. The Gantt Chart view is the default and probably best known view in Project.
Project includes a large number of built-in reports that are intended for viewing (but not editing) Project data.
You use calendars in Project to control when work can be scheduled to occur.