
Chapter 37. Data Binding with Windows Forms 2.0
IN THIS CHAPTER
- Binding with Typed DataSets
- Introducing the BindingSource
- Using the BindingNavigator
- Working with the DataGridView
- Data Binding with Objects
- Parent-Detail Binding
When many of us were creating Windows applications with Visual Basic 6, the concept of data binding was often a controversial subject. Some people would never use automatic data binding whereas others would use nothing but. The idea behind data binding is simple: through some means (whether in design mode or at runtime), tell a control where it can find its source data and how to use that data when the control is being displayed. Unfortunately, the implementation of data binding often falls short of the idea. This was the case with Visual Basic 6; the default data-binding ability of the language was slow, inefficient, and often completely incompatible with the needs of the developer.
The .NET Framework and Windows Forms made extreme advances in the area of data binding, but even Windows Forms and .NET 1.1 could often create cumbersome and frustrating situations for developers. With .NET 2.0, data binding for Windows applications has undergone another radical overhaul. This chapter gets you started with using the built-in data binding mechanisms provided by Windows Forms 2.0.
Binding with Typed DataSets
As you saw in Chapter 20, “Strongly Typed DataSets,” typed datasets are a feature provided by ADO.NET. They work by taking a schema that defines a set of relational data (tables, columns, foreign/primary keys, and so on) and turning that schema into a set of nested classes usable from within your application. Providing relational data exposed as a set of classes with strongly typed properties is a huge benefit to programmers working with relational data coming from any number of data sources including SQL Server or XML.
Using the Data Sources Window
When you’re dealing with data-driven applications, the Data Sources window is probably one of the most powerful new features provided by the new Visual Studio. To get started, create a new Windows Application in C# (it doesn’t matter what you call it). While looking at your main form, you may see a docked window called “Data Sources.” If you don’t, simply click the Data menu and then click Show Data Sources. You can also use the shortcut Shift+Alt+D. A sample of the Data Sources window is shown in Figure 37.1.
Figure 37.1 The Data Sources window.
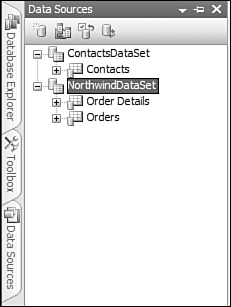
This particular window shows that there are two data sources defined, both of them typed datasets. From this window, you can create new data sources as well as edit datasets with the designer or configure datasets with the Data Source Configuration Wizard as discussed in Chapter 20.
The Data Sources window shows all of the data sources configured for the current project. This means that if you have a typed DataSet, an Object DataSource, data obtained from SQL Server, or data obtained from an Access or OLE DB source, they will all show up in the Data Sources window. As you will find out later in this chapter, binding controls to data sources in this window is as easy as drag and drop.
Adding a DataSet to a Form
In previous versions of the .NET Framework, typed datasets were things that you could create on your own, and you could store them in your solution, but that was the extent of the built-in support. With Visual Studio 2005, typed datasets are an integral part of data binding.
To see how simple this really is, just create a new DataSet in your project. You can do this either through the Data Source Wizard in the Data Sources window, or you can right-click the project in Solution Explorer, choose Add Item, and select DataSet from the item templates list.
After your DataSet is configured to your liking, take a look at the Data Sources window. You will see that the typed DataSet you just created is listed there as a data source. Using the tree view, you can expand tables and columns and view the relevant properties of each aspect of the DataSet. If you highlight a DataSet in this window and click the Edit in Designer button, you will be taken to the dataset designer.
This sample contains a DataSet called ContactsDataSet with a single table called Contacts. This table has three columns: FirstName, LastName, and ID. The ID column is an AutoIncrement column that is also the primary key of the table.
Now all you have to do is open the Data Sources window and drag your newly created DataSet onto your form. When you let go of the mouse button, you will see that the following components have been added to the form:
- Your typed
DataSet(in my case this wasContactsDataSet)—The typedDataSetactually appears at the bottom of the designer in the component tray as a full-fledged component. - A
BindingSourcecomponent - A
BindingNavigatorcomponent - A
DataGridViewcontrol
The BindingSource component is new to .NET 2.0 and provides a level of abstraction and encapsulation around the data source for a form. What this means is that the methods of the BindingSource component work the same regardless of where the underlying data is physically stored or how it is stored. It also publishes a set of events that allow the developer to hook into actions such as when a new item is added, when the current item is changed, and so on.
The BindingNavigator sits on top of a BindingSource and allows navigation through the items in the underlying source data. It contains the User Interface elements that are typically used in navigating a source of data including controls to move to the beginning of the source, move to the end, move to the next item, and move to the previous item, create a new item, delete the existing item, and save the current data.
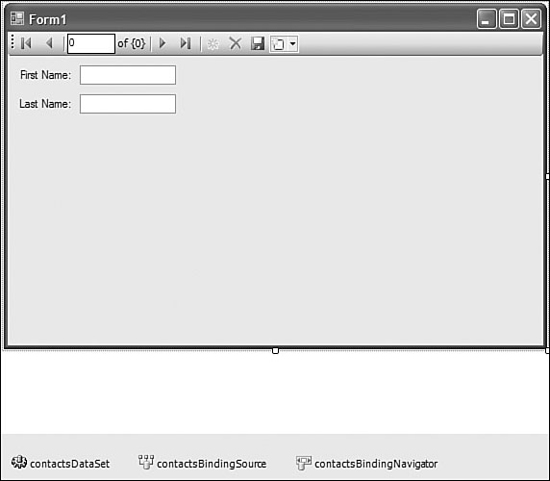
As you can see, the task of setting up a typed DataSet to be bound on a form is really as simple as dragging and dropping. With a few clicks you have a form that can add, delete, and edit records within your own typed DataSet. Figure 37.2 shows an example of a form created with this simple drag-and-drop procedure. In Figure 37.2, I deleted the DataGridView and dragged two columns onto the form from the Data Sources window. These columns arrive on the form prebound to the underlying data.
Figure 37.2 The result of dragging a DataSet onto a form.
It is worth mentioning here that so far what you have created is a form that is manipulating the contents of an in-memory DataSet. Keep reading to find out how to store the contents of the UI-bound DataSet in a backing store such as SQL Server or Oracle.
Typed DataSet Binding Sample
The preceding section showed you that in a matter of seconds, you can drag a DataSet from your Data Sources window and onto a form designer and have something that both runs and compiles. However, something like this isn’t very practical and will never appear like this in an application unmodified.
What you’ll see in this section is how to take the ContactsDataSet from the preceding drag-and-drop example and create an application that reads and writes data from an XML file.
To start, create a new Windows Application called TypedDSBinding. Rename Form1.cs to mainForm.cs. Now add the ContactsDataSet to the project. You can either copy it from previous samples if you were following along, or just create the DataSet manually with a single table called Contacts and the three columns: ID, FirstName, and LastName.
Now just drag the Contacts table from your Data Sources window onto the blank main form. As you’ve seen already, a DataGridView, a BindingSource, and a BindingNavigator will all appear on your form. Delete the DataGridView and then drag the FirstName and LastName columns onto the form. Thankfully, the painfully slow work of creating a TextBox, creating a Label, and then binding them up is all done for you when you drag columns onto a form.
The first piece of code you’re going to want to write is the code to load the data into your DataSet from the XML file. Double-click the main form to create a Form_Load event handler and enter the following code:
private void mainForm_Load(object sender, EventArgs e)
{
if (File.Exists(@"....Contacts.xml"))
{
contactsDataSet.ReadXml(@"....Contacts.xml");
}
}
Now you need to be able to save the list of contacts to disk when you’re done. The first step is to single-click the button in the ToolStrip with the icon of a floppy disk. By default the Save button is disabled. Enable it, and then create a handler for the Click event as shown in the following code:
private void bindingNavigatorSaveItem_Click(object sender, EventArgs e)
{
contactsDataSet.AcceptChanges();
contactsDataSet.WriteXml(@"....Contacts.xml");
}
Now when you run the application you will be able to create new contacts and edit existing ones, as well as delete contacts, and you didn’t have to write any complex code—just a few lines of code to load and save a DataSet as an XML file.
Introducing the BindingSource
To put it bluntly, the BindingSource component is your new best friend. In previous versions of .NET, one of the most frustrating things about data binding is that you could only do so much at design time. You had to wait until your application was running to see the real binding behavior. With the use of the BindingSource component, you can accurately model the binding behavior of all your controls at design time, even if you are binding to an object, a typed DataSet, an XML file, or even a Web Service.
Think of BindingSource as an intermediary or a connector between data bound controls and a data source. With the BindingSource in the middle, there no longer needs to be a tight coupling between the control and the data source, so we can bind controls to virtually any kind of data at design time. In addition to providing an encapsulation around a data source, it also provides standardized methods for starting, committing, and canceling edit operations.
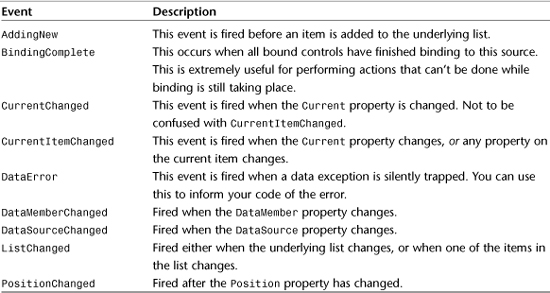
Tables 37.1, 37.2, and 37.3 show some of the commonly used methods, properties, and events of the BindingSource class. It is important to get a good grasp of how this class works before continuing through the rest of this chapter because the BindingSource is used by many of the other components and classes discussed in this chapter.
Table 37.1 Commonly Used BindingSource Methods
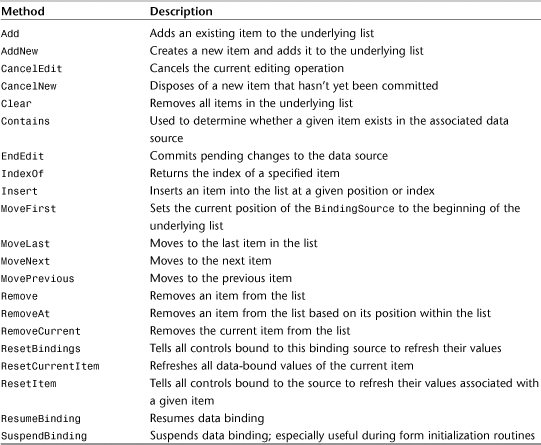
Table 37.2 Commonly Used BindingSource Properties

Table 37.3 Commonly Used BindingSource Events
Rather than showing you specific examples of how the BindingSource works, you will see the BindingSource in action throughout the rest of the chapter as the different kinds of binding are explained in detail. Because the component acts as an intermediary between bound controls and the underlying data, you can’t really see how it works unless you are trying to bind data, and examples of data binding are shown throughout the rest of the chapter.
Using the BindingNavigator
The BindingNavigator class was mentioned a few times in the section on binding with typed DataSets but never in much detail. This section provides you with in-depth coverage of the BindingNavigator and how to get the most out of this powerful new control.
BindingNavigator Basics
The first and foremost thing to remember about the BindingNavigator is that it is really nothing more than a tricked-out ToolStrip. It is basically a ToolStrip that comes preloaded with VCR-like buttons that provide a user interface for moving through and manipulating the items within a BindingSource. This means that if your design doesn’t call for a navigation toolstrip, you can stop building at the BindingSource and leave this component out. However, if you want users to be able to click buttons to move forward, back, to the end, and to the front, as well as being able to add and remove items, this control is definitely what you need.
User-Triggered Binding Actions
The following is a list of the actions that users can perform by clicking the various built-in buttons supplied with the BindingNavigator. Keep in mind that if need be, you can add your own custom buttons to the BindingNavigator because at its core it is still just a ToolStrip.
Create New Item
The AddNewItem property on the BindingNavigator indicates the ToolStripItem that will cause an item to be added. When this ToolStripItem is clicked, the AddNew method of the underlying BindingSource will be called. You can either use the Click event on the ToolTripItem, or you can use the AddingNew event on the BindingSource to inject your own code into the new item creation process.
Delete Item
The DeleteItem property on the BindingNavigator indicates the ToolStripItem that will cause an item to be deleted.
Move First
The MoveFirstItem property on the BindingNavigator indicates the ToolStripItem that will set the position of the underlying BindingSource to the beginning of the list.
Move Last
The MoveLastItem property of the BindingNavigator indicates the ToolStripItem that, when clicked, will set the position of the underlying BindingSource to the last item in the list.
Move Previous
The MovePreviousItem property of the BindingNavigator indicates the ToolStripItem that, when clicked, will move the current item pointer up one index in the list.
Move Next
The MoveNextItem property of the BindingNavigator indicates the ToolStripItem that, when clicked, will move the current item pointer down one index in the list.
Save Data
There is no special property of the BindingNavigator that points to the “Save” ToolStripItem. This is because the code that is invoked to save data is entirely your creation—there is nothing in the BindingSource responsible for saving the data to disk or database.
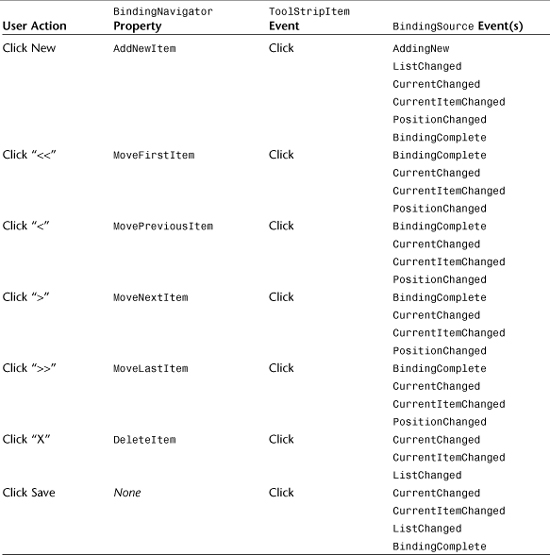
To help you see what events you can trap and which properties are important in the chain of events, take a look at Table 37.4.
Table 37.4 Chain of Events Starting with User Action
Working with the DataGridView
The DataGridView is much like its predecessor in that it provides for a grid-like display of rows and columns of data from an underlying data source. That’s where the similarity ends. If you have worked very much with .NET 1.0 and 1.1 DataGrids, you know that despite their power, you almost always ended up having to create cumbersome controls and templates and classes just to get the grid to do what you needed. The frustration of trying to shoehorn the DataGrid to fit into the design of your application is over. This section shows you how to create not only powerful and fast grids of data, but visually compelling ones as well.
DataGridView Basics
You’ve seen the most basic example of how to get a DataGridView up and running: drag a table from your Data Sources window onto a form and a BindingNavigator, BindingSource, and DataGridView will appear on the form. The DataGridView will automatically display all of the columns in the table, which is typically not the behavior you want.
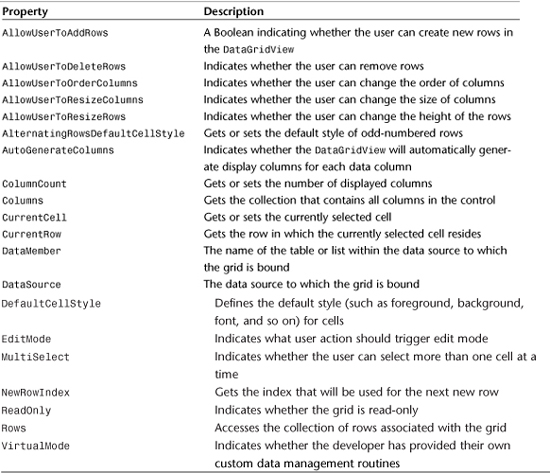
Before getting into a basic example of binding with the DataGridView, you should have a quick look at some of the events, methods, and properties of this control. Table 37.5 lists the events, Table 37.6 lists the methods, and Table 37.7 lists the properties. By looking at this information, you may begin to see how to do some of the more complex things with the DataGridView. For a complete list of all events, and methods, and properties, see the MSDN documentation that came with your copy of Visual Studio 2005 or the online MSDN documentation at http://msdn.microsoft.com.
Table 37.5 Some of the Events Published by the DataGridView
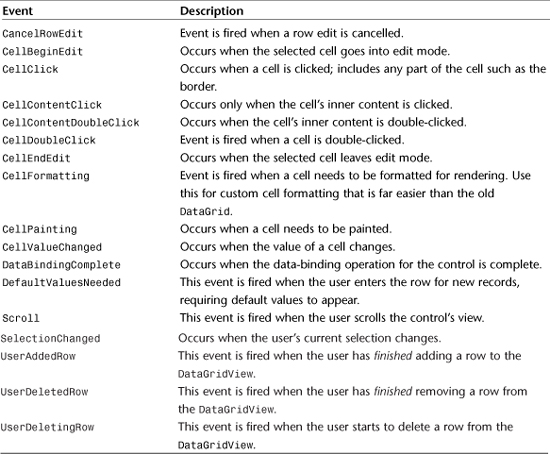
Table 37.6 Some of the Methods of DataGridView
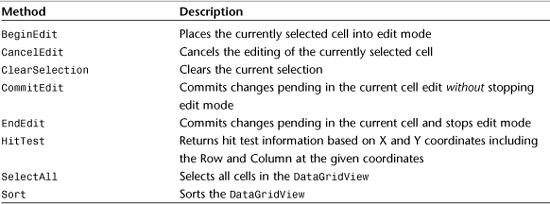
Table 37.7 Some of the Properties of DataGridView
As mentioned earlier, there are many more properties, methods, and events that provide the DataGridView with its power. In the rest of this section you will see a few of these properties in the context of some practical and common samples.
Using a ComboBox Column in a DataGridView
Those of you who have worked with the 1.1 version of the DataGrid know that there were quite a few limitations on its usefulness. For example, in a room full of developers, only the bravest (or most foolish, depending on who you ask) would volunteer to write the code to allow their DataGrid to support combo boxes, drop-down image lists, check boxes, and more. In fact, most people simply resorted to buying more powerful grids from component vendors.
That kind of custom grid programming is no longer a problem with the DataGridView. As you’ll see in this and subsequent sections, the DataGridView was designed from the ground up to allow programmers to customize, tweak, and extend it.
The sample in this section involves creating a column in the DataGridView that uses a ComboBox. This model is used when the column in the underlying data source is a number or some other key into a lookup table (such as a state code, an order number, a color code, and so on). This sample literally took me five minutes to create.
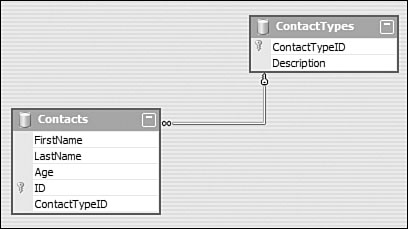
To start off, create a new Windows Application (C# of course). For that new application create a new DataSet that looks like the DataSet shown in Figure 37.3.
After you have the ContactsDS dataset created, drag it onto the surface of the main form and then delete the BindingNavigator tool strip. Modify the columns list and edit the ContactTypeID column. Change the header text to “Contact Type.” Then change the ColumnType property to DataGridViewComboBoxColumn. You should notice that a few new properties have appeared for this column under the Data category:
DataSource—The data source that supplies the items for theComboBox.DisplayMember—The name of the member on the list item that will be displayed in theComboBox.Items—A collection that allows you to manually configure the list of items in theComboBox.ValueMember—The name of the member on the list item that will be used as the current value of the selected item in theComboBox.
Figure 37.3 A contacts DataSet to illustrate a lookup column in a DataGridView.
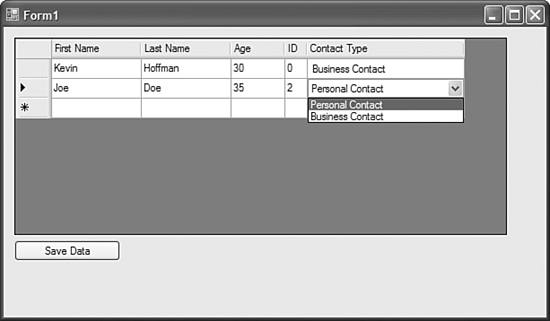
For this sample, set DataSource to the ContactTypes table. You can browse to this table and it will create a component called ContactTypesBindingSource and bind to that. Set the DisplayMember to Description and ValueMember to ContactTypeID. You can even set DisplayStyle to Nothing, which will actually hide the drop-down button until the cell goes into edit mode (this makes the column appear as a regular text column until the user clicks into it).
That’s it—you just created a column in a DataGridView that is an integer field that gets the list of available options from another table and displays that list in a ComboBox—and you didn’t have to write a single line of code. This kind of task is brutal and painful in .NET 1.1 but really couldn’t be simpler using the new DataGridView control.
To make the sample do something interesting, add the following lines of code to the Form_Load event to add a few contact types:
contactsDS.ContactTypes.AddContactTypesRow("Personal Contact");
contactsDS.ContactTypes.AddContactTypesRow("Business Contact");
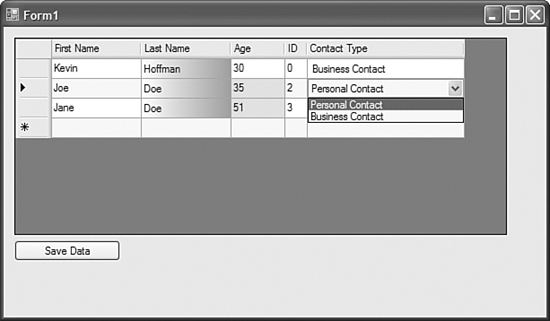
Take a look at this application in action as shown in Figure 37.4. The Save Data button shown in Figure 37.4 is just a simple button that takes the data being managed by the application and stores it in an XML file that can then be read later.
Advanced Cell Customization
Another grid feature that often makes developers cringe is the notion of customizing the appearance of a cell such as its background color, font, and more. In this next example, which builds on the previous ComboBox example, you will see just how much you can do with the new DataGridView with very little effort on your part.
Figure 37.4 The ComboBox column in action.
If you ever tried to implement ledger-style coloring in a Windows Forms DataGrid, you know that it’s not as easy as you like, especially if you know how easy it is to accomplish with the v1.1 ASP.NET DataGrid. You can now accomplish a ledger-style coloring in just a few seconds. In the DataGridView properties, edit the AlternatingRowsDefaultCellStyle property by clicking the ellipsis (“...”) button. Set the background color to yellow and run the application. You should now have a ledger-style grid without writing any extra code.
Another task that normally frustrates programmers working with the old DataGrid is conditionally formatting a single cell. For this example, assume that you are required to change the background color of the “Age” cell to Aquamarine if the person in that row is 35 or older. For this, all you have to do is handle the CellFormatting event, as shown in the following code snippet:
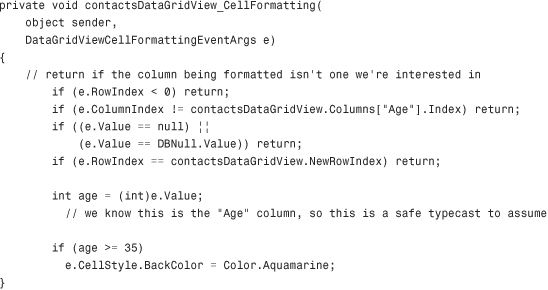
The CellFormatting event is called every time the cell needs to be formatted for output. This gives you the chance to change any of the properties of the cell to which you have access.
However, if you need to do something slightly more complicated, such as formatting that requires a Graphics object, you need to use the CellPainting event. Don’t worry; using the CellPainting event is nowhere near as painful as modifying the Paint event of the old DataGrid.
In the code snippet that follows, you see an example of a CellPainting event handler that creates a gradient background for the LastName column:
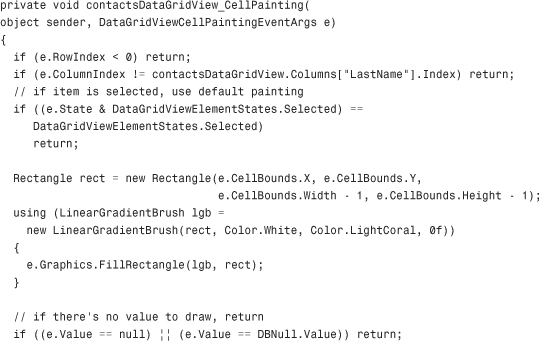
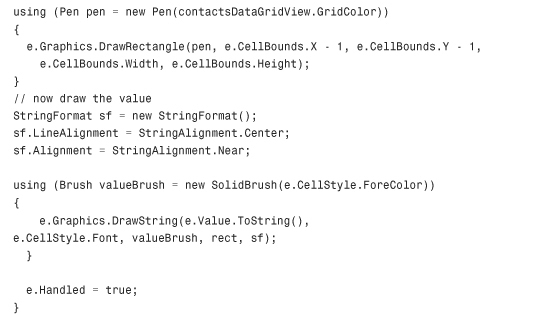
A little bit of GDI+ code was used in the preceding example to create the gradient and use a few brushes, but it’s all pretty basic stuff. Using GDI+ in this manner requires that your application have a reference to System.Drawing.Drawing2D. The really important line of code is
e.Handled = true;
This tells the DataGridView that you have handled the painting for the cell in question. When Handled is true, the DataGridView will not render the default cell style painting. If you left Handled to false, all of the painting you did in this event handler would be overwritten by the default cell style for that cell.
Figure 37.5 shows the new DataGridView, complete with the ComboBox column, the ledger style, and the gradient-background cell.
Figure 37.5 The DataGridView with advanced cell customization.
The DataGridView “Unbound”
Perhaps one of the most interesting features of the DataGridView is that you can actually use this control without binding it to any data. When you drag a DataGridView onto a form without specifying a data source, you can then use the Smart Tag or the Columns property to start adding unbound columns. To add an unbound column, all you have to do is specify the name of the column, the header text, and the cell’s template (TextBox, ComboBox, CheckBox, Image, and so on). After you’ve done that, you’re ready to programmatically add rows to the grid. You can do this in a couple of ways. The following few lines of code show a few of the different ways to get rows into the grid:
dataGridView1.Rows.Add(new object[] { "Kevin", "Hoffman" });
dataGridView1.Rows.Add();
dataGridView1.Rows.Add(9);
The first line of code adds a row and prepopulates the columns with values. The object array’s indices must correspond to the column indices or the data might not show up properly. The second line simply adds a new, empty row. The third line adds nine empty rows to the end of the data in the grid.
After you have programmatically placed your own rows into the grid (or the user does it for you), all of the code you’ve seen in this chapter dealing with the DataGridView will also work on an unbound grid. This means that you can change the formatting and painting behavior of an unbound cell as well as create a look-up ComboBox column just as easily as if it was a bound control.
Data Binding with Objects
There are always discussions about whether it is better to use XML, typed datasets, or business objects when working with data within an application. Everyone has their own reasons, but I have always preferred business objects. With a business object, you are working in a completely object-oriented model and you have complete control over implementing the business rules directly within the business object.
The problem has traditionally been that Visual Studio wouldn’t let you graphically hook up data-bound controls to business objects. You had to do this programmatically at runtime, which eliminated the RAD benefits of the visual designers. It was still better than manually loading the controls with data in for loops, but it wasn’t ideal either.
With Windows Forms 2.0 and the new data-binding components, you now get the ability to visually bind your controls to actual business objects through the Visual Studio designers. This is a huge benefit to those of us who are die-hard business object fans. It also works out quite nicely if you’re using a tool that maps business objects to your database (ORM tools, relational mappers, or even Microsoft’s ObjectSpaces library).
Object Data-Binding Basics
To start with, all you need is a business object. To follow along, create a new Windows Application called ObjectBinding and then add to the solution a new class library called BusinessObjects. Then you can create any business object you like. I created a class called Contact with a first name and last name. These business objects need a default constructor, and public properties that will represent the columns of data when presented in a grid format.
Now you need to add a reference from the ObjectBinding project to the BusinessObjects project and build the solution. The reason for this is that when you use the Data Source Wizard to add an Object Data Source, it browses compiled Assemblies, not source code files.
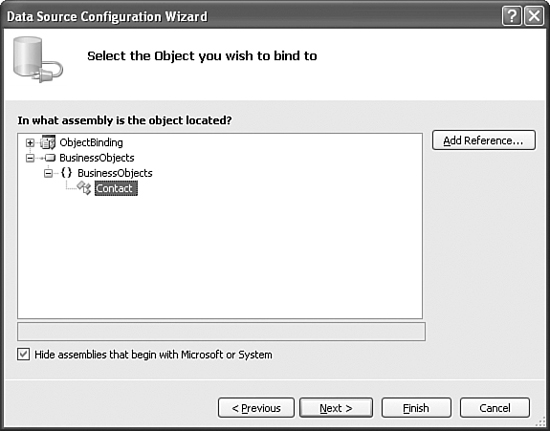
Open the Data Sources window and click the button to add a new data source. When prompted for the type of the data source you want, select Object and click Next. You will then see a dialog prompting you to select the assembly in which the business object class resides. Click the “+” sign to drill down into that assembly and locate the class that you want to use as a data source. Figure 37.6 shows the Data Source Wizard browsing to the Contact class.
Figure 37.6 The Data Source Configuration Wizard selecting an Object Data Source.
Now you have a Data Source that is actually an object. After adding the new data source to the form, the form also now has a new BindingSource component on it called contactBindingSource (if your class is called Contact). You can use that BindingSource to gain access to the underlying objects.
Using the IEditableObject and INotifyPropertyChanged Interfaces
Now that you have seen just how easy it is for you to bind your controls to business objects, you can bring your game up another level by implementing a couple of interfaces that are designed to make your business objects even more compatible with data binding facilities.
Using the INotifyPropertyChanged Interface
When you drag a business object from the Data Sources window onto a form, what you end up with is mostly one-way binding. The class instance to which the control is bound will have its values changed whenever the control value changes. However, the control may not automatically know when the value on the object changes.
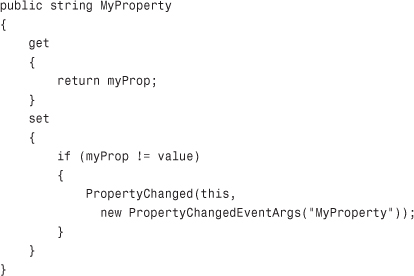
To ensure that your business object tells bound controls whenever a property changes, you can have your class implement the INotifyPropertyChanged interface. Any class that implements this interface is required to publish an event called PropertyChanged to which bound controls (or any other class that is aware of the interface) can subscribe. In the set accessor of your property, you can write a few lines of code to make use of the event, as shown in the following example:
Using the IEditableObject Interface
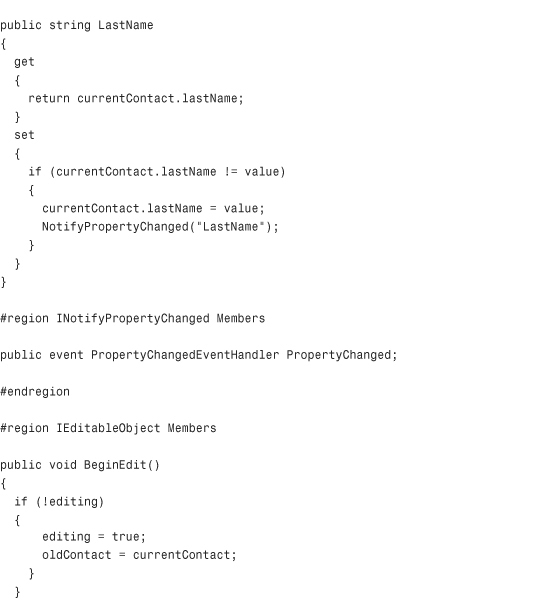
In addition to letting the user interface know when properties change, you can also allow your business objects to take part in simple commit-or-cancel edit operations. By implementing the IEditableObject interface, your class will expose the following methods:
BeginEdit—Indicates that the user has begun an edit operation on your classCancelEdit—Indicates that the user cancelled the edit, informing your class to roll back the changes made since editing beganEndEdit—Indicates that the user finished editing and would like to commit the changes
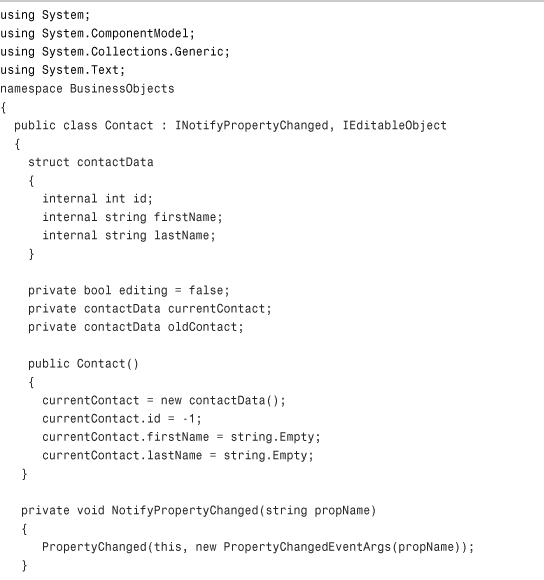
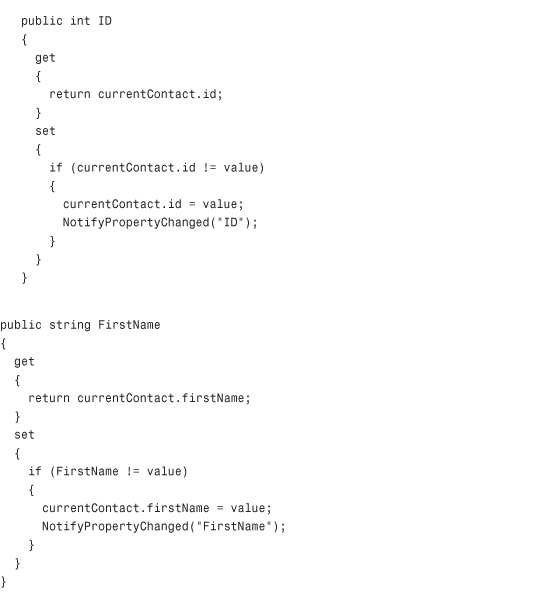
Listing 37.1 shows a Contact class that implements both the IEditableObject interface and the INotifyPropertyChanged interface.
Listing 37.1 A Class That Implements IEditableObject and INotifyPropertyChanged

Parent-Detail Binding
One of the things that hasn’t yet been covered in this chapter is the parent-detail binding pattern. This is a common situation where the user navigates through rows in a parent table and each of those rows is the parent row for child rows in another table. The example most commonly used to illustrate this is when dealing with an Orders table and an OrderDetails table. While the user is browsing through the list of orders, a list of order items appears every time the user changes the current order.
Binding with a parent-child relationship is just as easy as binding to a regular data source. With a typed DataSet, you bind the parent control to the parent table, just as you normally would. Then, for the child view, you simply bind to the DataRelation (often named with an “FK_” prefix indicating that the data relation is a foreign key) that dictates the parent-child relationship. After you do this, the parent-child relationship will be reflected in the GUI.
As an exercise, take the information that you have learned throughout this chapter and try to build your own parent-detail data binding. You can use all of the data-binding techniques covered in this chapter to create the parent binding, and then when selecting a data source for the child records, simply select the data relation rather than the child table itself.
Summary
This chapter was all about data binding with Windows Forms 2.0. Not only has data binding become quicker and easier than before, but it is now more flexible and more efficient in many cases. In addition to getting an overview of data binding, you were also introduced to the DataGrid's successor: the DataGridView. The DataGridView is an extremely flexible and extensible grid control that makes it easy to create compelling visual grids without having to resort to spending weeks creating custom columns or buying third-party grids. Finally, this chapter covered an extremely powerful new feature of Windows Forms 2.0: object binding. After reading this chapter, you should feel comfortable creating powerful, flexible, data-driven user interfaces in Windows Forms applications.