One of the first things you should do is set your personal options to control the way Microsoft CRM displays information. You can use these personal settings to streamline the system so it best suits your function in the organization and your style. For example, you can determine which window appears when you start Microsoft CRM each day. If your role is strictly in customer service, you might want the system to go directly to the list of your cases.
In this chapter, we discuss the choices you have and how to set them. It's unlikely that you'll need to change every option, but it's good to know what's available.
Tip
Customization is important, and the process shouldn't take long. A little attention to customization now will enable you to work more efficiently as you become familiar with the system.
You can streamline your use of CRM by setting your regular workday hours, how you want your scheduled activities to appear, the starting point for the system each morning, and many other options. Options like these are called your personal settings. Basically, you're telling Microsoft CRM how you like to operate.
To access your personal settings from the Web Client, follow these two steps:
At the bottom of the navigation pane, click the Workplace button.
An option to Personalize Workplace appears in blue just above the Workplace button.
Click the Personalize Workplace option.
The Set Personal Options window appears, with the Workplace tab displayed by default, as shown in Figure 4-1.
CRM provides you with eight tabs, each of which affects various default settings and how information is displayed. Most of these settings do not affect anyone other than you, so you should set them to please yourself. All dates in MSCRM are converted to Universal Time when entered into the database; make sure your time zone is set correctly if you share data with other users in different time zones.
In the sections that follow, we cover adjusting the options on these tabs. After you make changes on any of them, make sure to click OK to save your changes. To see the results of any changes you make, log out and then back in.
Click the General tab (called Miscellaneous in prior versions of Microsoft CRM) contains settings for what you want the system to display upon startup, how many records you want to see at one time, how you want the Find function to work, which time zone you work in, which currency you use, and whether you'd like to display CRM in high contrast. The General tab is shown in Figure 4-2.
The first group of options on the General tab pertains to your default start page. The Default Pane drop-down list offers you these six choices:
Workplace: This folder allows you to create and manage your calendar, personal work items, knowledge base, and reports all in one area. You can also work with your accounts and contacts in this area.
Sales: This folder allows you to create and manage accounts, contacts, leads, and opportunities.
Marketing: This folder allows you to create and manage leads, campaigns, and sales literature.
Service: This folder allows you to create and manage cases and contracts. This is also where the knowledge base is configured.
Settings: This folder contains administrative tasks. Here you can manage announcements, setup users and security, configure e-mail options and rules, and configure your system settings. You can probably eliminate this option as a reasonable choice. Selecting Settings means that every morning when you sign on, CRM automatically starts up by allowing you to change your Settings. This isn't something you're likely to do regularly. In fact, you'll probably set it and forget it.
Resource Center: This folder contains information to the new user including best practices and training material.
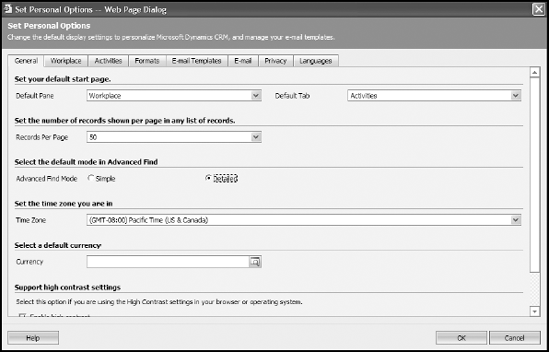
Figure 4.2. You can tell the system how you want to operate, rather than have it be in charge of you.
Note that the selections you see in the Default Tab option change depending on your selection in the Default Pane option. For example, if you select Settings as your default pane, you will see options for administrative tasks such as user security, announcements and email rules. If you select Service as your default pane, options for cases, contracts, and knowledge base appear as selections in the default tab.
If your job function is primarily in sales, marketing, or customer service, it might seem logical to select one of those choices as a starting point for your day. This might work for you. However, we prefer to come in each morning and see what's on our agenda. This is best accomplished by setting the Default Pane option to Workplace and the Default Tab option to Activities or to Calendar.
To set your default start screen, follow these steps:
Set the Default Pane option as desired.
To do so, click the down arrow to the right of the field and then make a selection. The options in the Default Tab option will change, but you won't be able to see that until you position your mouse in that field.
Set the Default Tab option as desired.
Click the OK button (at the bottom of the window).
Your new options are saved, but you won't see the effect of this until the next time you log into CRM.
Now on to the next option on the General tab — Records Per Page. Depending on the size and resolution of the screen you're using, you may want to change the number of records that appear in each list. The smaller your screen or the lower your resolution, the fewer lines you may want displayed at any one time. On the other hand, if you have a large number of records and prefer just scrolling up and down, set the number of records shown to a large number, perhaps 100 or more. The default is 50 records per page; we usually set ours a little higher.
Advanced Find Mode allows you to create more complex searches and save search criteria for future use. You can take best advantage of this feature by selecting the Detailed option. If you select the Simple mode instead, you can use predefined searches but cannot create new ones yourself. Even if you have no intention of creating Advanced Find searches right now, don't limit yourself by selecting Simple.
The Time Zone drop-down list contains time zones from all over the world. Choose yours. The goal of setting your time zone is to coordinate your activities with other members of your team who may be dispersed throughout the world. This assists in coordinating conference calls among team members.
For example, suppose you are in New York and set up a conference call with a team member in Sydney, Australia. If you schedule your call for 4 p.m. Monday, the call shows up on your Australian counterpart's activity list for 8 a.m. Tuesday (her time) — if she's selected her correct time zone as well, that is.
The Currency box allows you to select the currency you'll use when working with Quotes, Invoices, Orders, and Opportunities.
The Enable High Contrast option improves the display of buttons and icons in your system. Select this option if you have it selected in your operating system or Web browser (such as Internet Explorer). (Selecting this option will automatically reload your page.)
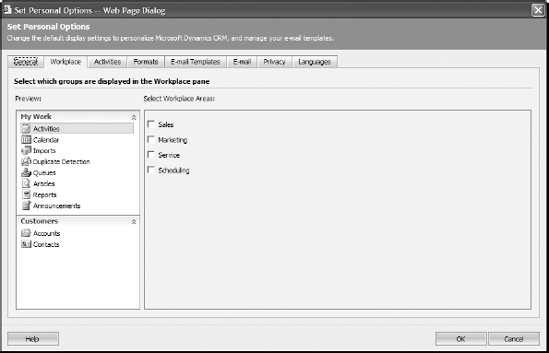
You use the Workplace tab in the Set Personal Options window (refer to Figure 4-1) to define your role in your organization and to tailor the work-place. (As you may recall, a workplace is a page that allows you to create and manage your calendar, personal work items, knowledge base, reports, accounts, and contacts all in one area to show any combination of sales, marketing, service, and scheduling information.) When you select the Marketing option, for example, marketing lists, campaigns, and quick campaigns become available to you in the navigation pane. This list of options may look different depending on how your system administrator or implementation partner defined the options when setting CRM up.
Simply click to add the check mark from each of the four options in turn. As you do so, more areas are displayed in the Preview panel on the left of the check boxes you are clicking on. When all four workplace areas are turned on, the maximum areas are available.
We recommend that you select just the one or two roles you usually play in your organization. Selecting more won't damage anything but will clutter the screen with functions you don't need. Our advice? If you're in sales, select Sales or Sales plus Marketing. If you're in customer service, select Service or Service plus Scheduling. If you're in Marketing, don't clutter up your work-place with Service schedules but do select the other three. Remember that the workplace simply consolidates information from different areas as mentioned earlier. If, for example, you selected only Sales to be displayed in your workplace but later needed access to Service information, you can simply click on the Service short-cut in the left navigation pane. (For more on this, please refer to Chapter 3.)
Activities is the third tab in the Set Personal Options window. This is where you to specify your default calendar view and the hours that you're typically in the office, as shown in Figure 4-3.
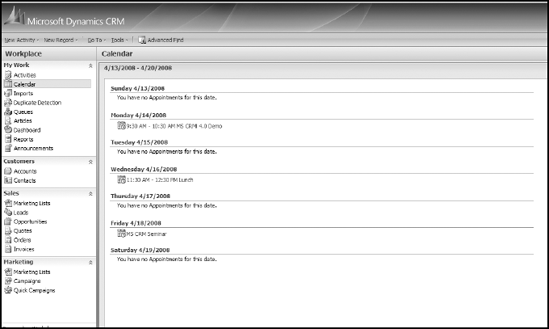
A good choice for the Default Calendar view is Weekly, which is shown in Figure 4-4. The calendar view, whether daily, weekly, or monthly, displays only appointments and none of the other activities, such as scheduled phone calls or tasks. If you want to use any of the calendar views and you want a realistic picture of what's on your schedule, make everything an appointment. Please note that these options affect what you see in the graphical calendar (calendar view). We think a better option is to use the Activities view, which shows all types of scheduled activities including appointments and phone calls. (Please refer to Chapter 2 for more on using Outlook Client and synchronizing MS Outlook with CRM.)

The second set of options (Set Your Default Work Hours) enables you to specify your typical workday hours. Although a Start Time of 2 p.m. and an End Time of 3 p.m. sounds appealing, you should set this more realistically as it affects your calendar as well as scheduling. By default, your workplace calendar displays the hours you've selected as your regular work schedule. This is also what everyone using the system sees as your official work hours. Enter them wisely; other users of the system will schedule your calls, appointments, and so on, within that range of hours. If you (or others) happen to schedule an appointment outside those normal hours, it will still appear on your calendar.
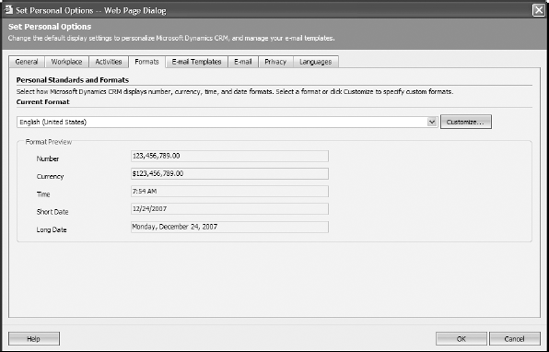
The Formats tab (see Figure 4-5) enables you to select from a pre-defined list the manner in which CRM displays numbers, currency, time, and dates. For example, if you choose the English (United States) option from the Current Format drop-down list, when you log into CRM you see numbers 123,456,789.00, currency with a dollar sign preceding it, time 8:30 AM, the short date in the mm/dd/yyyy format, and the long date with the day of the week preceding the day, month, and year.
You can additionally extend the pre-defined list by clicking the Customize button and adjusting the options in the window that appears.
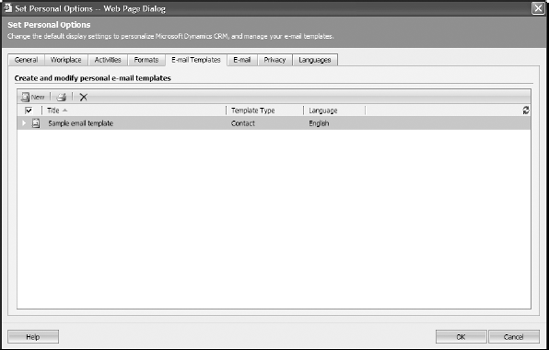
The E-mail Templates tab enables you to create and customize templates (predefined e-mails, e-mail body, subject, and so on) for almost every type of record (account, contact, opportunities, and so on) in the database, assuming your security level allows this. (We describe security and access rights in Chapter 8.) The ones you create in this section are available only to you. To create templates for the entire organization, use the Settings tab of Microsoft CRM.
This important feature enables you to create a powerful array of standard documents that you can use, for example, as automatic responses (see Chapter 9 for more on working with workflows) to inquiries about your products or services. This is a great way to expedite your response to sales inquiries. Unlike fine wine, leads never improve with age. From a list of templates you create, you can choose any template and create a bulk e-mail, also known as a direct e-mail or an e-mail blast. Bulk e-mail is a way to send multiple e-mails at one time easily and automatically. Some people associate this with spam. As long as you're legitimately responding to someone's inquiry or have received permission to send electronic communications (also called opt-in mail), it is not spam and may be an effective way to handle many routine business activities, including newsletters and special announcements.
Warning
It is probably to your professional advantage to include a way for your e-mail recipients to opt out of receiving e-mail from you. For more information, read the CAN-SPAM Act of 2003 at www.ftc.gov/bcp/conline/pubs/buspubs/canspam.shtm.
See Figure 4-6 for an example of e-mail template titles. From the E-mail Templates tab, you can apply any of the templates to an email, or you can create new templates by clicking the New button and following the instructions in Chapter 12.
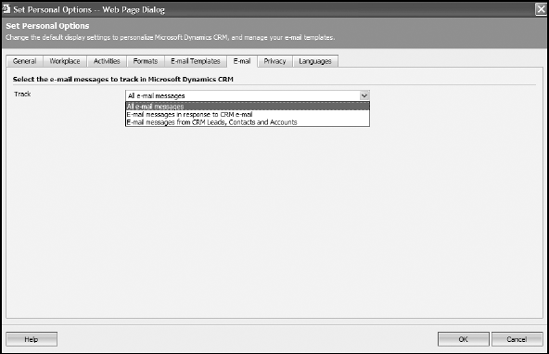
The E-mail tab (see Figure 4-7) allows you to better control the onslaught of incoming e-mail by letting you choose which type of e-mails are automatically tracked in CRM. Your options are All Emails, Emails in Response to Those You Sent Out or All Emails from Your Accounts, Contacts, and Leads in Your CRM System. Microsoft has incorporated a token-based system into the system which allows it to know if the e-mail should be copied to CRM or not.
From the Track drop-down list, if you select All E-mail Messages, all e-mail that would normally go to your Outlook inbox goes also to Microsoft CRM 4.0. If you select E-mail Messages in Response to CRM E-Mail, only those messages sent in response to e-mails sent from Microsoft CRM are brought into Microsoft CRM automatically. If you select E-mail Messages from CRM Leads, Contacts, and Accounts, only e-mails from leads of customers are will be saved in CRM.
Each method has its strengths and weaknesses. As a general rule, if you use the Outlook Client for Microsoft CRM, you should have Microsoft CRM automatically capture e-mails with the tokens. If you typically use Internet Explorer to access Microsoft CRM, select All E-mail.
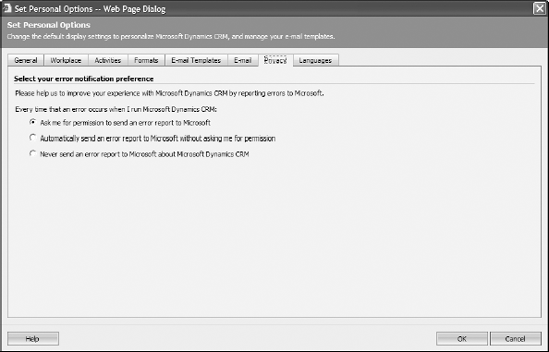
Users of Windows XP will immediately recognize the options presented here (see Figure 4-8). As with Windows, when MS CRM encounters an error, it can send a detailed report to Microsoft. You can tell MS CRM to do so in three ways: automatically, only with your permission, or never send a report. A good practice would be to have an administrator set this option up as most end-users aren't sure what to do when they see this prompt.
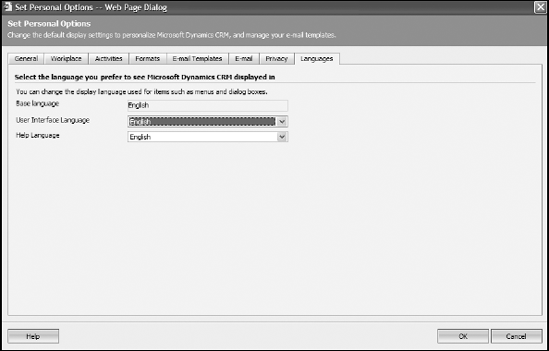
The last tab, Languages, allows you to select the language in which the main interface and help files are presented. (See Figure 4-9.)
Setting your user profile means telling the system (see the tip below) who you are and your role in the organization.
Your user profile coordinates you with your organization, so it's critical that your profile is set up before you and the other users really start using the system. The settings can always be changed as you go along and as your roles change.
Depending on the rights you have to the system, you may need to approach your system administrator to change your user profile.
Note
Even if you don't have the rights to tinker with these settings, you should know what options are available so you can at least provide input to the system administrator.
Your user profile enables you to record information about yourself and your relationship to your company, such as your title, the teams you work on, your roles in the organization, and the times you're generally available. Your user profile settings enable you to participate in one or more team activities (a team is a group of users which work together on specific records) and to have a specific role in those activities. (Please review Chapter 6, "Managing Business Units and Teams," for more information on teams and roles.)
Tip
Anyone can view anyone else's user profile in both the web and outlook clients, but administrative rights may be required to make changes.
To navigate to the user profile area, follow these steps:
At the bottom of the navigation pane, click the Settings button.
A window with 10 choices appears.
Select Users.
The Users window appears.
Double-click the user (you) whose profile needs to be reviewed or changed.
A window similar to the one in Figure 4-10 appears.
Tip
Your user profile may be displayed as read-only if your security settings don't allow you to edit it. If this is the case, your system administrator has to make any necessary changes for you.
Your user profile contains seven categories, each of which is displayed in the upper part of the navigation pane. These seven categories are divided into two groups: Details and Service. The Details group applies to everyone; the Service group applies specifically to customer service personnel. We discuss Service groups in detail in Chapter 22.
Under the Details group are the Information, Teams, Roles, Quotas, and WorkFlows categories. You should go through each category sequentially to view how your record is set up and determine whether any changes are required. Each of these categories defines a different aspect of your role in the organization, as we discuss in the sections that follow.
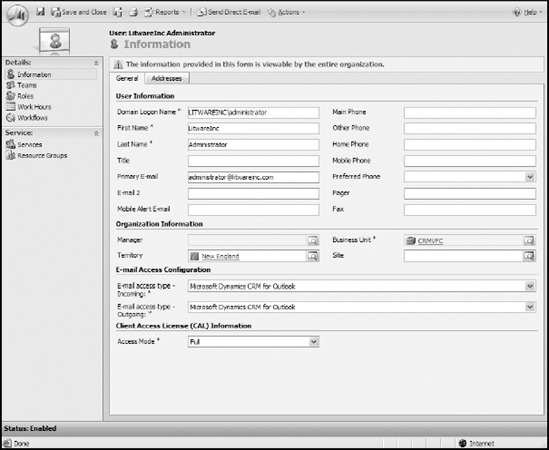
When you click Information in the navigation pane, you see the User window, with two tabs: General and Addresses. (Refer to Figure 4-10.) The fields labeled in red are required; everything else is optional but recommended.
Most of the fields on the General tab are self-explanatory, but these deserve further explanation:
Domain Logon Name: The server or entire set of resources running your CRM system.
Business Unit: The organization to which you directly report.
Manager: Your manager's name. (This field may be important if your system is designed to automatically escalate issues from one level of management to another.)
Territory: Particularly in sales, efforts are usually divided into regions or territories. Each salesperson is usually associated with one territory.
The Addresses tab allows for two separate addresses. Everyone in your company should use these the same way. We recommend that you use the office address as the Mailing Address and your home address as the Other Address. It could just as well be the other way around, but everyone in your company needs to conform to the same method. This is because of the way they are stored in the database. Inconsistent entry makes it difficult for automating certain tasks such as mailings to employees.
You use Teams, the next selection in the navigation pane, to group users who have the same basic role or who might need to share records.
Each user can be assigned to one or more teams. For example, you may be involved in your company's consulting efforts and also have some sales responsibilities. By assigning yourself to both the consulting team and the sales team, you assure yourself of being included in correspondence and meetings for those two groups. All the teams in a particular organization are displayed on the left. On the right are the teams to which the user is assigned.
Roles is the third selection in the navigation pane. Click the Roles option in the navigation pane to display the Roles window. Highlight the specific role you want to see and then click Manage Roles from the window's toolbar.
Microsoft CRM comes with a number of well-defined access rights, each associated with different roles that people perform in a company. For example, there's a well-defined set of access rights for an individual salesperson and a different set for the manager of customer service. You should have at least one role and could have several. These assignments are normally part of the initial configuration of the system and are usually the responsibility of your administrator.
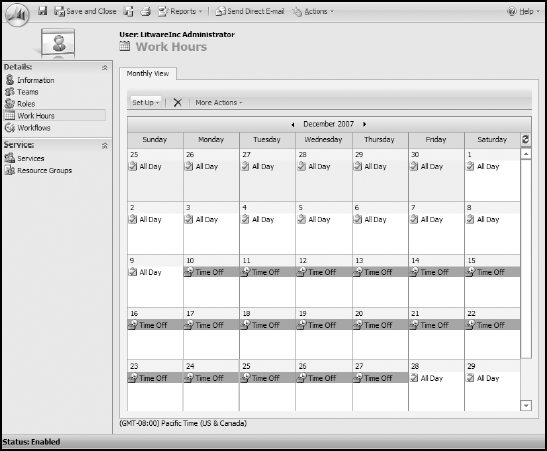
This is where each user's standard schedule is housed. You establish the typical work week and then add specific time off. If your organization runs more than one shift, the Work Hours area is where you indicate which shift each person is working. You can use this area also to indicate you're working or on vacation.
To view or edit your work hours, follow these steps:
At the bottom of the navigation pane, click the Settings button.
Select Users.
The Users window appears.
Select the user whose work hours you want to view by highlighting that user and clicking Work Hours from the navigation pane.
The window shown in Figure 4-11 appears.
In the top-left area, click the Set Up button.
This button is the key to managing each user's work hours. Three options appear, enabling you to set a new weekly schedule, set a unique schedule for one day at a time, or schedule time off. Each option displays a simple entry screen.
Choose an option, fill in the entry screen, and then click OK.
The final category under Details is Workflows. The Workflows screen allows you to monitor processes defined in your system. (These processes are simply workflow jobs, such as automated follow-up calls for every new leads, which are scheduled, running, or completed in the system.) We discuss work-flows in detail in Chapter 9.