Most organizations want auto-enrolment of certain certificate templates, while still having MIM CM capabilities. In the following example, The Financial Company will use the EFS certificate for enrolment and recovery.
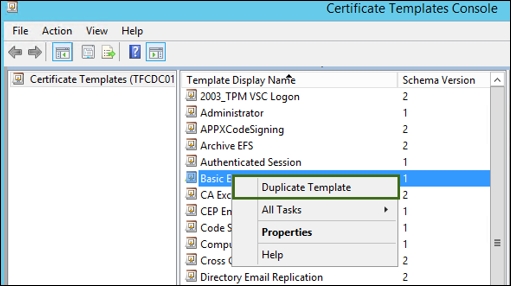
The first step in this process is to set up the certificate template. We will navigate to the CA to duplicate the Basic EFS template, as depicted in the following screenshot:
In the template screen, enter the following information:
- The General tab:
- Template Display Name: Archive EFS
- Validity Period: 2 years
- Renewal Period: 6 weeks
- Publish certificate in Active Directory: Enabled
- Do not automatically re-enrol if a duplicate certificate exists in Active Directory: Enabled
- Leave all the other settings at default values
- The Request Handling tab:
- Archive subject's encryption private key: Enabled
- Leave all the other settings at default values
- The Subject Name, Server, Issuance Requirements, and Extensions tabs:
- Leave all the settings at their default values
- The Superseded Templates tab:
- Add: Basic EFS (this is the template we duplicated)
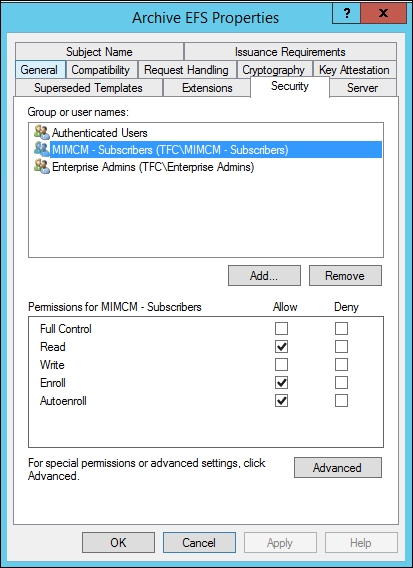
- The Security tab:
- MIMCM - Subscribers: Read, Enroll, and Autoenroll permissions
- Enterprise Admins: Read and Write permissions
- Domain Admins: Remove permission
- Authenticated Users: Read permission
After creating the template, we need to publish the certificate in order to use it. Certificate publishing is done similarly to the other templates we created earlier—by navigating to Certificate Template | New | Certificate Template to Issue.
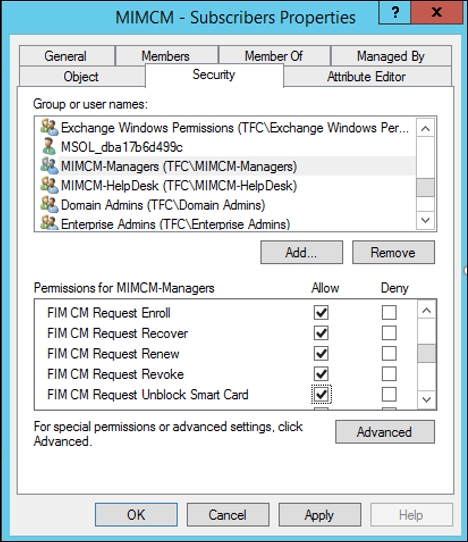
Next, we need to add or confirm that the MIMCM managers have the FIM CM Request Recover permissions on the Service Connection Point:

Based on our earlier reading, we know that the manager needs permission on the SCP as well as the target users. We, therefore, created a security group called MIMCM – Subscribers and assigned the FIM CM permission to include FIM CM Request Recover:
We now need to create an EFS profile template. As in the smart card scenario, we will duplicate the FIM CM Sample Profile template under Manage profile templates in the web interface. We will name this template EFS Certificates, add ArchiveEFS to the certificate template list, and remove the default template (User).
Let's now navigate to the Enroll policy and click on Change General Settings. Unselect the Enable policy checkbox:

In order to support recovery options, we need to click on the Recover policy and make sure Use self serve is disabled:
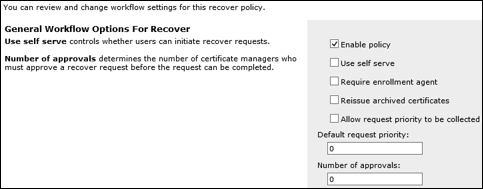
The next few configuration options are needed for recovery, and we need to make sure the revocation settings are properly set to the requirements of The Financial Company. For Workflow: Revocation Settings and Workflow: Duplicate Revocation Settings, we need to set to the following for both:
- Set old card or profile status to disabled: Enable
- Revoke old certificates: Disabled

In the profile, we need to set who can initiate a recovery option. We will use MIMCM –Managers, so we will need to add them to the following section and remove the default value of NT AUTHORITYSYSTEM, as shown here:

The Financial Company requires a reason for the recovery operation. We will update the Data Collection item. Currently, it shows as Sample Data Item. We will update the item to a recovery reason, as shown in the following screenshot:

When selecting encryption, the agent certificate is used to encrypt the data in the database. We will leave the one-time password setting to be displayed onscreen, but as an option, it can be e-mailed to the subscriber or target user. More information on the notification mechanism can be found at http://bit.ly/MIMCMNotification.
The last step of this process is to set up the Group Policy object and update the policy module in the CA. Let's finalize this setting now and test the scenario.
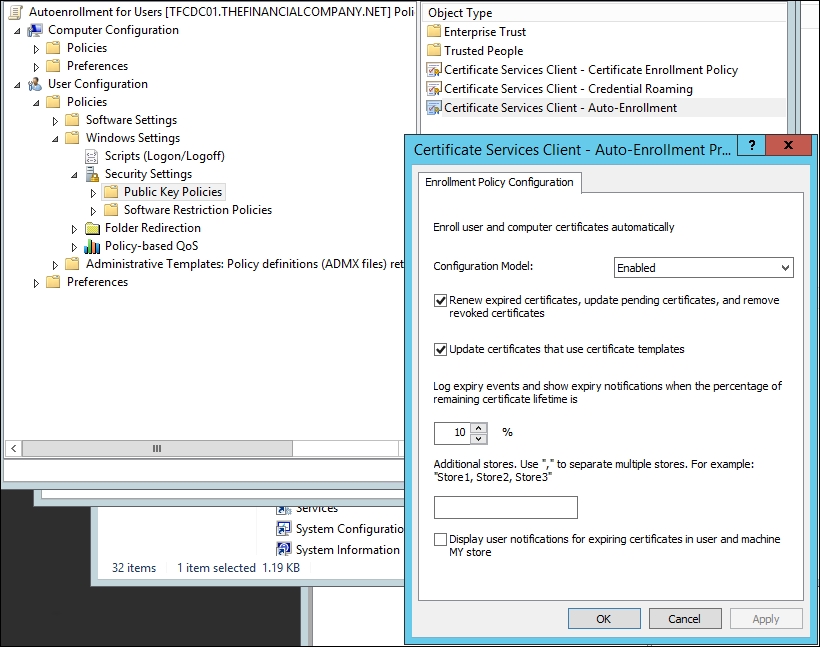
For the Group Policy object, we want to open the GPO editor and create an autoenrollment policy. We will name ours Autoenrollment for Users and then add security filtering to MIMCM - Subscribers as this will only apply to users in this group. Go to User Configuration | Policies | Windows Settings | Security Settings | Public Key Policies. We will set the autoenrollment policy as shown here:
Next, we need to map the autoenrollment to the profile template upon user autoenrollment. Let's go back to the CA. On the CA, click on Properties and then on the Policy module. Finally, on the Custom Module tab, click on Add, as you can see in the following screenshot:

You should now see a prompt for custom modules. The module we want comes with CM and is located in the Microsoft.Clm.PolicyModulePlugins.dll DLL. The DLL comes with four plugins, as follows:
- Certificate SMimeCapabilities Module 1.0
- Certificate Subject Module 1.0
- SubjectAltName Module 1.1
- Support for non-FIM CM certificate requests
More information on these plugins can be found at http://bit.ly/MIMCMModules.
The template we are interested in is Support for non-FIM CM certificate requests:

We will name this CLIENT EFS – AUTOENROLL and select the ArchiveEFS certificate. Next, we will click on the Configure button to configure the policy module connection, allowing the processing of the certificate. One key setting is the mapping to the profile template. We need to select the EFS certificate we created earlier and the maximum number of active certificates that we are allowed to create per user. We will set the maximum number of active certificates to 5:

We have now completed all the backend work to hook this all together. The work we performed configured the certificate and permission for the user and the manager. We created the template, the workflow needed to recover a certificate, and the GPO to initiate the enrollment on login. Lastly, we told the CA to record the enrolments in CM up to five times.
Log in as a user that is part of the issuers group, and the autoenrollment should initiate and install our certificate. We can now encrypt items using the certificate:
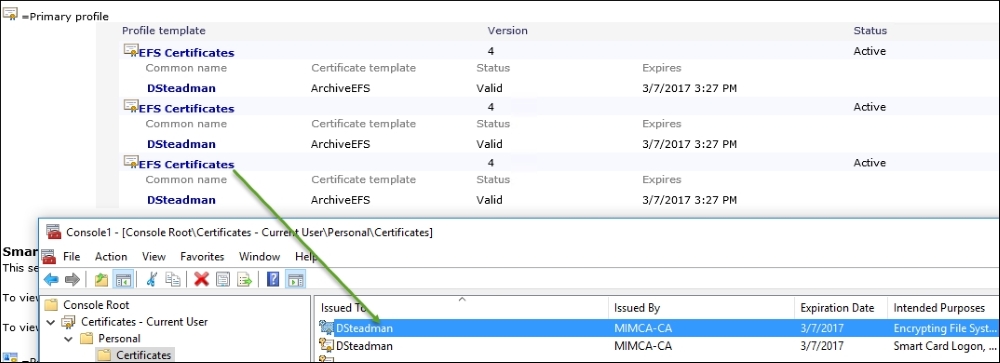
As shown before, a new certificate was issued. Note that we see two other profiles that are EFS certificates. Recall that in our configuration, we set a maximum of five certificates, which means we would issue a certificate on any new machines dsteadman logs in to, up to five machines.
Testing certificate recovery requires a CM manager that has appropriate permissions. The manager would log in to the web interface and search for the user to recover. In our example, Jeff is a CM manager and will log on to the portal and click on Find a user to view or manage their information, as in the following screenshot:

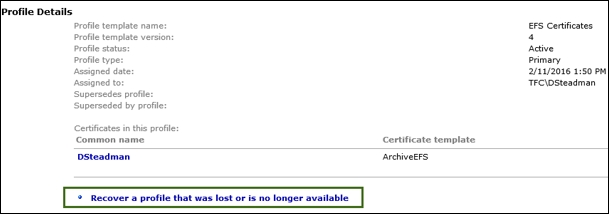
Enter the e-mail or username of the user we want to initiate the recovery of. We have an option to search all of the forest or perform a selected scoped search. Once found, we will see the three profiles the user sees. We will select the first EFS certificate because David has indicated that he secured a document using this certificate:

Clicking on this profile provides the following option:
The manager will be prompted for a recovery reason, which is prefilled with the default value we entered on the profile. We will leave the default value and click on OK:

We also have an option to recover the certificate. In this case, we will give David the one-time password option to complete the recovery:

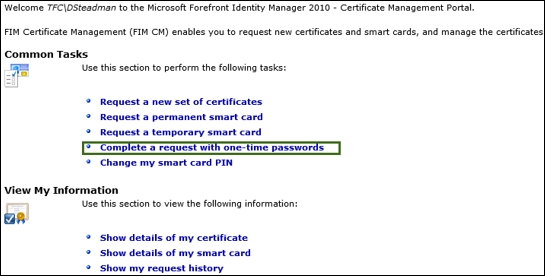
Let's log on to the web portal as David to complete the recovery and click on Complete a request with one-time passwords:
Enter the one-time password and click on Next twice:

David will now be prompted, typically twice, that a certificate operation is being performed on his behalf. Click on Yes:

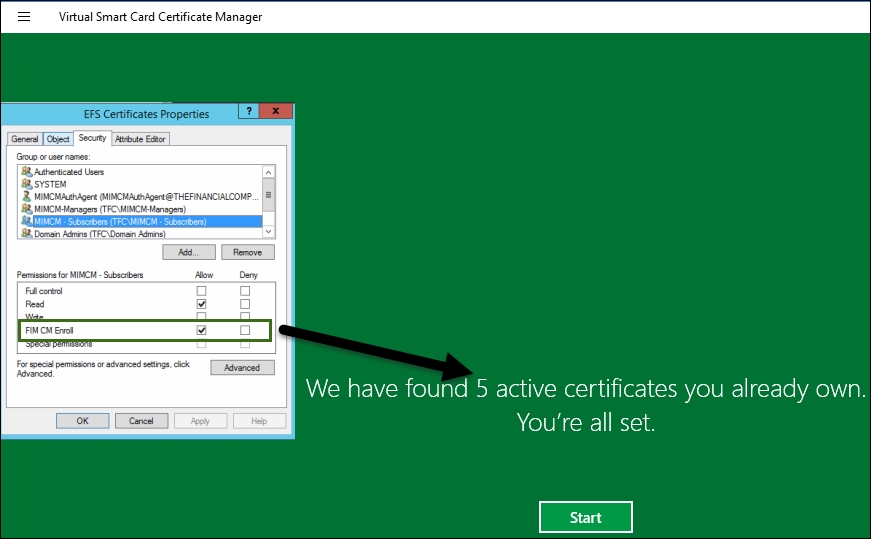
David is redirected to a screen informing him that the recovered EFS certificate is installed, as seen in the following screenshot:

To confirm that the EFS is truly recovered and installed, we will open the MMC console and find two EFS certificates:

If we launch the Modern App remotely, we will not see any certificates:

We know that we have two certificates, based on what we see in the local MMC. We also know, if we are logged in to the machine via remote RDP, that the TPM/virtual smart card will not appear because the TPM is inaccessible. So why don't we see the certificates from the Modern App? The Modern App looks at the profile template if, and only if, you have Enroll rights to the profile. In our example, we will use the policy module and autoenrollment to do the work. So, to see these certificates, we need to add the FIM CM Enroll permission to the profile template. We do not know whether this behavior will change in the future. It does seem as though we should see all our profiles even if we don't have the Enroll permission on the CM profile, but as of writing this, you need the permission: