Before we start to use our MIM implementation to manage identities, we need to decide where the information about the identities will come from, and where that information will go. It is best that we start off with the essential connections, and add more as we verify that the basics are working.
A very typical scenario is the one we have—The Financial Company has an HR (human resource) system that will, for the most part, work as the source of identity information. Then it has Active Directory, which is the primary system to receive the identity information.
The basic flow will be: HR -> MIM -> AD.
But that is only the basic flow. As you will see later in this book, there will be other sources of information and additional targets.
Most MIM implementations have at least one Management Agent connected to Active Directory.
There are a few things to consider before creating this Management Agent. First, you should have already sat down with business partners and technology teams, and determined which systems you will be connecting to, which objects, which attributes, and how an attribute should flow through MIM to other systems. These identity discovery and processing mapping discussions are extremely useful, because you will effectively be configuring MIM to coincide with those business processes. Secondly, keep things as simple as possible, and don't try to do everything at once.
If, for example, your plan is to have MIM manage both users and groups in AD, start off by implementing the management of users, and then add groups when the user part is working.
Are we interested in the whole AD or only its parts?
Some businesses specifically exclude parts of Active Directory from MIM. There's nothing wrong with excluding parts, but keep in mind that this decision may impact other requirements. For example, if a collection of users is excluded from MIM, those people will then also be excluded in MIM group management. If Active Directory has group nesting, excluding a collection of groups could have serious repercussions.
Do I need a test environment?
Yes! You should always develop and verify your MIM configuration in a testing environment before applying the configuration to your production environment. What is the worst that can happen? A lot! Depending on what you've configured in MIM and the permissions your service accounts have, you could overwrite or clear data, mistakenly create new accounts, or inadvertently delete accounts. The authors have worked in support long enough to tell you that this is one lesson you do not want to learn the hard way.
The Management Agent (MA) will use a service account to talk to Active Directory. The Financial Company is using the approach to have as few MA accounts as possible rather than having one account for each connected system.
In the case of The Financial Company, the SVC-ADMA account will be the account that we will use to connect to Active Directory. What we need to do is to give this account the permissions needed to manage relevant objects in AD.
You should always apply a least-privileged approach to all your accounts, especially service accounts such as the ones we will be using with our MIM Management Agents.
To keep things simple, our environment has user accounts in an OU named TFC Users. We then need to give MIM the required permissions to manage the objects. Right-click on the OU, and run the delegate control wizard. Give the AD MA account, SVC-ADMA, and management permissions on user (and maybe group) objects. In some cases, the aforementioned wizard might give the AD MA account more permissions than needed. If, for example, MIM should only be able to create and manage the objects but not delete them, we need to adjust the permissions in order to use the least-privilege approach.
When importing (reading) information from AD, it is possible to use what is called delta. Delta means we only get the changes since the last time we checked. In order for the MIM Active Directory Management Agent to read only the changes (the delta information in AD), it needs a special permission called Replicating Directory Changes at the domain level. If you do not perform this step, you will receive the error "Replication access was denied" when you attempt to read the AD object data. You can read more about this at http://support.microsoft.com/kb/303972.
- Open up the Security tab in the domain (
ad.company.comfor example). - You either create a group, if that is how you always do it, or you assign permission to the
SVC-ADMAaccount(s). You need to check the Allow option for the Replicating Directory Changes permission, as shown in the following screenshot: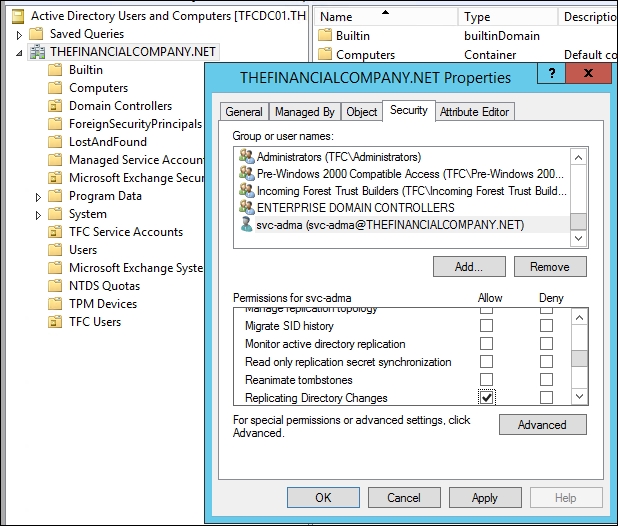
Alternatively, the least-privilege way is to go into the registry, create a DWORD value named ADMAUseACLSecurity, and set it to 1. This will tell the AD Management Agent to use the AD ACL permissions rather than requiring the DIRSYNC permissions. You will need to create the value in SYSTEMCurrentControlSetServicesFIMSynchronizationServiceParameters.
If you are implementing password synchronization and/or the Self-service Password Reset feature, you will need to assign permissions for that; details about this are given in Chapter 9, Password Management.
In this segment, we will walk you through the steps for creating the Active Directory Management Agent. We will slowly work through some of the new terms, but trying to discuss every term is a sure way for beginners to get lost in the product. Some of these terms will be explained later on in this book as we start to use more advanced features.
If you are curious to know about some terms right away, you can click on the Help button available on all the pages in the wizard.
To begin, you need to log in to your MIM Synchronization server using an account that is a member of the MIMSyncAdmins group:
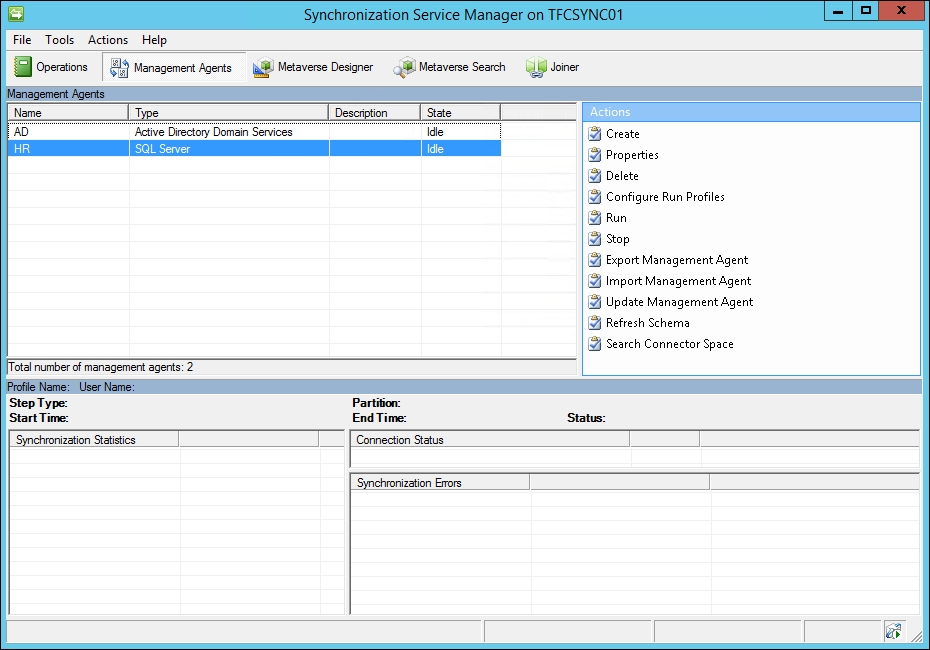
- Start MIM Synchronization Service Manager.
- Select the Management Agents tool, and click on Create in the Actions pane:

- Select Active Directory Domain Services in the Management agent for: drop-down list.
- Give the MA a descriptive name; at The Financial Company, we simply call it AD:

- The AD MA connects to the Active Directory forest, and not to a specific domain in the forest. We decide later on which domain in the forest to connect to. When connecting to the AD forest, we configure the account used for the connection. We will use the
SVC-ADMAaccount. The Options… button allows you to change the default LDAP connection options. It is recommended that you leave the default Sign and Encrypt LDAP Traffic option as it is: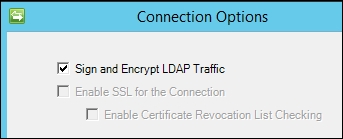
- In the Configure Directory Partitions section, select the domain partition DC=thefinancialcompany,DC=net. If you want MIM to use a preferred set of domain controllers, check Only use preferred domain controllers, and click on the Configure… button to choose the ones you want MIM to use. Specifying a preferred domain controller or domain controllers means MIM will only use those domain controller(s). If you were to specify a single domain controller, and that domain controller is down for maintenance or decommissioned, MIM will need to be changed to add a usable domain controller.
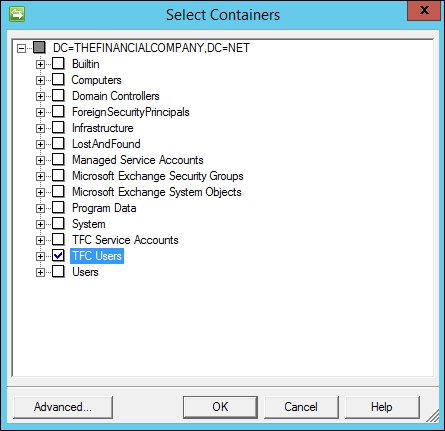
- The default is to work with the whole domain; but we do not want that, so let's click on the Containers… button. In the Select Containers dialog, uncheck the domain (top) level, thereby unselecting all the options. Then select the containers you want MIM to manage. In our example, we select the TFC Users OU, as seen in the following screenshot:
- On the Configure Provision Hierarchy page, we do not need to change anything; just click on Next.
Note
Provision Hierarchy means MIM can automatically create a missing OU if needed during provisioning. In our example, if we had configured MIM to provision Active Directory accounts to an OU named TFC User Accounts, which does not exist, it would throw an error. Enabling Provision Hierarchy would mean MIM would create the missing OU. Note that MIM will only create an OU if one is needed for provisioning, and it does not delete OUs.
- In the Select Object Types page, select the object types which you know MIM needs to manage. Keep the defaults, and add only what you need. Do not deselect the default Container, domainDNS, and organizationalUnit object types, because these are required for MIM to know where in AD the objects reside. Do not select object types you have no need for. Initially, The Financial Company has no need for the contact object type, so we do not select it. If we need any of these objects in the future, we can change the configuration.
- Select the attributes that you know you need. Needs will be discussed in the following chapters, and we will make frequent changes to this configuration. If you check Show All, it will display your complete AD schema, which includes any custom schema changes you have made. In addition to the Active Directory domain, there are two special attributes, objectSid and sAMAccountName, which are required if you want users to access the MIM Portal. For our basic demonstration, make sure the following attributes are checked: department, displayName, employeeID, employeeType, givenName, manager, middleName, name, objectSid, pwdLastSet, sAMAccountName, sn, title, unicodePwd, userAccountControl, and userPrincipalName.
- The join and projection rules will be configured using MIM Service in our environment. So, click on Next.
- Attribute flow will be configured using MIM Service in our environment. So, click on Next.
- On the Configure Deprovisioning page, there are a few things we need to consider:
- Deprovisioning is what happens when an object in the connector space is disconnected from its Metaverse object. We will look into how we can control this later in this book. If you are uncertain, leave the default value as Make them disconnectors.
- Stage a delete on the object for the next export run is what you will select if you want MIM to delete objects in AD when they are disconnected from the MV. To actually have deletes of users and groups in AD could cause a lot of problems if they occur when they shouldn't. In all cases, when we allow MIM to perform the deletes of objects in a connector space, we need to be very careful.
- The Do not recall attributes contributed by objects from this management agent when disconnected checkbox might sometimes be useful if, for example, you are replacing a Management Agent with a new one, and do not want the Metaverse attributes to be deleted in the process.
Note
Please read Carol Wapshere's article explaining deprovisioning options at http://aka.ms/FIMDeprovisioning before you start using the options.
If you are doing a non-declarative (classic) synchronization using only Synchronization Engine, and if you are using code to solve some problems, this is where you will configure which DLL contains your code. This is also where you will select the version of Exchange that you will use if MIM is to provision users for Exchange. For now, we will leave this as No provisioning.
The most popular MIM connection is Active Directory, and the second most common connector is SQL Server. For those organizations that do not have identity data in SQL, there are occasions when creating a few SQL tables will assist in your identity management solution.
At The Financial Company, the HR system uses SQL Server as a database, and we will interact with HR using a typical SQL MA. As with Active Directory, we should implement the least-privilege approach when assigning permissions to the account that MIM is using to connect to SQL.
As the HR database (at present) is not supposed to receive any data, just send the data to MIM; we can assign the db_datareader permissions to the SVC-HRMA account:

At The Financial Company, the HR data is in a database named HR.
If you want to filter what information is made available to MIM in SQL, you can easily do that by creating an SQL view and configuring MIM to read from that view. Just remember that when MIM uses an SQL view to talk to SQL, updates become a little trickier. If you create a complex view for MIM to read, and later on realize that MIM should also be able to update a column in a table, it may not be possible without redesigning the view.
Before we can configure our MA, we need to understand the data source we are connecting to. So, let's take a quick look at how the HR database is built up.
In the HR table (named HRData), there is information about our users and organizational units. In the table that follows, note the relation that we have between the column manager, which references the object ID column.
If the SQL data has this kind of reference information, we will be able to use this to synchronize these to attributes in other CDSs, which also use reference attributes. For example, as the manager column in our HR data is a reference value, MIM can easily populate the manager attribute in AD, and also reference an attribute pointing to another object in the AD:

In this section, we will walk you through the process of creating the SQL MA for the HR system:
- Start the Synchronization Service Manager.
- Select the Management Agents tool, and click on Create in the Actions pane:
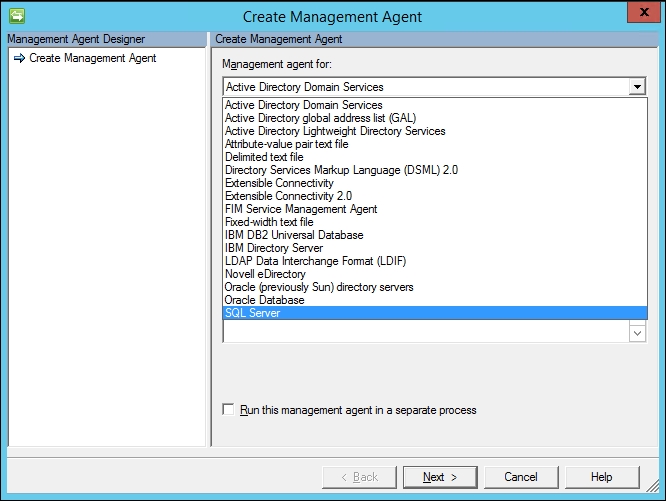
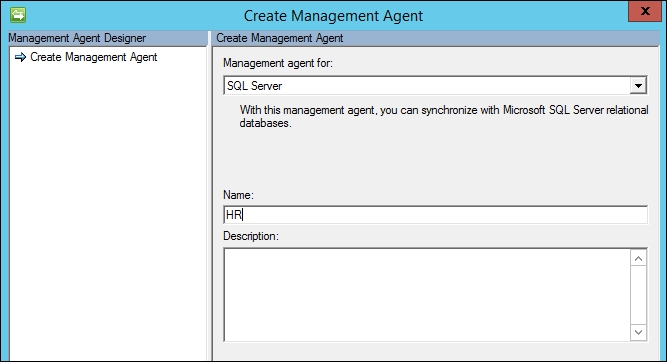
Select the SQL Server option in the Management agent for: drop-down menu, and give the MA a descriptive name such as HR, as seen in the following screenshot:
- As we are using SQL aliases, we use the alias server name dbHR. The database is HR, and the base table is HRData. We are using Windows integrated authentication with the
SVC-HRMAaccount.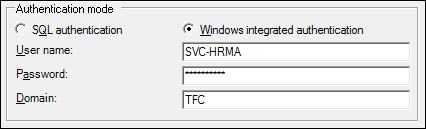
- Clicking on Next should show that the SQL MA has retrieved the schema, the columns, and the database types from the SQL database. This is seen in the next screenshot:
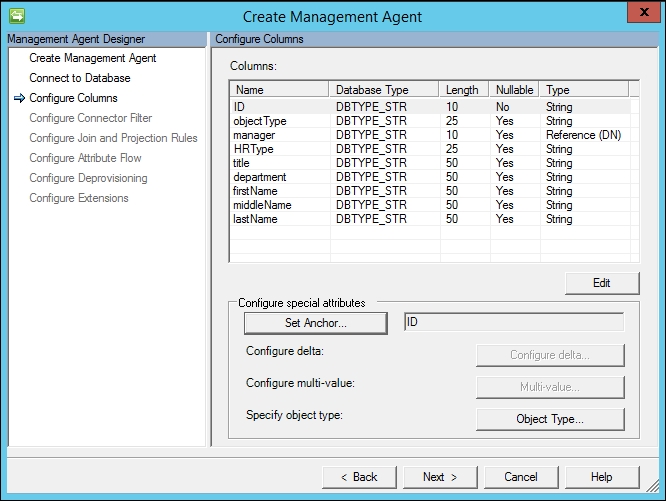
- In our case, because the ID column is a primary key, the SQL MA automatically sets the ID as an anchor. If you need to modify the anchor in your environment, click on the Set Anchor… button, and set the anchor attributes accordingly.
Note
In our example, the anchor attribute consists of a single column in the database that contains an unchanging unique value of each object. By definition, an anchor can be a unique combination of one or more attributes that do not change. Which attribute is to be used as an anchor attribute in each of the CDSs is an important decision to make. The anchor attribute value should never change for a specific object; the value should remain the same for the entire life cycle of the object. If the anchor attribute changes, it will be detected as a delete of the old object and an addition of a new object by MIM when importing information from the CDS.
- Clicking on the Object Type… button allows you to define if the SQL MA only contains one fixed object type, or if the information about object type is stored in a column. It would be better if you can get this information as a column in the view or table. This particular setting can only be configured during the creation of the MA; if you would like to change this later on, you will need to recreate the MA. In our HRData table, we have the object types in the column objectType. In order for MIM to detect the possible object types available, the table or view we look at must contain sample data with the possible object-type values.
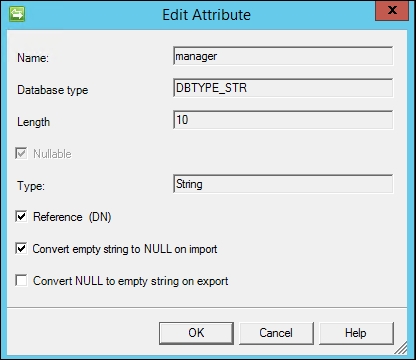
- There is one attribute in the list that needs to be edited, as we need to tell MIM that it is of the Reference (DN) type. A Reference (DN) type tells MIM that the data in the column contains the ID value of some other object. Select Manager, click on the Edit… button, and check the Reference (DN) checkbox:
- If, for some reason, we have configured the table or view used by the MA in a way that we reach objects we are not supposed to manage, we can configure a connector filter to make sure these objects are out of scope. Essentially, MIM asks if there is an attribute criteria that should filter or block the connector space objects from connecting to their respective Metaverse objects (MIM calls this process a join), or if MIM should block a connector space object from creating its own unique Metaverse object (called a projection). In our example, everyone in the HR source system should be provisioned an Active Directory account. Therefore, we keep the defaults of Filter Type as None, and click on Next.
- We will not configure a connector filter, a way to prevent connection to the Metaverse, so leave it as is:

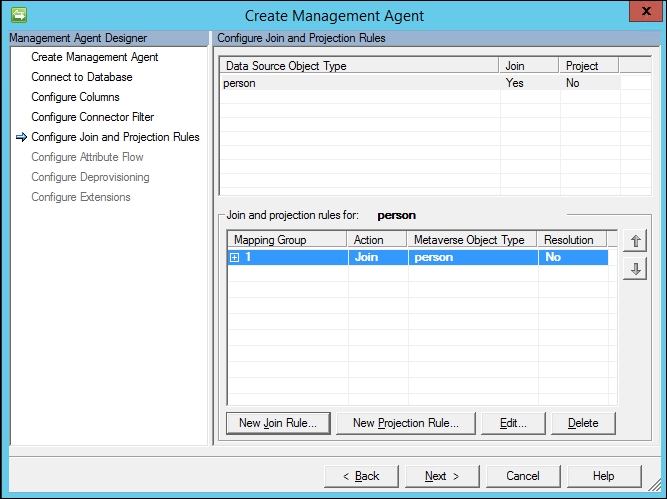
- Next we will configure the join and projection rules. Our anchor is ID; therefore, we should specify a join rule with ID. Click on the New Join Rule button to open the join rule window, which is shown in the next screenshot:
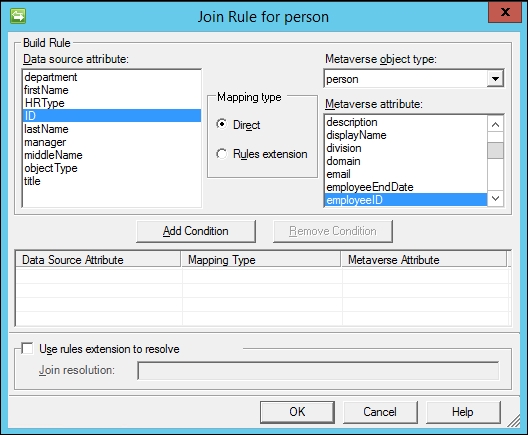
- Change the Metaverse object type to person, select ID in the Data source attribute section, and employeeID for the Metaverse attribute. Click on the Add Condition button, and a non-index join warning message appears, as shown in the following screenshot:
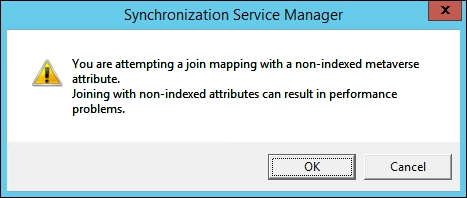
- MIM warns us that finding a matching employeeID value in the Metaverse would be faster if we indexed that attribute. Click on OK for now, and we will show you where the attribute index is later in this chapter. Click on OK to finalize the ID to the employeeID join, and you will be back at the Configure Join and Projection Rules step:
- We now need to configure a projection rule. This is one of the easiest things you will do today. Click on the New Projection Rule button, and the Projection type window will be displayed, as shown in the following screenshot:
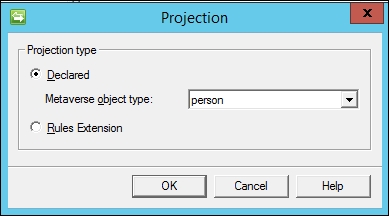
- Accept the default person as Metaverse object type, and click on OK:

- Click on Next to move on to the next step.
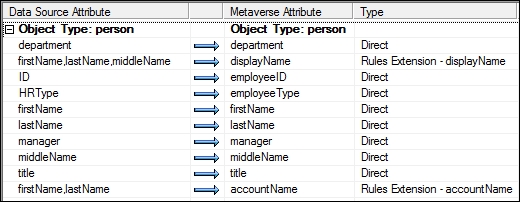
- We will now configure the attribute flow, that is, mapping attributes in the connector space to attributes in the Metaverse. This means the connector space attribute value can be copied to the mapped Metaverse attribute. In our case, we are mapping the connector space object type person (on the left-hand side) to a person object type in the Metaverse on the right side. Click on department in the Data source attribute section on the left-hand side of the screen, and click on department in the Metaverse attribute (right-hand side). Keep the Mapping Type set to Direct, and Flow Direction set to Import. Click on the New button to add the mapping. You should see a new attribute flow like the following:

- Perform the same steps to set up an import attribute flow, as shown in the following screenshot:.

This is a good time to talk about attribute names. Often, people new to identity management will get caught up on connector space attribute names not matching with the same attribute names in the Metaverse. For example, the attribute HRType does not exist in the Metaverse. Should you change your HR system, or create a new Metaverse attribute? Ultimately, it is your decision, but there is no reason to re-architect your source and target systems simply because attribute names do not match. In this case, something like employeeType effectively has the same function; therefore, it can be used. Non-matching attributes are expected in the identity world, because the systems are disparate. Our advice? Get over it.
- Let's set up an import attribute flow for our display name. TFC would like identities to have a display name comprising the first name, the first letter of the middle name, and then the last name. Notice that our source system does not have a display name attribute, but we can build it with some simple code. Not a developer? Don't panic! As you will see, it is not so bad. First, click on Advanced in the Mapping Type, and click on firstName in the connector space section on the left-hand side. Hold down the Ctrl key, and click on middleName and lastName to select the other attributes needed to build the display name. In the Metaverse attribute section on the right-hand side, click on displayName.
- Click on the New button to bring up the advanced window, and change the Flow rule name to displayName:

- Click on OK. The screen should now show the advanced import attribute flow, as seen in the following screenshot:

- Add another advanced import attribute flow for accountName, as shown in the next screenshot:
- We will complete displayName and accountName and the rules after we finish the remaining two steps. Click on Next to move on to the deprovisioning step.
- The HR system is a source system that will not have deprovisioning. On the Configure Deprovisioning page, we will click on Next to keep the default Make them disconnectors, and then click on Next again.
- The final step specifies the rules extension name that was auto-calculated as
HRExtension.DLL. You could change the name if you want, but we will keep the default for the purpose of this example. This DLL that we will create will contain the coded displayName and accountName that we want to generate. Click on the Finish button to complete the creation of the HR Management Agent. You should now see two Management Agents in the Service Manager console: AD and HR, as shown in the following screenshot: